Recently, furniture made from natural materials has become increasingly popular. It is beautiful, environmentally friendly, has a special warmth, is durable, does not cause allergic reactions, and creates a special atmosphere of coziness and comfort. Wicker products occupy a special place in the furniture market. But furniture made independently is considered a special chic and source of pride.
It is beautiful, environmentally friendly, has a special warmth, is durable, does not cause allergic reactions, and creates a special atmosphere of coziness and comfort.
The benefits of making furniture with your own hands
Made with your own hands, such furniture has advantages and certain disadvantages. Among the undeniable advantages:
- light weight, allowing you to move it to any place in the room or area of the site;
- does not require special care: it looks elegant and fresh, if you periodically wipe it with a damp cloth or sponge, this simple procedure protects the product from cracking;
- fits perfectly into any interior, adding lightness and sophistication;
- environmentally friendly, not emitting substances harmful to health into the surrounding atmosphere;
- when weaving is done correctly, it is durable and strong;
- complete freedom of imagination for home craftsmen;
- will significantly save the family budget;
- the opportunity to acquire skills that allow you to organize your own small profitable business.
Made with your own hands, such furniture has advantages and certain disadvantages.
Despite the undoubted advantages of wicker furniture, there are also disadvantages that must be taken into account:
- afraid of high humidity: cannot be left outdoors in bad weather;
- At the same time, the scorching sun will also not do any good: the furniture will dry out, warp, and lose its appearance, which will lead to a reduction in service life.
Light weight, allowing you to move it to any place in the room or area of the site.
Painting
This is probably the most enjoyable part of the whole job. But first, thoroughly clean the chair frame with hot soapy water to remove dirt and grease. Then rinse with clean water and let dry completely.
Hang the frame wherever it is convenient for you. It is better to paint on a warm, not too windy day. The first and second layers will be primer (ground base). But the second one is applied a few hours after the first one. Next comes two layers of base primer (third and fourth), which are applied 24 hours after the primer base. It is better that the last two layers are gray. As a result, the appearance of the finished rocking chair will be much more impressive. After this, apply matte varnish.
Deciding on design and construction
Structurally, wicker furniture can be:
- frameless,
- frame.
Fits perfectly into any interior, adding lightness and sophistication.
For a frameless structure, it is enough to use sticks. They perform the function of hard ribs. The difference between frame products is the presence of a metal base; steel rods are used for it. The weaving seems to be “attached” to them. Wooden poles provide stability and rigidity to the wooden structure.
Does not require special care: it looks elegant and fresh if you periodically wipe it with a damp cloth or sponge.
If home craftsmen are taking their first steps in weaving furniture, they should not take on complex products: it will be extremely difficult for an inexperienced craftsman to complete them, which will lead to numerous mistakes and disappointments; you need to start with the simplest ones, which give you the opportunity to master the necessary skills.
In order for the product to be of high quality and durable, you need to properly prepare the raw materials.
The furniture has several types of weaving:
| Type of weaving | Distinctive features |
| Single | Simple weaving is easy to master: each branch alternately braids all the posts of the frame. Usually used as the main method of making wicker items. Gives additional strength and keeps the shape of the product. |
| Openwork | Weaving is used in furniture decoration, adding special chic and originality. It can be used to create waves, corners, ovals, crosses, and diamonds. Requires perseverance, attention, accuracy. Before execution, you need to decide on the ornament, weave several single rows, then choose a decoration method. The most commonly used is straight openwork with stripes of light. A fairly complex type of work that requires significant skills. |
| Combined | This type is a combination of single and openwork weaving in their varieties. The design of wicker products using combined weaving is “aerobatics” and indicates a high level of craftsmanship. |
Environmentally friendly, does not emit substances harmful to health into the surrounding atmosphere.
How to do it at home?
Making a rocking chair with your own hands will still be possible for those people who have basic carpentry or welding skills, depending on the chosen master class.
On skids
The easiest way to make a homemade chair on runners is from an ordinary old armchair or chair. In fact, all that remains is to add the runners themselves, securely fasten them to the legs and, possibly, sew a cover. In addition to the chair itself on legs, you will need runners, a screwdriver, screws, a drill and sandpaper. To give the rocking chair an aesthetic appearance, paint and a brush will be useful. The runners themselves are cut out independently into shape using a pattern, or they are ordered from a craftsman.
It is important that the gap between the legs is 20-30 centimeters less than the length of the runners. At those points where the chair is fixed on the legs, holes are drilled, after which the runners are “fitted on.” If the result is positive, the latter can be sanded with sandpaper and painted in several layers.
The finished “skis” are put on the legs and fixed with screws in the already prepared holes
If the result is positive, the latter can be sanded with sandpaper and painted in several layers. The finished “skis” are put on the legs and fixed with screws in the already prepared holes.
Pendulum
An excellent pendulum rocking chair is made on the basis of bearings. Compact and durable design creates even swing and is ideal for outdoor use. For manufacturing, it is necessary to prepare two steel strips with dimensions of 40 by 4 millimeters and 60 by 6 millimeters, as well as profile pipes with dimensions of 20 by 20 millimeters and with a wall thickness of two millimeters. The movement of the rocking chair can be ensured by 8 bearings, the outer diameter of which is 32 millimeters, and the internal diameter is 12 millimeters, as well as 8 bearing cages. They are created by hand on a lathe, or cut from a tube. Finally, you can’t do without a pair of garage hinges and bolts with nuts size M12.
In order to minimize welding, profile pipes can simply be bent using a homemade jig. To avoid making mistakes, it is better to first apply markings every 100 millimeters. The entire frame of the rocking chair is made from a profile pipe, that is, the support part, two sidewalls, the seat and the back. As a rule, for a standard size of outdoor furniture it takes about 20 meters. From the strip and profile, parts are created that regulate how much the back of the chair tilts, in the amount of 2 pieces.
A steel strip measuring 6 by 60 millimeters is cut into two equal parts. From it, as well as bearings and bolts with nuts, pendulums are created in the amount of 4 pieces.
On springs
It is not recommended to make a spring rocking chair with your own hands, since this mechanism is very complicated to implement. The design has a powerful and motionless base, above which there is a large spring. It is she who is responsible for rocking the soft seat mounted on top. It is much easier to make a hanging rocking chair, which will decorate both the summer cottage and the children's room.
The easiest way to make a homemade swing is from a hoop with a diameter of 90 centimeters, a piece of thick fabric with dimensions of 3 by 1.5 meters, non-woven fabric, 4 metal buckles, 8 slings and a metal ring, from which the chair itself will be suspended.
The hoop is either created independently or formed from a metal-plastic tube or bendable wood. First of all, a pair of equal squares with sides of 1.5 meters are formed from 3 meters of fabric. Each of them is folded 4 times, after which a circle with a radius of 65 centimeters is cut out of the workpiece. The blanks are marked with an internal contour and holes for slings.
At the next stage, both blanks are ground together, leaving a hole for the frame. The remaining free allowance is cut with teeth, after which the finished cover is turned inside out and ironed again. The hoop itself is covered with the selected filler, cut into strips with a width of 6 to 8 centimeters. The frame is inserted into the case, both parts are connected to each other. The cover is filled with strips of padding polyester sewn to the fabric with a hidden seam. The sling is cut into 4 two-meter pieces, the edges of which are melted on both sides. The slings are pulled through the patterns and stitched several times. Buckles on the free ends allow you to adjust the height and inclination of the rocking chair. All slings are assembled and fixed on a metal ring.
How to make a hammock chair from a metal hoop is described below.
Necessary materials
To make furniture from wicker you will need materials. It is worth noting that they can be different, and many are exotic and inaccessible to us: banana leaves, bamboo, water hyacinth, seaweed. But most of the furniture is made from rattan, willow twigs, bird cherry vines, alder, raspberry, and hazel.
Experts say that it is possible to harvest raw materials in the spring.
IMPORTANT! If you decide to use a vine, willow and bird cherry, which are particularly flexible and plastic, are best suited. Bird cherry is especially good in this regard.
When weaving correctly, it is durable and strong.
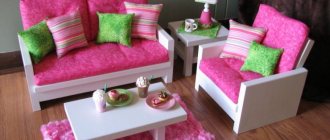
Excellent decorative elements are colored pillows and blankets of various colors.
Design features
According to their design, rocking chairs are divided into:
Gliders (with a pendulum mechanism).
These models have a fixed base, and the furniture swings due to a pendulum mechanism. Unlike classic products, they are distinguished by: silent operation and stability. They are often used by young mothers for feeding and rocking babies .- Hanging. Such designs are most often used in city apartments. They are made from different materials: rattan, wicker, metal, wood. Products are hung from the ceiling, tree poles. There are also models with independent supports. They create a feeling of weightlessness and lightness in any room.
As for the varieties, rocking chairs with pendulum mechanisms are made:
On skids.
Such products are the most common and are most often installed in classic interiors. They are equipped with radius skids, are distinguished by their simple design and simple assembly technique. But you won’t be able to swing too much on the chair. Because it can simply turn over.- With variable curvature. The features of the model include safety in operation. Such a piece of furniture is unable to roll over, which allows it to be used as a children's chair .
- On elliptical runners. Such products provide soft rocking. To reduce the likelihood of capsizing, they are equipped with bump stops.
Preparation of raw materials for robots
In order for the product to be of high quality and durable, you need to properly prepare the raw materials. Most often these are willow twigs.
- For weaving, you can harvest material that is collected from living trees in the absence of buds; the most suitable time for harvesting is late autumn. You need to make it before the first frost - such raw materials are easy to clean and store dry.
- Experts say that you can prepare raw materials in the spring, but you need to remember that you need to cut the rods before the buds begin to swell; if you are late, green leaves will appear on the new furniture.
- You need to cut the branches at forty degrees - pruning will not harm the tree, and in a year or two new branches will appear.
- You need to conduct a kind of flexibility test. The cut branch must be bent: if it does not break, then the raw material is suitable for the job. Thin vine used for fine binding of products is considered to be of high quality.
- Thicker branches are used to make the frame.
The opportunity to acquire skills that allow you to organize your own small profitable business.
Hanging hammock chair
It is not difficult to build such a chair. You just need to master the basic technique of weaving macrame.
Such a hanging chair will create a special atmosphere on the site, conducive to peace and quiet.
To make a chair we will need:
- Two metal hoops of different diameters (for seat D=70 cm, for back D=110 cm);
- 900 meters of cord for weaving;
- 12 meters of slings;
- 2 thick cords for connecting rings;
- 2 wooden rods;
- Scissors, tape measure;
- Work gloves.
Article on the topic: Do-it-yourself office chair repair
To decorate the chair, it is better to use hoops made from metal-plastic pipes with a cross-section of 35 mm. Metal-plastic pipes of this thickness have a metal braid inside and are able to provide sufficient strength to the suspended structure.
To make a hoop from a pipe, first determine the length of the segment using the formula S = 3.14xD, where S is the length of the pipe, D is the required diameter of the hoop. For example: to make a hoop D = 110 cm, you need to measure 110x3.14 = 345 cm of pipe.
Wooden or plastic internal inserts of the appropriate diameter are ideal for connecting the ends of pipes; they can be secured with ordinary screws.
For weaving, a polyamide cord with a 4 mm thick polypropylene core, which can be purchased at a hardware store, is ideal. It is good because it has a soft surface, but unlike cotton fibers, when knitting it is able to create denser knots that will not “creep” during use. To avoid discrepancies in the color and texture of the material, it is advisable to purchase the entire volume of cord at once.
Stage #1 – creating a wrap for hoops
Our task is to completely cover the metal surface of the hoops. To decorate 1 meter of hoop with tight turns it takes about 40 meters of cord. We make the turns slowly with good tension, laying the cord evenly and neatly.
To make the winding more dense, tighten it every 20 turns, twisting them forcefully in the direction of the winding until it stops. As a result, we should get a smooth and dense surface of the braid. And yes, to protect your hands from calluses, it is better to carry out this work with gloves.
Stage #2 – mesh weaving
When creating a grid, you can use any macrame pattern you like. The easiest way is to take a “chess” with flat knots as a basis.
We weave the mesh with double polyamide cord, attaching it to the braided hoop with double knots
While weaving, monitor the tension of the cord. The elasticity of the finished mesh will depend on this. The free ends of the knots should not be cut off yet. You can use them to form a fringe.
Article on the topic: DIY cocoon chair
Stage #3 – assembly of the structure
We assemble the braided hoops into a single structure. To do this, we fasten them at one edge, wrapping them together with one cord.
From the opposite edge of the winding we place two wooden rods vertically, which will serve as support for the back of the structure
The length of the support rods can be any and is determined only by the selected backrest height. To prevent the hoops from slipping, we make shallow cuts at the four ends of the wooden rods.
Stage #4 – design of the back of the chair
The weaving pattern for the back can also be any. Weaving begins from the upper part of the back. Gradually lowering yourself to a seat.
We tighten the free ends of the cords on the lower ring, collecting their hanging edges into loose tassels
When the pattern is braided, we fix the ends of the threads in the lower part of the back and decorate them with fringe. The structure will be strengthened by two thick cords that connect the backrest to the seat. An elegant hanging chair is ready. All that remains is to attach the slings and hang the chair in the chosen place.
Required Tools
To weave furniture from wicker, you don’t need many tools, but you should have:
- knives and pruners;
- tape measure and measuring tape;
- various templates.
Afraid of high humidity: should not be left outdoors in bad weather.
We must not forget about the armrests, which, however, are made at the request of the master, but serve as an additional element to strengthen the entire structure.
This is the required minimum; with the help of such a set of tools you can weave simple and small-sized products.
The difference between frame products is the presence of a metal base; steel rods are used for it.
Manufacturing process: technology and manufacturing nuances
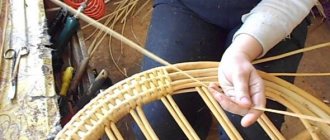
In order not to lose interest in weaving furniture and not to spoil a large amount of material, you should not immediately “swing” at large and quite complex products - a sofa or a table. It’s better to start with the simplest “braids”, for example, a chair. It consists of several elements: a lower bench, a seat, a backrest, and armrests. To work, you will need willow sticks with a diameter of up to 30 mm and thin willow twigs.
Wooden poles provide stability and rigidity to the wooden structure.
The beginning of the work is the manufacture of the frame.
ADVICE. When working on a chair, you will need curved parts. To bend the rods, you need to soak them, and when they become soft, remove any irregularities and bend them on a prepared template and let them dry.
You need to cut the branches at forty degrees - pruning will not harm the tree, and in a year or two new branches will appear.
The beginning of the work is the manufacture of the frame. If a craftsman is taking his first steps in weaving furniture, it is better to use the frame of an old chair made of metal or wood to make the work easier.
You need to conduct a kind of flexibility test.
When working on a chair, you will need curved parts.
ATTENTION! We must not forget about the armrests, which, however, are made at the request of the master, but serve as an additional element to strengthen the entire structure.
But most of the furniture is made from rattan, willow twigs, bird cherry vines, alder, raspberry, and hazel.
The procedure for making a chair.
- We make the frame. The frame itself is made of thick, durable sticks and a piece of plywood, which is used as a seat. One pair of sticks will act as the front legs; it should be 15-20 cm shorter than the second.
- The legs are connected with self-tapping screws, the seat is nailed down.
- Also, the curved elements of the chair back and armrests are attached to the frame with self-tapping screws.
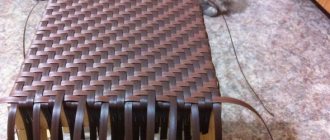
- The frame is wrapped with willow ribbons and can be secured with glue for strength.
- The frame is braided using single weaving.
Bird cherry is especially good in this regard.
It’s better to start with the simplest “braids”, for example, a chair.
If desired, the resulting chair is treated with stain.
To make furniture from wicker you will need materials.
How to make your own vanka-stanka
This type of rocking chair, called Vanka-Vstanka, is made of plywood. You can set the required scales yourself or use a ready-made drawing.
Before proceeding directly to the process of making a vanka-stand, you will need to prepare a drawing, as well as tools. The tools for making a vanka-stand you will need are the following:
- graph paper;
- roulette;
- pencil;
- drill;
- screwdriver;
- dye;
- confirmants;
- self-tapping screws;
- wood glue;
- hammer;
- brush;
- drying oil;
- primer;
- antiseptic.
Well, everything is almost ready. Now you can start drawing up the drawing.
It is necessary to note the fact that the design of such a type of rocking chair as a rocking chair does not require taking into account the individual parameters of the person who will sit on it. For this reason, if necessary, the finished drawing can be corrected. For example, if desired, this type of rocking chair can be made double. So, the drawing is ready. Now all that remains is to transfer it onto graph paper, and then onto thick paper to the full size of the parts. Then the patterns are cut out, and the sidewalls are drawn. They are made of plywood, and the fasteners are made of bars.
Manufacturing parts for rocking chairs
Using an automatic jigsaw, we make side parts for the future chair from wood, and we construct connecting drums from timber. The best connection of chair parts using spikes. We make a drawing and, based on it, we make spikes and openings for them in the side of our chair. We cut plinth panels from the board. When choosing a board, first estimate how many panels it will make. If after making the panels there is still a board left, do not throw it away, it will be useful for repairing the product. Then we thoroughly sand all the resulting parts, after which they should be coated with a primer and painted.
Assembling the resulting parts of the rocking chair
It is necessary to connect the side parts of the product with timber, we have a tenon joint, so we insert the tenons into the openings, previously lubricated with special construction glue. Next you need to install the plinth panels. In order for the panels to lie evenly, it is necessary to draw markings. To do this, make four marks on the rail, that is, two on each side. To prevent the panels from cracking, make notes with a thin drill and attach them with self-tapping screws to the side of the product
That's it, our chair is ready. It should be primed and painted. Now you can spend your evenings in front of this chair near the fireplace.
The final stage is decoration
High-quality wicker furniture practically does not need decoration: it is good in itself. If you want to add an element of creativity and “revive” it with bright colors, you can use willow ribbons in weaving, including dyed ones; they will be organically combined in the ornament of the product. Excellent decorative elements are colored pillows and blankets of various colors.
If home craftsmen are taking their first steps in weaving furniture, they should not take on complex products.
Thicker branches are used to make the frame.