Instructions
The success of this project depends specifically on the placement of the wood nail strips along the top of the cabinets. If you place the stripes too far in front or behind, a narrow but visible line will ruin the look. Success also depends on using an electric nail gun. Not only does this valuable tool allow you to use thin nails and avoid breaking cabinets, but it can also get into those tricky places where a regular hammer can't. When purchasing lumber, avoid sheathing lumber as it has jagged edges. Instead, choose straight-edged spruce, pine, fir or other good quality softwood.
Features and purpose
In the interior of residential and non-residential premises, molding can be used to decorate the ceiling or walls. Even an ordinary baseboard partly serves as molding. On indoor doors such decoration is used much less frequently. Currently, simplicity is valued in the interior; the style of “minimalism” is now in fashion. And it doesn’t involve a lot of decor. But history knows of times when a lot of decorations and stucco were used to decorate the interior of buildings, even in excess.
Furniture moldings have long been widely used as the following decorative elements:
- overlays;
- corners;
- slats;
- various platbands;
- cornices
With their help, for example, you can emphasize or veil symmetry. You can improve the appearance and even give the furniture a more “expensive” look. Using decorative elements you can change the style of furniture. For these purposes, for example, self-adhesive moldings are used. They can make a thing from a simple cabinet from both the era of socialist realism and classicism, making it lighter or giving additional volume to individual parts.
In new furniture, the molding performs the following functions:
- decorating individual elements of new furniture;
- masking joints, seams of fabric trim, delineating inserts;
- decorative, to maintain a certain style;
- practical for protecting smooth, soft parts from damage.
Furniture molding can also give new life to old furniture, and is also often used to hide scratches, damage, and defects.
Cut the slats
Cut the strips to the size of the perimeter of the cabinet, plus the thickness of the overhanging crown. So if the crown lip width is 3cm, you will get:
Front stripe
The front strip should be the same width as the cabinet width, plus 3cm at each end. So for a 90cm wide cabinet, the front strip would be 96cm.
Side stripes
The length of each side strip must be obtained starting from the depth of the closet (let's say 30 cm):
- 30 cm - cabinet depth
- 3 cm overhang towards the front strip
- Expansion gap between kitchen wall and cabinet edge
Thus, for a 30 cm closet, the length of each side strip will be 33-34 cm.
Installation of skirting boards for kitchen countertops
In principle, the installation methods for plastic and aluminum kitchen moldings are very similar. Roughly speaking, first secure the mounting rail, and then snap the outer part of the plinth onto it. The rail will be plastic in all cases, but its shape, like the shape of the kitchen baseboard itself, may vary.
Differences in profile shapes
There are three options for attaching the baseboard to the tabletop. The first, as in the photo, is when the mounting rail is completely covered by the outer part of the molding. Silicone strips that provide a tight connection between the profile and the tabletop are also located on top. This design is more typical of kitchen baguettes made of polyvinyl chloride. The connection of elements in one plane, as well as in external and internal corners, is ensured by special plastic inserts, as with PVC floor skirting boards.
How to attach a plinth to a tabletop: hidden mounting rail and plastic fittings
The next type has silicone sealing edges located on the mounting rail, and the outer part is simply a decorative element. This structure often has an aluminum kitchen baseboard for countertops. They are also found with a PVC external part, but less often.
How to install a kitchen plinth: fastening strip with soft strips located on it
And the third type. The mounting rail here lies flat on the tabletop, and the molding is installed on top. As for the silicone strips, the lower one is part of the mounting rail, and the upper one is attached to the groove in the upper part. The diagram of this design can be seen in the upper right corner of the following photo. It is typical only for aluminum kitchen profiles. The caps, internal and external corners for these moldings are also made from aluminum.
How to install a baseboard on a countertop: flat mounting rail
Paint and finish the molding
Before painting, cover the cabinets with painter's film and secure them with masking tape. Depending on the size of the nail holes, you can fill them with wood putty or leave them unfilled. Paint can often fill in the small holes left by nails well. Apply at least two coats of paint. Let the paint dry for at least four hours before removing the film.
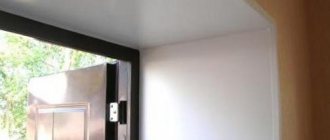
Moding can be used for more than just that. as decor on kitchen cabinets. Try making a shelf above a door or window by decorating it with molding.
Execution options
The material used in the production of furniture moldings must be light, but at the same time quite durable. It should also be easy to install. Modern polymer mixtures fully meet these requirements. They allow the production of fairly complex structures. Furniture moldings in this case are produced using casting.
Materials used in the manufacture of molding:
- polyurethane (a type of foam with small granules) allows you to make light, flexible products with a round shape. It is necessary to take into account the lack of strength and not use elements where they can be damaged. Easy to glue, but requires final painting;
- wood is the most environmentally friendly, noble material that fits well into modern and classic design. The production of wooden moldings, especially handmade ones, is very complex and requires high precision. Subsequently, the parts are treated with protective compounds, tinted and varnished;
- plastic - due to its moisture resistance, it can be used in bathrooms and kitchens. If you cannot find a ready-made molding of the desired color, you can paint it yourself with water-dispersion or alcohol paint;
- metal is the most durable and reliable molding of alloys that are not afraid of corrosion and tarnishing. It is installed both in places where it is easy to damage and to protect the furniture itself;
- marble - does not require further processing, is extremely strong and durable, it is also indispensable in terms of expressiveness. When used correctly, it noticeably improves the interior;
- metal-plastic - combines the ease of giving complex shapes during manufacturing and increased resistance to impacts and cracks.
Metal
Tree
Polyurethane
It’s easy to quickly and creatively change a standard design yourself if you use self-adhesive overlay molding. They come in various colors and structures (gold, chrome, beech, alder and others). Any special knowledge will not be useful when working with them. Enough accuracy and dexterity. The application algorithm is as follows:
- outline the line for the decoration;
- remove the protective film;
- For convenience, self-adhesive molding, or so-called “self-adhesive”, is glued in small sections.
For decoration, flexible furniture molding is also used. It also has an adhesive surface. But, compared to regular “self-adhesive”, flexible ones have more capabilities. They are used to update old cabinet furniture, mask cracks, scratches and give it a modern look. Instructions for use:
- clean the surface of paint or varnish by removing the doors and disconnecting the fittings;
- thoroughly sand the surface;
- make markings so that you can immediately stick the decor along the lines;
- When working, you need to do the corners first, then fill the gaps.
A fairly long service life makes this method quite inexpensive for updating furniture.
Self-adhesive
↑ How to update an old kitchen set with your own hands: decorative inserts
After a kitchen renovation, does your old kitchen set not fit into the new environment? No problem! The matter can be fixed! Decorative inserts made of wallpaper, self-adhesive film, ceramic tiles or rattan will help to update the design of old kitchen furniture.
How to update an old kitchen set with your own hands: decorative inserts from ceramic tiles
We decorate kitchen furniture with ceramic tiles
How to give an old kitchen cabinet a facelift using ceramic tiles? As easy as pie! We remove the kitchen cabinet doors from their hinges, thoroughly clean the surface, and if desired, paint it in a suitable color. Using tile adhesive, glue the tiles to the facade. To make everything look as neat and beautiful as possible, we create a frame from decorative molding around the “tile applique”. That's it!
To make everything look as neat and beautiful as possible, we create a frame from decorative molding around the “tile applique”
We decorate the facades of an old kitchen with rattan inserts
- rattan fabric
- sharp scissors
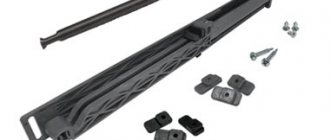
- decorative wood planks
- furniture stapler
- acrylic lacquer
- small furniture nails without heads
- sandpaper
- hammer
- brush
Kitchen fronts decorated with rattan inserts
Step 1: We measure the front part of the doors to calculate how many meters of rattan fabric we need to purchase for finishing. The canvas can be purchased in the form of ready-made rolls or cut, which will cost much less.
Step 2: Place the roll of rattan fabric in the bath and thoroughly moisten it with cool water. Leave for about half an hour so that the material is well saturated with moisture. When wet, rattan increases slightly in size. After installation and complete drying, the canvas is stretched like a string.
Step 3: While the rattan “reaches the desired condition,” we prepare the wooden planks that we will need in order to press and attach the rattan fabric to the facades around the perimeter. The color of the frame should be in harmony with the interior of the kitchen and the new finish of the set.
Step 4: If necessary, the color of the planks can be changed by covering them with acrylic varnish of a suitable color. Apply varnish to the planks and dry. To remove roughness, carefully sand the painted workpiece with fine-grained sandpaper. After sanding, apply another layer of varnish, dry and sand again. For a perfectly smooth surface, you need to apply 3-4 layers of acrylic varnish.
Step 5: Taking the rattan fabric out of the bath, roll it out on an equal surface and cut it according to the measurements taken. The doors can be completely covered with rattan fabric, but facades on which only the middle is decorated with rattan look much more interesting.
Step 6: Using sharp scissors, cut out blanks from rattan fabric. Using a furniture stapler, we attach them to the kitchen facades. We place the paper clips along the edges, then they will be covered with strips and will be invisible.
Step 7: To make the frame on the facades have beautiful, neat joints, place the planks in a miter box and file the outer edges at an angle of 45 degrees. We blot the sawn areas with a brush with acrylic varnish.
Step 8: Using furniture nails without heads, we nail the strips to the facades along the edges of the rattan fabric so that they cover the clips.
To transform old kitchen furniture, you can decorate the facades with rattan inserts
Decorate your kitchen cabinetry with crown molding, prong molding, edge molding or any other design. Using molding you can change the appearance of any kitchen furniture. The use of such architectural details can emphasize the main style of the headset.
For many different configurations and designs, it is acceptable to use crown overlays, edges and others, which will make your project stand out from many in a non-trivial way.
Traditional crown molding
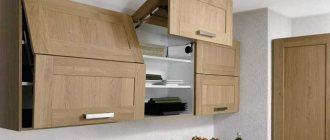
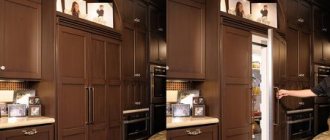
This type of decoration is used to hide the void between the cabinet and the ceiling. Empty space is a common phenomenon in this place. If the ceilings are on average 2.5 m, then the gap is about 10-15 cm. These gaps can be beautifully filled in this way.
Ceilings can be so high that the overlays become more of a decorative element, as shown in the photo. This casting consists of several parts neatly stacked on top of each other to produce a uniform configuration. Overlays are detailed design accents and can often be expensive. And the more complex the design, the more expensive it is.
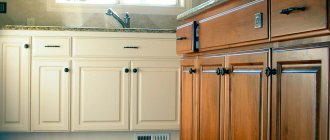
How to update kitchen facades: molding and painting
Renewing the facades of old kitchen furniture using molding and painting
A great way to quickly and easily redesign old kitchen cabinetry is to use molding and paint. What is molding? These are decorative overlays that are widely used for finishing various surfaces and structures, such as walls and ceilings. Look around! Surely, various kinds of moldings are present in your interior. To decorate the facades of the kitchen unit, we will need thin semicircular strips.
- wood glue
- decorative semicircular molding
- Miter saw
- HVLP spray gun
- gloss deck paint
- drill
- furniture fittings
- screwdriver
- marker
Step 1: Preparing the facades. Before removing the facades, we make the appropriate digital marks on each door and cabinet so that during installation we do not confuse anything and return everything to its place. We dismantle the facades, remove fittings and fasteners. Using a damp cloth, carefully remove all dirt. Wipe the facades dry with a dry cloth. Since we will be using paints and varnishes, it is advisable to carry out the work not indoors, but outdoors in a well-ventilated covered place, for example, under a canopy. We cover the working surface with film and lay the prepared facades on it.
Step 2: Install decorative molding. Using a miter saw, cut the decorative molding into pieces of the desired length. We file the outer edges at an angle of 45 degrees. We glue the finished planks to the facade, “planting” them with wood glue.
Step 2: Install Decorative Molding
Step 3: Using a marker, mark the locations for installing fittings and fasteners. We drill holes with a drill or hammer drill.
Step 4: Prime the surface. Fill the paint reservoir in the spray gun with primer. Apply the primer from a distance of 15-20 cm. Wait about an hour until it dries completely.
Step 4: Prime the Surface
Step 5: Painting. When the primer is completely dry, fill the spray gun with deck paint. We carry out painting in the same way as a primer at a distance of 15-20 cm. To create an original pattern or ornament on the surface, you can use special stencils. If, after the final coat of paint has dried, unevenness and other flaws are noticeable on the surface, apply another coat of paint for a flawless result.
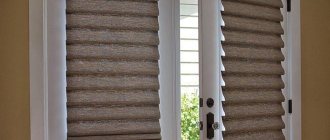
How to update a kitchen set: self-adhesive film
The easiest way to transform old kitchen furniture is to cover it with self-adhesive film. Cheap and cheerful! By choosing a high-quality film with an imitation of wood, marble, tile, natural leather or stone, you can give your kitchen, if not exclusive, then a very decent appearance. The waterproofness of vinyl film, its resistance to high temperatures and mechanical stress will preserve the pristine beauty of your design impulse for a long time. If you know how to handle a centimeter and scissors, you should not have any particular difficulties with film facelift. The main thing you need is accuracy and patience.
- adhesive tape
- centimeter
- ruler
- sharp scissors
- stationery knife
- plastic smoothing scraper
The easiest way to transform old kitchen furniture is to cover it with self-adhesive film.
Step 1: We take measurements of the kitchen cabinets: facades, sides, drawers. For better and more convenient work, it is advisable to remove the facades and lay them on a flat surface.
Step 2: Remove the handles and other fittings. Using a damp sponge, thoroughly wash all cabinets and drawers, paying special attention to removing grease stains. There should be no traces of grease, dust or other contaminants on the surfaces to be glued. It should be perfectly flat, clean, dry and smooth. Otherwise, during operation, the film will begin to bubble in problem areas and move away from the surface. After wet cleaning, be sure to wipe all cabinets dry.
Step 3: A centimeter grid is applied to the protective paper layer on the back of the self-adhesive, which greatly facilitates cutting and slicing the film. We mark the required dimensions of each part. If all measurements are taken accurately, it is still advisable to leave a margin of 1-2 cm. In places where there will be bends, add 2 cm. If you have chosen a film with a repeating pattern, trace along the front side so that the repeats of the pattern match.
Step 4: We cut using a stationery knife along the ruler. We cut out curved patterns with sharp scissors according to preliminary markings with a marker or pencil.
Kitchen set covered with self-adhesive film
Step 5: After peeling off a couple of centimeters of the protective paper, apply the adhesive side of the film to the facade. Using a plastic scraper, smooth out the glued area to remove air bubbles and other irregularities from under the film. We do not glue the film all at once, but gradually remove the protective paper by 5-10 centimeters and carefully smooth out each area covered with a scraper. Take your time! Any bumps and irregularities will be especially noticeable on a plain surface, but on a variegated pattern they are less noticeable. Smooth the film from the center to the edges. Small air bubbles under the film can be pierced with a thin sewing needle, and large ones can be cut with a sharp knife and smoothed out the film.
If the film lays unevenly during gluing, do not panic! It's not the end of the world yet. The matter can be fixed! The self-adhesive film will only fully stick after a few hours, so you have enough time to remove the film from the failed area and re-stick it.
How to update old kitchen furniture: replacing facades
Need a major budget redesign? Replace old facades with new ones! This is not only the most radical, but also the most expensive way to update old kitchen furniture, but it will still cost much less than buying a new kitchen set. If you have a modular kitchen or a model that is still popular, purchasing ready-made facades will not be difficult. For exclusive and out-of-fashion models of kitchen units, facades will have to be made to order, fortunately there are plenty of companies providing such services today. When ordering a façade, you will be able to choose not only an original design for your kitchen, but also the optimal material in terms of price-quality. Economy options: inexpensive wood (usually pine), chipboard, plastic. A more solid new thing: facades made of MDF and solid wood.
For exclusive and out-of-fashion models of kitchen sets, facades will have to be made to order
The installation of new kitchen facades can be entrusted to specialists, who will certainly be found in the same company that manufactured them, or you can install them yourself. To do this, remove the old doors by unscrewing the screws and securing hinges. Finished doors and drawer fronts are usually sold unfinished in stores, so you will have to finish them using a standard 35mm hole saw. Having drilled new holes for the hinges, we fasten the doors to the walls using screws. Ready! Modern furniture is assembled easily and quickly. Anyone who has ever had to do home renovations will successfully cope with the installation of new facades.