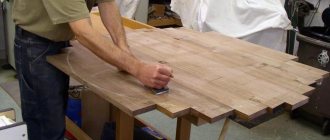
Hi all! Self-made furniture has a number of objective advantages. It’s not difficult to imagine the admiration of others if you make a round wooden table yourself.
I understand that now you can easily buy it, purchase it to order from the manufacturer, or find it among used options. Large and small models are available for sale, of different types of designs and sizes, with a carved tabletop, immediately with chairs and other components.
But still, sometimes you want to take everything into your own hands, test your capabilities and clearly demonstrate your skills. No one forces you to make drawings and draw diagrams yourself. You can take ready-made ideas with clear dimensions, make some adjustments and personal wishes, and then implement the project in practice.
Advantages and nuances of self-production
A round table is an excellent option for creating a comfortable environment in the kitchen, living room, children's room, veranda, gazebo. The absence of corners eliminates the possibility of bruises and promotes an atmosphere of comfort and intimacy. However, it should be remembered that such a piece of furniture will not fit into every interior.
If you have skills in handling household tools, patience and attentiveness, making a round table is not at all difficult.
The decision to make a round wooden table yourself has the following advantages:
- Saving the family budget. Factory products are much more expensive. The added value is several times higher than the price of raw materials. The cost of making a round table with your own hands only includes the purchase of wood and fasteners.
- Possibility of choosing a model. It is not always possible to find the product you need in stores. Independent design and assembly allow you to compile elements of different models, creating your own unique version.
- Choice of size, configuration. Furniture is made for a room with a certain shape and limited area. Sometimes rooms are so small that not a single factory item fits into them. The solution is a portable round table for the kitchen with your own hands.
- Gaining the necessary experience. Having assembled a very complex structure, the home master will be able to develop further, bringing new projects to life.
The downside is that it is quite difficult for beginners to make a round tabletop on their own. In addition, there is a need to purchase special tools, without which it is impossible to obtain perfectly smooth edges.
Saving the family budget
Possibility of choosing a model
Selection of size, configuration
Gaining the necessary experience
Popular designs
To make a round table with your own hands, various ideas are used that can be gleaned from magazines, thematic pages on the Internet, or by visiting furniture stores. The most popular designs today are:
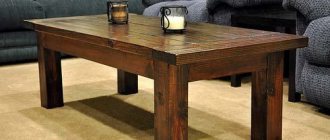
- Coffee table. As a rule, such items are made in a multi-tier design with open shelves. Their walls simultaneously serve as legs.
- Kitchen table. Well suited for small rooms where there is a free corner. The sloping edges allow the piece of furniture to be moved around the room without hindrance. If necessary, a pull-out shelf for devices can be installed.
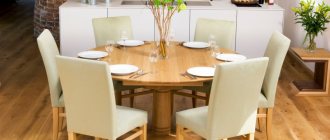
- Dining. A large wooden round table will fit perfectly into the interior of a square-shaped living room. The product will look especially good against the background of cabinet furniture made from solid wood.
- Folding. A do-it-yourself oval table with folding tops is an indispensable solution for small apartments. When assembled, it takes up little space, but when in working order it can accommodate a large number of guests.
When developing a diagram of how to make a round table with your own hands, you should think about not only its dimensions, but also the configuration of the space under the tabletop. The presentability, stability, and ease of use of the product depend on its design.
Magazine
Kitchen
Dining
Folding
The base of a round table can be like this:
- 4 legs. A classic that has stood the test of time. The advantage is that such furniture is stable and easy to use. People do not need to think about where to place their feet, as there is enough space for this.
- With jumper. This table design is practical, durable, and easy to manufacture. The disadvantage is that the knees of those sitting will constantly rest against the crossbar.
- Crosshairs. This model is more suitable for rooms decorated in country style. Sitting at such a table will be moderately comfortable.
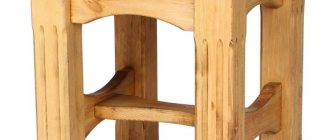
- One post with a cross or disk. The furniture looks impressive and takes up little space due to its compactness. Stability is achieved by installing a heavy, wide base. Otherwise, a homemade round table on one leg will constantly tip over.
- Modern developments. Curvilinear supports diverging from below and above are becoming fashionable. Comfortable and practical are models in which the legs are connected by a threshold, making the sitting process more comfortable.
Priority is given to projects that best match the interior of the room where the furniture will be located.
4 legs
With jumper
One pillar with a cross
Crosshairs
Modern developments
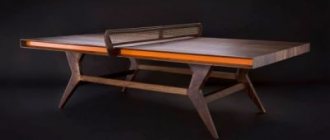
Round table for interior in Provence style
Lovers of durable and simple furniture, the reliability of which has been proven over many decades, will certainly like a table in the Provence style. Another advantage is the material it is made of – natural wood. Table diameter 48 inches (121.92 cm), table height 30 inches (76.2 cm).
Prepare to get started
Before making a round table, be sure to prepare the necessary set of tools:
- roulette;
- grinder with attachments of different granulometry;
- electric drill;
- electric puzzle;
- miter saw, can be replaced with a circular saw;
- if possible, use a modern device that helps fix joints, workpieces and perform the most complex fastenings with self-tapping screws;
- screws 7-8 cm;
- screws 6cm;
- screws 3cm;
- confirmations 6.3 cm;
- glue, finishing materials for wood.
If you have the opportunity and sufficient work experience, then cut blanks of the specified parameters from wood (plywood, wooden boards and lumber). The color pictures show the location of parts on the product; study them carefully.
- 1 center support piece 4 x 4 x 23.25 inches (10.16 x 10.16 x 59.055 cm);
- 1 piece upper support cross 2 x 4 x 43 inches (5.08 x 10.16 x 109.22 cm);
- 2 pcs top cross support 2 x 4 x 19 inches (5.08 x 10.16 x 48.26 cm);
- 1 piece lower support cross 2 x 6 x 18.5 inches (5.08 x 15.24 x 46.99 cm);
- 4 Base Bottom Pole Pieces 1 x 6 x 6.5 inches (2.54 x 15.24 x 16.51 cm);
- 8 beams 2x4x14 inches (5.08x10.16x35.56 cm);
- 2 table mount segments 2 x 6 x 6.5 inches (5.08 x 15.24 x 16.51 cm);
- 1 base piece 2 x 6 x 27 inches (5.08 x 15.24 x 68.58 cm);
- 2 base pieces 2 x 6 x 10 3/4 inches (5.08 x 15.24 x 27.305 cm);
- 2 intermediate table segments 2 x 6 x 40 inches (5.08 x 15.24 x 101.6 cm)
- 5 inner table segments 2 x 6 x 48 inches (5.08 x 15.24 x 121.92 cm);
- 2 segments 2 x 6 x 30 inches (5.08 x 15.24 x 76.2 cm)
- 2 segments 2 x 6 x 56.5 inches (5.08 x 15.24 x 143.51 cm)
- 1 table base for 2 x 6 x 60.5 inch (5.08 x 15.24 x 153.67 cm) segments
The dimensions of the blanks for the tabletop do not correspond to the parameters of the scheme. Once mounted on a sheet of plywood, they will be cut to give the tabletop a round shape.
Detailed job description
- All parts that form the lower base (base) of a wooden table must be cut with a bevel at an angle of 45 degrees. Please keep in mind that the cross consists of a solid part and 2 halves located perpendicularly.
- Similarly, make a cut in the top cross piece at a 45 degree angle.
- Assemble the 3 upper parts of the cross (1 solid and 2 perpendicular halves), place them on the central support. Correct the situation. Attach to the bracket at an angle, securing with 3 screws on each side. Pre-apply glue to the joint.
- Place the bottom end of the center support in the middle of the bottom cross base. Apply glue to the joints. Connect the parts of 3 confirmations on each of the 4 sides.
- The upper beams must be cut at the junction with the table crossbar at 50 degrees, at the bottom at 40. The lower beams at the top (at the point of contact with the central support) at 30 degrees, and for connection with the base, crossed at 60.
- Lay the beams so that the upper ends of the top slats (light green) are exactly on the cross slats, and the lower ends (green) are respectively on the lower cross slats.
- Assemble the base base. Attach the cross halves to the entire center leg using glue and 3 Euroscrews for each connection. Also attach the lower segments of the base (red) with confirmations and glue.
- You can buy a ready-made tabletop or use part of an old table. In this case, you can install the circle on the finished base and level the position. After this, proceed to place the table on the top bar with confirmations. Screw 3 for each connection. Don't forget to further strengthen the connection with glue.
- The wooden table is assembled, you can begin finishing. First of all, fill the unevenness and depressions of the confirmats with a special filler.
- After drying, carefully sand the entire product. Use a coarse grit first, then move on to a finer grit.
- Cover the round table with several coats of varnish. 1-2 applications will highlight the beauty and texture of the wood, 3-4 will give the surface a brilliant shine. Instead of varnish, at the request of the master, the table can be painted or decorated in the chosen way.
Selection of materials
When choosing a material for making a round table, you must take into account the following criteria:
- strength;
- durability;
- ease of processing;
- moisture resistance;
- beauty and attractiveness;
- compatibility with the interior;
- own capabilities and skills.
You can use the same or different materials for different parts of the table. It all depends on the taste preferences of the owner and the initial project.
For table top
There are the following options for making a round table:
- Wood. An array of pine, oak, beech and ash is used. The raw material is easily amenable to all types of processing and has a presentable appearance. Finished products fit organically into any interior, both indoors and outdoors. The downside is that wood is susceptible to dampness, insects and mechanical damage.
- Chipboard. For manufacturing, it is better to take laminated boards, which are durable and affordable. The disadvantage of ready-made tables is the loose structure of the material, in which screws do not hold well.
- Monolithic polycarbonate. The material is beautiful, very strong, but easily scratches and melts from contact with hot objects.
- Plywood. A round plywood table is made of waterproof material with a thickness of at least 16 mm. The slabs are durable, with a beautiful surface, but are sensitive to moisture.
- Metal. A strong base that is resistant to all types of impact. The downside is that working with stainless steel requires special tools and professional skills.
For the top of a round table, it is advisable to choose materials that will fit well into the decor. So, glass, chipboard and solid wood are suitable for the kitchen. When making a table for a gazebo, it is better to choose plastic or metal. Such products will withstand changes in humidity and temperature without consequences. We should not forget about the aesthetic side of the issue. When putting practicality and durability first, it's easy to lose out on design. However, here you can find a middle ground using various surface decor options.
Wood
Chipboard
Monolithic polycarbonate
Plywood
Metal
For the base
The best choice for a round table is metal, which is almost impossible to damage. Depending on the place where the round table will be installed, the choice is made among the following materials:
- Profile pipe. Products made of black, galvanized, stainless steel or aluminum are used.
- Corrugated fittings. Inexpensive and durable raw materials that must be regularly cleaned and treated against corrosion.
- Water pipes. The advantage is that you can use ready-made shaped parts to connect them.
The next strongest ones will be solid wood with a cross-section of 20 mm and chipboard with a thickness of at least 12 mm. It is better to connect the panels with bolts, nuts and wide washers. Self-tapping screws do not provide a sufficient safety margin. Plywood should be abandoned, as it bends even under light loads. The exception is light coffee tables that do not experience heavy loads.
As for the base for a round table, strength should come first, and convenience and presentability should come second.
Profile pipe
Corrugated fittings
Water pipes
Solid wood
Plywood
Tools and Fasteners
To make a round table from wood you will need the following tools:
- roulette;
- level;
- hacksaw;
- drill;
- screwdrivers;
- compass;
- miter box;
- Grinder;
- pencil;
- clamps.
If you plan to work with metal, then you need to purchase an angle grinder, a welding machine, and electrodes. In addition, a steel disk and iron rods will be useful for assembly.
To make a wooden round table with your own hands, you will need the following materials:
- steel corners;
- self-tapping screws;
- 20 mm boards with selected edges;
- timber 50 x 50 mm;
- wood glue;
- furniture varnish;
- stain;
- edge tape;
- acrylic paint;
- antiseptic.
When drilling and grinding, it is advisable to use a gauze bandage and safety glasses. To ensure the safety of making a round wooden table, you need to purchase powder and foam fire extinguishers in advance, which can be used to put out fires if they arise during work.
The simplest “ix-legged” table
The simplest option that does not require special skills from the master. The tabletop is assembled from boards, secured with two transverse bars spaced from the ends by approximately 100 mm. The maximum length of screws is 85 mm. Regular boards are left with small gaps; a standard is used for the same width of the gaps.
To assemble the legs, a template is first drawn - a rectangle. Its width corresponds to the “span” of the legs (600 mm). Height - the “growth” of the product without a tabletop (750 mm). The boards are laid crosswise, cuts and intersections are marked. Having sawed off the boards along the lines, use a chisel to select half-tree notches in intersecting places. Their depth is 20 mm.
Article on the topic: DIY jointer table
The legs are fastened with self-tapping screws (35 mm), connected with a jumper, and attached to the bars. The resulting table is treated with stain and a double layer of varnish. Pre-tinting with water-based acrylic paint is possible.
Determining dimensions and preparing a drawing
The beginning of making a round table with your own hands is to determine its dimensions and configuration. The strength, stability, and practicality of the product depend on the correctness of the calculations. The basis for calculations are the following criteria:
- total area of the room;
- the presence of other furniture and its installation location;
- purpose of the item;
- height of legs;
- configuration;
- optimal size to meet the assigned tasks.
You need to think about it so that even on the most beautiful round table you can easily arrange a set of dishes for the whole family. In this case, it is advisable to provide a reserve for 1–2 guests.
After this, design documentation is prepared, where dimensions, hole diameters, and distances between parts are drawn. Detailed detailing will allow you to complete the work with a high degree of accuracy. Drawings can be made both on paper and on a computer. The choice is determined by individual skills and experience in carrying out such work.
Samsa
The most popular Kazakh pies with any filling.
You will need:
500 g offal, 2 onions, 10 g salt, 1 glass of water, pepper, 3 cups flour, 250 ml vegetable oil, 0.5 tsp.
soda Preparation:
Fry the chopped onion and boil the offal until tender. Pass everything together through a meat grinder and add spices. Knead the dough from warm water, flour, soda, salt and 2 tbsp. oils Leave for 15 minutes, divide and roll into 10-12 cm flat cakes. Place the filling, seal the edges of the samsa and fry in vegetable oil.
Creative ideas
To make housing more original and attractive, non-standard approaches to furniture manufacturing are used. You can use one of the following ideas:
- The bottoms are made of boards from giant decommissioned barrels. The available inscriptions only emphasize the interesting history of the product. The lower edges of the tables can be equipped with thresholds made of iron brackets or chopped firewood.
- Large diameter trunk cuts. Their edges may be rounded or remain with bark. Wild wood looks very good in gazebos, verandas and hallways of country houses.
- Coils from the power cable. The products are comfortable, large, stable. They only need finishing. Service inscriptions add originality.
- Solid wood with carvings. The depressions made are filled with epoxy glue. It looks very unusual.
A round table helps create an atmosphere of intimacy in the home. And if it is made with your own hands, it will definitely become loved by all family members. Exclusive design will help give the room individuality and unique style.
How to set a table beautifully: serving
Dastrakhan is an important element of the culture of the peoples of Central Asia and some ethnic groups of the East. Initially, this word meant 'tablecloth' or 'set table', but over time it acquired the meaning of a feast.
Traditionally, a small round table is set for dastarkhan, sometimes a rectangular one is used. The piece of furniture is usually low - up to 35 cm. Kazakhs invite guests to sit in the most honorable places - small light mattresses or felt pillows. Kazakh dastarkhan can be served in the house or on the street.
Green tomatoes for the winter: a selection of recipes
For Kazakhs, it is important not only to put the best dishes on the table, but also to beautifully decorate the meal. How to set the table beautifully? Every little thing matters. Check out what a proper table setting should look like:
Tablecloth and napkins
Do you want to set the table beautifully? Follow these rules:
- Be sure to cover the table with a tablecloth. It is desirable that it be white, but other light colors can be used. It’s good if there is a traditional pattern on the tablecloth - this symbolizes the good attitude of the hosts towards the guests.
- Make sure that the edges of the tablecloth cover the table well. If it is round, the cover should not fall below the seat. Is the table rectangular? The tablecloth should cover the legs of the table.
- As for napkins, there are no strict rules, since the Kazakhs borrowed this tradition from other peoples relatively recently. However, if you fold the napkins beautifully, this is only a plus.
Broccoli for the winter: preparation recipes
Dishes and their arrangement
Previously, Kazakhs served the table with various dishes made of leather, wood, and iron. Nowadays they use modern, but always beautiful pieces of service.
Article on the topic: Do-it-yourself round table with a rotating middle
Set up the table like this:
- It’s good if all the dishes are round. A prerequisite is that the plates and dishes are intact, without chips or any damage.
- A set with gold or silver trim is ideal for dastarkhan.
- Place the food on the plates in a circle and place the dishes on the table in the same way.
- Serve kumiss in teneg - bowls painted with silver ornaments, tea - in kes - cups with gilding.
Modern dastarkhan: Wikimedia
Decorating dishes
Do Kazakhs decorate dishes? Undoubtedly. The subtleties of this action look like this:
- Serve kaunshek and zhorgem (dried melon and thin sausage) as an appetizer. Weave them together to form patterns.
- Apply patterns to bread products using cherry or berry juice.
- Do you want to set the table according to the laws of national aesthetics? Serve meat dishes on a special wooden dish - tobacco. There are several types of dishes that differ in size. Meat dishes are not decorated with anything, but the food is laid out in a certain way. The ram's head and the meat on the pelvic bone are placed on a large dish, the meat from the tibia is placed on a medium dish, and the remaining parts of the carcass are placed on a small dish. Be sure to garnish meat dishes with herbs.
How to salt cabbage in pieces for the winter: simple recipes
A beautiful table with food is an integral attribute of dastarkhan. Be sure to prepare your meal according to all rules.