Every self-respecting housewife strives to make her home more beautiful and maintain a cozy atmosphere in it. This can be achieved in different ways. For example, you can buy ready-made room decor items in a store, or you can do everything yourself.
In the recent past, it was fashionable to make your home more comfortable with the help of various crocheted napkins.
Now these decorations have changed a little.
The simplest and least expensive option would be a napkin.
And now you won’t surprise anyone by the fact that there are napkins in your house, but now they are made of beads.
Quite recently, crocheted openwork napkins have been in fashion. They decorated coffee tables, headboards of sofas and armchairs, and served as a stand for vases of flowers and hot teapots. But time passes, and fashion trends change along with it. So the openwork knitted napkin turned into a beautiful napkin with beads, and there is nothing surprising about it.
The weaving patterns of such napkins are similar to those of previous napkins.
In this article you will learn how to make a napkin from beads.
They are now much easier to make and have advantages.
It does not need to be washed, as dust does not form on it.
Advantages of a beaded napkin
Beaded napkins have a number of advantages over knitted tablecloths.
The methods of weaving such products are as simple as possible; even a novice craftsman can handle them.
- This napkin does not require periodic washing. After all, it is very difficult, in fact it is very difficult to get it dirty. And if this does happen, then just wipe the stain with a damp cloth and the napkin will be like new!
- The manufacturing principle of this product is as simple as possible. You can even do the work with your child, brother or sister.
- The attractive appearance of a beaded napkin, which cannot be compared with a lace knitted napkin.
- Cheap materials.
It looks so impressive that it cannot be compared with any knitted napkins.
It will cost you much less, because beads are affordable to everyone.
Necessary materials
- Beads of various colors and shades.
- A special needle with a thin eye for beading.
- A fishing line or thread to match the color of the beads (you can also use transparent, stretchy monofilament).
The threads must be white and strong to support all the beads.
Important! For beading it is better to use Czech beads, because... The beads in it are perfectly sized. If you take low-quality, crooked beads, you risk ruining the appearance of the product.
Mostly napkins are white, or with the addition of a few other colors.
Beads and beading
Beads are small decorative beads with holes for stringing. Egypt is considered the birthplace of beads; translated from Arabic, the word “busra” means “fake pearls.”
When purchasing beads for decorative embroidery or weaving, it is important to pay attention to its quality. A good bead should be:
- The same shape, size and color of the same type.
- Do not leave paint on your palms or fabric.
- Have identical holes for stringing.
Today, high-quality beads are produced by Toho (Japan), Preciosa (Czech Republic), and Zlatka (China).
Beading is a traditional skill of working with beads. To create decorative items using the beading technique, you need beads, thread or wire, and a needle. Accessories made in this way turn out beautiful and voluminous.
The African tribe Ndbele became famous for its beadwork. Tourists from different countries come to Ndbele to see the magnificent beaded jewelry and accessories. The weight of some products reaches 25 kg.
Master class on weaving napkins from beads for beginners
The process of creating openwork beaded napkins with weaving patterns will be discussed in detail and step by step in this section.
The principles of weaving are taken from crocheted doilies.
The simplest technique for weaving such a product is to weave rings of beads that will make up the napkin.
Start weaving from the middle and continue weaving to the edge.
Start weaving the napkin from the center to the edges. First, form the base of the product, consisting of six rings that need to be closed into a common large ring.
In this case, you can determine for yourself what size your napkin will be.
Make a new row of beads of a different color. Increase the number of rings with each subsequent row.
You can weave until you get tired of it or until you run out of beads.
When you have weaved a napkin of the desired size, tie the thread and cut off the excess.
You can see how to weave napkins from beads with your own hands using the diagrams.
Important! Each ring should consist of the same number of beads.
LiveInternetLiveInternet
It is better to take even beads or carefully calibrate them, otherwise the napkin may become wavy or the weaving will become skewed. I’ll say a few words right away about what all such descriptions look like. Since there are a lot of rows in such napkins, diagrams are not drawn for them; the description is given in the form of rows with numbers and letters. Capital letters indicate the color of the beads, numbers before the letter indicate the number of beads of that color, then small letters symbolically indicate actions. In simple jobs there are only a few steps. For example, German designations: ü1 - weave through one bead i2 - weave into the second bead, / - weave into the middle bead of the “arc” of the previous row, d5 - weave through the next five beads. bead color designations: W - white, G - gold, B - blue, Gr - green, Ge - yellow I will also add a sign with abbreviations in other languages for comparison
Everything is not as complicated as it seems at first, let's look at an example. First row - collect 8 beads, tie them in a ring, draw a needle and working thread into the first bead. We weave counterclockwise. The second row in the abbreviated form (in German) looks like this 2: 5W ü1 this means that we weave 5 white beads through one bead of the previous row and so the entire row in a circle (photo 1)
in photo 2 the second row is woven, in the last step we insert a needle into the bead with which we started to weave the row (now it is bead 1), and then we pass inside the first two beads of the woven row (now it is beads 9 and 10 in photo 3). This is how each row usually ends (unless otherwise stated). The third row (abbreviated notation - green text in photo 5) - repeat two steps in a circle. First 1 white+1 gold+1 white. beads are woven through one bead of the previous row (photo 4). Then the same set is woven into the second bead of the next arc of five beads (photo 5)
in photo 6 the weaving of the third row ends - we weave the last three beads into the bead from which we began to weave this row, and then into the first two beads of the woven row. This time we started the row with 3 beads, not 5, so that the second bead turns out to be central in the arc. In the fourth row (photo 7) we weave 5 white. beads into the central bead in the arcs of the previous row. Photo 8 shows how to finish the 4th row and move to the 5th. Fifth row (in photo 9 it is already woven) - 3 white. beads through one, 1 white + 1 green + 1 white into the second (in an arc of five beads from the previous row)
The sixth and seventh rows - you can see how to weave both from the photo and from the abbreviated notation (green text in the photo), and so on... I redraw the verbal description for myself in lines (along the rows of weaving) with colored circles, it’s easier for me to follow it and not make mistakes. When there are long rows (the report consists of several steps), I glue a sticky piece of paper under the working row for notes. This way I won’t accidentally end up on the wrong row (there were times without a sticker... I looked in the wrong row, I had to intertwine)
8: 1W+2Gr i2; 3W ü1; 3Gr 9: 3Gr / 2W+1Gr / 1W+1Gr+1W / 10: 1Gr+4W / 1W+1Gr+1W / 2W+1Gr / 11: 3W ü1; 2W+1B / 3B / 2B+1W i2; 12: 3W / 3B / 3B / 3W / 13: 1W+2B / 1Ge+2B / 2B+1W / 5W 14: 1B+1W+1B / 1B+1W+1B / 3W i2; 1G+1W+1G ü1; 3W / 15: 3B / 3W / 1G+2W / 2W+1G / 3W /
in photo 12, 15 rows have already been honestly woven, but in the 16th row, a little specificity begins in this napkin. The edge of this napkin is not even in a circle, but with corners. Having weaved a couple of steps according to the description, we no longer weave new arcs, but pass the needle through the five outer beads (in the abbreviated description d5W), then again add arcs according to the description (photo 13). The 17th row is woven according to the same principle. 16: 3W / 1G+2W d5W; 2W+1G / 3W / 17: 1G+2W d9W; 2W+1G / 3W /
I weave the last two rows (18th and 19th) at a time, without going over the entire napkin in a circle. There are already a lot of threads in the beads between the corners. 18: d1G+13W; 2W+1G / 1G+2W 19: 5W (add them only at the edges of the corners)
having weaved two arcs of the 18th row (along the green line in photo 14), I turn it down and pass inside the beads in the opposite direction (blue line), then up into the gold and to the left in four white beads (red line), cast an arc of 5 white beads (19th row) and weave along the edge of the napkin to the next corner.
This is the kind of napkin we should end up with. I found this pattern on blogs, whose design I don’t know for sure, I wove it from a photo, so don’t scold me too much for violating “Aftar” rights
Examples of diagrams for creativity with descriptions
Note! Patterns for weaving openwork napkins are very similar to patterns for crocheting tablecloths, so if necessary, they can replace each other, you just need to show a little imagination!
In order to weave a beautiful napkin with beads, it is preferable to use calibrated beads so that it looks attractive.
For amateur needlewomen who are no strangers to holding beads in their hands and know how to use complex patterns, it will not be at all difficult to make a napkin consisting of spiral flowers.
The most popular weaving techniques are mesh stringing, cross stringing and mosaic.
The main thing when making a napkin from beads is to adhere to the weaving pattern and color sequence. We first weave the flowers separately, and then fasten them together with thread.
Each of these techniques has its own subcategories; they can, of course, mix with each other and change a little.
But here is a simpler pattern - such a funny web of beads.
Beads with sharp edges must be strung on a strong and thin thread.
If desired, you can also make them using thin wire and hang them as miniature snowflakes on the Christmas tree.
But here is a diagram that is quite difficult for a beginner to understand. But if you are an advanced craftswoman, then it will not be difficult for you to make a beaded napkin according to this pattern.
This fascinating activity is bead weaving.
If you couldn’t figure out the previous diagram, then here is its simplified analogue. First, individual flowers are woven, and then joined together with a thread and a needle.
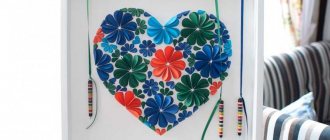
A beaded napkin is a spectacular way to decorate your interior, either just for mood or in honor of the holiday.
Note! If the center of the weave lies crookedly, then it is worth passing the second row of thread through it, perhaps several times.
There aren't many ways to create them.
LiveInternetLiveInternet
Quote from Irina_EL's message
Hello! This is my first master class.
Sorry that I couldn't show you the manufacturing process in color. I just don’t have very good quality on my camera, I tried, but nothing is visible there. I wanted to give up and quit... but no. I said earlier that with God’s help I would make a master class, and then God sent me the idea that it was still possible to make a master class through drawings, and I tried to make it. How you did it is up to you to judge. God's blessings and wisdom to you as you create the napkin. I apologize in advance if the master class turned out poorly! Remember: “At the beginning and at the end of the work, no knots are made and weaving is done in a single thread.”
First, let's prepare beads and thread with a needle. The length of the thread is no more than 80 cm. Next, we collect 12 golden beads and close them in a circle as shown in Fig. 1.
Next, we collect 7 white and 1 black beads and pass back through the black bead into 7 white beads and tighten the thread. Rice. 2. Then we collect 6 white beads and pass into the 2nd bead from side 1, and we will continue to move in the same direction.
When we have passed through the 2nd bead, we tighten the thread and pass through the first 3 white beads. Rice. 3.
Next, we collect 4 white and 1 black beads and go back and pass through the black bead into 4 white beads and tighten and then collect 6 white beads and pass through the 3rd one. bead Fig. 4.
Next we do everything in the same way. Rice. 5.
At the moment when we approach the last row, we need to be careful and pay attention to the fact that in the last step we collect 3 beads and go through the first 3 beads from the very beginning and move towards the very first bead Fig. 6
And then we walk with a needle and thread along the chamomile to secure the thread, after which we cut off the thread. Then we return to the other end of the thread, which we have from the very beginning of work, and also walk with a needle and thread, i.e. fasten the thread. And now the first part is ready. Next, take a new thread and continue to do it again.
This is what happened when we finished one daisy. Rice. 7
Many people have a question: how to connect the second chamomile. I give an example of how this is done in Fig. 8 . We collect only 4 white beads, without the black one, go to the black one and then do as we did before, i.e. when we went to the black one, we go to the 4th white one and again collect 6 white beads. If you don't understand, ask.
Next, I will show the assembly processes only without comments.
If you have any questions, please contact us
Thank you for your attention!
Blog Romanenko Nikolay