Wooden furniture has been made for thousands of years, but today it has been undeservedly forgotten. The reason for this attitude is the lack of high-quality and stabilized material - the preparation of wood on an industrial scale at the current level makes the final product too expensive.
However, homemade furniture made from natural wood is still made by home craftsmen. The most popular products are benches and chairs made of logs, which are easy to manufacture and can create a specific look for their surroundings. Take a closer look at them.
How to make a chair, stool or armchair from a stump, hemp or log with your own hands
There are an endless number of options for chairs made of stumps and logs, as well as tables. There are two main technologies for creating a chair or stool from hemp:
- by firing method,
- chainsaw.
Using the firing method to make a chair or stool is quite simple. First, the log is sawn crosswise lengthwise to the required length of the legs. The cracks are wedged with wooden chips. Small chips and branches are poured into the wedged cracks, a little gasoline is added and set on fire, fuel is added little by little to maintain combustion and ignite the bulk of the log. This burns out the center of the log. After the necessary firing with an angle grinder with a brush, the excess coals are removed and a do-it-yourself stool made of logs or hemp on 4 legs is obtained. It is further processed.
The required workpiece is cut out with a chainsaw and then ground with an angle grinder, or fired, painted, etc. You can also place the stool on furniture wheels, screwing them from below, the lower surface should be perfectly flat. You can attach a pillow to the hemp on top, so you get homemade upholstered furniture. By placing a cut of wood on the legs, you will also get a wonderful stool.
Do-it-yourself hemp stool using the firing method.
Chair-stool made of hemp (logs) with a chainsaw.
Do-it-yourself garden chair made from logs (video)
A simple chair from a log is made in almost the same way as a stool, but the back is cut out with a chainsaw, as in the video below.
https://youtube.com/watch?v=_zXwsd0Aci0
Garden chair made of logs in the shape of a hand (video)
Chairs or armchairs from logs can be made of any shape and size, for example in the shape of a hand. To do this, you need to work well with a gas or electric chain saw.
Gallery of photographs of chairs, armchairs and stools made of logs and stumps
Finally, options for creating armchairs, chairs, stools from logs and stumps.
As you can see, there is nothing particularly difficult in making a chair or stool from a log, the main thing is to approach the matter with soul and hard work.
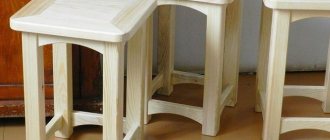
Traditional simple stools
Timeless classics live not only in the facades of buildings. Time-tested solutions are also preserved in the designs of stools. Adding smooth lines to their appearance eliminates boring angularity.
In the photo below we see the classic version. Thanks to the rounded drawers and legs, it looks quite decent. The milled grooves on the legs also improve its appearance.
Simplicity has its own charm. Designers successfully play with this quality, creating deliberately rough, brutal products. Artificially aging furniture is not an easy task. The author had to work a lot on the product, the photo of which we see below.
The category of classic “stool design” includes designs with drawers under the seat. To do this, use wide side frames and hinged lids.
Driftwood and branches in the garden
Any wood is a material for creativity. A board with a greeting is laid out from thin branches.
The decor on the welcome board is attached with glue
Thick ones are used to make unique garden furniture.
A stylish chair will last longer if you remove the bark from the branches
Interestingly shaped driftwood will give your garden a picturesque look if you simply place it among the plants.
Don't pass by beautiful driftwood - it's very rare
And with the help of glue and screws, various animal figures are made from pieces of wood. But first, the bark is removed from the branches and they are lightened.
Step-by-step instruction:
- Soak the material in a solution of soda ash: 2 cups per 7 liters of hot water. Place a weight on top.
- After 3 days, remove the bark using a wire brush.
- Then immerse the branches in a bleach solution for 2 days: 1 glass per 7 liters of water.
- Dry in the sun for 3 days.
- Sand with fine-grit sandpaper.
Selecting material for drawing up figures is a long but exciting task.
Gallery: crafts from driftwood and branches
A wreath of bleached branches will decorate a door or gate. Place a strange mushroom made of driftwood and branches under a tree.
To create a Christmas tree, branches drilled in the middle are placed on an iron pin. It is better to make large figures from driftwood. From curved branches and driftwood, fancy stands for pots are created. Before installing the seat on the bench, it is carefully sanded
You can make any door decoration from small twigs. A funny pig made from driftwood looks great on a green lawn.
A lamp made from branches is an exquisite decoration for a gazebo or veranda
Beautiful examples
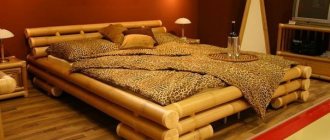
Massive chopped bed. This piece is incredibly strong due to its design. The bed is wide enough and comfortable, so it can comfortably accommodate a couple of people.
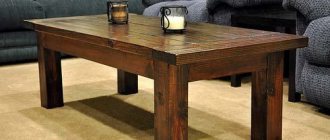
Combined set of table and benches. Quite elegant, it has a somewhat lightweight design (in the production of the tabletop and seats, boards, rather than halves of logs, were used). Joining the material in a “paw” type will add reliability and strength to the furniture.
A very atmospheric chopped sofa in the loft style. There is nothing superfluous in this model; the structural elements are roughly assembled, which adds extravagance to it.
To learn how to make a bed from logs with your own hands, watch the video.
Tables and chairs
Untreated wood is an almost ready-made form for creating creative furniture. At the beginning of work, it is advisable to thoroughly dry the wood and carefully process it. Then the products will last you much longer
The simplest option for such fittings is stumps and decks of different sizes. Cut down the stump with an even cut - and the table and chairs are completely ready to perform their direct functions!
The excessive asceticism of hemp stools and benches can be smoothed out by backrests, comfortable seats or soft pillows
In the following photos we will admire the designer handmade collection
Attach the tabletop to a piece of large driftwood and your rustic design will be flawless
For stability, make neat, even cuts on the original stand
If you manage to get a wide log, make a tabletop for a summer kitchen or a surface for a bar counter
Small branches are perfect as components for chairs. Use larger ones for the legs, connecting them into one
Pots made of rotten stumps
Nature itself will give you interesting ideas. Moss and vegetation on the stumps refresh the old tree. Its rotten center inside is an excellent option for a flowerpot. All that remains is to plant your favorite plants, but only in a pot to avoid destruction of the wood. Massive branches with graceful curves give us an idea for fencing. Strength and reliability, together with natural beauty, make wood an ideal environmentally friendly basis for paving. The cuts should be smooth, and it is not at all necessary to process them, then the rough surface will not be slippery during rain
Non-standard spruce
Impressive arch
Fauteuil (Chair)
Between 1889 and 1919 François-Rupert Carabin created many pieces of furniture, mainly from oak, pear or walnut wood. One such piece, completed in 1893, was called Fauteuil (Chair).
Choosing a stump
The most important point in this master class, of course, will be the process of finding the right stump. In our case, a part of a 100-year-old tree was selected, which its owners were planning to cut down any day.
Avoid soft woods such as pine to avoid rotting and choose the piece that is straightest at the top and bottom. Although, if you have a crooked stump, but you just fell in love with it, then you can fix it all and just trim the crooked parts.
The longer your stump takes to dry, the better, especially if you decide to use soft wood. But even hardwood stumps need to be thoroughly dried before you begin. Let the hemp sit indoors for several weeks.
What kind of furniture can be made?
When clearing a garden or other area of stumps or old trees, it is worth finding a more worthy use for them than recycling. Using logs and roots will allow you to make interesting crafts, furniture, and buildings.
Entire compositions are built from them, used for arranging a playground, and variations are created in the form of flower beds. Old logs are also used to make furniture.
Logs are used for construction:
- benches made from a single trunk;
- chairs and benches made of hemp;
- dining table;
- furniture set.
Having experience in working with wood, you can make comfortable and functional furniture for your garden yourself. Even the simplest design requires time, desire, and the availability of suitable professional tools. For furniture production, a log with a decent cross-sectional diameter is more suitable. During the work process, it is processed with an ax, then an electric saw or chainsaw is used to create the basic shape. At the final stage, cleaning with a chisel and grinding is carried out.
Stump - teremok
You will need: a stump, a log, a hammer, a saw, a chainsaw, a chisel, a hacksaw, tall grass for a broom, an elastic band or rope, for the path - pieces of roofing felt, fine gravel, a watering can with water, a regular broom, a fence, a brush, paint, toys.
Master Class
- Remove the core from the stump for doors and windows.
- Mow the tall grass and make a broom.
- Place a grass broom as a roof.
- Line the path to the tower with pieces of roofing felt.
- Cut the log into circles using a chainsaw, then lay them out on the roofing felt.
- Fill with fine gravel and sweep the gravel from the wooden circles with a broom.
- Fill with water and leave to dry.
- Put up a fence, paint the tower and place toys as residents.
The tree stump is ready!
Types of designs
Drawing of a garden table
One of the popular options for garden furniture is a gardener's workplace. Even if you are not an avid gardener, without a well-equipped table it will be much more difficult for you.
If you prefer original solutions, you can make a picnic table in an unusual style.
Folding garden chair
On a fine summer day, a gazebo with folding chairs and a table, which are not only comfortable, but also compact, will be indispensable. Bright modular structures, such as benches, will add variety to the landscape. During frequent family vacations, do not forget to take care of the kids and make a table and chairs of a suitable size for them.
Interior items made from branches
Before you start work, select the appropriate material. The main condition is the absence of rot and mold on the branches. In turn, the cracks will add decorativeness to the branches.
- Clean the natural material from excess dust and dirt, and then dry thoroughly. It is best to dry the wood in the shade in a well-ventilated area or even under a canopy, if possible.
- Next, you will need to process the branches with carving. Work in the direction of the fibers, first with a coarse and then with a fine nozzle. Don't forget about the end cuts.
- As already noted, parts can be connected to each other using glue, screws, a wedge, etc.
- After the blanks for the final product are ready and sized for joining, they must be processed. Large cracks that are very embarrassing can be eliminated using epoxy resin in several stages. Once the resin has dried, sand down any exposed areas.
- The next stage is assembling the product.
- The finished piece of furniture must be decorated. To do this, you can use stain, with which you can radically change the color of the wood, without losing all the charm of the texture of the material.
- Finally, it is advisable to use varnish applied in at least two layers.
Your wild imagination, as well as our photos, will help you adapt the branches! Be bold and don’t stop in the face of difficulties!
Advantages and disadvantages
The advantages of such furniture include:
- creating a special, romantic and fairy-tale look on the site;
- ease of manufacture;
- durability of products;
- lack of complex care;
- high maintainability;
- low cost.
The disadvantages of such furniture are considered to be:
- surfaces require high-quality processing and application of protective coatings, since they are located outdoors;
- wood burns well, which puts forward special requirements when finishing furniture;
- the material is subject to rotting, warping and cracking;
- protection from moisture is required.
Expert opinion
Korzhavin Daniil Dmitrievich
Designer of stylish home furniture
These disadvantages are familiar to most homeowners. Ways to avoid or compensate for possible threats are not particularly difficult. The only requirement will be the timely implementation of protective measures.
Types of tables
There are several popular types of hemp tables. Here are the main types of structures in terms of material processing features:
- Natural looking product. This is the easiest design to manufacture; it involves the use of a stump in its original form. The only processing that needs to be done is sanding. It is necessary to ensure that table users do not get splinters.
- Painted furniture. If desired, the stump can be painted in any color or patterns can be applied to it using a stencil or brush. Painting the product allows you to adapt it to the interior, made in a certain color scheme.
From the point of view of the design features of the finished product, the following types of tables can be distinguished:
- Furniture with glass. If the master plans to make a coffee or coffee table, then he can use a stump as a stand to which a glass table top is attached. The parts of the structure are connected to each other using screws or special glue.
- Product with legs. The table can be equipped with legs of any length. New wooden or chrome-plated legs, as well as legs from old furniture, are suitable for work. Forged racks of openwork shapes allow you to make the table more elegant and unusual. Legs not only improve the appearance of the furniture, but also reduce the likelihood of scratches on the floor when moving the product from place to place. In addition, the legs raise the stump above the floor and allow air to circulate underneath it. All this allows you to extend the life of the structure.
- Table on wheels. Instead of legs, you can attach wheels to the bottom of the furniture. This will significantly increase the mobility of the structure.
- A product made from bars connected to each other. If the master has several thin wooden blocks instead of one large stump, then they can be connected to each other using glue or fasteners. The result is a table with an unusual shape. It can be equipped with a glass or wooden tabletop.
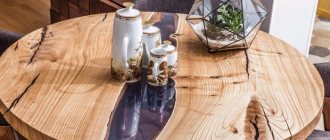
- A “one on top of the other” type structure. There is an easy way to make an original coffee table. To do this, you need to take several slices of wood of different thicknesses and place them one on top of the other with a slight offset.
- A table made from a cut trunk. If the furniture maker has a whole tree trunk at his disposal, then it can be cut into two halves or carved into a rectangle and used as furniture for the home or garden.
Other design options are possible, it all depends on the imagination of the master.
Bench options
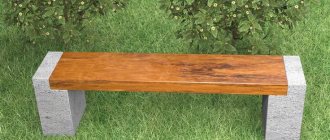
- A bench made of logs that blends well with the surrounding nature. It consists of half a log, used for a seat, and two short round logs, which are legs.
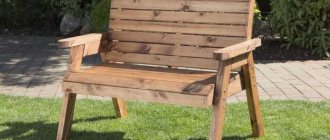
- A beautiful wooden bench with a back and armrests, reminiscent of a sofa. Curved and cut elements make it more attractive, while leaving knots and irregularities gives the structure a natural look.
- Bench made of wood and metal. The base of the structure is metal. The wooden parts of the seat and back are attached to it. The thin metal parts make it look lightweight.
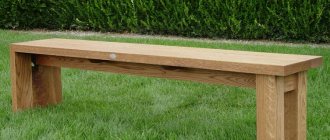
- The bench has a simple, classic shape. It is made of wooden, rather wide boards. This width allows you to sit comfortably on the bench. Armrests make the design more complete.
- An original bench made of wood with figured details. This option is well suited for a site with a natural, rural design. Carved legs and armrests, a figured back - all this gives the product originality.
- A bench with an interestingly shaped back. The curved parts gradually bend back, creating a unique design. The seat is slightly curved but has a more traditional appearance.
- A set of wood – a table with two benches. The design looks traditional due to the material used. The original solution is to fasten all components into a single structure.
- The bench is made of solid logs. A single piece is cut out of it, combining the back and seat. The legs are attached to the bottom. The log required is quite large.
- Bench with a drawer for storing toys. Outwardly it looks like an ordinary wooden bench-sofa, but under the seat there is a drawer in which you can put various things.
- A comfortable bench made of wood with a simple shape. The base is made in the form of a rectangular box. The back is also simple with a straight shape. The seat has soft cushions for added comfort.
- Wooden bench located around a tree. It is made as if it consists of four benches, each of which has one armrest. The composition looks attractive and comfortable.
- A simple bench made of wide boards. It looks solid, but its size is somewhat hidden due to the gaps between the boards and the light blue color in which it is painted.
Design selection
The design of the entire table can be divided into two components: the choice of tabletop and legs.
When choosing a countertop design, it is important to consider some features of your room and your imagination:
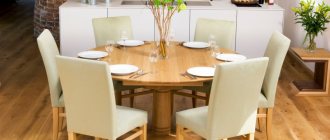
- If you want a round or oval shape, then you should have enough space, because... it has impressive dimensions. Ideal for a large living room or hall, and also harmonizes with the gazebo;
- A small tabletop is a beautiful addition to a small living room;
- The rectangle shape is suitable for all occasions.
When choosing legs, rely solely on your taste. You can make a table with one, two, three or traditionally four legs.
What do you want the final version to look like? This is a purely personal question and depends on your taste and preferences. If you want something unusual, but nothing comes to mind, you can look at photographs of tables made from cut wood and make everything according to the sample.
Creative solutions in the design of a hunting lodge and furniture for a fisherman
Making a carpentry workbench with your own hands
For each room, be it a gazebo near the house or a bathhouse, we try to create unique interior accents, and we transfer some solutions to rooms for different purposes if we see that our idea will only benefit from this. For example, wooden arches made of logs painted with picturesque landscapes can complement the hunting design of any room.
Also, small coffee tables are suitable for all rooms in the hunting lodge - we often make their tabletops from cut wood; and the legs are made of suvels and burls. All this creates a colorful and impressive hunting design and makes the house truly memorable and atmospheric.
Snag - an idea for a sculpture
Branched bends of roots, gnarled stems, powerful stumps - the best material for creating the image of realistic and fictional figures
For some, the curves are wings, while others recognize the silhouette of an animal in them. Do not limit your imagination, use wood in its natural beauty
Have you collected a collection of various branches and twigs? Try creating something more complex like this beautiful stallion creation. Thanks to movement, precise proportions and shapes, the sculpture seems to come to life before your eyes!
Notice the exotic image in the driftwood? Finalize the form, show its character to the maximum, making the figure noticeable to everyone
Old driftwood is an unusual and valuable material for impressive decorative items, furniture, and expressive figures. Most likely, we have not mentioned all the options for their use. Now you!
What other uses for driftwood can you imagine? Or maybe you already have a piece of art made from this original material at home?
General requirements for material for manufacturing
When choosing a material for making a chair, it is important to pay attention to the following points:
- No damage to wood in the form of internal and external cracks, fungal infections and traces of parasites;
- In a cut of high-quality material there should be no traces of fused or underdeveloped knots;
- The wood must be strong and wear-resistant.
The main varieties of trees from which you can build a chair for home use are:
- Larch;
- Oak;
- Maple;
- Ash;
- Alder;
- Pine;
- Cedar;
- Beech.
To construct an element of garden furniture, it is recommended to use coniferous trees. Possessing a large amount of resin, they resist decay processes, as well as fungal infections and parasites, much longer.
Furniture made from stumps and snags
In addition to plants and a garden path, the garden plot has a place to relax. Garden furniture must be durable, stable and withstand aggressive environmental influences. Wooden garden furniture is quite expensive, so it is best to make it yourself.
If you have a large stump in your garden, try cutting it into a comfortable chair. Depending on the size of the hemp, the chair will be either for an adult or for a child. Using a chainsaw it is easy to cut out the seat, backrest and even armrests. You can also use the stumps themselves as a place to rest. If necessary, they should be treated with sealants and painted.
logs and hemp in furniture making
A driftwood from an ugly and curved piece of wood will turn into an original decor. A large piece of driftwood can be used as a table leg and to decorate chairs.
Driftwood and stumps can decorate country furniture in an original way
Sanded and varnished driftwood will add zest to any room.
Here is another photo of original furniture made from driftwood and stumps:
Where is this furniture used?
Furniture made from logs has a specific appearance, which makes it suitable for use only in appropriate conditions. Most often, such products are found in garden plots, as part of landscaping elements for country houses.
The owners are happy to decorate recreation areas with products made from logs. At first glance they look rough and primitive. However, garden furniture of this type has a special appeal and creates a feeling of special comfort.
In addition to visual appeal, such products are distinguished by ease of manufacture. It does not require any special skills or knowledge of professional carpentry. However, skills in handling tools will be needed in any case.
The specific nature of furniture made from logs involves rough and extensive processing, requiring the use of a powerful and rather dangerous tool. This must be taken into account when deciding to make benches or chairs from logs.
Can they be used in the interior of an apartment?
There is no fundamental ban on the use of log furniture in an apartment. If the owner likes such products, there can be no objections. However, it is necessary to keep in mind that the appearance of chairs or benches is too specific, which does not allow a harmonious combination with other interior styles.
You will have to decorate the entire room in the same style, making all pieces of furniture from the same material. Otherwise, individual products will look inappropriate and even ridiculous, and it will not be possible to achieve the expected effect. Therefore, when planning to create an interior from logs, you must first calculate the amount of work and the amount of material required to implement the plan. Perhaps the results of the calculation will force you to reconsider your plans.
Hemp flowerbed
You will need: a dry stump, a chainsaw, an axe, a piece of polystyrene foam, a ruler, an antiseptic, paint, soil, sand, flowers (which ones are best to use are described in the master class in paragraph 7).
Master Class
- Trim the bottom edge with a chainsaw to create a level base.
- Draw contours on the surface of the stump, retreating at least 5 cm.
- Make 10-20 cm indentations in the stump using a chainsaw and an axe.
- Treat the inner walls of the stump with an antiseptic or paint it. This way the stump will last longer.
- Using a chainsaw, drill a hole for drainage to prevent moisture from accumulating, then insert a piece of foam.
- Mix store-bought soil with garden soil and add sand, then pour it into the stump.
- Plant flowers. Flowers with a small root system are best suited, such as: tulips, begonia, petunia, geranium, daffodils, oxalis, purslane, pansies, primroses, marigolds...
- Water your flowers regularly and take care of your flower bed.
The hemp flower bed is ready! I recommend watching this video!
I recommend viewing a photo gallery of ideas for creating flower beds on a stump!
Assembling a table base from logs
- Reinforcement and glue will help make the assembly of the structure reliable and durable. Insert metal pieces into the joining logs. The rods must fit exactly into the holes. If they peek out slightly, cut off the same amount at the end of the metal fastener. Disassemble the structure for final connection.
- Fill the bottom hole ¼ full with glue, then insert the reinforcement, put the next log according to the drawing on top (we recommend numbering all the logs used accordingly in the drawing).
- On top-mounted logs (the rods are in them), fill the holes with glue to the very edges.
Children's birthday menu: ideas for the festive table
Leave the resulting design. The glue must dry.
Idea #5 – garden sculptures
Anyone can create garden figurines from stumps, but real artists end up with wonderful works of art that amaze with their realism. If you are driven by the desire to simply decorate your area, then you can create a simple image that does not require special skills.
Of course, this magnificent deer calling out in the spring forest was skillfully carved from an ordinary stump by a high-level professional
Making a simple figurine from a stump is not at all difficult. Those who made snowmen in childhood can apply their accumulated experience in this case. The role of hands will be played by twigs, instead of the nose and mouth we will attach twigs, Eyes can be made from brown bottoms from plastic bottles. The role of the pupil will be played by the cork from the same bottles.
All this is attached to the stump with self-tapping screws. On the horizontal surface of the cut, you can simply lay out pine cones, which will imitate hair. This garden guard, which we whipped up, is ready.
But any schoolchild can make such a funny guard for a dacha, and this is precisely why such a garden sculpture is valued
If it happened that you had to cut down a whole row of country trees, do not be sad. This situation also has its positive side. But you now have a large number of stumps located close to each other. And this is not bad at all. Make them into a fairyland for your children, putting into practice all the information that you have already received in this article.
It will be just a wonderful place to play. First you have to clear each stump of bark. For this you will need a chisel and a hammer. The chisel must be inserted between the bark and the tree trunk, then gently tap it with a hammer. The bark will move away from the trunk and soon the stump will completely lose it. Now it can be thoroughly sanded using medium-grit sandpaper for this purpose.
Such an owl could easily become the companion of Baba Yaga herself and settle in her hut, flying out from time to time to hunt
Be sure to remove wood dust formed during work with a damp cloth. The wood prepared in this way should be treated with an antiseptic, which will protect it from rotting.
Now you can start decorating the stump. Let's choose a large stump to turn it into Baba Yaga's real house. Let's take chalk and outline the location of the future windows and doors of the grandmother's hut. Recesses in wood for doors and windows can be made using a chisel and hammer.
We will need pieces of boards from which we will make doors and window shutters. These parts of the future structure can be painted right now, while they are not yet nailed into place. Doors and shutters should be nailed to the places marked on the stump using nails whose heads have been bitten off. When finishing decorating the hut, you can collect branches and driftwood of unusual shapes from the area to stick them around Baba Yaga’s house. Let them portray dense years.
On smaller stumps you can depict heroes of a variety of folk tales or funny cartoon characters. You can decorate these stumps and draw your intended characters on them using paints for outdoor work. The images outside will wonderfully complement the flowers planted directly inside the stumps. How to do this was described in detail at the beginning of the article. You can limit yourself to pots with plants.
Another wonderful composition, made by a professional artist and sculptor, creates a great mood inherent in a small fairy-tale corner of your garden
We'll turn a couple more stumps into children's chairs. To do this, we won’t even cut out the massive back. If you have old chairs, use their backs for this job. They should be carefully freed from varnish, and then, using ordinary nails, nailed to the stump seats. All that remains is to paint the finished chairs in bright colors that children will definitely like.
Simply turn the small remaining stumps into a flock of fly agarics, using bowls or basins of the appropriate size as their caps. Now you know exactly how such fly agarics can be made. That's it, the improvisation on the theme of the fairy tale is ready.
Features of assembling wooden tables
If a person undertakes to make something, it means that he knows how to use tools, read blueprints and work with lumber. Such a home craftsman does not need to be taught the basics of carpentry. But it would be worth noting a number of nuances when making a wooden table. These notes will only help in the process.
Let's start with the types of connections. There are quite a few of them, but for a table that you assemble with your own hands, the ones listed below are quite enough.
On the dowels
In this case, the parts are fastened by placing them on an adhesive composition (Fig. 1 – 3).
The nuance is that to make the “cylinders” that are inserted into pre-drilled “channels”, a tree of a denser structure than the table elements is taken. This is what ensures the strength of the connections. Before installing them, chamfers are removed from the edges of the dowels and holes.
These round sticks are available for sale in any furniture showroom in several sizes. Turning them, even if you have a carpentry machine, is a waste of time. It is not recommended to purchase plastic dowels for the table; they are used for detachable connections. For example, frame furniture (walls, multi-level shelving, etc.).
You should not use nails to fix table elements (Fig. 4). Metal and wood differ in the degree of thermal expansion. Such a connection will not last long - it will begin to “shatter”, especially if the table is intended to be installed on the territory or in an unheated room.
On the kings
It is advisable to make such connections if the table either has to be disassembled periodically, or without this it is impossible to move it through the doorway. Although not all drawers require dismantling the structure. The most commonly used options are shown in the figures.
Bolted
Such connections are used mainly for garden furniture or those installed in extensions; for utility tables. An example is shown in the figure.
The nuance of working with fasteners
In order for the self-tapping screw to be easily screwed in and “go” in the desired direction, a hole is first made at the point of its installation using a drill with a diameter slightly smaller than the fastener leg. The main thing is to maintain the coincidence of the axial lines, that is, to prevent skew. In this case, to “plant” the screw, you can do without a screwdriver.
Features of wood processing
Everyone knows that a plane is used first, an abrasive with a large grain, and then a fine one. But sometimes it turns out that the last stage, polishing, has to be done many times. Much depends on the type of wood and the degree of drying. After applying the first layer of varnish, the fibers may “stand up”. Nothing wrong with that. You should wait for the workpiece to dry and repeat its processing with abrasive. The work is painstaking and takes time. But it is precisely this method that can bring “problem” wood to ideal “smoothness.”
To eliminate the risk of injury to a person, all edges and corners of the table should be slightly rounded.
Features of external decoration
- Minor defects in the form of cracks and chips are eliminated with putty.
- Once sanding is complete, all wood dust must be removed. In this case, a regular household vacuum cleaner with an appropriate attachment will help out. It is recommended that after such cleaning, wipe the entire table with a slightly damp cloth, let it dry and repeat removing any remaining dust. After this, you can safely start applying stain or varnish - there will be no “pellets” on the wood.
- You can add originality to the table not only with the help of curly cutouts, an unusual shape of the tabletop or legs, a combination of textures of different species, and so on. One of the good options is artistic painting.
And finally. The work of independently making something out of wood (for example, a table) is just the initial stage of mastering the skill of a “designer-assembler”. Having developed technologies and techniques on wood and acquired the necessary skills, it is enough to simply switch to other materials - metal, plastic, glass. So the benefits of a wooden table made even according to the simplest drawing (besides the pleasure of work and money saved) are obvious - time not wasted.
What can be made from old stumps?
Human fantasy is truly endless! Sometimes you surprise yourself - where do ideas come from? Moreover, even the most ancient thing can be used if desired. So it is with an old stump or snag, which not very enterprising people will most likely throw out or burn. But don’t rush, because you can give it a second life. You ask how? And we will answer - very simply!
An old stump can become furniture, which is so necessary in the garden, or part of it, for example, a chair for children and adults, which depends on the size of the stump. If it is tall, then you can use a chainsaw to cut out a part so that you get a back, and if the stump is also very large in girth, then you can make armrests and you will have a large chair.
Small, low stumps are perfect for the playground. The upper cut needs to be cleaned and sanded; a colored design can be applied on top with paints.
The chair immediately suggests making a table, where it is so pleasant to drink a cup of tea under a spreading apple tree in the shade. Our stump can become both a support for the tabletop and the table itself, if the size allows. In the first case, you must first level the surface of the stump and treat it with special impregnations that will prevent it from rotting.
Then on the sides, parallel to each other, we nail two planks, and on them we nail two more perpendicularly. After that, we knock the boards into a tabletop of any shape you like, and fasten it with nails to the planks below. This is one of many options. To ensure that the product serves you for a long time, coat it with varnish.
You can also make other DIY tree stump crafts that can be used as garden sculptures. For example, a bright fly agaric will become an accent on a green lawn or under a spreading bush.
The stump will be the foot of the mushroom, and make the cap from an old bowl, which must be covered with red spray paint, and when it dries, paint white spots. You can also paint the leg and even draw a face on it and thereby revive the fly agaric. Thus, you can make not only fly agaric, but also other mushrooms.
With a little imagination, you will have a one-of-a-kind stump sculpture.
Also, a stump can become a pedestal for any sculpture, a plant in a tub, and even a barrel of water for watering the garden.
And what beautiful containers for plants can be made from stumps! To get a flower pot, you just need to remove part of the core, add drainage (expanded clay) and fertile soil and plant the plants. The young will look very beautiful, for which about 4 cm of soil is enough.
And if the stump is large, then it can be used as a flowerpot and a pot of flowers can be inserted into it. Or cut out the middle to a depth of 25-30 cm and arrange a real mini-flower bed.
To do this, again make a drainage layer of 5-10 cm and pour about 20 cm of fertile soil. And then you plant various plants.
Climbing species (ornamental strawberries, petunia, nasturtium, etc.) will look beautiful in combination with low-growing annuals and annuals. Such a decorative element will be an excellent addition to larger landscape compositions.
Self-production
Simple options
Even a novice summer resident who does not have too much experience in working with carpentry tools can make wooden crafts for the dacha with his own hands. Naturally, you need to start with simpler options, and then you can move on to monumental products that will become the central element of the landscape design of your dacha.
The manufacturing instructions below give only general direction. Otherwise, you should rely only on your own taste and sense of style. Don't be afraid to experiment.
Perhaps in the future your wooden sculpture will be a role model.
- The simplest option is plywood garden crafts. On a sheet of suitable size, you can draw out individual parts of a pony, donkey or goblin, cut them out and tie them together using strong twine.
- Another idea is small branches of fruit trees. They are suitable for making wall or floor planters. In this way you can make pots for house plants with your own hands. In this case, it is advisable to cover the interior space with plastic film to avoid soil spillage or insert plastic containers there.
- Having gained experience in working with a manual or electric jigsaw, you can begin making more complex crafts. Carefully transfer your chosen design onto the plywood and carefully cut it out. The finished wooden sculpture is sanded with sandpaper, cleared of sawdust and coated with varnish or paint to protect it from adverse environmental conditions.
- There are other DIY plywood crafts: for your dacha you can make not only garden sculptures, but also figurines that look natural in the garden. For example, plywood bunnies will be an unexpected detail decorating a carrot bed. The procedure for making them is simple: draw an outline and cut out the shape using a jigsaw.
Complex designs
For those for whom making country wood crafts with their own hands has already become a kind of hobby, you can offer more complex options - making a mill or a wooden well. Here, in addition to your desire, an accurate mathematical calculation is necessary, otherwise the cut out parts will be impossible to fit together.
You can also offer a simpler option:
- We saw planks of the same length, which will be the basis for the mill (you can use small blocks of suitable cross-section).
- We take two sticks and place them parallel to each other at a distance slightly less than the length of the element itself.
- The next two elements are placed on the laid planks (perpendicularly) (the whole process is somewhat reminiscent of building a log house only on a smaller scale). You can fasten the parts to each other using nails or glue.
- Having constructed a structure of the required height, we begin to build the roof. To do this, take four small blocks and connect them in pairs to form a ridge. Pieces of ondulin left over from the construction of the house can be used on the roof. Then the design will fit best into the landscape design of the site.
- The material for the blades will be two or three planks, fixed at an angle like an aircraft propeller.
- You can decorate the structure with a decorative climbing plant that will entwine one of the walls.
The well is made in a similar way. In this case, you can complement the composition with a miniature bucket and a bench. By fencing all this off, you will get a beautiful and unusual playground for children.
Do not forget that the wood must be treated with antiseptic compounds, varnished or painted. This will extend its service life and make the crafts more attractive.
Flower garden made of chopped logs
Just decorating your area with flowers is, of course, great in itself. But if the flowers are placed on a tastefully made chopped flower bed, then your landscape design will take on a completely different, unique and incomparable look.
Flower girl made of logs “Myrtle” Art: 019 Price: 20,000 ₽.
Buy online
Chopped set
Chopped set “Razdolye” table and two benches
Art: 008/2 Length 2 m. Price: 70,000 ₽ Art: 008/3 Length 3 m. Price: 75,000 ₽ Art: 008/4 Length 4 m. Price: 80,000 ₽
Buy online
Chopped set "Relax" two sofas and a table
Art: 009/2 Length 2 m. Price: 70,000 ₽ Art: 009/3 Length 3 m. Price: 75,000 ₽ Art: 009/4 Length 4 m. Price: 80,000 ₽
Buy online
Chopped set “Compromise” table and two benches
Art: 010/2 Length 2 m. Price: 70,000 ₽ Art: 010/3 Length 3 m. Price: 75,000 ₽ Art: 010/4 Length 4 m. Price: 80,000 ₽
Buy online
Chopped set “Three heroes”
Art: 011 Price: 80,000 RUR
Buy online
Log houses for hygienic zone
In a private household, one cannot do without a delicate place for privacy - a log house for a hygienic zone . Our miracle log house clearly proves that “yard amenities” can be not only practical, but also pleasing to the eye, since it will serve as an integral part of the landscape, because you probably want to have a beautiful hygienic area that would complement and not spoil the landscape.
Log cabin for toilet
Art: 015/1 4 Walls Size 1.5x1.5 Price: 50,000 ₽ Art: 015/2 Five-wall 3x2 Price: 70,000 ₽
Buy online
Log gazebos of any size
How can you characterize log cabins made of wood in one word? Modernity. Yes, exactly, since chopped logs are ideally combined with all types of modern finishing materials used in construction. Log gazebos are a great opportunity to stand out and provide your yard with not only convenience, but also beauty.
Log gazebo “Oasis” Art: 018 Size: 3x3 Price: 70,000 ₽
Buy online
Chopped sandboxes
When purchasing a sandbox, first of all, we should not forget about the baby’s health; the sandbox must be made from harmless materials such as chopped logs - an environmentally friendly material that creates a microclimate beneficial to the child’s health. By buying a chopped sandbox, we show our children our love for them. It’s as easy as shelling pears - order a chopped sandbox , place it in your dacha, pour in sand and give your baby a lot of fun and a lot of positive emotions. A log sandbox is a place for children where they have a real opportunity to play as adults, planting, watering, and hilling their “sand garden” without damaging the real beds. Playing in the sand develops tactile sensations and motor skills. Having mastered how to scoop up sand with a scoop and pour it into molds and a bucket, kids very quickly learn to eat with a spoon. A sandbox for a summer cottage develops the imagination of preschool children and evokes a desire to create. By drawing letters in the sand, you can learn the alphabet easier. A chopped sandbox is both pleasant and useful!
Sandbox, chopped from a log “Happy Childhood” Art: 016 Price: 90,000 ₽
Buy online
Children's log house with sandbox 1.5x3 “Little Princess” Art: 017 Price: 70,000 ₽
Buy online
Chopped benches
Chopped bench “Friendship”
Art: 004/2 Length 2 m. Price: 25,000 ₽ Art: 004/3 Length 3 m. Price: 30,000 ₽ Art: 004/4 Length 4 m. Price: 35,000 ₽
Buy online
Chopped shop "Granny"
Art: 005/2 Length 2 m. Price: 20,000 ₽ Art: 005/3 Length 3 m. Price: 25,000 ₽ Art: 005/4 Length 4 m. Price: 30,000 ₽
Buy online
Chopped bench “Prelest”
Art: 006/2 Length 2 m. Price: 25,000 ₽ Art: 006/3 Length 3 m. Price: 30,000 ₽ Art: 006/4 Length 4 m. Price: 35,000 ₽
Buy online
Chopped bench "Aurora"
Art: 007/2 Length 2 m. Price: 25,000 ₽ Art: 007/3 Length 3 m. Price: 30,000 ₽ Art: 007/4 Length 4 m. Price: 35,000 ₽
Buy online