Curtains are a familiar detail that gives logical completeness to any interior. The choice of drapery to decorate window or door openings raises the problem of choosing a method for attaching it. Let's figure out what options for attaching curtains to the cornice exist, and in what cases they are used. Read on to find out what features different mounts have and what styles they are suitable for.
Window decor in the living room interior Source hzcdn.com
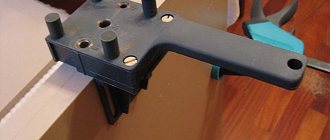
How to attach roller blinds to plastic windows
Accessories for roller blinds
Important! For installation with drilling you will need: tape measure, level, simple pencil, sharp knife, drill, screws, screwdriver. We offer you to see what the design of a roller blind looks like and where it can be attached.
Methods for installing roller blinds
Step-by-step instruction:
- Determine where the curtains will be placed.
- Mark the locations of the grooves.
- Drill holes in the designated places and attach the brackets.
- Mount the mechanism with the chain on one edge of the shaft with the blade.
- Check the functionality of the chain system.
- On the opposite side, insert a limiter into the shaft pipe.
- Secure the strip in the grooves and secure the ends of the pipe with clamps.
- Check functionality.
Installation method for roller blinds with drilling
Which folding mechanism to choose
Manufacturers of window accessories typically offer standard systems that include manual chain mechanisms, or more innovative automated systems. The latter are somewhat burdensome for the pocket, so there is a “Solomon solution” - semi-automatic roller shutters.
Gradually, a spring mechanism is gaining more and more popularity, which allows you to adjust the level of installation of the canvas with one pull. This system is especially suitable for families with small children because it does not expose them to the risk of injury from the sudden lowering of the roller shutter or chain. The “smart” system is characterized by ease of installation in two stages. Installation of a self-folding mechanism allows you to quickly open the window towards the light without causing any noise.
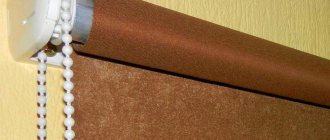
How to attach roller blinds to plastic windows without drilling
If the width of the sash allows, you can mount the brackets on hooks. During installation, check that the latches do not interfere with the movement of the sashes when opening and closing.
Procedure:
- Secure the brackets with hooks at the same distance from the edges of the sashes.
- Place a plug on one end of the shaft tube and secure it in the bracket.
- Hang the chain mechanism on the opposite end of the pipe.
- Insert the plug and then secure the structure.
Installation of roller blinds on hanging brackets
Material Density
Differences in translucency and transmission capacity are ensured by the density of the material. According to this indicator, the canvases are:
- transparent - decorative blinds that diffuse the flow of sunlight. Combined with drapes or curtains;
- dimout - partially transmits the sun's rays, retaining heat. Curtains provide high-quality shade for offices, living quarters, winter gardens or greenhouses;
- blackout - models are completely light-proof, so they are ideal for ceiling or attic blocks. Look good in a bedroom, nursery or home theater;
- day-night – systems with transparent and dense panels. Users can choose the darkness as desired without opening or closing the canvas.
Advice! When purchasing blackout systems, consider quality lighting.
How to attach roller blinds to plastic windows without drilling using tape on a blind window
To mount the structure on the sash, you need to purchase special side brackets with a gear. They are easily glued to the surface using adhesive tape.
Step-by-step algorithm:
- Apply duct tape to the back of the groove plate.
- Insert the plates into the side brackets.
- Mount the lifting mechanism onto the gear.
- Secure the structure to the brackets.
Installation of roller blinds on a blind sash
Possible installation errors
Problems that are often encountered:
- Incorrect location of brackets.
- Violation of the geometry of the structure: distortions and waves appear when the canvas moves.
- Damage to the plastic profile when installing curtains with screws.
- The roll structure has been assembled incorrectly, causing the fabric to move with difficulty.
Roller blinds can be glued or attached with self-tapping screws. Each method is selected under certain conditions. For example, self-tapping screws are used inside the opening, on the wall and ceiling. To fix the structure on the frame or sash, choose the mounting option using adhesive tape.
After installation is completed, it is allowed to attach plugs. It is possible to attach such curtains using clips. They are hung through the doors from above.
How to install day-night roller blinds on plastic windows video
Day-night curtains are made using innovative technology that allows you to adjust the degree of illumination. There are several classifications of products.
Types of products by type of control
| Control type | Characteristic |
| Chain | The mechanism is equipped with a plastic chain, when you try to pull it, rotation is activated. If you release the chain, the blade will lock in the desired position |
| Remote | Such products are equipped with an electric drive. Control is carried out from the remote control |
| Spring | Curtains must be fixed manually using a special hook or ring |
There are several options for installing such structures. We offer detailed video instructions that will help you succeed the first time.
Installation and assembly of roller blinds day-night
Briefly about the main thing
Correctly selected curtains transform the interior, emphasize style and add coziness. The method of attaching the decor also plays a role in this transformation. The type of fastener is determined by the chosen cornice, which, in turn, depends on the interior style.
For each type of cornice, there are several types of fastening, which greatly simplifies the task of choosing. All types of fasteners have their own scope, advantages and disadvantages. When choosing fasteners, they take into account what fabric it is intended for, and also consider whether it fits into the style of the living room, bedroom or office.
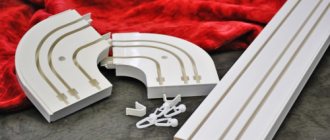
How to attach roller blinds with guides to plastic windows
Models with guides are products equipped with plastic or string structures that facilitate a tighter fit of the canvas to the surface of the window. The structures can be of an open type, when the shaft with the canvas is in sight. Products with a box are supplemented with a cassette that covers a tube with wound fabric.
You can install blinds using self-tapping screws or special tape. Attach the brackets to the surface of the frame or into the opening in the chosen way, insert the base with the canvas, fix the guides, install the box (if there is one).
Installation diagram for roller blinds with guides
Mounting options
If it is necessary to enhance the attractiveness of window decor and accentuate its style, special attention is paid to curtain fastenings; Their types differ in their range of application and have their own strengths and weaknesses. The vast majority of curtains are mounted on a curtain rod, but they can be hung in different ways.
Ties: a romantic touch
Ties allow you to tie the curtain to the curtain rod; The fastening is secured with a knot or bow. Despite the simplicity of execution, the design of the ties can be different. Depending on the idea, they are sewn from the same material as the curtains, or a different fabric is selected, matching or contrasting. The ties are sewn tightly to the panel or made removable; in the latter case, a spare set is often made.
Two-color ties Source wixstatic.com
Often the role of ties is played by ribbons. Frivolous, romantic fasteners are used in vintage, country and Provence style designs. Casual ties fit perfectly into the shabby chic style. They can be modified for eco style by replacing the fabric with coarse cord made from natural hemp.
Air ribbons, cords and fabric strips are suitable for attaching light curtains made of light fabrics. Typically, such fasteners are chosen for a nursery or bedroom. The heavier the curtain, the more ties you will need, and the wider they will have to be made.
The advantages of ties include their bright decorativeness and noiselessness. A separate plus is that you don’t have to remove the curtain rod to remove (or hang) the curtains. The fastener also has disadvantages. It is not suitable for dense, heavy curtains, and with light curtains it is difficult to move along the cornice. Hanging curtains becomes a time-consuming task; the more ties, the more painstaking handwork.
On strings Source blogspot.com
See also: Catalog of companies that specialize in interior redevelopment
Loops
Decorative loops are made from strips of fabric; This is one of the most common hanging methods. The loops are traditionally wider than the ties; depending on the characteristics of the fabric, the width ranges from 5 to 20 cm. The loops are tightly attached to the fabric at both ends. There is an alternative - sometimes they are decorated with a fastener with a button, Velcro, clip or button.
Loop fastening is a universal technique. It is suitable for use in cozy, home interiors, for curtains of light and medium weight. Hinges cannot be found in a solid office or a classic living room, but they will fit perfectly into Scandinavian and modern style.
Loops on curtains in a nautical style Source pinimg.com
Decorative hinges are valued for their versatility: they are silent, can withstand significant weight, and can be easily removed from the cornice. The informal appearance of hinges limits their use in classic styles. Fabric loops are difficult to move and distribute along the cornice. If you want to remove or hang curtains with loops that do not have a fastener, you will have to remove the curtain rod.
Rings and loops on a pipe cornice Source pro-mebel-textile.ru
Eyelets
Under the name are hidden rings of metal or plastic that cut into the upper part of the drapery. A common method is when the curtain is strung on a cornice using grommets, or less commonly hung on hooks.
Eyelets are unusually decorative, but are relatively massive and are not suitable for use on light fabrics. Their area of application is heavy curtains, where they help form uniform folds.
Eyelets in a modern interior Source miro.medium.com
Eyelets are suitable for discreet interiors of different directions: minimalism, classic, retro; they are chosen for window decor in the living room, office or bedroom. Curtains with metal rings look discreet and elegant, so they look good in a loft interior.
Eyelets are attractive because they can withstand significant weight, while the curtains easily slide along the cornice and are easily distributed in beautiful folds. The downside is the inability to use eyelets for light fabrics and tulles. Also, curtains with grommets are quite noisy, and you have to remove the curtain rod to get to them.
Thick curtains with eyelets Source modernplace.ru
How to hang roller blinds with fishing line
Curtains for plastic windows are often produced with string guides. The fishing line helps to avoid the movement of the canvas during closing and opening of the doors.
How to attach roller blinds with fishing line:
- Connect the grooves and holders.
- Insert the strings into the bottom holes of the holders.
- Glue the grooves to the frame or mount them with self-tapping screws.
- Install a chain mechanism on the tube with the blade and install plugs.
- Fix the shaft in the brackets.
- Attach line tension devices to the bottom of the sash.
- Pull the strings, press them with clamps.
Installation diagram for roller blinds with string guides
Structure management
Roller curtains can be controlled mechanically. Manufacturers offer the following devices:
- cord with chain. The simplest adjustment is to select the position of the material with a cord on the panel. You will need to lift, fix in the desired position and lower the roller blinds manually. The chain cord can be placed on any side of the mechanism. If handled carefully, the system does not sag and can be used for a long time;
- spring holder. The device is suitable for classic sun protection options and curtains that open from bottom to top. The control process is implemented by automatically fixing the material at the desired level. Spring mechanisms are only suitable for curtains without constant adjustment. Otherwise, they may stretch and weaken. Problems with fixing blinds lead to expensive repairs to the holder;
- electric drive. Despite the complexity of the design, the system is easy to use. The electric motor allows you to control the canvas on high windows, ceilings, and sloping attic walls without going near it.
Advice! Before choosing a control system, test it in a store.
Problem five – they were embarrassed to use “level”
I never cease to be sincerely surprised how often people neglect the building level during installation. If you are sorry to spend just a minute using a level to set the mounting points of the holders exactly horizontally, be prepared for serious disappointment.
Even I, a cat who didn’t study geometry at school, understand that violating the straight angle leads to skew of the shaft and roll. A deviation of a couple of degrees is not critical, but if the displacement is significant, the system will stop working correctly. The owner of the product will both hear and see this. Firstly, the shifted parts of the lifting mechanism will not touch correctly, producing a loud, unpleasant noise.
Secondly, when lifting, the canvas moves strictly vertically. But due to the displacement of the shaft, the roll will begin to wind unevenly, sliding towards the holder. As a result, the interior will be replenished with a sloppy, crooked curtain that catches the eye of everyone entering the room. And if the fabric “floats” to the drum control unit, then as it is wound, the drum will “snatch” it - and so on every time the curtain is raised. Every time you have to manually correct the “bitten” curtain, which will quickly be ruined. And this sad story begins with the fact that someone was too lazy to attach an ordinary slatted level to the wall...
How to install closed roller blinds?
Unlike the installation of open-type roller blinds, this type has a number of differences. In addition to the fact that you need to secure the brackets, you will need to attach the guides and the box. For this you need regular double-sided tape.
First, let's check the package. We thoroughly degrease the mounting area with white alcohol or another liquid, and pay special attention to the places where the guides will be attached. We determine the left and right guides, apply them to the glazing bead, and make sure that it fits snugly. If necessary, we shorten the guide with a special knife, from above, in order to maintain a neat industrial edge.
We mark with a marker at the top the points where the guides will be located. Remove the protection from the adhesive tape of the protection box and the cover on the sides of the box. We apply it to the marked points and align the box with them. We unwind the curtain to its full length, make sure that the roller blind covers the entire space of the window and does not warp.
We mark the attachment points and drill holes. We secure one side of the box, check that it is parallel to the glazing beads, and secure the box on both sides with self-tapping screws. We put the covers on the sides. We remove the protection from the adhesive strip and glue the guides along the marks made.
You also need to take into account that the brackets are usually made of plastic. Therefore, when tightening the screws, it is important not to overpress them so that they do not burst during operation.
If the installation is carried out scrupulously, following the basic rules, this is a guarantee of long-term and trouble-free operation of the systems.
Roller blinds for windows
The product performs the function of curtains and is a necessary and necessary attribute. There are a wide variety of models of roller blinds, you can choose them for any interior of the room - both residential and office. The mechanism is so simple that even a child can handle it.
The curtain fabric is treated with a special compound, thanks to which direct sunlight does not enter the room. This composition makes it possible to use the canvas for many years.
It is best to buy this accessory in a store , where experts will help you choose not only the curtain material, but also a reliable fastening system. If you fail to take the correct measurement yourself, the company’s representatives will do it correctly so as not to have to redo it in the future.
What will we install?
Before assembling and installing roller blinds, make sure they are the right size for the window.
For installation, inexpensive fabric roller blinds from the Gardenia Roleta Light brand (Poland) were purchased. The width of the purchased curtain is 120 cm and the length is 170 cm. For comparison, the width of the opening was 115 cm, which means that after installation we will get a curtain overhang of approximately 2.5 cm on each side of the opening.
The gap between the canvas and the opening is minimal
The advantage of installing over the opening is a more familiar appearance of the window and ease of maintenance of the glazing. That is, if the roller blinds, the price of which is low, are assembled at the top of the opening, the double-glazed window can be washed completely. When installing the curtain directly on the profile, cleaning may cause some difficulties.
Carrying out installation work
To carry out installation work, you will need the following tools and consumables:
- Water level;
- Ruler or tape measure;
- Screwdriver with electric drill function;
- Drill with a diameter of 6 mm according to the diameter of the fasteners thick;
- A shaped screwdriver or bit for tightening screws;
- Hammer;
- Screws with a seal with a diameter of 6 mm and a length of 60 mm.
Do-it-yourself installation of roller blinds on plastic windows is carried out as follows::
- Unpack the set of curtains and related parts;
- We carefully study the installation instructions printed on the packaging and on the special insert;
- We decide on the location of the panel and the winding mechanism;
The panel can be installed in a roll against the wall or in a roll away from the wall. I recommend moving the roll forward so that there is no gap between the installed curtain and the opening at the edges. The winding mechanism can be installed either on the left or on the right. The choice of location may be determined by ease of use.
Winding mechanism with chain
- We install (simply insert with force) the roll winding mechanism in accordance with the selected side;
If you look closely you will see the grooves into which the plug fits
- On the other side, insert a plug with a protrusion under the holder;
Attention! If you stick your finger inside the roll, you can feel special grooves on the inner surface into which the protrusions on the inserted plugs will fit. Therefore, if the plugs do not fit properly into the roll, do not press hard, but turn them a little around the axis and they will fit properly
Insert the holders until you hear a characteristic click.
- We insert the holders into the brackets (the fully inserted holder will click, and we can make sure that it is inserted);
The installed plug also clicks
- After there is a click, we install the external latch, which also snaps into place when fully inserted;
We insert the brackets with a little force, since they still have to be disassembled
- Temporarily insert the brackets into the plugs at the ends of the roller blinds;
It is important to correctly align the roll horizontally
- We apply the assembled structure to the wall in the form in which it will be installed and mark the external dimensions and holes for mounting screws;
In order for the installed curtain to be positioned evenly, during the fitting process we adjust the roll along the horizon line, applying a spirit level.
An example of how to make holes with your own hands to prevent dust from scattering throughout the room
- After the markings are made, we drill holes, insert screw seals into them and drive them in so that they are flush with the surface;
- We fasten the brackets, tightening the left one completely, and just tightening the right one;
- We insert the roll into the brackets, first into the left and then into the right;