by Alexey | Tools | Wednesday, December 15, 2021
| Follow Make-Self.net on Facebook and be the first to read our articles. |
A router is a very useful tool in woodworking. It can be used for shaping wood, drilling various holes, cutting grooves, finishing edges and much more. It's hard to imagine any complex project without it.
A router table may be the most important tool a carpenter can use.
Most people use routers as portable tools. While this is a viable option, a table-mounted router is safer to use and can perform its functions on a whole different level. If you're looking to build your own router table yourself, you've come to the right place. We've rounded up 13 of the best DIY table designs.
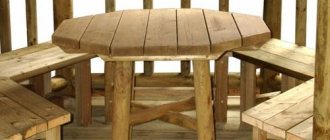
Folding milling table
This briefcase-sized design transforms into a fully functional router in minutes and folds up for storage just as quickly.
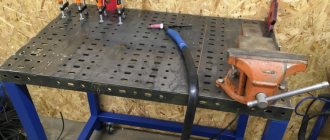
A full-size router table can be a great solution—if you have the space. But if you only use the router occasionally or need a mobile solution, this might be a good solution. This benchtop tool provides all the precision and stability you'd expect from a full-size router table.
Making a countertop
If you watch a video on creating a milling machine, the first step is to take a piece of plywood and mark on it the dimensions that fit the shape of the table. It is recommended to mark a minimum of 80x80 cm.
If you make a small table, the wooden elements will constantly fall. Then you need to hold the ruler with your left hand, and cut off the excess part with your right hand.
The second step is to take a pencil and make a mark where the hole for the cutter will be located. Most recommend making the hole one-third the width from the longitudinal edge. Then drill a hole using a crown of the same diameter.
The third step is to attach the tool to the hole and trace its base with a pencil. You need to make sure that the router does not wobble to the side.
There will be another 3 steps allocated to the seat. To create it, you need to use a router to make a cutout 5 mm deep according to the dimensions drawn in pencil.
Be sure to check the fit so that the machine does not wobble. Later, repeat the manipulation only on another piece of plywood, only with a difference of 15-20 cm from the base of the router. When you have 2 holes on your hands, you need to connect them together, place them on the table, then insert the router into them.
The seventh step is to make small grooves so that the fonts can be placed in them, keeping the router in balance. The eighth step is to connect the elements and check that they are securely fastened. After adjustment, tighten with self-tapping screws using a drill. The last step is to take 2 pieces of plywood and place them at the level of the font so that the router stands securely.
Spacious milling table on wheels
If you're a fan of Ana White, then you know that she has everything you could ever want to build.
It's no surprise that she has a great plan for helping you build a great router table. It has ample storage and work space. I hope you enjoy it as much as we do.
Features of a manual circular saw
The tool is based on an electric motor with a saw blade mounted on a shaft. Models from different manufacturers have approximately the same design.
The products are equipped with many additional accessories:
- Start button with rotation speed controller;
- Protective casing;
- Retractable parallel stop;
- Regulators for cutting depth and tilt angle;
- Sawdust ejection pipe.
The saw blade rotates towards the base plate, towards itself. The main rule when working with a manual circular saw: first start the engine so that the disk begins to rotate, then carefully bring it closer to the surface to be treated.
The tool is convenient when performing the following work:
- Sawing boards, plywood, particle boards;
- Cutting timber, cutting slats;
- Recesses for groove tenons;
- Edge processing, chamfering;
- Cutting waste lumber for fuel.
The power of the device is selected based on needs. For short-term work in domestic conditions, processing workpieces up to 4.5 cm thick, a power of up to 1.2 kW is sufficient. Semi-professional tools have a power of 1.8 kW and cut workpieces up to 6.5 cm thick.
Professional equipment with a power of 2.2 kW can withstand long-term loads and leaves a cut of up to 8.5 cm. Woodworking enterprises use saws with a power of up to 5.5 kW; their weight reaches 100 kg.
Professional milling table at half the price
This table includes all the best features found in store bought router tables at half the price! We have had the opportunity to study and use most of the router tables available on the market. Based on this experience, we developed our own fully functional and easy to assemble desk. The detailed project can be viewed here.
Frequently asked questions
What should be the height of the table?
This is an individual indicator, for each master it is different. The average height is 1 m, but this value is recommended and is not a strict requirement.
Is it possible to make a table top from a wood panel?
Yes, you can. This is a good choice of material, but you need to ensure that the tabletop is level. The best option is processing on a wide planing machine, or milling with the appropriate equipment.
Is it necessary to have a movable stop?
Yes, this is required. Otherwise, it will not be possible to adjust the depth or height of grooves, quarters and other processing options for workpieces in the manufacture of different types of moldings;
What should the stop height be?
As a rule, the height of the vertical bar is limited to 20-25 cm. You can make the emphasis less high. The overhang of the cutter rarely exceeds 6-7 cm, and the remaining height is needed only for rigidity and fastening of additional devices - clamps, additional pads, etc.
Is it possible to get by with ordinary legs connected by a drawstring belt as a base?
Yes, you can. Moreover, some users install the tabletop on sawhorses and quite successfully use it for its intended purpose. What matters here is the immobility and stability of the base, and the design and appearance are chosen at the request of the owner.
Wall cabinet for router
This compact storage cabinet does double duty as a top-notch router table while also holding all your accessories.
With plenty of storage and a built-in desk, this cabinet allows you to knock two important items off your list. And here's what's interesting: it takes up very little space. The secret to its compactness is that it folds out when you need it and retracts when you're done.
Design requirements
Since the table is a regular plane, there are few requirements for it. However, they are all fundamental and require mandatory compliance:
- smooth surface without depressions, dents, deviations from the plane;
- rigidity, lack of pliability or mobility when pressed;
- the correct size, ensuring safe operation and ease of control of the machine.
These are the basic requirements.
However, when making a table, additional requirements often arise:
- the presence of a reliable supporting structure combined with storage for cutting tools and equipment;
- easy access to elements for installing and adjusting the cutter extension;
- the ability to adjust the height of the table to perform different procedures;
- ease of installation and removal of the router from the table;
- easy access to the machine start button, if necessary, a backup button for emergency shutdown of the machine;
- in some cases, the possibility of quick dismantling to free up space in the workshop.
Only general requirements are listed. Many owners create tables of their own design, designed to perform certain, sometimes very specific, operations. For each owner, the list of requirements can be significantly expanded or reduced, depending on the size or configuration of the workshop, the nature of the intended work and the level of training of the master himself.
Milling small parts
Several router table accessories make it easy to achieve safe and accurate results.
The problem with small workpieces is that there are large holes in the tabletop, and the stops can cause small parts to get stuck. This can ruin the project and be unsafe. This router table attachment holds small parts and allows the workpiece to be pushed past the router bit for precise and safe cutting.
Follow us on Pinterest for more interesting articles.
Useful short videos from Make-Self.net
Base
The base of the machine must be reliable and motionless. From a design point of view, it does not matter in what form it is implemented, as long as there are reliable supports. However, users prefer to use the machine base to its maximum advantage. They make a cabinet equipped with compartments for tools and accessories. It is convenient, practical, and allows you to keep all the accessories from the router at hand.
Some users go even further and make one base for different tabletops for hand-held power tools. This option allows for more efficient use of workshop space - working with wood requires the use of a large amount of equipment. If you have several tabletops for different power tools, adapted for installation on one base, you can significantly free up space.
The only requirement for the base is the organization of free space for the router. All other points remain at the discretion of the owner. Strength, stability, immobility - these requirements are met when using a cabinet with doors and drawers. Sometimes it is mounted on wheels so that it can be moved around the workshop without much effort, freeing up space for other machines or for laying out boards on trestles.