However, not everyone can afford it. In this case, we recommend making a tool cabinet with your own hands. This will not take much time, but it will bring satisfaction from the fact that you have dealt with the problem without extra costs.
Material
Before starting work, you need to take care of the materials for work. To design a tool cabinet at home you will need:
boards _
This is the main building material for the cabinet. The best option in terms of price/quality ratio is pine boards. They make the frame of the cabinet. The thickness of the boards is not critical, but experts advise using thicker boards.The tools that you will place in your cabinet will likely be heavy, so the shelves and frame must be durable;
- plywood _ Designed to create the back of a cabinet, as well as partitions for drawers. Exactly how much plywood will be needed depends on the size of the cabinet and the size of the partitions;
- timber _ It is advisable to stock up on beams made of the same material as the boards. The beams are used to create legs or runners on which the cabinet will stand.
Important . Do not use plywood as bottoms for drawers. Plywood sheets are not at all durable, so they will not be able to withstand a lot of weight.
Types of designs
There are several categories of tool boxes, the main difference of which is the design, material of manufacture and size. But if everything is determined with the material, then you need to choose a suitable design. Below are the main types of tool boxes that can be made from metal.
Modular boxes, containers
Table. Classification of tool boxes.
| Product type, photo | Description |
| Cart | Large tool box mounted on wheels. The trolley is designed for moving drills, welding machines and other large equipment. |
| Dresser | A stationary piece of furniture, the design of which consists of several compartments that slide out. It is large in size, so you can store many different sized items in it. |
| Case | Another type of tool box, which is a small box with a convenient handle. Such structures are intended for storing tools designed for minor repairs. The cases are small, so you can carry them with you. |
| Multi-tier box | A small tool box consisting of many compartments of different sizes. The design is intended for comprehensive storage of working tools and parts. If desired, the multi-tier box can be placed in the trunk of a car for further transportation. |
| Open box | One of the simplest types of tool box, which is a small open box with a special handle for transportation. The product can be made of different materials, for example, wood, metal or plastic. |
On a note! When choosing the design of a tool box, it is better to give preference to multifunctional products in which all compartments are closed with lids. Otherwise, small parts may get mixed up during transportation, which will significantly complicate the further operation of the box.
Scheme and drawing
To assemble a high-quality tool cabinet at home, you cannot do without a good drawing. You can create a drawing yourself, but it is better and easier to find a ready-made sketch on the Internet.
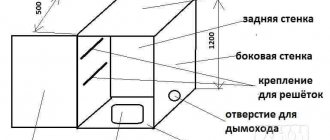
When creating a cabinet for your own needs, you don’t have to worry too much about carefully drawing out the design, but only draw a modest sketch. Preliminarily determine the dimensions of the back and side walls, and also pay attention to the dimensions of the lid and tray.
Advice . When planning shelves, do not forget about the thickness of the boards, which will “destroy” part of the free space.
Be sure to adjust the drawers to the size of the shelves (minus 5-6 mm for freedom of movement). It is strongly recommended to make the boxes removable, which will make working with the tool easier. When designing, it is best to plan to place the tools in the drawers in one row and one layer. This will make working more comfortable and also allow you to create a shallow cabinet.
Addition
The cabinet can be supplemented with lighting
Depending on where the cabinet will be used, you can supplement it with various convenient things, such as lighting. Often garage lighting is not enough to easily find the right tool, so additional lighting will be very helpful. If you understand electricity and do not plan to move the shelf, then you can make automatic lighting.
Place the cabinet in the desired location. Determine the cable length. Using screws, secure to the ceiling or walls. If convenient, you can run it under the baseboard or stove. Then place the lid and close it. After carrying out the manipulations, we proceed to the serial connection according to the “phase-zero” circuit. We do everything with the electricity turned off for safety reasons.
Another lighting option is a halogen lamp. This method is used for large structures. Ready-made kits are available for sale. They include: a switch, transformers, the lamp itself, a connector and the required number of wires. You just need to put everything together sequentially.
LED strip - the simplest lighting option
The simplest and no less effective way is LED strip. It is convenient to use even for an iron cabinet. Such tapes can be purchased as reels, which are sold from 5 to 10 meters, or by purchasing several meters separately. To install such lighting you will additionally need: a power supply, a controller and a wire with a plug at the end so that it can be connected to the power supply.
Connection steps
We connect the block, cable and controller. The wires must be connected by color using a soldering iron. We check the operation of all light bulbs. Using the adhesive side, we attach the backlight in the right places.
Tools and Fasteners
To create your own tool cabinet you will need:
screwdriver _ Select drills of the required diameter for the device in advance;- power saw or hacksaw . One of these tools will be needed at the preliminary stage for cutting boards;
- corners for fastening . To give the structure real strength, use special furniture corners. You may also need hinges, but only if you want to make a cabinet with doors;
- furniture screws and special nuts for them . They must be made of brass. The material does not rust and is highly durable. One of the minuses is the “biting” price of brass.;
- self-tapping screws Useful for auxiliary fastenings. However, you can do without self-tapping screws by using nails. Then stock up on a hammer as well.
Advice . For working with a wood screwdriver, galvanized screws are suitable, not steel ones. Their characteristics are the same, but steel ones are significantly more expensive.
The use of nails when assembling the structure is not recommended. It is no secret that the wood will dry out after a certain time, and the nails will not be able to provide sufficient strength.
Advantages of metal products
Tool boxes are made from different materials, such as wood, plywood or plastic. But a structure made of metal will be more durable. Such products have many advantages, for example:
- resistance of the structure to mechanical stress of varying degrees of intensity;
Metal structures have a number of advantages
- fire resistance (a metal box will not catch fire, like a plastic or wooden one);
- resistance to high air humidity and sudden temperature changes;
- long service life (the original characteristics of the design do not disappear even after many years of operation);
- resistance to rodent attacks;
- the ability to repeatedly disassemble and reassemble the product without outside help;
- quick assembly of the structure;
- ease of maintenance (you only need to occasionally repaint the surface if it begins to rust);
- health safety. The chemical composition of the metal does not contain harmful volatile compounds, so the presence of a metal cabinet in the room will not cause harm;
- relatively low cost of the product.
Mobile cabinet
Note! A metal cabinet can serve in a garage or workshop for many years, so when choosing a product you should give preference to spacious models made of durable metal. Their dismantling and subsequent replacement will cost much less.
Assembly
The initial stage of assembling a cabinet is creating a frame . A frame is assembled from boards, as mentioned above. The boards should be cut to specific dimensions indicated in the drawing. The side walls, bottom and lid are assembled from the boards.
Advice . Make sure there are no wide gaps between the boards.
For assembly you need:
The boards should be joined according to the drawing, and then secured with auxiliary fastening (nails or self-tapping screws).
This type of fastening will not hold the structure under load too firmly, but will significantly facilitate the fastening procedure itself.- Having assembled the frame on the “temporary fasteners”, you can proceed to the installation of the main fastening. Take furniture corners and secure all the joints with them (using self-tapping screws, of course). When the structure is firmly fixed, you can begin to install furniture screws and nuts. For this purpose, the ends of the walls are drilled in the places where the shelves and the lid are attached. Please note that the length of the drill and screw must match.
- The next step is to drill holes for the furniture nuts. They need to be made perpendicular to the already drilled holes in the shelves, roof and bottom. This is the most difficult and responsible stage. Once all the holes are ready, install the main fasteners.
Congratulations, the frame with shelves is now complete!
The next stage is creating the legs . To do this, a beam is attached to the bottom of the frame (only on the reverse side), as if runners were attached. You don’t have to worry about overly strong fasteners - just use cheap self-tapping screws. After this, pre-prepared legs are attached to them in the corners.
The final stage is boxes . They are created by knocking down a frame of the desired shape and size. The bottom is attached to this frame from below. If it is necessary to add shelves, cuts are made on the inside where the partitions will be mounted.
Advice . If the creative passion has not passed, you should start making a cabinet for books or clothes.
Making boxes
A set of small drawers for holding fasteners and other woodworking odds and ends is an optional but very useful option in a carpenter's closet. By making and gluing together a series of simple wooden pieces, you can make the inside of your closet look neater and more organized. To speed up the work process, parts are cut out serially, placing the workpieces in a small stack.
The project cannot be considered complete until the method of hanging the cabinet is determined. Our article on choosing hanging accessories will help you do this simply and without errors.
Conclusion
Now you know how to quickly and efficiently make a convenient tool box. The video in this article will tell you additional information on the topic, and if you have questions, write them in the comments under the review.
Did you like the article? Subscribe to our Yandex.Zen channel
March 7, 2022
Accessories, Tools and materials
If you want to express gratitude, add a clarification or objection, or ask the author something, add a comment or say thank you!