Today, kitchen interiors are equipped with many useful things, among which household appliances play an important role. Modern headsets have the ability to integrate devices, making the room not only functional, but also aesthetically attractive. Among the most popular built-in household appliances is a fume hood. This design has many advantages, but the main ones are space saving and a unified harmonious appearance of the kitchen. Fume hoods were created to hide unattractive ventilation and hood communications. Their meaning is mainly decorative, but in order for the space inside to also fulfill its function, you can equip them with shelves for storing dishes or bulk products. The design of the cabinet matches the set as a whole and externally it is indistinguishable from other modules.
Advantages of built-in hoods
The hood in the kitchen should be located directly above the hob, so the hood will do its job more efficiently - purify or remove contaminated air during cooking. The main advantage of this design is its invisibility, unlike island or classic type hoods. Almost the entire body of the hood is hidden in the wall cabinet; only the lower working part is visible, through which the air enters the ventilation duct or is cleaned using a carbon filter.
Some interiors, due to the small space, cannot accommodate a classic hood, then a device built into the cabinet will be an ideal option. It takes up very little space inside the furniture and allows you to additionally use the space for storing small kitchen utensils. Some fume hoods can be equipped with built-in lighting in the form of incandescent lamps, which ensure comfortable use of the hob at any time of the day.
Installation rules
You need to start installation with the furniture into which the hood will be built. If the cabinet fits in size, then you can continue installation as usual, simply by making the necessary holes in the furniture, but this is not always possible. A small device with parameters of 50-60 cm usually fits in a standard kitchen cabinet.
Before installing the hood, you should carefully study all the dimensions and parameters in order to correctly select the necessary elements and make suitable connectors
If this is not the case, then the kitchen owner has two options: order new furniture or dismantle the cabinet to use a special hood box. The latter option has certain advantages, since the box is assembled separately at the bottom, then the hood is fixed in it, and only after that the entire structure is installed on the wall.
This is what the box in which the hood is installed looks like. The structure is assembled separately, then attached to the wall or furniture, which is more convenient than placing the device directly in the closet
A façade is installed on top of the hood, so the hood looks neat and stylish from the outside. The problem of insufficient space can be solved by using a device of minimal dimensions - 45 cm.
This model can be placed even in a very small closet. But it should be remembered that compact dimensions in this case come at the expense of performance.
It is necessary to take this point into account so that it does not turn out that a suitable-sized hood cannot cope with the required amount of work. If the cabinet fits the dimensions, you need to make a hole in its bottom for the hood, taking into account its size. Sometimes it is more convenient to completely remove the bottom. You will also need to make an opening for the air duct at the top of the cabinet.
In the upper part of the cabinet intended for installing a built-in hood, you need to make a round or square hole for the air duct
It can be round or rectangular, it all depends on the type of duct. Flexible corrugated structures with a round cross-section are often used, but there are also plastic ventilation ducts with a rectangular or square cross-section.
The air duct connects the hood to a hole in the wall leading to a common ventilation duct in an apartment building or directly to the street in the case of a private building. Another cutout will need to be made on the back of the cabinet to secure the device and install the socket.
Once all the necessary openings in the cabinet are ready, you can proceed directly to installing the device. First, the hood is secured in a cabinet or box. In this case, you should make sure that the moving part of the device freely extends to the required width.
Part of the built-in hood extends so that it covers the entire surface of the stove. Only this position will effectively purify the air in the room.
After this, the air duct is attached to the connector at the top of the device using a clamp. Experts recommend making this mount detachable so that it remains possible for simple dismantling. Some craftsmen immediately use sealant, but professionals do not always approve of this decision.
In order for the built-in hood to be positioned correctly in the cabinet, it may be necessary to install an internal vertical partition, which is recommended to be removable
Periodically, the structure will have to be disassembled to clean it from accumulated fat and other contaminants. However, it should be remembered that the connection must be sufficiently tight to ensure effective removal of contaminated kitchen air.
Most often, the hood duct is removed vertically from the cabinet, but sometimes a side outlet through the rear wall is used for this purpose. In this case, the hole is made at the back. You should not make holes “not a peephole”, you should first apply markings.
Some models of hoods are equipped with a convenient template, which greatly facilitates the process of marking the mounting floor for the device. If such a template is missing, you will have to perform the markup in the usual way, i.e. using a tape measure and a building level. The hood must be installed strictly horizontally.
The installation of a built-in hood is usually carried out after the entire kitchen unit has been assembled, so that the entire structure is comfortable and looks neat. Self-tapping screws with dowels are usually used as fasteners for hoods. After installing the hood in the box, a special adapter is installed in the corresponding hole to connect the air duct.
After this, all that remains is to take it out into the ventilation duct. The exhaust duct should be as short as possible in length, since this indicator affects the overall performance of the device. The maximum allowed number of knees is three.
These points should be taken into account at the stage of general kitchen design; it is recommended to install the stove as close as possible to the general ventilation duct of the house. The diameter of the air duct must be the same as the dimensions of the pipe intended for it. Typically this figure is 120 mm or more.
The power cable should be routed upward so that it does not overheat near the hob. There is usually a socket on the back wall of the cabinet
An important point is choosing the correct position for the power cord. It should not pass directly over the hob.
The cable must be secured inside the cabinet, and the socket for connecting it must be installed in the area of the rear wall in which the hood is installed. You can choose another location for the outlet, the main thing is that this part of the device does not overheat when the stove is on.
After all installation work is completed, you should connect the device to the power supply, pull out part of the hood and test its operation. Ventilation of the kitchen space can also be done using an exhaust fan, but if a hood is already installed in the room, the use of additional devices is considered unnecessary.
Size range and design features
In order not to make a mistake when choosing a hood, you need to consider some important points before purchasing. These include: dimensions and design, filters and their number, fan power, control, installation options, additional features. Built-in options are a compact model that can be easily installed in a cabinet located above the stove. The working plane of the hood can be increased by extending the panel provided by the design.
Fume hoods come in different sizes, usually ranging from 450 to 900 mm. The appearance of the device does not play a special role, since the body is almost completely hidden in the furniture. But the issue of functionality and performance is of higher importance. Thanks to the standard sizes, there should be no problems when selecting a hood for a wall cabinet in the kitchen.
The main thing is that the working plane of the hood must correspond to the size of the stove or hob, otherwise its operation will not be as effective. The hood simply cannot fully cope with the cleaning or removal of polluted air.
The distance at which fume hoods should be located from the hob should be at least 750 mm for gas burners and 650 mm for electric ones. Failure to comply with these standards may result in damage to the appliance in the event of overheating from the stove or even fire.
General characteristics
A fume hood is necessary not only to absorb unpleasant odors, but also pleasant ones that arise during cooking. After all, it’s one thing when the aroma of food hovers only in the kitchen, another thing if it permeates the space of the entire apartment. In addition, the hood prevents the smallest particles of fat and food splashes formed during cooking from scattering across the walls and cabinets. The hood draws them into itself, significantly facilitating the subsequent cleaning process.
Any hood has grease filters installed. They are removable and easy to remove and clean. This should be done regularly, because the performance of the device largely depends on the cleanliness of such a filter.
The peculiarity of a built-in hood is that its device is hidden in a cabinet suspended above the stove. It can be either flow-through or recirculation. The operating principle of the first type is that polluted air is discharged through an outlet into a ventilation shaft or, in the absence of one, directly to the street through an additional hole in the wall. Fume hood fans are used to move air.
Recirculation does not require a ventilation shaft. The principle of operation of this system is to purify polluted air and return it to the apartment. For this purpose, the hood is equipped with special filters, most often carbon filters. They purify the air, trap dirt particles, and neutralize odors. The quality of the hood’s operation depends on their parameters. In addition, filters must be changed periodically - once every six months. Air is drawn into the hood from below through a grease filter, on which the bulk of food particles, fats, and dust settle. Then it passes through a system of carbon filters and, cleaned, returns back.
According to the type of design, a built-in hood can be:
- fully built-in;
- with retractable panel;
- visor.
Fully built-in
With pull-out panel
Visor
The first type fits completely into a fume hood. Therefore, the working surface of the hood is equal to the area of its bottom, which, as a rule, is smaller than the area of the stove. For greater hood performance, it is necessary that these two indicators coincide. Therefore, visor models and those with a retractable panel have greater productivity. The visors include an internal device hidden in the cabinet under the hood and a surface hanging over the stove.
The most convenient is the retractable model. When turned off, it is compact and almost invisible to the eye. To turn it on, you need to pull out the panel located above the stove. It may be equal to the area of the slab, or it may be larger.
Depending on the type of control, there are push-button or touch models. The latter are more modern and easy to use. You can turn it on, off, and regulate its operation with the slightest touch, say, with the edge of your palm. This is important because hands are often dirty when preparing food. But such a system requires more careful maintenance. Even fingerprints are visible on the touch panel, and it is easier to disable it than a push-button panel. If we talk about standard characteristics, they can be seen in the table.
| Standard size chart | 50x60x90 centimeters. |
| Fan power (performance) | For a small apartment you will need at least 210 cubic meters per hour. |
| Type of filter used |
|
| Noise level | A noise level of up to 50 dB is considered comfortable. |
| Additional functions |
|
Types of filters
In a kitchen unit, the hood usually has double cleaning using carbon and plastic or aluminum filters. The former neutralize odors released during the cooking process. The latter collect particles of fat, soot, dust and other contaminants. Plastic cassettes contain filters made of padding polyester or non-woven fabric, but there are also metal options that require cleaning when they become dirty.
The fume hood can operate without using a fine carbon filter in its design. But at the same time, a grease filter is necessary so that contaminants do not settle on the hood mechanism itself. There are also budget models that operate without filters at all. Their job is to remove air through the ventilation duct, while taking in clean air from the outside.
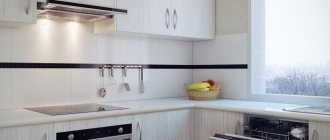
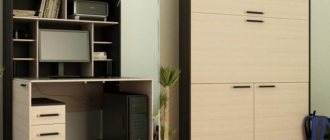
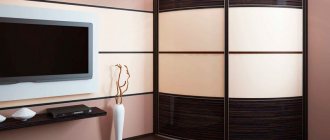
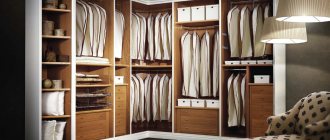
Photos of kitchen units with built-in hood
<
>
A cabinet for a kitchen hood will allow the housewife to cook with maximum comfort, and a large selection of model designs will not only hide the device, but also introduce new elements into the kitchen interior and bring to life the most daring design solutions.
Fans
An important component of any hood is its performance. It directly depends on the number and power of fans installed inside. The number indicating productivity is calculated using simple mathematical operations. It is necessary to take the volume of the kitchen space and subtract from it the total volume of furniture and household appliances located there. The resulting number should be multiplied by ten.
Many modern hoods are capable of purifying air up to 700 cubic meters. m per hour. It must be remembered that the higher the performance of the device, the more noise it creates during operation.
This must be taken into account when purchasing a hood, and be guided by the kitchen area. In a small space it is better to use a hood with a lower capacity, but in a studio apartment you can place a more powerful device.
Deciding on the size
The larger the area of the fume hood, the higher its performance, and accordingly, the more air it can purify. When choosing the size of the hood, it is necessary to take into account the area of the kitchen; the larger it is, the more powerful it is, the larger the design should be.
In small rooms, as a rule, a hood that matches the size of the kitchen stove is sufficient. Usually this size is 60 cm. In general, the parameters of hoods vary from 45 cm to 90 cm.
The smallest ones, 45-50 cm, are the least productive. Powerful 90 cm, as a rule, are equipped with a retractable panel and cover the maximum working space of the kitchen. Such hoods require more space for location, but will provide maximum protection from food splashes, grease, dust, and kitchen odors.
However, usually the dimensions of the hood coincide with the dimensions of the stove. Kitchen cabinets are made in the same size. The kitchen cabinet, located above the stove, is 60 cm long and leaves free space for the subsequent arrangement of the hood. The choice of size also depends on whether the kitchen is already equipped or planned from scratch. When the stove and kitchen unit are installed, in any case you will have to adjust the hood to the existing dimensions. That is, install it in a 60 cm cabinet.
When planning a kitchen from scratch, you can calculate in advance all the dimensions of furniture, household appliances, including hoods. In this case, they can be absolutely anything - at least 80 cm, at least 50. The main principle that should be followed: the ideal size is one when the exhaust surface covers the area of the hob, and not vice versa.
Device management
The fume hood and its operation can be adjusted using a built-in electronic module, the panel of which is located on the front of the device. Management occurs in several ways:
- using buttons, each of which corresponds to its own operating mode;
- a slider that moves along the panel;
- thanks to the touch panel. This control is completely electronic; you just need to set the desired operating mode by pressing the screen.
A fume hood with a touch panel is more modern and functional, as well as a convenient option, unlike the others. But its price is significantly higher than models with mechanical control.
General requirements, rules and standards for installing hoods
There are general rules that should be followed during the installation of any exhaust systems. The main thing is compliance with the manufacturer’s requirements and established standards. The instructions for any model always contain recommendations on the optimal distance to the stove. As a rule, you can vary these parameters within 10 cm depending on the height of the housewife or the characteristics of the furniture design. The standards were developed to prevent fires to maintain fire safety. The width of the hood must match the width of the hob. If the suction surface is smaller than the area of the stove, effective air purification will not occur.
Installation features and height above the gas stove
Of all types of stoves, it is the gas stove that puts forward the most serious requirements for the installation and placement of the hood. It is unacceptable to ignore standard recommendations, since their failure to comply creates a real threat to the lives of both the individual family and the other inhabitants of the building.
Let's start with the fact that using a gas stove implies the presence of an open fire in the room. Any devices and structures placed above them must be removed from the surface at a distance of 75-85 cm.
When installing the air duct, you must remember that it is unacceptable to completely close the ventilation hole. Gas accumulated in the room as a result of an accident or improper handling of the stove must be able to escape freely. If a separate outlet to the ventilation duct is not provided, the existing one should be divided into two parts. This is achieved by installing a special grille divided into two sections. In one part there is a hole for the pipe, the second has standard jumpers.
Installation features and height above electric and induction hobs
The requirements for installing hoods over electric and induction hobs are somewhat milder. This mainly relates to recommendations for placing the device at a certain height above the stove. In this case, it is allowed to install the hood a little lower - at a distance of 65-75 cm.
Installation features and height of inclined hood
Inclined hoods are indispensable in miniature rooms, where the issue of maximizing the preservation of free space is acute. When installing an inclined hood over a gas stove, the requirements are slightly different. The lower edge of the surface should be at a distance of 55-65 cm from the gas oven. You only need to step back 35-45 cm from an induction or electric stove.
Additional features
When choosing a hood, an important factor is the additional functions that the device is equipped with. Among them we can highlight such a program as switching on at certain intervals. That is, the hood will start on its own and function for some time, regularly purifying the air in the kitchen.
There is also a residual run function, when the hood will be able to work for some time after switching off. This usually lasts from five to fifteen minutes, which allows you to make the air in the room perfectly purified. For more expensive models, there are programs that may not be the most necessary, but also no less useful. For example, an LCD screen for watching videos or connecting a computer. The weather system allows you to monitor the weather, while the fume hood is connected to a weather station on the street, and the results are displayed on the display.
Basic functions of a kitchen hood
The main purpose of the device is to remove or filter polluted air. Like a vacuum cleaner, the hood draws it in and sends it into the ventilation shaft, or passes it through filters that trap unwanted particles.
Products released during the combustion of natural gas pose a danger to human health. Therefore, the key task of the hood is to remove precisely these substances.
The device provides an influx of fresh air into the room and maintains a normal atmosphere. Getting rid of carcinogens is an equally important function of this device.
The hood prevents grease and soot from spreading throughout the kitchen, saving cleaning products, time and effort for the housewife, and eliminating the painstaking daily cleaning of surfaces.
DIY fume hood installation
It is quite possible to install a hood in the kitchen yourself in an existing wall cabinet, without resorting to the help of specialists. To do this, you should familiarize yourself with some tips and tricks and select the right materials and tools.
The easiest way to mount a static type device, without a telescopic panel. Here you need to prepare the following tools:
- hacksaw or electric jigsaw,
- bolts and screws,
- screwdriver,
- pencil with tape measure.
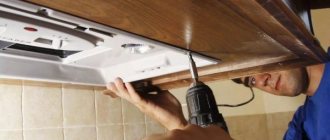
To turn a conventional wall-mounted module into a fume hood, you need to remove the top and bottom panels from it. A hole should be cut in the top wall for the air duct. On the bottom panel, mark the places where the corrugation is attached, as well as the bolts and cable. Next, you need to secure the hood at the required height above the stove. Attach the body of the hood itself to its sides. Pass an air duct through the top panel and connect it to the entire structure. The last step is to pull the cable and connect it to the outlet.
With simple steps, you can install a fume hood yourself and enjoy the process of regular air purification in the kitchen. But, despite the rather simple installation scheme, you should follow the instructions and safety precautions, and it is also advisable to use work clothes, gloves and safety glasses.
The hood is an indispensable part of the kitchen. It not only purifies the air during cooking and eliminates unpleasant odors, but also gives the interior a stylish and modern appearance. Unfortunately, not every kitchen can boast of a large area, then a fume hood will come to the rescue. It is capable of performing the same functions as a classic hood, but at the same time significantly saving space and not compromising the integrity of the kitchen unit.
Step-by-step installation instructions
We will consider a simple installation option; it can be considered universal and can be used in any kitchen furniture sets. The wall cabinet will have two multi-colored front doors. The hood's plastic rectangular smooth pipes make the process of periodic cleaning much easier. It is very difficult to remove dust from corrugated ones; dirt remains in deep folds.
Step 1 . Using a ruler or tape measure, accurately measure the distance from the bottom of the unit body to its top cover. This measurement is needed to determine the location of the fixation loops. Work very carefully, otherwise gaps will appear between the side walls of the cabinet and the hood, which are not easy to eliminate. The fact is that the furniture is made of laminated chipboard, and such material does not allow drilling holes very close to each other. You will not be able to raise the hood a few millimeters by drilling new holes; you will have to take other complex measures.
Measure the height of the device
Step 2 . Drill holes in the sidewalls, do not forget to add half the thickness of the sheet to the obtained measurement data. In our case, chipboard with a thickness of 18 mm, accordingly, we need to add 9 mm. The jumper will be fixed in this place; the hardware should fit exactly in the middle of the bar.
Two holes are drilled in the sidewalls for confirmations
Practical advice. It is recommended to fix the shelf for fastening the hood with confirmats (euro screws). They provide maximum fastening strength, and this is very important for this element. The fact is that vibration inevitably occurs during operation of the hood. Even small multidirectional efforts can weaken the fastening, the cabinet will begin to shake, and the intensity of unpleasant sounds will increase.
Step 3 . On the installed shelf, mark the exit point of the hood pipe, then put a plastic adapter on it. To do this, place the facade on the hood shelf, measure the distance to the hole and, taking into account its diameter, draw a circle. You can attach an adapter and draw a circle from it, it’s much faster.
Mark a hole for the pipe on the shelf
Step 4 . Mark the hole for the power cable. There is nothing complicated, the wire bends and in any case it is possible to install it in place.
Next to the large hole, mark a smaller one for the cable.
Step 5 . Use a hole saw to drill a hole. To ensure an even cut on the back side of the slab, do it in two stages. First you need to select a depth of approximately 1/3 of the thickness of the material, then turn the shelf over and drill from the back side. With the help of this technology, the occurrence of chips is completely prevented.
Drill a hole with a crown
Important. The diameter of the hole should allow the hood switch to fit in without any problems. This makes it possible to turn on the unit after attaching the cabinet to the wall.
Step 6 . Use an electric jigsaw to cut a hole for the exhaust pipe. Uneven edges can then be corrected with a hand router.
The edges of the holes are processed with a milling cutter
Step 7 . Check the dimensions, install the cabinet on the hood. Place the facade, figure out how you will attach it. The door opens upwards, this must be taken into account when purchasing fittings.
Trying the hood on the cabinet
Step 8 . Secure the shelf to install the lower facade, drill a hole in it for the air duct. The algorithm of actions is no different from those described above.
Marking for the air duct
Step 9 . Mark and cut a hole on the top cover of the cabinet to display the angle of rotation of the hood.
A hole is marked in the top lid of the cabinet for the pipe to exit.
Practical advice. It is better not to seal open sections of chipboard with an edge, but to carefully coat them with an antiseptic sealant. It protects the material much more reliably from moisture. In addition, it takes less time and mold does not appear in areas where it meets the wall.
The cabinet with the hood is assembled, you can fix it to the wall and connect the device to the network.
Cabinet with hood ready for installation
Self-installation
A hood is not the most complicated device, so if you have a little experience and a set of necessary tools, it is quite possible to install it yourself. Self-installation is a great opportunity to save on the services of specialists.
Installation of a hood attached to the bottom of the cabinet
Hanging models are attached directly to the bottom shelf of the cabinet. Installation is simple, installation is carried out using self-tapping screws and a screwdriver. Since connecting the air duct to the recirculating device is not required, the installation ends by connecting it to the electrical network.
Installation of a hood in a wall cabinet
Installing a hood into a cabinet yourself requires certain carpentry skills. For a new set, the device is purchased at the furniture design stage. In order for it to fit into an already used hanging cabinet, it is necessary that the dimensions of the hood correspond to the internal dimensions of the case.
To work you will need:
- jigsaw, you can also use a manual one;
- hacksaw for wood;
- pencil;
- screwdriver (preferably a screwdriver);
- awl;
- construction angle, tape measure;
- clamps.
Installation steps:
- First of all, you need to free the cabinets from the facades, and not only the specific cabinet for the hood, but also the adjacent drawers. Next, remove the cabinet and fasten the adjacent cases together with clamps. Do not skip this point - the boxes may fall and be damaged.
- We unscrew the bottom shelf and apply it to the upper plane of the exhaust device. We outline the outline of the air duct and the holes for the outlet of the wire with a plug to connect the device to the network. Cut out the marked holes.
- We insert the hood into the housing and mark the upper boundaries of the device. We fasten the bottom shelf along the marked lines. We drill 4 holes in it.
You can ensure exact alignment of the fastening points with the holes using a stencil.
We fix the hood inside the cabinet and install the air duct. We use it to connect the ventilation hole and the system. We install shelves and fronts. It is worth checking the functionality of the equipment before installing the facades.
Installation of a hood with an air duct
The installation procedure for such a hood includes:
- fixing the hood;
- development of air duct and electrical wiring diagrams;
- box fitting;
- installation of the box using sealant.
The air duct is assembled from a plastic box or made of aluminum corrugation. The first option is stronger, more aesthetically pleasing and more reliable. Therefore, it is worth giving preference to it. Plastic is easy to saw and joined with special elements. Additional strength is added to the joints using sealant. Corrugation also has its advantages - its flexibility allows you to lay the air duct along a curved path.