In this article, we offer you several lessons that tell you how to create a box with your own hands from paper for jewelry or any other valuable things, which will not only be functional, but will also be pleasing to the eye in itself. You can decide for yourself how many compartments or recesses you need and what size they should be. And the only materials you will need are cardboard, wrapping paper and small pieces of beautiful fabric. The site has a lesson related to the topic: a DIY wooden box.
Required materials and tools
Components for manufacturing:
- Cardboard with a density of 260-280 g/m3.
- Several pieces of different materials.
- Glue (the more the better).
- Lots of fleece.
- Decoration materials (beads, seed beads, etc.).
- Paper tape.
- Office tools.
Cardboard box shape
Simple rectangular or square
A do-it-yourself cardboard box for crafts is formed from a box and paper tubes. First you need to choose a suitable base for the box - for example, a shoe box. It is better to take a base for the bottom approximately the size of an A4 sheet or less, this will make the finishing process easier.
To form the tubes you will need glue and knitting needles. For weaving, you can use tubes made from ordinary printing paper, waste press and magazines. The finished cardboard box can be painted with acrylic paints or left as usual.
It is advantageous to use colored paper for a printer: it has a wide color palette.
The process of creating a cardboard box with your own hands will not take much time. First, on the outside of the box you need to glue vertical tubes that serve as guides. You need to glue at intervals of 4-6 cm - it all depends on the size of the box. Then the tubes are bent onto the side edges, and then inward.
A compacted cardboard of suitable size is glued to the bottom, which will hide the place where the tubes are attached. Then the tubes are intertwined around the circumference of the base. The lid also folds.
Round box
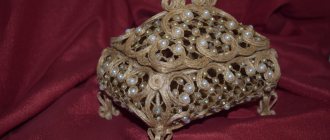
For needlewomen, a round spool of tape left over is an expensive material. This base can be used in different types of needlework: decoupage or scrapbooking, decorated with coffee beans, seed beads, beads, jewelry stones, glued on leather or fabric. To make a box from round cardboard with your own hands, it is recommended to use interwoven cardboard.
First you need to attach the reel to the cardboard and draw three circles along the inner and two outer diameters. Circles with a smaller diameter are glued together; it is recommended to use Moment glue. Treat the finished element with sandpaper and glue it to a circle of larger diameter, placing it in the central part.
As a result, a lid will be formed that will seal the box tightly.
If there is a need to sand the edges. The box layout is ready. You can decorate it to your taste with different beads and decorative stones using any needlework technique. The lid can be made slightly protruding: you need to enlarge one of the circles with a larger diameter. This will make the box easier to open.
Heart shaped box
This heart-shaped box is perfect as a wrapper for a Valentine's Day surprise. First of all, you need to cut out a heart-shaped element from cardboard - this is the bottom of the box, the dimensions of which will determine the parameters of the box as a whole. Then you need to cut a wide strip of cardboard with teeth on one side. Glue the strip to the bottom. Assemble the other side in the same way.
You need to glue the two halves of the walls and secure them with paper clips, wait for the glue to dry. Decorate the inside and outside of the box with paper with different textures or patterns. Glue two pieces of fringe to the base - they will act as curtains on which the lid is held. Next, cut out the second heart, this will be the top cover. It needs to be glued to the curtains.
Decorated paper should be glued in the same way. Then you need to decorate the cardboard box in the shape of a heart to your taste. Alternatively, you can glue lace along the contour. Decorate the top with flowers, beads, ribbons, etc.
Crafts from candy containers
No less original and attractive will be a box modeled from an old cardboard box left over from sweets. Such containers can have a variety of shapes. There are square, round, oval, multifaceted and many other interesting variations of such boxes. From each copy you can make a chic box.
To make an attractive box from the above box, you will need:
- the box itself;
- multi-colored paper;
- plain paper;
- glue;
- acrylic paint;
- scissors.
Let's consider step by step how you can model an elegant box using these components.
- First you need to prepare a candy box. It must be clean, without candy wrappers and chocolate chips.
- The cleaned container will need to be very carefully covered with paper around the entire perimeter. The entire base should be completely designed in this way. At the same time, it is very important to leave a small supply of paper “finishing” at the edges.
- In order to decorate the lid and bottom of such a box as neatly and aesthetically as possible, you will first need to glue the side areas. The corners must be carefully trimmed, and then also carefully bent inward. At all stages, paper must be taken with a small margin.
- Using sheets of plain paper you will need to decorate the inner cavity of the future attractive box.
- When the interior design is completed, the box must be put aside and not touched until it is completely dry.
“Candy” boxes make especially attractive and elegant boxes. Almost any type of container in question is suitable for carrying out such manufacturing work.
Very beautiful boxes are made from Raffaello candy boxes. After that, you can store a variety of things in them, for example, jewelry and hairpins for girls.
How to make a lid for a box
Recommendations for making a lid for a box:
- Determine the dimensions of the cover . Lay the cardboard on a table or floor and measure a rectangle of the desired size in the center. To accurately draw the corners of a rectangle, you must use a triangle or a drawing ruler. This will be the bottom of the lid.
- Draw a straight line from one edge of the box. The height of the box lid is the length of the line. The height of the sides is much less than that of the box. You must not forget about the allowances in order to connect the sides of the lid. They should be 3-5 cm.
- On each of lid edges you need to connect the edges of the line in a straight line. These are the sides of the lid. You also need to draw allowances for other connections at an acute angle. It will be enough to enlarge on both sides.
- Cut out the parts using a utility knife.
- It is necessary to carefully bend the cardboard along the contour of the folds.
- Carefully fold the edges of the box and tape them together along the length of the seams.
How to decorate?
There are quite a few ways to decorate a box, and here, again, you need to focus on your capabilities. Simply painting will significantly improve the appearance of the glued base for the box. To do this, you need to perform several steps.
- Tape the folds, joints and gluing seams with masking tape.
- Apply primer to all external sides. For smooth cardboard you only need one layer. If there are irregularities, the primer will have to be applied several times after the previous layer has completely dried.
- The dried primer should be sanded with sandpaper, and you can begin painting. A more uniform layer is obtained from a spray can, but you can use a regular brush.
- There can also be several layers of paint - it must completely and evenly cover the base.
In addition to plain coloring, various techniques are used, including painting. An alternative method is to cover it with fabric or paper. On paper or fabric, you need to make a pattern with allowances - it will look like a drawing of a box. If you take fabric, it is better to apply glue both to it and to the base. After gluing, the canvas should be smoothed well to expel air.
Another way of decorating is decoupage, this way you can decorate a painted or glued box.
Select a suitable image from a decoupage card, napkin or any printed publication. You can use the entire picture of a suitable size or cut out the desired part. For multi-layer napkins, the top layer is separated.
The image is applied in the desired place and carefully covered with glue, while avoiding folds, tears and bubbles.
After drying, the surface can be modified - some details can be drawn more carefully, and the surrounding background can be filled in. Finally, a layer of varnish is applied.
Decorated boxes can be decorated with beads, rhinestones, ribbons, lace and even flower arrangements. Any natural material will do - shells, coffee beans, pebbles. There should not be too many decorations, two or three varieties are enough.
Decorate the box with fabric
To decorate a cardboard box with your own hands, you can use not only old press or wallpaper, but also decorate it with fabric. Using the covering, it is possible to cover the box with fabric. Such a thing can serve as a separate gift, as well as as an organizer for storing small household items, for example: toys for children, home decor items, sewing supplies.
Materials and accessories that are indispensable for covering the box with fabric:
- Box. When choosing, you are allowed to apply the rules described above for working with press, magazines, and wallpaper.
- The fabric itself will be used to cover the box.
- Specialized glue, tape.
- Sharp scissors.
- You may need an awl, as well as a strong cord (you need to choose the color of the fabric).
In order to do everything accurately and get an excellent result, you need to follow the recommendations:
- To make a pattern, you need to determine the dimensions of the sides, and also remember to leave allowances for the part that bends to the other side.
- Glue the main part. It is recommended to choose an adhesive that does not saturate the fabric, causing stains. You can use suitable double-sided tape if it adheres the fabric to the cardboard well.
- The fabric should be pressed tightly against the cardboard. If necessary, you need to remove excess material.
- When you have finished decorating the outside, move on to decorating the inside.
Design ideas
Do you think that pasta is the most original material for decorating boxes? Nothing happened! The most unexpected materials can be used as decor, if, of course, you know how to work with them!
What do you think is there, under the decoupage napkin, that creates such an interesting texture a la crocodile skin? You won't believe it: a run-of-the-mill eggshell!
Are there any old newspapers left? And we’ll put them into action, for the benefit of hand-made:
And from glossy magazine pages you can make an interesting braid. An ordinary jute thread, but what a look! However, burlap is in no way inferior to it.
Yes, and different-sized buttons, clasps and other accessories from outdated clothing can be put to good use!
Soft box made of cardboard and fabric
You can make a box with your own hands from compacted cardboard and cover it with fabric. Make the lid using padding polyester - it will be soft. This box is perfect for storing jewelry and craft materials. The parameters of such a box are 18 cm by 9 cm. Also, you can enter your own size based on what you will use it for.
To create you need:
- thick paper,
- matter,
- filler,
- glue,
- stationery,
- paper tape.
You need to draw a circle of the required diameter on thick paper and cut it out. For the sides, cut out rectangles.
Instructions:
- Use tape and clamps to form a box.
- Cover the box.
- Cover the bottom of the box with fabric.
- To seal the side edges, cut out a rectangle from not very thick cardboard and cover it with fabric.
- Cut out a lid from cardboard and glue the side. Place the padding polyester on the lid and cover it with cloth.
- Use an additional piece of paper and fabric to cover the edge of the lid.
Paper decor
The design of the boxes can be extremely varied. We offer you a very simple and interesting option. This way you can design any product.
Decoration algorithm:
- tubes are formed from A-format paper;
- twisted tubes are glued to the box around the perimeter, maintaining a distance of 3 to 4 cm;
- the decor is glued in a vertical direction;
- the tubes are glued, bending towards the base;
- the places inside where the paper guides are glued are hidden with thick cardboard;
- The lid and sides of the box are decorated in a similar way.
Pincushion box
To create a pincushion box you need:
- White fabric with polka dots.
- Satin ribbon.
- A roll of tape.
- Compacted cardboard.
- Glue gun or regular quality glue.
- Scrapbooking paper.
- Stationery.
- Fillers.
Instructions for making a cardboard pincushion box with your own hands:
- A braid slightly wider than the bobbin is laid on a sheet of cardboard.
- Trace the bobbin from the inside and outside with a pencil.
- The result should be two identical strips and two circles of different diameters.
- Using a glue gun, glue one strip inside the bobbin (try to make the seam carefully).
- Use a utility knife to remove excess edges. Hide the seam with tape (it’s better to glue it with a “moment”).
- Glue a circle with a large diameter to the bobbin.
- Glue the second braid to the outside of the box - cut off the excess borders.
The pincushion box is almost ready - all that remains is to decorate:
- Glue red satin ribbon on top, bottom and sides.
- Trace the spool on a white fabric with scarlet polka dots.
- Sew the fabric, leave half unsewn.
- Cut the parts so that the seam does not come apart.
- Turn right side out.
- Insert the cardboard circle into the fabric.
- Put some filler inside.
- Glue the bottom of the fabric with cardboard.
- Add more filler, fold the top of the fabric, and glue it to the cardboard.
In order to decorate the cover of the pincushion, make a bow from ribbon and glue it to the cover.
Tips from needlewomen
Working with cardboard is not difficult if you follow some tips:
- For cutting, it is better to use a special cardboard knife with a sharp end. If this is not available, then a regular or stationery one, but well sharpened, will do.
- Before cutting parts, be sure to draw a contour according to the template, strictly observing the dimensions.
- To bend thick cardboard, make a shallow cut along the fold line, using a ruler.
- It is not recommended to use colored stationery paper for decoration; it is better to replace it with one intended for scrapbooking.
- When gluing paper to a cardboard base, it is important that it is saturated with glue. Since applying a dry sheet will lead to the formation of bubbles. It should also be smoothed from the middle to the edges. The fabric is glued identically.
Master class on creating a box with drawers
You can make an excellent box with retractable drawers with your own hands from available resources, such as cardboard or matchboxes. Regular matchboxes will only hold tiny rings, but if you buy travel or fireplace matches, you can make a full-fledged box.
Required items to create a box:
- thick cardboard - for the frame;
- matchboxes for boxes;
- decorative buttons for handles;
- for decoration, adhesive-based film, wallpaper or leftover leather.
Formation will take very little time:
- matchboxes, without a layer of sulfur, glued together;
- Glue thick cardboard on the outside;
- surfaces that are visible to decorate with wallpaper or film;
- Secure decorative buttons onto fishing line or wire using an awl.
If desired, decorate with beads, drawings, bows.
From shoe boxes
One of the easiest options to make a beautiful and useful box is to use a shoe box. To create a casket, just cover the box with fabric or colored paper.
If you need a smaller box, you can use a box of tea, milk, etc. as a basis.
In the case of a milk carton, it will be enough to tip it on its side, make a slot in the shape of the letter “C” on top and bend this piece of cardboard. This will be the lid. Then the box needs to be covered with a beautiful fabric, after which the lid and bottom should be covered with two satin ribbon ties.
Box in the shape of a doll sofa
Instructions for making a box in the form of a doll sofa:
- cut out the parts in the form of a parallelepiped approximately 7 by 15 cm;
- make an identical element 2-2.5 cm high;
- in a larger box, leave an open hole at the top, fill it with filler and compact it well;
- assembly: place the smaller closed element on the end (this will be the back), and need to be glued from the back to the soft seat;
- form upholstery with beautiful fabric. Completely cover doll furniture and measure to make a cover;
- cut a piece of fabric and sew it, the seam should be at the bottom;
- For better fastening at the bottom of the cardboard, you can make small holes through which you can pass ties or staple the fabric.
Choice of shape and size
When making boxes, it is important to carry out all the steps in stages - this way the work will progress more smoothly and will not require too much time. The first step is to determine the shape and size. These parameters depend on the amount of material, location and purpose. In addition, the degree of difficulty must correspond to the skill of the manufacturer. , simpler options are better
- square;
- rectangular.
Next, you can try to make a round box or in the shape of a polyhedron. These varieties are the most common and traditional.
Since cardboard cuts, bends and crumples quite well, you can find more complex products in the form of a heart, shell, suitcase, watch and even a piano. In the same vein, you can make a hiding place, disguised in the form of a book or the base of any figurine.
In addition, the box may have:
- concave or curved sides, cover;
- legs, handles, hinges, locks and other fittings;
- drawers.
Decorative boxes are designed to store:
- money;
- documents and photographs;
- jewelry and costume jewelry;
- business cards and stationery;
- hours and much more.
For people who deal with a lot of small parts, organizers with internal compartments are necessary. Boxes for handicrafts or creativity are made using the same principle.
Boxes can be either very tiny - up to 5-7 cm, or large - up to 20 cm or more. Small ones can be placed on small surfaces - open shelves, bedside tables, tables. Volumetric ones take their place in the closet. In principle, their parameters are limited by the size of the cardboard sheets.
In addition, it is worth considering that the walls and bottom of wide organizers must be strengthened, since the cardboard will sag. And decorating small boxes is much more convenient and less tedious.
Step-by-step instructions for an organizer box
To design an organizer box you must have:
- untreated wooden box;
- velvet fabric;
- high-quality glue;
- tassels.
Tools needed to create an organizer box:
- drill and drill bits;
- screwdriver;
- pinking shears;
- sewing machine.
Making a cardboard box with your own hands is very simple if you follow the step-by-step photo instructions.
Instructions:
- Treat the wooden box with stain; anything that is not absorbed should be wiped off with a rag.
- Using a drill, you need to drill a hole in the center in order to fix the handle
- Cut two pieces of fabric slightly smaller than the bottom and lid of the box. Then you need to cut another piece half the size. Next you need to lay a short piece of fabric on a long one and stitch it to make a pocket. Secure the velvet fabric and organizer inside the lid and at the bottom of the box.
Casket of greeting cards
From the most ordinary postcards, using thread and a hook, you can make a wonderful casket!
- To do this, you need to prepare and cut out all the parts for a rectangular box: the bottom, the lid and four side parts.
- The density of the blanks must be strengthened by duplicating them with several layers of cardboard.
- At the same time, all parts must have postcards on the front and inside sides.
- The subjects of the pictures are selected at will.
- The layers can be lightly fixed with glue to each other.
- Next, using a hole punch or an awl, carefully make holes along the edges of all rectangles at an equal distance from each other.
- Using a hook and thread we connect the fragments together.
- We tie the lid of the box on all sides and attach it to the base in two places.
Box in the shape of a book with a hiding place
Instructions for making a hiding box:
- Cut out a 15 by 22 cm rectangle from colored cardboard;
- mark out;
- bend and get a workpiece;
- for decoration you need to cut out four rectangles 14.5 by 9.5 cm;
- cut two strips 14.5 by 2 cm;
- glue the parts, placing ribbons under them for ties, for decoration inside;
- decorate outside;
- receive the workpiece;
- take two rectangles 12 by 14 cm and two 9 by 12 cm;
- Mark all the blanks into strips 1 cm wide, they also need to be folded like an accordion;
- glue four parts together: insert the edges of one element into the edge of another;
- check the corners - they should be straight;
- glue the remaining accordions;
- glue the part inside;
- decorate the hiding box.
How to create a wonderful jewelry box
On the eve of March 8, I want to tell you how to make a jewelry box using the cardboard technique. I love this technique because it allows you to make a beautiful and practical thing from simple and affordable materials. You can come up with any shape, any number of departments and drawers - and you can do all this from a sheet of cardboard and a piece of fabric.
For the master class, I chose a relatively simple form of jewelry box. It has one department for small bracelets, chains, pendants, etc. and a department for rings and earrings. It can be a very successful gift and will not require large financial investments from you. Or maybe you want to make one for yourself to store your treasures? 
In this master class you will learn basic cardboard techniques, get acquainted with one of the types of hinges and a method for making a puffy cover on such a hinge. The latter can also be useful for those who make notebooks.
There will be a lot of text and pictures too. I tried to describe for you not only the sequence of actions, but also explain why I suggest doing it this way. So that you know in advance about some possible mistakes and ways to avoid them.
Ready? Then let's get started
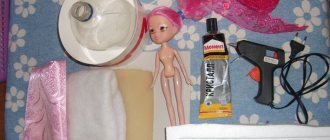
We will need:
Materials:
- Binding cardboard (2mm thick will be enough).
- PVA glue. (You need something thick and not yellowing over time. For example, PVA Furniture. A more expensive option is PVA. You will find both of them in construction stores. If you are not sure that you need 1 kg of glue and want to try just one box, then it will do PVA... Of the types of PVA that I have seen in office supply stores, this is the only one I believe).
- Masking tape (about 4cm wide) or thin kraft paper to reinforce the ribs.
- Glue "Moment-crystal".
- Ordinary Whatman paper.
- Textile. (100% cotton is best. It will be easier with it. It sticks well and does not stretch. At least a couple of companion fabrics. The main thing is without synthetics).
- Tapes - 2 pieces, 15 cm each (these will be stoppers for the lid).
- Optional - padding polyester and decorations for the lid.
Tools:
- A wide knife with segmented blades (I like the construction knife better. The stationery knife has a thin blade and cuts cardboard worse).
- Scissors.
- Self-healing cutting mat. Or an unnecessary piece of linoleum.
- Ruler. (At least one iron ruler with precise markings. I have three of them: a meter ruler for drawing long lines across the entire sheet of cardboard, a short one with precise markings, and a large transparent rectangular ruler.)
- Synthetic glue brush. She should have neat stubble. Otherwise, take the cheapest one.
- Pencil, sharpener, eraser.
- Stack to smooth all surfaces and corners.
- A cloth to immediately wipe off the glue on the work surface.
- A jar with low sides to pour some glue from a large jar into.
- Not necessarily a roller knife. Some cardboard makers like to use it to cut cardboard. I love cutting fabric with it. Convenient, but you can do without it, it’s not cheap.
Assembling the base
Where does any cardboard box start? From the drawing! Cartoning requires precision. Therefore, as soon as you have an idea for a future box, take paper and write down the exact dimensions of the parts. There are no particular difficulties here. You just need to always take into account the thickness of the cardboard. In our case 2 mm. As an example, I will give the exact dimensions of my box:
When laying out, try to place pieces of the same width side by side. This makes it easier to cut them into equal parts.
When slicing, keep the tip of the knife perpendicular to the cardboard (no need for chamfers here). The knife itself is angled in a position that is comfortable for the hand. And cut vertically from the far edge towards yourself. Smooth perpendicular cuts should be obtained. These are the ones that will give us a strong connection without distorting the shape of the box.
Please note that the factory edge of the binding board is not smooth. There are two options - cut off this edge or sand the cut parts. This can be done with a file or sandpaper. The main thing is to end up with parts of a given size with smooth edges.
We cut out all the parts from the binding cardboard and proceed to assembling the box. For this step we will need masking tape (or craft paper), a moment crystal and a stack.
We glue the walls from above to the bottom, not from the sides. Apply glue to the long wall part, on the bottom of the cardboard cut, like toothpaste. Generous enough. It’s easy to remove the excess later, but if there is not enough glue, the box will be shaky.
Place the part and align it. By the way, here we see one of the advantages of our glue - it does not dry out instantly and allows you to move the part and put it exactly in place. When you have aligned the part, press it on top with both hands - this way the glue will better adhere to the parts. Remove excess glue. I just remove it with my finger. If you are worried about your manicure (the glue does dry out), then try removing this excess with something metallic.
After the long wall we glue two short ones. Here we apply glue to both sides to glue the joints with the bottom and the long wall.
Align, press. You should get a neat corner without steps. All joints must be smooth, one part smoothly transitions into another. Because these small “thresholds” will be noticeable even after gluing the box, and the appearance will not be very neat.
Next we need to glue a partition between the two sections. In order to glue it evenly, I first marked its location on the walls of the box (see photo above). Apply glue to the cuts on three sides and insert the partition into place.
Now put the glue aside and paint all the upper sections of the parts with white acrylic paint. This is necessary so that the color of the fabric on the sides is not distorted and it does not look dirty. Avoid paint runs!
While the paint dries, we will strengthen all the ribs. You can use strips of craft paper and glue them onto PVA, or you can use masking tape. I like the second option.
Let's start outside. Cut a piece of tape slightly shorter than the side of the box. It is not necessary to glue from corner to corner; I find it convenient to take the pieces a little shorter. Since the walls will become completely motionless and the corners will subsequently be covered on both sides with fabric, I am not worried about them. So, apply a piece of tape and smooth it out with a stack. It is important. In order for the tape to really hold the cardboard well, it must be smoothed and pressed properly.
To move along the edge to the other side, I press the tape at an angle with two thumbs exactly on the edge. And gradually I seem to “roll” with my fingertips to the other side. And I smooth it out with a stack. There is only one thumb in the photo, because the second one is occupied by the camera
In general, the cardboard stack should become your mantra and second hand. Ultimately, you should not have a single centimeter left unironed.
We go through all the external edges in this way: both vertical and horizontal.
It's a little more difficult to paste on the inside and not so convenient. We pinch a piece of tape with two or three fingers and place it in place. At the same time, we apply it only to one side for now. You don’t need to glue it to the second one right away.
We hold the free side with the finger of one hand, using the other hand we stroke the tape from the glued edge towards the corner and gradually move it towards the corner. We carefully move the same stack along the depression and thus paste the tape into the corner, while simultaneously moving the other hand away from there so that it does not interfere.
In this way we strengthen all the joints from the inside.
Now let's prepare the platform for the rings. It should not be as deep as the main compartment, because then it will be inconvenient to use. At this place, if desired, you can make a remote drawer, but let’s not complicate the design now. In order to raise the floor, we glue “supports” to the long walls of a small compartment. And we’ll glue a pad on top of them.
Ta-dam! We have finished the cardboard base of our box. I like the next stage more, because with each piece of fabric glued the box is transformed.
Pasting with fabric
What is useful to remember when working with fabric?
- The fabric completely covers the cardboard. There should be no gaps anywhere in the finished box.
- Wherever possible, we avoid open cuts. I will show how they can be made so that they do not crumble, but this can only be used on stationary elements. In all other cases, we fold the fabric. It is advisable to minimize the thickness of the folds.
- Apply the glue in a thin, even layer so that it does not bleed through the fabric to the front side. If this happens, blot the affected area with a damp cloth. Several times until you remove all the excess. It is not possible to completely remove glue from every fabric, so it is better to avoid such mistakes.
Hereinafter, we will glue the fabric to the cardboard and paper with PVA glue.
Let's start with the back side. Since it will be glued to the spine, it is not necessary to completely cover it with fabric; we will make do with a narrow strip of fabric. Cut out a piece of fabric equal to the long side of the box and 4 cm wide. I missed a couple of photos here, but I'm sure you can imagine a rectangle of fabric. First glue it to the back side of the wall and cut it as shown in the photo. At both ends and above the partition.
We coat the edge and the strip on the inside of the wall with glue. We bend the fabric in the same way as we glued the tape, stretching it over a cut of cardboard and carefully ironing it with a stack.
Now from white Whatman paper we cut out a rectangle with a length equal to two short walls and one long one. The height of the paper part is equal to the height of the walls along with the thickness of the bottom. For us it is 6.2 cm.
Apply glue to the paper part in a thin, even layer. If you cannot evenly distribute the layer of glue with a brush, use a roller. But I like working with a brush.
Glue the paper piece to the wrong side of the fabric. There are two interesting points here:
- I don't cut the fabric ahead of time. Instead, I first glue the paper piece to a solid piece of fabric, and only then cut out the desired piece. Why? This makes it convenient for me to measure seam allowances, and also convenient for aligning the paper part relative to the pattern or threads in the weave of the fabric.
2. If the part is long, do not try to cover it all with glue at once. Do this in sections. Covered, for example, 15 cm in length, glued to the fabric. We folded back the dry part, covered another 15 cm with glue, glued it to the fabric, etc. Because good thick PVA dries quickly enough and it is unlikely that it will be possible to do this all at once over the entire length, say, 40 cm.
We begin to glue our part to the front long wall. Yes, we start from the middle. This makes it easier to avoid skewing the part. If you've ever tried to stick a long piece of tape to something, you'll know what I'm talking about.
Before we glue the seam allowances to the back wall, we'll make cuts like these on them and form the corners.
Our blank is now glued on the outside, but the seam allowances are sticking up and down. Let's do something about this.
We bend the seam allowance sticking up on the long wall and glue it. He does not participate in the formation of corners. To make corners on short walls, you need to successfully fold the fold. We have already formed the corner near the back wall (see photo above), we just need to glue it. We will first form the second fold “dry” without glue. To feel how the fabric will lie. We are not cutting anything here. Please note that the entire fold should lie on the short wall and fit neatly into the corner, without creeping onto the long wall
From behind, after these manipulations, the workpiece looks like this:
Now you need to glue the allowances on the bottom. There are two options: to do this without trimming the fabric and with trimming. I choose the second one. Why? Because without trimming we will get folds in three layers of fabric. And these three layers will then be like the “legs” of a 1mm thick box. This millimeter will not allow the box to be glued to the bottom tightly enough over the entire area.
So let's cut. You need to cut so that there is 2-3 mm left for a tiny fold. Further, the slices should not overlap each other. We will need a small fold so that the outside corners will look neat later. And the miniature size of the folds and their small thickness will give us the opportunity to press them into cardboard.
After gluing, we get flat corners.
Now you need to cover the bottom inside the box. To do this, cut out two parts from paper, the sizes matching the sizes of the bottoms in two sections of the box. Glue these parts onto the fabric, cut them out with 1.5 cm allowances. Cut the fabric diagonally, leaving 1.5-2 mm to the corners of the paper. You don’t need any more, because then you won’t be able to fit this allowance neatly into the corner of the box.
First, coat the bottom with glue and place our part there. Then we glue the allowances and corners. We smooth everything out with a stack.
To cover the cut of cardboard, we cut out a rectangle of fabric near the partition, just as we cut out a fragment for the back wall. But with one significant difference. Remember, above I wrote that I would show the moment when we have an open cut? It is he. And our task is to play with this cut so that it is as unnoticeable as possible. To do this, we need the fabric to not fray. This is not difficult to ensure - before cutting the fabric, coat the areas of future cuts with glue. But be very careful so that the glue does not bleed onto your face.
Here's what we have at the moment:
At this interesting point, we will put aside our preparation and move on to the cover. This is because of the stopper tapes. In principle, you can make the cover first and then, without interruption, the box. But I like this order.
Cover
Our cover consists of three parts: the bottom, the cover and the spine. The lid will have a layer of synthetic padding. The bottom and spine are like the rest of the parts with a layer of white paper. By the way, this is the only moment in the box where I first glue the paper to the cardboard, and only then the fabric. As for the cover, I lightly coat it with glue and apply it to the padding polyester. Glue is needed to prevent the padding polyester from fidgeting. I trim off the excess with a roller knife.
I want to decorate the lid with a pendant. To do this, you need to make a small slot in the lid. Along the long side we mark the middle. On the short side - 1cm from the edge. We make a small slot, insert a ribbon there and glue the tails to the cover. Of course, it’s more convenient to do it before gluing the padding polyester, but this thought came to me while I was walking. Why through a slot? It's more reliable. The habit of tying on notebooks, I do the same there. We will make sure that the slot for the ribbon is located flush against the edge of the endpaper. The cut will not be visible, and you can even lift the box by the pendant, but nothing will be done to it.
For the cover, cut out the fabric with 2 cm allowances on each side.
Place all three parts on the fabric, leaving a distance of 3-4 mm between them. We immediately glue the flat parts, the part with padding polyester is temporarily attached to the spine with pieces of masking tape so that it does not fidget. And glue the allowances along the long edge.
We make a cut for the pendant, try it on, but don’t glue it yet. Let's glue it after we form the corners.
How to make corners with minimal thickening? At the moment this is how I do it. I trim the fabric along the cardboard, not reaching the corner 2 mm. From this point I cut perpendicular to the cardboard. Next, I fold the fabric so that its cut is parallel to the cardboard and lags behind it by 2 mm, which is equal to the thickness of the cardboard. In this case, we have a small fold. Let's cut it off. We get a broken line, which first continues the line of the cardboard, then goes at an angle of 45 degrees. When you fold this structure onto the cardboard, you will see how neatly it fits there.
After we have formed all four corners, glue the allowances on the short sides.
Now is the time to glue the stopper tapes. Thanks to them, the hinge will last much longer. And it’s more convenient to use a lid with stoppers.
We cut two ribbons 14 cm long and glue them symmetrically at an angle to the cover. They should be free at a distance of 1 cm from the edge. The rest is glued.
Now let's make the endpaper. To do this, cut out a piece from paper that is 2 cm shorter in length than the cover and 1 cm narrower in width. On three sides the allowance is 1.5 cm, on the fourth - 3 cm. This long allowance will then be hidden between the spine and the back wall.
We form the corners on the paper parts as follows: from the long side we cut off the excess fabric flush with the edge of the paper part. On the short side we make a broken line, as in the photo below. We glue the long side first, then the short one. The photo below is from another detail, simply because the frame here is better.
Glue the resulting part onto the endpaper. It will turn out like this:
It's time to connect the main box of the box and the cover. To do this, coat the bottom with moment-crystal glue. We apply glue to the smaller part, i.e. on the bottom of the box, not on the lid. We do not reach the edge a little and carefully spread the glue so that it is distributed evenly. I smear it with my finger. This glue is then easily removed from the skin with a film.
Press the bottom of the box to the bottom of the lid. We align the back wall with the edge of the part; the three outer walls will have indentations of 7 mm. To make the parts stick better, I turn the resulting structure upside down and place a stack of heavy books on top. 20 minutes will be enough for her. The cardboard itself sticks together quickly, the main hitch is in the fabric allowances. You need to wait until it all sticks together and the bottom does not lag behind the box.
Then I glue the spine to the back wall. In the same way, you just won’t be able to crush it with books. I hold it with my hands.
After this, you can glue the free ends of the stopper tapes to the box using PVA. This must be done symmetrically on both sides.
There's not much left
We will cover the inner walls of the box. To do this, cut out two long rectangles. For a deep compartment, this rectangle will be 5.2 cm in height, for a shallow compartment - 2.3 cm.
Glue the paper parts to the fabric, cut them out, and glue the seam allowances. Leave the seam allowance free on one narrow edge.
Carefully glue the part into place. We start from the end where we have a free allowance. We glue the part in stages onto each of the 4 walls. Carefully iron the corners with a stack. If you don't iron it, there will be rounded holes in the corners inside the box.
We make the joint near the front wall. Why? He is least visible there. Although we tried our best to make sure it fit together neatly, I prefer the look of a solid piece. When you use the box in the future, you will mainly see it from this perspective, and we focus on it.
Note that after we covered the walls from the inside with fabric, it turns out that each corner is reinforced seven times (!) : glue, tape on both sides, paper on both sides and fabric on both sides, and glue between all layers. This is what makes cardboard boxes completely indestructible. I love them for this!
All that remains is to make the rollers for the rings. I make them from rolls of white felt. For our box you will need 6 pieces of felt 20 cm long and 5.5 cm wide. Roll them into loose rolls and seal them with instant glue. In the photo I have two-color rolls, because there wasn’t enough white felt :) Usually I have them completely white. We wrap the rolls on top with fabric. Before cutting the fabric, coat the cut areas with glue. Remember, we did this for the partition above. We glue the fabrics only at the bottom, where the joint is at the felt. There is no need to glue the entire area, otherwise the fabric will become stiff. And we need elastic, but soft rolls.
We lay the rolls tightly. The photo below shows how much wider our pads are than the box. Apply a narrow strip of PVA to each roll and glue it in place.
Ready! We rejoice at the result and look at it from all sides
In this photo you can see that the ribbons are parallel.
Experiment with different fabrics and favorite patterns
Thanks to everyone who read this master class. I will be very glad if it turns out to be useful and interesting for you. I tried to fit everything into one master class, it seems to me that this is more convenient than breaking it into parts. But if there is something that is not clear to you, do not hesitate to ask in the comments, I will answer everyone
Vera Makarenko
Making a box in shabby chic style
Components for making a box:
- candle;
- decoupage napkins;
- casket;
- decoupage glue;
- white acrylic primer;
- acrylic lacquer;
- acrylic paint;
- sandpaper;
- sponge.
You need to cut out a pattern from a decoupage napkin, then divide it into layers. Cover the entire area of the pre-made cardboard box with paint. Use a hairdryer to dry and leave until completely dry. Rub the candle on the box in places where there will be abrasions. Be sure to rub the corners with a candle. Cover the box with white acrylic primer and dry.
Rub the box with sandpaper to create a worn effect. Attach the decoupage pattern to the box and apply glue on top. Let it dry and paint the edges of the pattern with your own hands. Dry and varnish.
Peculiarities
Many people consider boxes to be trinkets that simply take up space. They're actually quite functional.
They are often used to decorate the interior. Moreover, if the style requires a large number of small details, you simply cannot do without boxes. In order for such decorations to be appropriate, you need to carefully consider their design.
They help to maintain order and properly organize the storage of various things. The practicality of such a container is determined by its strength, size and shape.
The fruits of your labor can be safely used as a gift. Moreover, such a gift will appeal to both a very young girl and a fairly adult woman. Moreover, the box, depending on its design and purpose, can be presented to a man. Sometimes people accumulate a lot of little things that simply need to be placed in suitable boxes.
Beginners who are faced with making boxes for the first time should pay attention to cardboard. It is no coincidence that this material is popular. Among the advantages of cardboard are:
- environmental friendliness;
- ease of processing;
- low cost;
- availability.
Cardboard can be found in any office supply store. In addition, it can be safely reused. There are many ways to decorate a finished cardboard product; you can choose any that suits your strengths and abilities.