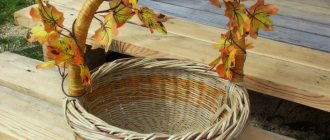
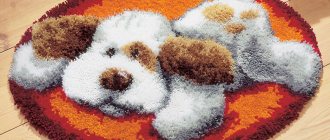
Making products from twine is a newfangled trend in needlework. The material is used for both small and large crafts. Jute is used to weave stylish rugs and beautiful boxes - spectacular and inexpensive products that decorate the house, maintaining a rustic style and Provence. You can buy jute rugs or knit them yourself.
A cute little thing that is not difficult to make from jute with your own hands is a box.
You can store jewelry, memorabilia and trinkets that are simply dear to a woman’s heart in it.
Creative people are always interested in new directions, for example, various decorative elements, boxes, figurines, baskets and much more can be made from twine. Jewelry boxes made of jute and other small items are very popular.
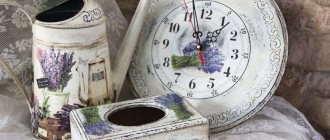
A beautiful round box made of jute filigree technique will be a wonderful gift for family and friends.
To learn how to crochet a box, you need to read the detailed instructions for making it. With minimal cost and effort, the technology allows you to produce an original product.
The box can also serve as a decorative element for your own boudoir.
Jute is a magical material, you can make almost anything from it.
Peculiarities
Jute filigree is usually made up of extraordinary patterns in the form of the letters “C” and “S”, and the empty space of the jute box is complemented with the help of snails and the figure eight, the infinity sign.
Articles on the topic (click to view)
- Chintz: what kind of fabric is it, pros and cons, application
- Textiles in the interior
- Photo curtain for the kitchen
- Kitchen interior with black and white curtains
- Photos of beautiful curtains with eyelets
- Photo of voile curtains for the kitchen or living room
- Photo of a bedroom interior with beige curtains
Beginning needlewomen will be able to master the basics of weaving by thoroughly studying diagrams, drawings, stencils and sketches.
Ease of use and accessibility doubly attract novice needlewomen to master the technique of jute filigree.
Classic decorative elements
There are a number of patterns that are considered basic and suitable for beginners to master. Masters of jute filigree come up with their own patterns.
Basic patterns include:
- Ring. A circle is formed from the thread.
- Half ring. Half a circle is formed.
- Cucumber. Two threads are connected to each other to form an oval.
- A drop. The threads are connected to form a pattern reminiscent of a drop of water or a pear.
- Petal. The two threads are joined at both ends to form a symmetrical leaf-like figure.
- Curl. The ends of the tourniquet form arcs at the bottom, the ends of which are bent.
- A blade of grass. The thread is bent in half, after which both ends are slightly bent down.
- Snake. The tourniquet is bent left and right, resulting in a very tight snake.
- Stenek. The thread forms a spiral, the end of which hangs freely.
- Corn. The fiber curls into a dense grain, which in appearance resembles a fat point.
There are a lot of similar basic elements; these 10 will be enough for a beginner to begin to comprehend the basics of needlework. In the future, you can come up with your own variations and patterns.
Manufacturing technique
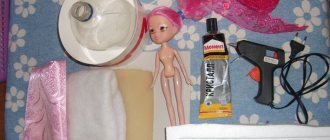
To make a jute box, you need the following set of materials:
- leg-split;
- office glue and scissors;
- cardboard blank;
- wooden skewers;
- decorative elements;
- tweezers.
All materials are available and inexpensive. The manufacturing process itself is as follows.
- First, we prepare a suitable cardboard base - you will need a cardboard ring (you can take it from used wide tape, 9 centimeters in diameter).
- We glue sketches of the future box to it (you can look up ideas on the Internet or come up with them yourself).
- Wrap the twine tightly around the cardboard template. Apply glue to the inner surface. We tightly glue the turns of twine over the entire surface, as well as onto the sides of the future box.
- We leave the prepared product to dry, after which we clean the film and remaining glue with a stationery knife.
The box is almost ready, but in order for the round jute box to transform into a turtle box, some decorative elements and a little patience are needed.
The bottom of the box can be fabulously decorated using openwork technique. We draw a circle with a compass, similar to the diameter of the cylinder, and, lubricating it with glue, carefully and slowly make curls, gluing them tightly together. Let it dry.
The bottom of the box is formed by evenly laying the twine on the sides. The thread is placed directly on the glue and pulled out in one direction clockwise until the space is completely filled.
Expert opinion
Smirnova Ekaterina Anatolevna
7 years of experience in interior design, professional architect
It's time to make the lid of the box. Everything is simple here: we lubricate the surface of the pre-prepared base with glue, and use twine to depict turns and ornaments of any complexity. Let it dry.
From a round box you can easily make a turtle-shaped box with your own hands by adding legs and a shell. As for the shell, you need to work hard, namely, paste the shell with identical buttons, preferably green.
Use small buttons, or better yet, beads to mark the border between the body and the shell. In the same way we fill the gaps of the box lid.
Since the tortoise shell is convex, before pasting it with buttons and beads, you should cut a piece of foam plastic in a semicircle with a stationery knife, glue it to the lid of the box and wait until the glue dries.
Using two white buttons we attach the eyes to the turtle. Instead of buttons, you can choose any other elements to your taste. Separately glue the neck and head of the turtle to the body. The lid of the box can simply be removed or a fastening mechanism can be mounted using small door hinges.
Tips for Beginners
- There should be no gaps in the cardboard; the work must be done carefully.
- Drawings and ornaments can be drawn, but it’s easier to print them from the Internet.
- The jute must be new, not old, stale, so that it does not tear during weaving and winding.
- All elements must be tightly fixed with glue. Then you should wait for the glue to dry completely.
As stated above, filigree is a jewelry work, so take enough time, work slowly, while enjoying the work done. Before you start weaving a box, you should prepare all the materials in advance. And of course, an enthusiastic approach is important. Something you can’t do without.
Interior decoration
The turtle is a symbol of nobility and prosperity, and therefore a box in the shape of a turtle, made by yourself, will become a priceless gift that can fit into any interior.
In addition to aesthetic pleasure, needlework and twine weaving is a stream of positive and inspiring energy.
Jute weaving is limitless - by twisting, the miracle thread can become not only a box, but also any other practical piece of furniture. It could be:
- interesting panel;
- vase;
- frame;
- souvenirs and Christmas tree toys;
- functional shelves;
- Wall Clock;
- candlesticks;
- interior partitions;
- flowerpots and swings;
- jute baskets (for plants, linen);
- chandelier;
- kitchen attributes;
- jewelry (bracelets, earrings).
Jute gives a certain comfort and charm to the home interior and bathroom. They can not only make what you want, but also use them as simple parts to decorate furniture, mirrors, and wall clocks.
Handicrafts in general have a beneficial effect on the psyche and make a person resistant to stress. During needlework, points on the palms and fingers that are responsible for certain organs are constantly massaged. And natural materials such as jute have an even more positive effect.
In addition to beautiful things made with one’s own hands, a person is also enriched spiritually. So, where there is beauty, there is health.
How to make a jute box, see below.
Design of costume jewelry
Jute thread is often used to make unusual jewelry. Using a cord or thread, you can decorate an old bracelet, hairband, or make an unusual pendant.
As a basis for work you will need old jewelry. The item will need to be cleaned of old decor and its surface degreased with a solvent.
Having thought through the pattern, the thread is glued to the product according to the template.
Additionally, it is easy to glue beads or rhinestones for beauty.
Take a non-standard approach, it is not difficult to create many interesting items from jute.
How to make a jute box with your own hands?
Making products from twine is a newfangled trend in needlework. The material is used for both small and large crafts.
Jute is used to weave stylish rugs and beautiful boxes - spectacular and inexpensive products that decorate the house, maintaining a rustic style and Provence. You can buy jute rugs or knit them yourself.
A cute little thing that is not difficult to make from jute with your own hands is a box.
You can store jewelry, memorabilia and trinkets that are simply dear to a woman’s heart in it.
Creative people are always interested in new directions, for example, various decorative elements, boxes, figurines, baskets and much more can be made from twine. Jewelry boxes made of jute and other small items are very popular.
A beautiful round box made of jute filigree technique will be a wonderful gift for family and friends.
To learn how to crochet a box, you need to read the detailed instructions for making it. With minimal cost and effort, the technology allows you to produce an original product.
The box can also serve as a decorative element for your own boudoir.
Jute is a magical material, you can make almost anything from it.
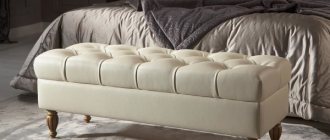
Stool decoration
Jute cord is highly durable. Therefore, it is used for the manufacture and decoration of stool seats.
It is easy to knit a decorative cover for a stool using knitting needles or a hook made of natural thread.
Another way to make a cover for a stool is to glue a spiral blank onto a fabric base. This method is suitable for those who do not know how to knit.
To make a seat, you need to wrap the opposite edges of the frame with cord.
Execution technique
First of all we make the bottom. You need to draw a pencil along the inside of the cylinder and cut out the resulting circle. You need to leave approximately 5 mm in reserve. We make cuts along the contour and glue the bottom for the workpiece. We put another circle on top of it and secure it with glue.
This box will decorate any home or become a pleasant gift for friends or colleagues.
The jute rope needs to be twisted into a spiral. Fixing it with glue, screw it on, completely filling the bottom area.
Wraps the side of the workpiece in the same way.
The work is done carefully so that there are no gaps in the cardboard.
Jute filigree is becoming very popular among needlewomen.
Expert opinion
Smirnova Ekaterina Anatolevna
7 years of experience in interior design, professional architect
Using a hook, you need to knit chains of air loops. Its length is equal to the circumference of the cylinder. The lid is made in the same way as the bottom of the product. You can crochet it.
Interior items made using filigree technique from jute cord fit harmoniously into the interior and can become a beautiful and expensive gift.
We cast on 2 air loops, and in the 3rd - 12 columns, then the number of loops needs to be doubled. Third row - knit 36 loops. We continue to perform the next two rows with 36 loops each. This way you will get a knitted lid for the box. We stretch ropes from the front side and attach wooden beads to them. We tie the ends into bows.
Considering the availability of jute, the main material for such creativity, absolutely everyone can master the technique of jute filigree.
You can draw a drawing on paper and work from the drawing, or you can immediately lay out the drawing in a frame.
Dish rack
An example of a rope craft for beginning needlewomen would be a stand for hot dishes.
To create it you will need:
- rope or jute cord;
- base (cardboard, cloth, wooden blank);
- universal glue;
- scissors or stationery knife.
Operating procedure.
- Give the base the required shape. Usually stands are made round or square. It is easier for beginning craftsmen to use a circle as a basis.
- The desired pattern is formed from rope or cord. It's easier to start with a spiral blank. The base is covered with glue, the cord is carefully laid in a spiral.
- The edge can be decorated with a cord of larger cross-section.
It is not difficult to depict any ornament on a wooden base. If you pre-impregnate the wood with stain and varnish it, the result will be a unique interior element.
Box made of jute filigree technique
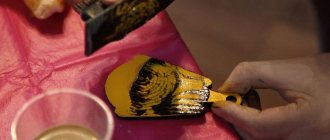
Basically, a cord of natural color is used for work, but for multi-colored work it is painted with acrylic paint. Also, to obtain white jute cord without dyeing, it is soaked in chlorine. The technique involves creating openwork patterns from jute twine.
Do you agree that there is often a moment when there is nowhere to put the next decoration? I propose to make a box with your own hands from jute twine using stationery tape.
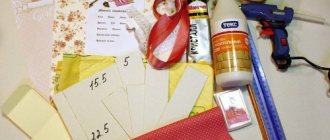
For work we will need:
- jute twine (cord)
- Titanium glue, or any other transparent glue.
Attention! It is necessary to work in a well-ventilated area, as the glue smells very strongly!
Stage 1. Take a piece of squared paper, put some tape on it and draw it around it.
Stage 2. Mark the center of the resulting circle. Insert the sheet into the file.
Stage 3. Apply glue to the middle of the file.
Stage 4. We start by twisting the curl.
Stage 5. Consistently fill the entire circle. Two such circles are needed. The first will serve as the bottom of the box, the second as its lid.
Stage 6. After we have filled the circle (the bottom of the future box), we do not cut the thread.
Stage 8. Glue the pattern to the tape in a circle. You need to glue it with tape yourself.
Stage 9. We place adhesive tape with a pattern on the bottom of the future box, coat it with glue and wind several rows to the pattern. Thus, we connect the bottom with the future box.
Stage 10. We cut the thread and wind several rows on top, as if creating headbands.
Stage 11. Coat the first curl on the pattern with glue, cut off a piece of twine (cut the ends diagonally). The pieces of twine should be of different lengths depending on the curl being laid out.
Stage 12. We lay curl after curl along the glue trail.
So, curl by curl, we lay out the entire pattern.
Important! So that the upper and lower patterns are glued flush to the rims. After the entire pattern is laid out, we leave the box to dry for a day. After drying, carefully separate the box from the tape with a stationery knife. So we walk around and take out the tape.
Stage 13. We make the lid in the same way as the bottom of the box. We again apply the tape to the workpiece and make a few turns around it.
We decorate the top of the lid with additional patterns.
We decorate the jute box with decorative elements.
The final stage. We treat the box with PVA glue diluted with water. We remove the remaining glue on the patterns with a hot awl.
Decorative plate
Take any salad bowl you like, cover it with film, secure it and start gluing it with curls, starting from the bottom of the plate. Curls can be placed arbitrarily, trying to maintain symmetry, or you can use any designs you like.
Tools – scissors, glue and knitting needle.
There is no need to immediately cut off a piece of thread. First put the drawing, then carefully cut and glue with small scissors. The film is well suited for this, as the rope adheres perfectly to it.
The most basic elements of this style are curls and loops; their alternation produces beautiful patterns.
Attention! We must try not to twist the thread and lay it as it unwinds from the skein. Otherwise, it may unravel after painting. You need to work with glue more carefully so that there is not too much of it.
Lay the patterns as you want, so that they are laid more often and densely.
Then you need to separate the pattern from the film with a sharp knife and wipe off the glue. Glue with diluted PVA and paint if desired. You can use a spray can or a brush.
The result is a plate, as in the photo.
Design options
Before you start making a box, you need to decide on its design. Here are the most interesting options.
- If you are just starting to get acquainted with a new type of creativity, choose simple options. These are boxes of rectangular, round or square shape. Avoid weaving complex volumetric elements in favor of a minimalist design. Once you are confident in making these crafts, you can move on to the next level of crafts.
- When making crafts to decorate a room in a retro style, pay attention to the “Nostalgia” style . A light openwork and round box will fit perfectly into the interior.
- Models with flowers and plant elements are the best choice for Provence style . One of the main characteristics of this trend is the plant motif. A heart-shaped product would also be great. You can decorate the products with beads, lace or ribbons.
- For a country , choose boxes with other decorative elements made of wood and even metal.
- If you want to decorate a child’s room with a handmade product using flexible jute, you can give the box any shape (bunny, kitten, butterfly and other options).
Tools and materials
When making crafts, you may need the following.
- Jute (twine).
- Rough burlap material.
- Sharp scissors.
- Threads and needles.
- Sewing centimeter and ruler.
- Various templates and stencils made of cardboard.
- Frame of a future craft.
- Decorative elements: lace, beads, rhinestones and much more.
- Adhesive composition.
Note: For beginners, it is better to prepare sketches of finished products for visual reference. The list of necessary tools and materials will differ depending on the chosen master class.
Simple craft ideas
You can start creating interior items using jute cord by making your own crafts from burlap and twine.
How to do it?
This master class for beginners will help you make an original craft with your own hands. During the manufacturing process, follow the instructions exactly. For work, prepare the following.
- Jute in two different colors (light and dark).
- Glue "Titan".
- Ruler or meter.
- Scissors.
- Round base (you can use a regular pan).
The step-by-step diagram will be like this. The first step is to make a circle of threads; to do this, the chosen shape is wrapped in jute 3 times and coated with glue. As soon as the composition has dried, the first element can be removed. This is what should happen. We make two such elements.
We put one of the circles on the mold (pan) and begin to glue two jute threads (strings) to it, placing them vertically, at the same distance between them (from 0.5 to 0.7 centimeters). If the gap is too large, the craft may look sloppy.
To prevent paired threads from interfering during work, you need to secure them on top with a thread.
On top of the product, at the base, glue a strip of three-strand tape, focusing on the attached photograph. Having risen a little higher, we place another such element. We repeat this step again. As a result, we got 3 rows at the same distance from each other.
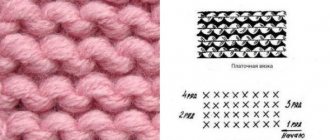
As soon as the glue with which you fix the threads has dried, remove the base. Now we need a light thread. With its help we weave a seam called “goat”. To make the pattern look neat, we hide the end of the thread inside and secure it with glue. If you are not familiar with the “goat” pattern, refer to the photo and the diagram attached below.
Let's create the bottom row. We make another row on top so that it looks like in the photo.
This is what the completed row will look like. Glue two more rows of three horizontal threads.
In this case, you need to use the form again. Using the pattern described above, make 3 more rows of light twine using the goat pattern.
This is the final basis for the future box.
To secure the structure, you need to glue another strip of jute to the outside, and to the inside we attach the circle that we made at the beginning. For a neat appearance, cut the racks along the inner circle.
It is worth noting that the circle of threads on the outside should be located slightly lower than the inside, as in the picture. Now we glue another element of threads on the outside. It will already be on the same level as the inner circle.
Now we decorate the top edge, glue a ribbon of three jutes to it on top of the product. Top view of the finished edge.
Now we need to make the lid. We make a circle of three threads, taking into account the diameter of the box.
Expert opinion
Smirnova Ekaterina Anatolevna
7 years of experience in interior design, professional architect
After finishing the elements on the inside, you need to glue a few more ribbons, making 3 or 4 rows. To check the dimensions of the cover, place the product on it.
Next, from ribbons (ribbons made from threads) you need to create a mesh, as shown in the picture. Using elements of the same length, fill the entire lid.
Next, the resulting mesh needs to be trimmed in a circle, giving it the desired shape. Connect the two pieces and get a base for the lid that will look like this.
Now the mesh needs to be decorated using white jute. Select a cross pattern.
Using two ribbons, braid the edges of the finished mesh on both sides, as shown in the picture. We glue the resulting part into a circle made specifically for the lid.
Now you need to connect the two parts of the craft - you will get a nice handmade product. The junction of the bottom of the box with the base must be covered with a wide ribbon of twine.
To make the lid hold better, you can add a border to it. The original craft is ready.
It can be decorated with various decor, such as artificial flowers.
Watch the video for a master class on making a bean bag.