Decoupage is the process of decorating the surface of objects with patterned napkins that are glued to plastic, wood or metal.
The surface is first cleaned, painted, and after the image is transferred by removing a layer from a napkin and placed on PVA, it is varnished and a real masterpiece is obtained!
The history of decoupage
The use of this decoration technique first began in medieval Europe.
This type of decor was used to decorate the facades of furniture in Germany in the 15th century. Great demand for such decoration arose in the 17th century in Italy. Cabinetmakers used paper decor in the form of pictures to decorate inlaid furniture. The fashion for such products arose after the era of the Great Geographical Discoveries, when furniture products designed in Chinese or Japanese style became popular among the European elite.
From the Middle Ages to the present day
The first mention of decoupage as a separate art form dates back to the end of the 15th century: in China they decided to decorate utensils with cut out pictures. In Europe, it gained popularity in the 17th century: in this way, furniture was decorated with various inlays in the oriental style.
This decorative design still offers different styles and effects that can be combined to create a unique solution. If you supplement it with techniques such as craquelure or brushing, the result will exceed even your wildest expectations.
All kinds of patterns, drawings, and landscapes can be used as applications. Beginners are recommended to start with the easiest options to perform. In the future it will be possible to perform more complex work.
Below are recommendations and useful tips on how to make decoupage on wood from beautiful decorative napkins . It is this technique that is most understandable and accessible for implementation.
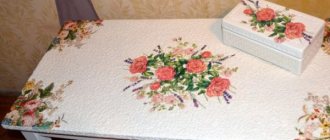
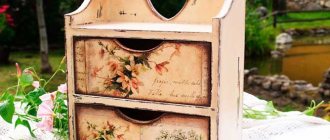
In this way, you can not only show your creativity in various interior items, but also restore old furniture that has lost its appearance. Dressers and cabinets, chests and caskets, tables and chairs, as well as other items will find a second life and continue to delight their owners.
Materials and tools
Before starting work, you should master the basic instructions and rules underlying the decoupage technique, become familiar with the set of tools and the features of processing the surface pasted with drawings.
Before starting work you should prepare:
- wooden products whose surface will be decorated;
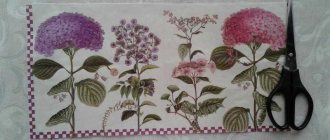
- paper napkins with suitable images;
- brushes;
- PVA glue;
- clear acrylic varnish and acrylic paints;
- dry wipes;
- primer;
- scissors;
- wood putty.
Advice! Beginners can buy special decoupage kits in craft stores, which contain everything they need for work.
Preparatory stage
Before you start decorating a wooden surface, it should be properly prepared for work. Typically, the decoupage technique is used to restore old wooden surfaces that need to be prepared for work. To do this, the workpiece is cleaned of dirt and dust using damp microfiber.
If there are cracks, irregularities and chips on the wooden surface, they need to be repaired with a special wood putty. Apply the primer to the surface of the wood using a spatula. When the putty dries, the wood needs to be treated with fine sandpaper.
After this, you need to prime the surface, dry it and sand it again. Afterwards, remove the working dust and begin gluing the paper image. If the wooden product that will be decorated using the decoupage technique is old, then the primer should be applied twice. This pre-treatment will make the wooden surface perfectly smooth and allow the paper decor to adhere firmly.
When the blank is prepared, you need to decide on the decor by choosing a suitable thematic image. You can use any napkins with a picture, the main thing is that the picture lies evenly during gluing. The easiest way for a beginner to work is with three-layer paper napkins, which have a certain paper quality.
Surface preparation
The wooden base must be prepared. To do this, remove any remnants of old paint, varnish or other coating. The surface must be cleaned of dust and dirt, treated with a grinding machine or emery cloth.
An ideal result can only be obtained when working with a clean and smooth surface.
- A piece of wood or a board for decoupage should have a minimum number of knots and cracks.
- For convenience, a piece of furniture can be disassembled into parts.
Step-by-step instructions for decoupage techniques
Before starting work, you need to remove the image layer and cut out the necessary pictures for decoration. There is no need to worry about the thin paper tearing. The picture in the glued state will look intact if it is placed correctly on a wooden surface.
Instead of scissors, you can carefully tear out images on a thin colored layer of napkin with your hands. First you need to make at least an approximate sketch to make it easier to lay out the desired decor from paper pictures on the surface of a wooden blank.
After all the pictures from the napkins have been prepared, the paper fragments should be laid out on the item to be decorated to see how the overall pattern being created will look. When the sketch of the future decor takes on a finished form and it is clear where to glue the paper fragments, you can proceed directly to the decopage itself.
How to correct shortcomings
If the product consists of several small parts that are combined into a single composition, then the edges of the fragments need to be straightened with your fingers or a thin brush. If it is noticed that in some places there is some kind of heterogeneity, then this can be corrected with the help of paints and different shades.
If the surface is still a little damp, then the details can also be drawn with a thin brush and paints - some details can be highlighted with additional colors to make them clearer.
After this, the boundaries of the finished item are drawn up. There are several methods here too. In some cases, they prefer to get rid of the edges by cutting them off, sometimes you can paint the sides, and in some cases the edges of the napkin are folded. There are a lot of techniques here depending on what a person is working with.
Finally, the product is left to dry: if you want to speed up the process, you can use a hair dryer (only at a distance so that the parts do not move).
Decoupage technique: highlights
The algorithm for this decor is simple:
- glue is applied to the paper fragment with a soft brush;
- the picture is glued to a wooden surface;
- the pasted image is dried;
- Colorless acrylic varnish is applied to the decor created from paper napkins.
Coating the finished work with varnish is the final stage. The varnish is applied in two layers. If desired, using special coatings you can create the effect of a patina or an aged surface on which characteristic cracks appear.
These are the basic principles of decoupage technique. In addition to them, there are special varieties of such decor, which will be described below. Having mastered simple pasting, you can move on to more complex ways of decorating wooden surfaces with images from paper napkins.
Interesting ideas
The decoupage technique allows you to decorate objects in any style. For this reason, it is in great demand when decorating rooms.
At the planning stage, it is necessary to carefully consider the appearance of the item and select suitable elements for decoupage.
Delicate floral patterns will look harmonious on a white or very light background.
Artificially aged items will fit well into a classic design.
Bright compositions are perfectly emphasized by a dark background.
Black and white illustrations or old newspapers are perfect for modern interiors.
A creative approach to work will allow you to create bright and unusual interior items.
Decoupage technique of “implanting napkins into wood”
This is a more complex technique, the use of which when decorating wooden products will require additional materials:
- wax;
- cloth for polishing waxed surfaces;
- gas burner for roasting;
- metal brush.
This decoupage technique is performed on the basis of wood brushing - artificial aging of the surface. First, the wooden surface is prepared, which is given an antique look. To do this, the front side of the wood is burned with a torch, then part of the burnt surface is removed and brushing is carried out: processing the wood with a metal brush, which is moved along the wood fibers with light pressure.
This method removes the top layer of soft wood fibers, making the texture of the wood clearer and more prominent. Brushing is similar to scraping wood. This operation should be done carefully, otherwise the wooden workpiece may be damaged.
Pre-firing the wooden surface destroys the soft fibers of the wood and simplifies the brushing process.
After finishing brushing, you need to sand the wood with sandpaper of different grain sizes, having previously treated the surface with stain or varnish. Sanding should also be carried out along the grain of the wood.
After this aging of the wood, wax begins to be rubbed in. When waxing is finished, you need to sand the surface and polish it. Then you can glue the paper pictures by applying glue to them. When the paper decor is completely applied, the surface is dried and coated with acrylic varnish. You can also use the craquelure technique - creating small cracks that imitate an aged paint surface. To do this, you can use a special craquelure varnish.
Master class on decorating a cutting board using decoupage technique
After mastering the decopage method, you can try to make your first work. Beginners should choose small items with a flat surface for decoration. A wooden cutting board is best suited for this.
To work you will need to prepare:
- wooden cutting board;
- white primer for wood;
- three-layer paper napkins;
- PVA glue;
- sponges;
- tassels;
- acrylic varnish and acrylic paints.
If the surface of the board is old and dirty, it should be sanded. Then the prepared workpiece is primed and dried. While it dries, select a suitable pattern for decoration. To create an original image, you can combine fragments of drawings from different napkins, creating original thematic pictures.
The white primer layer will be the background for the image. The edges do not need to be covered with pasted images. The glue will be brushed onto the paper image, not onto the wooden surface.
When all the fragments of the image are pasted, you need to let the decor dry, and then cover it with acrylic varnish in several layers. It is optimal to apply 5-8 layers of varnish. Each layer should be thoroughly dried before applying the next one.
Having mastered the decoupage technique, you can transform your living space in your home or country house with your own hands. This decor allows you to give old furniture a spectacular appearance. Using decoupage, you can create original household items that will be an excellent gift for family and friends. Those who are seriously interested in such applied creativity can turn it into a profitable business.
Useful tips
Wooden surfaces decorated with decoupage fit harmoniously into any interior. Using different design methods, it’s easy to create unique interior items with your own hands.
A few useful tips will help you achieve better results:
- It is recommended to apply the glue with a soft brush to create an even layer,
- Gilding looks impressive to create “antique” products.
For uniform painting, work should be done on horizontal surfaces. For this reason, it is recommended that furniture pieces be dismantled and then reassembled.