It is difficult to imagine a beautiful, complete interior without perfectly matching curtains. The market offers such a wide selection of types and colors of window treatments that you can easily get lost in it. Some resort to the help of designers, while others cope on their own. In the second case, you can pay attention to such a detail as swag. You can make such curtains yourself, the main thing is to stock up on expert advice.
Beautifully decorated window openings can give even the most trivial interior charm and a sophisticated appearance.
Exquisite curtains are not only a decoration for a room, they help create a cozy atmosphere that allows you to rest and unwind after an active day.
What is swag?
Those who are faced with the process of choosing new curtains for the first time often ask the question “What is swag?” Swag is one of the elements that can be used to decorate curtains, namely an addition to the lambrequin (its upper part); it is draped in a special way. It looks like a semicircle with folds on it. It consists of a head and shoulders (some call them wings).
Curtains can look like a real work of art if swags are used to create them.
Depth is the degree of its sagging, length is the length that this element occupies on the cornice. Next comes the middle part - the middle along the cornice. The shoulder is the part with drapery folds and other fabrics. Even when preparing a pattern, you come across the concept of “sag” (the third name is “depth”), this is the length by which the lower part can fall from the upper. Usually the difficulty is in arranging them correctly, but if done correctly, they will become a real highlight in the style of your room.
If you imagine exquisite, expensive curtains, then most likely they will be decorated with a lambrequin with swags.
Swag is used as a decorative component when sewing elegant and luxurious curtains.
Related videos
httpv://youtu.be/uZyAc_fyAx8
Sewing a swag yourself is not difficult, we have already found out this fact. In addition, mechanical swag is only one of the methods for beginners, which is designed to simplify the sewing process. But after mastering, the result will be charming, and, most importantly, this is a reason to be proud of a product you made yourself. Another plus is that after the first window you will want to redo the rest; skill can only grow and grow over time. Step by step, the sewing business will yield to you and the pieces will begin to come out better. Various video tutorials filmed by professional artists can help you master other techniques. There are many on the Internet, you just need to choose the right one for yourself.
Types: what are they?
Equilateral swag
This is usually used if there are other decorative elements on the curtains, since it does not overload the composition and looks symmetrical, its shoulders are the same.
Swag is used to decorate a window opening.
In order to speed up the sewing process, you can use a ready-made pattern. List of main parameters that must be taken into account when sewing a swag with equal sides:
- Middle;
- Shoulder;
- Depth;
- Bottom sag length.
It is part of a horizontal soft lambrequin, which is designed to give the curtains a sophisticated and sophisticated appearance.
Asymmetrical swag
This species will have different shoulders: one is wider and the other is narrower.
Despite the fact that swags are considered an integral element of the classical style, this does not mean that they are not used in other stylistic directions.
We will describe how to cut and calculate the parameters of the swag. To build this element, you can choose a fabric measuring 140*140, then divide this segment with chalk into two halves diagonally. Then you need to draw lines in both directions that will be equal to half the length of the element; we do this perpendicularly. At the ends of the resulting line we place point No. 1 and point No. 2.
The correct selection of colors and textures will help revive a room decorated in the Art Nouveau and even High-Tech style, bringing its share of the avant-garde.
Important! It is imperative to take allowances into account in order to process the edges later (approximately 05. – 1 cm).
At an angle of 15 degrees from points 1 and 2, you need to set aside segments that will be the same in length as the swag’s shoulder (if you don’t trust your eye, use a protractor). At the ends of the segment you need to put point No. 3 and point No. 4.
“Svag” translated from English means “garland” or “leaf-shaped ornament.”
On the diagonal itself, you need to cancel the sagging depth (let it be marked as point A), connect points A and 3, as well as points A and 4 with an arc. The pattern is ready.
Scheme
It’s worth making it a rule to make sketches of future lambrequins. This helps to choose the best arrangement of elements and their proportions in accordance with the size of the window, cornice, curtains. It is better to carry out the diagram on a scale, for example, 1:10. In this case, a three-meter lambrequin on paper will be equal to 30 cm.
If you adhere to this rule, it will not be difficult for you to find out any size of the lambrequin component. To do this, you just need to measure it with a ruler or count the number of cells and multiply by the scale value.
You can carry out all constructions on a computer or in a specialized NanoCad program, which allows you to obtain drawings, patterns of curtains and their components with sizing.
Do-it-yourself swag: how to make patterns? Step by step description
Sewing this element is a rather complex and multifaceted process. It can take a lot of time to master the art of sewing and become a professional at it, but for beginner seamstresses and hobbyists there are simpler methods by which you can sew a curtain.
It is made in the form of a semicircle, sagging freely, and consists of beautiful draped folds.
You shouldn’t be scared, because according to the instructions of this easy method, anyone can sew such curtains. The whole point is that you can sew not only a classic swag, but also a simpler one to make - a mechanical one. Its peculiarity is that folds can be made not by hand, but by resorting to tricks and using mounting tape, or you can come across such a name as curtain tape. At the same time, it is almost impossible to distinguish this option from the one that was created manually. Therefore, this alternative is not at all inferior to the classical method. So, a small master class on sewing an equilateral swag.
Several swags can be used simultaneously in one lambrequin, which are arranged as if overlapping each other.
Often between them you need to sew an additional decorative element that will fill the resulting space.
Options:
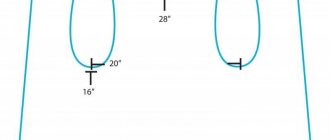
As a standard, these elements are sewn with a height of 35 cm and a width of 60. These dimensions may vary slightly, depending on the size of the window and the desired effect. We will use the following parameters:
- length 90 cm;
- depth 45 cm;
- the bottom sag is 140 cm.
Swags do not always have the same width, for example, the central element may be smaller than the side parts.
From these measurements it turns out that:
A – half (of its middle) – 15cm
B – depth – 45 cm
B – shoulder – 30cm
G – half of the lower sag – 70cm
Being at different heights from the cornice, they form a two-level composition.
You can decide on your own what size your swags will be by slightly editing the patterns.
Sequencing
Whatever version of the product you choose, usually sewing a swag with your own hands consists of the following steps:
- Selecting a suitable model and drawing up a diagram.
- Taking measurements and calculating the size of the swag and the amount of material.
- Constructing a pattern or scaling a finished template.
- Positioning the part on the fabric (this is always done diagonally) and cutting.
- Creating folds.
- Sewing seams, finishing edges, hemming curtain tape or Velcro for attaching to the cornice.
The work at each stage may differ slightly, but in general the scheme always remains approximately the same.
We create patterns to sew swags
The first step is to construct an angle with vertex (1). From it to the right you need to set aside a segment that will be equal to half the middle + 3 cm for processing. It turns out 18 cm. The second end of this segment will be point No. 4. Next, we also measure a segment from point No. 1, the length of which will be equal to the depth parameter multiplied by k, where k is equal to 2 - 2.5.
Creating a swag is quite a troublesome and painstaking task, but there are easier and simpler options, for example, “shell”.
Additional Information! This indicator depends on the chosen fabric: if we are working with dry fabric that is stiff enough for draping, then it is better that this indicator is equal to 2. But if the fabric is soft and easy to drape, then it is better that in this case k is equal to 2 ,5.
Even a novice craftswoman can drape such an option. It received this name due to its similarity to a sea shell.
Next step: from point two we draw a circle. Instead of a compass, you can use a thread, attaching it to point No. 1. After this, on the resulting arc from point No. 2, mark point No. 3. it should be in half of the lower sag, and, of course, do not forget about the additional 3 cm for processing. We connect points No. 3 and No. 4 with a straight line, and the angle that will be obtained at point 4 will be slightly rounded. As a result of the work done, we get a figure (1-2-3-4) - it will be the basis of our pattern. We will make the stitching of the mounting tape along line 1-4-3, and the tie on section 4-3. The middle (1-4) is not tightened, but only processed.
There are several varieties of this element for decorating window openings, each of which has its own flavor and is characterized by distinctive features.
Usually this element is sewn on a lining, but using soft fabric you can do without it. So, we have half of the pattern ready.
Swags come in a variety of designs, including two-level ones.
Additional Information! In this case, you can cut at an angle of 45 degrees, or you can cut along the warp thread, this is even more convenient.
This type is located in a horizontal plane relative to the entire curtain fabric at the same height.
When you start sewing, work the side that lies between points 2 and 3 using a bias stitch or a double bend. On those sides to which the curtain tape will be sewn (1-4-3), turn the seam allowance inside out and then iron it. From the wrong side we stitch the curtain tape. We tighten side 4-3, and leave the middle (1-4) unstretched. Now the pattern is ready!
This model can also have asymmetrically laid shoulders.
Carrying out cutting
The design of the lambrequin will look more interesting if the mounting board is decorated with contrasting fabric with a pattern.
To cut lambrequin fabric for one window, you need to prepare the fabric from which the following parts will be obtained:
- swag - 1 pc.;
- lining - 1 pc.;
- cascade - 4 pcs.
Separately, a piece of fabric is prepared, which is necessary for upholstering the mounting board so that its base does not show through the beautiful drapery. To make the cutting as simple and fast as possible, it is necessary to place its central part while drawing the contours within the frame of the remaining elements. This will save fabric, and the work itself will be quick and easy. If you use fabric with patterns and designs to sew a lambrequin, then symmetry must be observed during cutting. Otherwise, the lambrequin will not look so neat. The symmetry should be located from the middle, so the folds will be much more pronounced and brighter, and the design itself will turn out to be exquisite.
For lining fabric, it is best to use a piece of a contrasting shade, since during fastening the reverse side will be slightly visible from under the folds. However, if such an effect is not needed, then you can take textiles of the same color, but in slightly different tones. Then the flowing shape of the cascade will be expressed more clearly and beautifully.
With the transition to de jabot
Curtains can be made even more unusual and original if you use the technique of transition to de jabot. This option can replace two components of a lambrequin at once; in addition, it allows you to avoid primitive and boring design solutions.
Thanks to the presence of such an element, you can create decorative patterns from curtains, giving the room sophistication and elegance.
Accordingly, the pattern will consist of two parts: the swag pattern, which will be attached to the de jabot pattern. So let's get started.
It is necessary to select the material for such an element with special care, since the entire appearance of the resulting composition depends on it.
- We are building a swag pattern. In the previous paragraphs, we have already looked at how to make a pattern for an asymmetrical and ordinary element.
- We attach an element de jabot to this pattern. How to make a pattern for it? Let's look further.
- On the perpendicular to the fold of the fabric aB from point G1, mark the distance G1D, it will be equal to the length of the finished element de jabot along the cornice, taking into account the folds.
- From point D we draw a perpendicular to line G1D and measure the height of the de jabot on it (in the figure this is point DD1)
- All that remains is to draw the sag line.
If you want the folds of the swag to be soft, then opt for fabric that drapes easily.
The swag pattern with the transition to de jabot is ready!
How is tailoring done?
Before making a lambrequin, you need to sew a swag. First you need to make an allowance for the future seam and iron it carefully. A similar action is repeated for the lining part of the future lambrequin. After this, the parts of the face and back are put together with their front parts. The braid is pre-sewn between the base and the lining.
Next, using a sewing machine, the parts are stitched, but one corner remains unstitched so that the part can be turned out later. Now you also need to iron the swag, and carefully close the left corner using a hidden seam. All seam allowances are turned out and smoothed out. The parts of the future cascade must be folded right sides together and stitched, but one corner also remains unstitched. The fabric is turned inside out and stitched after smoothing in exactly the same way as for the previous piece. After all the elements of the future lambrequin are ready, you need to use regular chalk or a bar of soap to apply neat marks in those places where folds will form when attaching the lambrequin to the mounting board.
Use a ready-made template
If you are new to this business, in order to properly sew a swag with your own hands, it is better to take ready-made patterns. Now computer technology has greatly simplified search and work.
You can print the version you like in the desired scale on a printer. There are two ways:
- Make a pattern in parts on landscape sheets of home printing equipment.
- Order from a company that provides large-format image production services.
In the first case, you will do everything without leaving home, but you will have to glue the sheets with tape. In the second option, you won’t have to connect anything, but you will have to spend extra money.