Category: Repair
Published 10/11/2021 · Comments: · Reading time: 6 min · Views: Post Views: 2,821
None of the things are eternal, and sooner or later they become unusable. There can be many reasons for this, but the main one is the expired service life, or failure to comply with basic rules.
How can you fix a closet door yourself?
What problems can happen with furniture hinges?
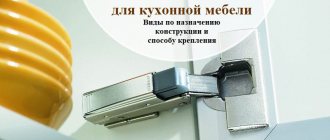
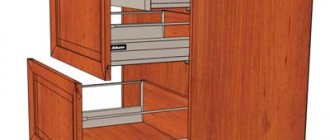
Modern designer furniture, kitchen units, cabinets, shelves, are complemented by closing doors made of different materials, which are connected using hinges. Because of them, various types of breakdowns occur and eventually the furniture hinge will need to be repaired.
Typical chipboard damage
To be precise, our furniture is made of chipboard - this is the official name for particle board, and chipboard means wood-laminated plastic. But it turned out that the second abbreviation took root, and it became the name of exactly the material that we are used to seeing in our homes.
The most common damage to chipboard panels can be considered the following:
- Scratches, cuts and cracks on the surface.
- Destruction of material in places where hinges and other metal parts are attached.
- Damage due to moisture.
Moisture getting inside the slab through damage to the coating will lead to irreversible changes in the material - swelling and loss of strength. Also, chipboard products cannot withstand dynamic loads; the hinge attachment points can break off along with part of the slab.
Chipboard repair in each of the listed cases will differ in complexity, tools and materials used. This will be discussed in more detail below.
Causes of problems
- The door fell off. So the loop couldn't stand it. Reason: weak screwing of self-tapping screws or screws.
- The hinges were torn out by the roots. The main reason is the incorrect calculation of the depth for the screws or the door is too heavy for this fastener. Frequent opening and closing of furniture doors.
- Deformation of fasteners. The protective decorative coating has peeled off. Violation of furniture manufacturing technology. A crack or dent has appeared under the varnish facing film. Improper drying of wood when making furniture. Wear of mobile joints. The furniture has become misaligned.
- Manufacturing defects. Due to incorrect manufacturing of connecting parts, the result is defective fasteners, which, when screwed in, lead to frequent breakdowns.
- Frequent disassembly. Unfortunately, with frequent disassembly and assembly of furniture, it leads to the fact that the previous holes in the seats can no longer hold the fastening loops.
- Loosening. Occurs from frequent opening and not careful closing of doors. Make adjustments using screws. Do not twist, check that the lid fits tightly to the surface and there should be no movement. Otherwise, deformation will occur.
- Incorrect fitting of furniture hinges leads to problems.
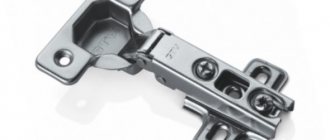
How to repair a broken furniture hinge?
When furniture breaks down, any modern interior loses its appearance and, at first glance, new furniture instantly turns into old trash. There is some confusion in this situation. An uprooted hinge immediately catches the eye of household members or guests who come to the apartment. You can repair a furniture hinge at home yourself.
We'll give you tips on repairing broken furniture hinges.
- You can raise the loop higher or lower it and screw it on.
- If there is nothing left to fasten to, then do the following: fill all the torn places with epoxy resin and put the fasteners in their original place. It has been proven that this method holds the loops for a long time. The resin must dry completely.
- Cut out the area of the torn loop and replace it with a new insert. Then adjust the color and attach a new loop.
- Attach a new block to the surface of the damaged door using self-tapping screws and screw in new hinges. If you don’t want to make other holes, then place the bars on glue and place them under a press. The press time is up to 10 hours, this is a kind of reinsurance against a new breakdown.
If there are only holes left on the surface of the furniture, then you can drive the wedges in and tighten them using special screws, but it is advisable to select them a little longer than the previous screws.
A few words about chipboard
The history of the material dates back to ancient China. It was there that paper was first made by mixing sawdust with water and then drying it on a special mesh. This material received its further development only in the second half of the 19th century. However, these were unsuccessful attempts to create chipboard. Only in the 50s of the 20th century did they begin to mass-produce furniture boards in the form in which we can see them now. Only laminated ones appeared later.
Unfortunately, some modern manufacturers prefer quantity over quality. Many people still remember furniture made in the USSR. It was more reliable than the modern one and still serves today. But even in this case, the question often arises of how to repair a cabinet door made of chipboard. This is not very difficult to do if the integrity of the material is slightly damaged.
Restoring holes for fasteners
Chipboard is a fairly durable material, but only if its integrity is maintained.
Due to improper use, heavy loads, frequent opening or disassembling of furniture, various fittings fall out of their fastening points. In this case, simply tightening the fasteners will not work, since the hole has become larger.
Therefore, you can either move the mount to a new location or restore the old area.
Fittings and fasteners on chipboard furniture may also sometimes need restoration. To do this you need:
- Enlarge the existing hole using a drill with a diameter of 8 mm.
- Pour wood glue or plain PVA inside the hole.
- Hammer coke or a wooden wedge into the hole and cut off the excess.
- Drill a hole in the coke with a smaller diameter than the self-tapping screw.
- Install the fasteners in their original place.
The holes for fasteners can be widened using a drill.
Tools used in furniture repair
Tools for chipboard restoration are selected depending on the type and complexity of the damage.
- Electric drill with a set of drills.
- Flap grinding wheel.
- Felt pad for polishing.
- Screwdriver.
- Circular Saw.
- Milling machine.
- Construction hairdryer.
- Sandpaper, brushes, roller.
Of course, not all of these tools will be used when repairing chipboards, but it is better if they are available.
Helpful tip: A flap wheel is indispensable when sanding large surfaces. But it has a significant drawback - the petals become clogged with particles of old paint, varnish or resin, and the circle ceases to perform its functions. This is easy to fix, just put it in water for 10-15 minutes, clean it with a wire brush, and it will be as good as new. You can clean any abrasive in the same way.
What to do if you need a small brush, but don’t have one at hand? Linden bark will help out - a stick cut out of it needs to be dipped in boiling water, dried and one edge riveted with a hammer. You will get a good brush, which also has one advantage - the dried tip does not need to be cleaned, you just need to cut it off and throw it away. The edge needs to be riveted again with a hammer, and the brush is ready.
What furniture screws are needed?
Chipboard screws are special hardware products that are used to connect wood products. Furniture screws make a strong threaded connection that does not destroy chipboards and wood.
Screws of this type are used when assembling furniture products from various types of particle boards:
- chipboard;
- laminated chipboard;
- plywood.
They are also used when attaching narrow drywall. These screws are made from strong iron alloys. They have the following system:
- a head that provides torque;
- slot - a recess in the end part of the head;
- bulky threads protruding from the iron rod, which are conical and jagged at the bottom;
- a sharp tip that quickly penetrates the structure of the wood board.
A special hardware system, which has a large threaded and rod surface, allows you to reduce the load at the joint, which increases the strength of furniture or other structures assembled from chipboards.
For the production of such screws, durable carbon steel is used, which ensures durability and strength of such hardware. To protect against water, the finished screw is coated with a special anti-corrosion compound consisting of zinc, brass and nickel.
The introduction of similar devices will extend the life of a product or structure assembled from chipboard.
A special system of hardware is tightly connected to the material due to the similar diameter of the smooth part of its rod. If you fail to screw a screw into a chipboard, you can quickly turn it back, causing minor damage to the board.
There are two types of such screws:
- all-round;
- confirmation;
- elements with blunt ends.
They can have different sizes. To assemble furniture from chipboard, screws with a diameter of 1.6 to 10 mm are usually used. The length of one unit can vary from 13 to 120 mm. For narrow chipboards, hardware 16 mm long is most often used. Ordinary screws have a cylinder-shaped shaft and a head of different shapes:
- secret;
- semi-secret;
- semicircular.
Models with a countersunk head are used when attaching handles, hinges, and guides for drawers. The screw sinks completely into the material.
Hardware with a semi-countersunk head is used in the development of fastenings that are completely hidden in the material. Thanks to the smooth transition from the rod to the threaded surface, when twisted, such a head is completely immersed in the material.
Hardware with a semicircular head is used in those cases when it is necessary to make a connection of increased strength and eliminate the possibility of deformation of the created chipboard structure. A universal screw can have regular or cross-shaped slots. The introduction of products with cross-slots provides a number of operational advantages:
- during operation, the drill or screwdriver is firmly installed in the head the first time;
- when twisting, you can work with only one screwdriver;
- such screws are simply installed in inaccessible places of a chipboard product.
Euro-screws are called confirmats, which are now most often used in furniture production. These are reliable and cheap furniture hardware that allows you to create strong connections that are resistant to powerful mechanical actions, including fracture.
They can also be used instead of corners when assembling cabinet furniture. To hide the screw after tightening it, the head is locked with a special plastic plug.
Restoration of broken areas
How to repair chipboard if its hinges are broken? This is quite a difficult job, sometimes requiring the use of special tools.
The most common damage is a torn hinge and damaged screw insertion points. In this case, there are two ways to repair the chipboard:
- fill the damaged area with a mixture of PVA glue and sawdust;
- Drill a hole and hammer a wooden rod of the appropriate diameter into it, after lubricating it with PVA glue.
The first method is simpler, but less durable - screws that are screwed in will become loose over time.
The second one is more reliable, it requires accuracy and skills in working with wood. The main thing here is not to drill through the chipboard; for this, a special limiter attachment is put on the drill, with the help of which the drilling depth is set.
After gluing, the wooden rod will protrude from the base; it is best to cut off the excess with a hacksaw blade for metal, and then sand it with sandpaper until a smooth surface is formed.
How to repair a chipboard if moisture gets inside it?
In this case, the material swells and loses strength. The edge of the tabletop can be trimmed using a circular saw, and a piece of chipboard of the same size can be glued in its place.
If you carefully select the color of the coating, the joint will be barely noticeable; it must also be protected from moisture with varnish.
What to do when completely dismantling a cabinet door
If the cabinet door has completely fallen off, this indicates that the hinges have been completely torn out. To solve this problem, you need to purchase hinges of the same size and install them, slightly changing the position.
True, it is worth carrying out preliminary preparatory work that will close the gaps that have formed. For these works, PVA glue and sawdust, or a special product will help.
How to repair a broken furniture hinge
The furniture hinge on the façade can be torn out of its seat along with part of the chipboard. In this case, the ideal option would be to completely replace the door. However, it is not always possible to choose a material of the same shade as the main structure, and therefore it is worth trying to repair the canvas.
Broken hinges are a common problem with chipboard furniture.
There are two options:
- Move the hinges below or above the original installation location. This is an easier method, but it will require sealing the old holes. A plastic plug is suitable for this. If the hole is large, then it must be filled with a mixture of PVA and small sawdust. After final drying, the area is masked with wax and polished.
- Repair original seats.
You can repair the hinges using the two methods above.
A more complex option, but one that avoids new holes, which will extend the life of the facade. The works look like this:
- clear the landing site;
- pour a mixture of epoxy resin and sawdust into the recess;
- level the surface with a plastic or rubber spatula;
- wait for it to dry and, if necessary, add more mixture;
- After drying, sand the area;
- Mark the area and drill a groove for fastening to the required depth.
To extend the service life of hinges and facades, it is necessary to open the doors smoothly and not hang heavy objects on the handles, as this leads to distortion.
Loop position offset
This is the easiest way to fix a torn hinge - move it 1-2 cm up or down. However, we must remember that changing the position is necessary both on the door and on the cabinet itself. To make screwing in a new location easier, it is recommended to make small holes first, which will make it easier to secure the screws.
One way to repair doors is to move the mechanism to another location.
This method will cause a little more problems in the case of cup hinges, for which we will additionally have to cut holes to insert the hinge into them. The easiest way to do this is to use a carpenter's chisel.
Changing the position of the hinge is associated with leaving unsightly holes after the previous fixation of the entire mechanism. Fortunately, the holes are located inside the furniture and will remain invisible to outsiders.
The holes will not be visible to the naked eye.
Purchasing a new loop
Purchasing a new hinge is advisable if you do not want to waste your time and energy on repairs. In this case, loops of a different type and size are purchased, then they are installed in another location. The unnecessary hole is covered up, and the new mount is installed lower or higher than the old one.
In some cases, purchasing a new loop will help.
Seal holes with toothpicks or matches
This method is the simplest and to perform it we will need regular PVA glue, matches or wooden toothpicks. Next, put together the required number of toothpicks so that they fit into the hole as tightly as possible, then dip them in PVA glue and insert them into the hole.
Then take a hammer and easily hammer them into the hole until the end, leave until the glue has completely hardened. We cut off the remains sticking out of the hole with a stationery knife or a hacksaw, then clean it with sandpaper.
The aesthetic aspect of this method leaves much to be desired and may well be used in places where the hole will be hidden from view.
Repair using furniture confirmations
To secure the hinge, you can use special furniture fasteners - confirmats.
They are similar to self-tapping screws, have sharp threads, but are made of softer metal.
These fasteners have a larger diameter and sometimes it is enough to replace ordinary screws with them to return the door to its place.
To insert furniture fasteners, you need to drill out the damaged hole. Use a drill stop to prevent the door from going all the way through. It could even be a simple plastic tube from a felt-tip pen.
Then simply put the loop in place and secure it with a confirmat. But don't forget to add a self-tapping screw in the center of the hinge for security.
An alternative would be to use a metal liner. It is screwed into the hole and then a self-tapping screw is attached to it.
Mortise furniture nut and screw
If the hole did not fall out with chips when the self-tapping screw came off, you can drill it out and screw a furniture nut into it.
After this, the loop is installed on a screw instead of a self-tapping screw. This method is significantly stronger, since the mortise nuts have a larger grip area and therefore hold better.
6. Restore the hole with a wooden dowel
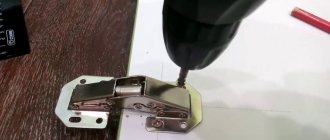
First of all, we measure the thickness of the chipboard. Next, take a wood drill and set either a limiter or a mark on it to make a hole of a certain depth. If your material thickness is, say, 9 mm, then you need to drill to a depth of no more than 7 mm.
The thickness of the drill is also selected individually, everything depends on the diameter of the screw being screwed in and the nature of the damage. I took a 5 mm drill. Carefully drill a blind hole.
There is no need to rush, because if you accidentally drill the front side, it will not be pleasant.
Pour wood glue around the edges. You can use the classic one - PVA or any other.
Naturally, the cap must be pre-fitted to this hole in diameter and length. Carefully drive it into the hole.
We are waiting for the glue to dry. Next, we drill a hole under the screw so that when screwing there is less internal stress, since the cap is made of a single piece of wood and with excessive pressure it will easily burst or crack.
That's all! The hole has been restored.
You can screw the screw into place.
The connection is very strong. Most likely even stronger than it was, since the insert adds additional density.
We repair all the necessary holes for the hinges.
Using this simple method, you can repair and restore a hole not only in chipboard, but also in other, absolutely any wood.
Wooden or metal die
A more labor-intensive method is to use a wooden or metal dowel, which we insert into the screw hole. However, the dowel needs to be a little wider, so we need to drill a hole the size of the dowel we want to put there.
During this operation, you must be very careful not to drill into the other side of the furniture and cause further damage.
You can use a dowel for repairs.
Then fill the hole with wood glue and insert the dowel into it. Then we leave everything for several hours. Once the glue has dried, cut the protruding part of the dowel down to the level of the plate. In addition, you can additionally sand this area with fine-grained sandpaper.
The last step is to screw the hinges back on. Using the above method ensures reliable fastening of the hinges for a long time.
After the procedure, the hinges are screwed on with a screwdriver.
Cold welding for chipboard and self-tapping screw
If, when the loop breaks, part of the chipboard is torn out, then the lost surface can be restored by cold welding.
You need to fill the hole with it, and while it is fresh, tighten it and remove the screw. After the weld has set, it is twisted back into a loop.
You need to fill the hole with it, and while it is fresh, tighten it and remove the screw. After the weld has set, it is twisted back into a loop.
Epoxy glue and pin
You can pour epoxy glue into the hole from the torn screw and screw the pin into it.
This can be done by cutting off the head of the bolt. To be able to rotate it with a screwdriver, you need to make a longitudinal cut at the end.
After the glue hardens, the loop is put on the pin and tightened with a nut.
After the glue hardens, the loop is put on the pin and tightened with a nut.
How to repair a hinge with epoxy resin
To repair larger damage, epoxy resin can be used. This is a plastic material that, after hardening, turns into a hard surface.
Epoxy resin consists of two components that must be mixed thoroughly before use.
You need to tightly fill the damaged hole with resin and level the surface flush with the main one.
While the resin has not hardened, you need to screw the confirmat into it and leave it until it hardens completely. The fastener can then easily be unscrewed from the wall and reinstalled along the thread through the loop.
Instead of a confirmat, you can use a regular bolt: cut off its head and make a slotted thread at the end.
Glue the bolt with the threads facing out using epoxy glue or drown it in resin, as in the previous version.
Then install the loop and secure it with a suitable nut.
If the inner surface of the wall is white, you can mask the repair area with a regular corrector, and for colored surfaces, select a suitable paint or cover the area with self-adhesive film.
You can also use filling the hole with cotton wool soaked in PVA glue. When the glue hardens, you can screw a self-tapping screw into this place.
Wire
Take a piece of wire and wrap it around a self-tapping screw. Then screw it into the hole in the wood in the usual way. Since the screw will have an increased size, it will fit tightly into the expanded funnel and will not fall out during operation of the product.
Other methods can be used to compensate for the gap. For example, craftsmen often use wooden plugs, from which they cut out wedge-shaped inserts and fix them in funnels.
It’s even easier to take a larger self-tapping screw than was used before - it’s perfect for creating a new fastener. Finding a way out is not difficult: you need to choose any suitable method, show imagination and a little skill.
12. Repairing chipboard furniture using epoxy plasticine
The repair material epoxy plasticine is sold in the form of a two-pack product (resin and hardener) or in the form of “sausages”, which must be thoroughly kneaded to mix the components.
To carry out repairs, do the following:
- Cut a piece of plasticine to the desired size.
- Wear gloves and thoroughly knead the epoxy until a homogeneous mass is obtained.
- If the chip is located at the location of the mounting hole, install a screw and fix it with epoxy.
- Form a neat patch, cut off its surface with a sharp knife, comparing it with the main plane.
- To obtain a more even patch, place a film on top and carefully press the damaged area with a block.
- Leave the repaired part until completely dry.
- The screw is removed from the epoxy mixture, obtaining a new hole with threads for fasteners.
- Sand the surface with fine-grain sandpaper and paint with oil paint of a suitable shade.
13. Restoring a broken place for a hinge
To work, you will need a lining and a bolt, which must be immediately screwed to the torn loop. The hole is clogged with oil to prevent epoxy resin from penetrating there in the future.
A small amount of epoxy resin and hardener are diluted on a film, a piece of masking tape, or in a disposable cup. Add a little filler (sawdust or construction putty) to make the mixture thick enough.
The resulting product is applied to the damaged area, then a loop is screwed on to hold it in place. Leave the part until completely dry. As the resin hardens, the lining will adhere exactly where needed.
Next, using clamps and a clerical blade, they make a kind of formwork for the edge: they fix the blade on top to limit the plane for pouring the mass. The inner surface of the chip from the outer edge is filled with a similar mixture (epoxy and putty) and allowed to dry.
At the next stage of work, you will need a small section of the sewer pipe, the diameter of which will exactly fit into the hole for the loop. Using masking tape, it is secured inside the round hole, and the remaining part of the damage is filled with epoxy mixture.
After drying, remove a piece of pipe and apply a finishing epoxy layer. As the initial setting progresses, carefully level it with the blade of a stationery knife.
New edges of a suitable color are glued to the ends of the furniture piece. To do this, use a hair dryer, an edge with an adhesive base and thick gloves for safety reasons.
The edge of the edge is heated with a hairdryer and pressed against the end of the part by hand. After cooling, the excess sections of the edge are cut to length and width using a special furniture veneer cutter or a regular stationery knife.
Next, the edge is sanded until the edge is perfectly even. At the end of the work, paint the repaired area with suitable paint and secure the loop.
Thanks to simple steps, you can give a second life to most products in the house and save on the purchase of new furniture.
How to repair a broken furniture hinge
It happens that a furniture hinge on the facade itself is pulled out of its seat along with pieces of laminated chipboard or MDF. The simplest option is to completely replace the module door. But the façade material may differ slightly in shade from the rest of the structure, and the cost of such repairs may be high.
You can repair the canvas and install the hinge yourself and at minimal cost. There are two options:
- Moving hinges above or below the original installation location.
- Repair of the hinge seat.
The first option is the simplest and fastest, but you will still have to seal the old holes. To disguise a broken seat, you can use a special plastic plug. Large holes are restored using PVA mixed with fine sawdust. After the mixture has dried, it is masked with wax pencils and polished.
Moving the loop to another location.
The second option is more complex, but, nevertheless, it will avoid making new holes and will extend the life of the facade for several more years. To restore the hinge seat you will need:
- epoxy resin;
- small sawdust;
- rubber or plastic spatula;
- electric drill;
- loop cutter.
A loop torn from the facade with “meat”.
First of all, you need to clear the seat of the torn loop, mix sawdust with epoxy resin and fill the recess, leveling the mixture with a spatula. Allow to dry and, if necessary, add more filler. After complete drying, sand the hinge installation area. Next, make markings and, using a cutter or electric drill, drill a groove of the required depth for the mount.
Prepare a mixture of sawdust and epoxy resin, and fill the seat of the furniture hinge bowl with epoxy resin.
The area for the hinge bowl is re-milled.
Reinstall the hinges.
Cold welding and screw
If the hole from the self-tapping screw is badly torn, it can be repaired by cold welding for chipboard. In this case, along with welding, you need to insert a bolt or screw with the head down. After the weld has solidified, a loop and nut are installed on top. If part of the weld is visible behind the loop, then it can be painted over.
Not very beautiful, but reliable: a simple repair option
If repairs are a matter of time for you, then you can go the simple route.
Drill through the wall with a thin drill where the hinge breaks.
From the front side, countersink the drilling area so that the bolt head is recessed.
Secure the loop with a bolt directly through the wall, recess the cap.
Hide the drilling site with a special furniture sticker - these are sold in hardware stores, and it’s easy to choose the right color.
Here is another visual material on repairs that may be useful to you:
Cotton wool and wood glue
When the torn self-tapping screw comes out neatly, without leaving a wide crater, the hole can be drilled out a little.
Then cotton wool mixed with wood glue or regular PVA is pressed into it.
When the mixture dries, you can screw the screw into it. When the mixture dries, you can screw the screw into it.
Glue + sawdust
The solution is as old as time, and it should be noted that it works well. Perfect if you have a piece of chipboard torn out.
The idea is simple - we take sawdust (you can take it from a chipboard, a piece of which has been torn out), or find it near furniture factories, next to large construction supermarkets (usually there are pieces lying around that no one needs), crush them, mix them with glue (previously we used PVA) this Apply the mixture to the broken areas and let dry. And that’s it, tighten the “screws”. It's holding up well.
However, now there are a large number of adhesives; on the Internet I even saw a guy pouring a lot of glue from a glue gun into broken places. And everything seems to be holding up
I used to repair hinges in the kitchen a long time ago. BUT due to the fact that the sash was used often, it broke quite quickly.
So this is again an option for a while, for constant use (10 - 15 openings per day), this is not the best way.
Disadvantages and advantages
Each method has its own advantages and disadvantages. Let's take the following as an example:
- Cold welding and polymers can be used when the hole diameter cannot be changed. However, the resulting coils are characterized by low strength.
- The tap is used only when the hole can be slightly enlarged. This produces high-quality and durable coils.
- Inserts allow you to expand the range of application of the cutting tool, but the restored thread is also not designed for heavy loads.
In general, we can say that there are simply a huge number of ways to restore fasteners. The choice is made depending on where it is used and what the load is.
: Through bolt
To repair a cabinet whose side is not visible, you can drill a blind hole from a self-tapping screw all the way through. It is countersunk from the outside and a screw or bolt is inserted into it.
Then a loop is put on from the inside and secured with a nut. If there is a decorative plug, it can be installed on top of the cap on the outside.
Useful tips and tricks
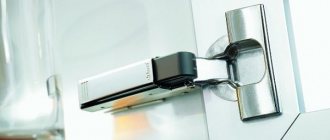
When purchasing furniture, you should pay attention to specific sets of hinges in terms of their durability. Properly selected hinges help to open or close the door efficiently, and drawers will not get stuck on the guides. Hinges for kitchen furniture are used quite intensively, so it is necessary to choose reliable and durable options and not skimp on hinges.
Door hinges must be of high quality.
The exceptions are those found in rarely used furniture, such as a pantry. The most common problems with hinges are loosening or pulling. A broken hinge cannot hang in the same place where it was before.
It should be moved 1-2 cm up or down. Changes should concern not only the door, but also the cabinet itself. Driving the screws should be preceded by creating delicate holes.
When the mechanism becomes loose, it needs to be moved to another location.
Installing hinges on the cabinet is necessary for self-assembly of furniture or in case of breakage of parts. This process does not take much time and is quite accessible even for inexperienced craftsmen. The only thing worth paying attention to is correct and clear labeling. The success of all subsequent actions and positive work results depend on this stage.
Repairing the hinge mechanism does not require much skill or experience.
When installing hinges, follow the instructions; when disassembling and restoring, take your time, let the materials dry well. Restored doors and high-quality installation of hinges can last a long time.
If you choose complex fittings and have no idea how to install hinges, then it is best to contact a professional.
Please follow the instructions during installation.
When working, take your time, carefully measure each part of the fastener so that the markings coincide with an accuracy of 1 mm. If this is your first time doing installation or restoration, then watch the training lessons; they clearly show all the stages of these processes.
It is necessary to carefully mark the installation location.
Chipboard is characterized by problems with hinges, but they are easily solved. In order to solve the problem quickly, use the instructions and carefully follow each step you perform.
Installing hinges of a simple design does not require any special skills. They are easy to install if you follow each step step by step.
Cleaning and repair of mechanisms
Moving parts are the most susceptible to breakdown; parts of these parts become unusable over time and require replacement. You can independently repair or replace elements such as rollers, springs, meshes, rivets and slats.
Mechanisms on chipboard furniture also need to be cleaned periodically. Each of their mechanisms requires an individual approach to diagnosis and repair, but the general operating procedure is as follows:
- Dismantle the mechanism.
- Take it apart into its component parts.
- Install the damaged element.
- Make the necessary replacement.
- Reassemble the mechanism and place it in place.
Regular lubrication of moving parts will help prevent or delay minor breakdowns. Lubrication reduces friction of metal elements and also protects against rust.
When to contact a specialist
You should contact a specialist in case of serious damage, for example, broken furniture, and lack of special skills and knowledge. Also, you should not attempt to repair expensive or memorable furniture yourself, as there is a risk of causing irreparable damage to it.
If furniture made from chipboard is severely damaged, you should contact a specialist.
If you need not just minor repairs or minor elimination of defects, but a serious comprehensive restoration, then it should definitely be entrusted to the appropriate specialist or cabinetmaker.
Before you repair chipboard furniture with your own hands, you need to evaluate your strengths and select suitable materials. If you work carefully, you can achieve a high-quality update in the appearance of products.