Unfortunately, nothing lasts forever. The same problem also affected the color of the furniture.
But there’s nothing wrong with that, the solution to this problem is quite simple - after all, you can repaint it yourself and restore its former attractiveness using such an inexpensive and very effective method.
By refreshing the appearance of your favorite furniture with paint, you can give it even more originality and originality.
If you are the owner of antique furniture and do not want to throw it in the trash, we recommend that you familiarize yourself with the technology of painting it.
Believe me, this way you will significantly save your budget.
What are the reasons for updating the color of furniture
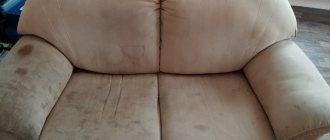
You can see the external problem areas of outdated polished furniture products with the naked eye.
Let's say that seeing that the top polishing layer begins to gradually peel off, and the surface has noticeably darkened, is already the “first bell” that painting is already urgently necessary.
Restoration of polished furniture is also necessary if mesh, cracks, chips, scratches, abrasions and other defects are found on its base.
If the furniture is antique, then the presence of distortions on it will not “steal” its value, which cannot be said about ordinary furniture.
“Deterioration in appearance already indicates immediate repair of the furniture structure. If it was varnished, then you can do the painting yourself, since the help of a specialist can “cost you a pretty penny.”
Even painting it yourself can preserve its wood structure. At the same time, you can change the texture of the product if you wish, and make it in a dark, white or even bright tone.”
Is it possible not to remove the old varnish?
If you start reading recommendations from professional builders, they all agree: old varnish must be removed before new painting. This is what building canons recommend. But in real life, you can try to move away from them - and get excellent results. Thousands of examples prove this! So the answer to the question: is it possible not to remove the old varnish? Yes, you can.
Often a chance to repaint is given to furniture that has only two options: to the landfill or to a new life, if the experiment is successful. If what you have in front of you is not the most valuable piece of furniture, then you can take a risk. Because no one can give a 100% guarantee of a successful result. If it is almost an antique, then you can work on restoration only after removing the layer of old varnish.
Choosing paint and other accessories
To restore the former attractiveness and paint your favorite polished furniture, you need to acquire only high-quality paint products.
First of all, they must be “friendly” with the wood surface, since its further “life” depends on this.
It is also worth paying attention to the effectiveness of the paint (and it can vary). For metal elements (for example, handles) you will need a paint for metal, otherwise their coating will simply peel off.
In turn, paint for wood products must have:
- moisture resistance;
- resistance to abrasions, rapid deterioration, dirt, mechanical stress and chemicals;
- withstand low temperatures (when polished furniture is outdoors);
- long-term operation and preservation of efficiency.
After removing the initial coating, you can paint it to suit any taste and color.
Depending on your preferences and the color compatibility of the design with the interior, you can create the effect of matte, semi-matte, smooth or transparent surface.
If you decide to transform polished furniture into white by painting, then a translucent paint coating will help you (matte will age the appearance a little).
The most popular paint compositions for wood products are:
- Acrylic (made from water, goes well with natural wood, veneer, plywood, laminate, MDF board);
- Enamel “METALLIC” (suitable for fittings and for creating an unusual shade for wood);
- Varnish (intended for the initial layer to refresh it).
It happens that you have to restore furniture products that often come into contact with something hot or are in a room with a high temperature. In this case, you should give preference to paint with a fire-resistant effect.
In addition, to increase resistance to heat, it is advisable to prime the base. After you have acquired paint and varnish materials, you should arm yourself with the necessary equipment.
For painting, you often take a paint brush or roller, and for massive polished furniture you can use a colorful spray gun. To carry out cleaning, they usually prefer sanding paper or a machine.
If the varnish layer has firmly grasped the surface, you will need a scraper or a brush with metal bristles to help. When heating the initial coating, you also need to get a special construction hairdryer.
In addition, you need to have in your painting arsenal a primer, putty, varnish (if necessary), detergent or laundry detergent, varnish solvent, antifungal compound, and, if necessary, insect repellent.
The process of painting lacquered furniture
Painting a varnished surface is easy. This process does not require any special material costs and will take you very little time. However, you should strictly adhere to the instructions and tips for finishing work outlined below. Let's look at how to paint polished furniture (let's take a cabinet as an example):
- A polished cabinet requires careful preparation (elimination of all drawers, components, various stands and doors). Next, the interior shelves, various recesses, as well as joints and corners are painted.
- Shelves, drawers and doors are painted separately from the main surface of the furniture (which must first be covered with a special film). If you are going to paint furniture yourself for the first time, then paint with a roller rather than a brush, so you can cover the desired area more evenly.
- After painting all the internal elements, we move on to painting the main surface. Apply the paint with slow, careful movements, avoiding smudges and omissions. After the first layer has dried, apply the coloring composition again - this will create the most uniform and durable coating.
- After the paint has completely dried, we begin assembling the structure. At this stage, you can decorate or sand the surface to give it a custom design.
To paint polished furniture, a spray bottle will come to your aid. Compared to a standard brush and roller, it distributes the paint more evenly without any overlap or streaking.
Repainting an old chest of drawers (2 videos)
Furniture before and after painting (24 photos)
Procedure for applying paint materials
To carry out restoration when painting, you need to perform several steps.
Experts strongly recommend removing the previous varnish layer, otherwise the quality of the already painted product will decrease significantly.
In such a matter, it is advisable to listen to their advice in order to get the desired result.
Painting furniture at home
Initially, it may seem that this is a difficult task and only a professional can cope with it, but in fact this is far from the case. During use, chips and scratches appear on the furniture, as a result of which the varnish coating suffers. Over time, a piece of furniture becomes unsightly and you want to throw it away. However, a more economical option is to repaint the polished surface, thanks to which it is possible to completely change the appearance of the furniture.
The first and one of the main stages is the choice of paint for restoration work. The final result directly depends on the chosen composition and color. There is no optimal solution, so everyone chooses the paint they like best. First of all, you need to realize that there is paint for coating metal objects and wood. It is important to determine whether the paint should have frost resistance and water-repellent properties. The coating itself can be transparent, matte or glossy.
If the furniture is made of wood, then it is advisable to cover it with special paints that protect the material from high temperatures and open fire. If you need to paint garden furniture, the paint must have good corrosion protection. It is worth noting that for different types of surfaces you need to choose not only paint, but also the painting method.
Stage one - preparing the base
This step should not be skipped, since it is considered the most basic in furniture repair.
The original coating can be removed by thermal, mechanical or chemical means. When using the thermal method of cleaning varnish, you will need a hair dryer. Actions occur in the following sequence:
- It is necessary to protect yourself with a special suit, gloves and goggles;
- Using a hairdryer, heat treat a small part of the base (the same can be done with a blowtorch, but you need to be very careful so as not to harm the product);
- Use a spatula or knife to remove the old varnish.
Mechanically, the work will be more difficult. The manipulations are:
- All drawers and fittings must be removed from polished furniture;
- Carefully treat fastening elements with soap or soda (as needed);
- Degrease and clean the surface from dirt using soap or powder;
- Scrape off the varnish ball with a scraper, coarse-grained sandpaper or a brush with metal bristles;
- Use fine-grained sandpaper or a sander to clean the base.
For the third method, you will need a special solvent that will not harm the wood product.
The remover is treated with a paint brush, and after a film has formed, the surface is left for about three hours, and then the original varnish layer is carefully removed with a spatula.
Selection of paint and additional materials
To make the product look beautiful, you need to buy a good paint and varnish material. The product must be suitable for wood, because the durability of the new coating depends on the quality of the paint. It is also worth considering personal preferences - the effects of different paints may not be the same. For handles and other metal parts, you should additionally purchase metal paint, otherwise they will quickly peel off.
Paint and varnish material for wood must have a number of properties:
- moisture resistance;
- resistance to abrasion, rapid wear, dirt, mechanical influence, and staining when exposed to chemicals;
- frost resistance if the product is used outdoors;
- long service life while maintaining original properties.
After removing the old varnish, you can apply almost any paint effect to the base. The new coating will be glossy, matte, semi-matte, you can make it completely transparent with or without color. It all depends on personal preferences and how well the product fits into the overall interior. If you decide to repaint the furniture white, it is better to buy translucent paint - matte will immediately give the products an out-of-date look.
Here are the most common types of paints for wood products:
- acrylic - water-based, perfect for natural wood, veneer, plywood and even laminate, MDF;
- enamel with a metallic tint - intended for painting fittings, as well as for giving the wood an original tone;
- varnish - usually purchased for painting an old coating in order to renew it.
It happens that you have to varnish or paint furniture that comes into contact with hot objects or is used in hot rooms. Then the paint should be chosen with fire-retardant properties. Pre-treatment with a primer is also allowed to increase the level of heat resistance.
After purchasing paint, you should prepare a number of auxiliary materials and tools. To apply paint and varnish, buy a roller or brush; large areas can be painted with a spray gun. For sanding, purchase an emery sheet or use a sanding machine. Removing stubborn varnish will require the use of a scraper or wire brush. If you decide to heat up the old coating, you will have to purchase a hair dryer.
Additional resources you need to prepare:
- primer;
- putty;
- varnish for varnishing after paint (if required);
- detergent or washing powder;
- varnish thinner;
- antiseptic (etchant);
- insect repellent (if required).
Stage two - applying putty
In order to understand the condition of your furniture products, you need to divide them into many parts. In this way, it will be possible to restore even inaccessible areas and completely replace outdated elements.
After sanding, the base must be cleaned from dust particles with a dry cloth or vacuum cleaner, and then an antifungal agent must be applied to prevent the further appearance of unwanted fungal formations.
Noticeable flaws must be thoroughly covered with putty. Colorless ones are ideal for this purpose (they are good friends with any tree and do not affect its structure).
It is applied with a uniform thin ball to ensure the smoothness of the base, then allow time to dry and, if necessary, apply a second layer. Upon completion of work, sand the putty area.
Can we get to work?
We've sorted out the choice of materials, now let's move on to changing the old furniture. For clarity, we chose two different surfaces: a laminated chipboard cabinet and an MFD shelf.
We will share the easiest and fastest way to color them. Even a beginner can handle this.
First, let's take the necessary tools, namely:
- Several brushes (It is better to buy not the cheapest ones, since there are times when they fall off. This will not have the best effect on the coloring composition)
- Roller
- Masking tape
- Priming
- Sanding cloths
- Gray acrylic paint (The most common option, so we’ll focus on it)
- White acrylic
Remember! The lighter the surface, the more difficult it is to paint. This is a painstaking and complex process that requires the application of many layers. If light paint is not necessary for the interior, then it is better to take a different color. This will make it easier for you
- Oil paint for wood
- Varnish
The entire handmade transformation process is divided into two stages:
Stage three - degreasing the surface
Using this stage, you can significantly extend the service life of your updated favorite polished furniture.
In addition, the adhesion of the paint to the base increases and uniform distribution of the material is ensured. Any detergent composition is suitable for degreasing.
It must be diluted with water, treated the surface and rinsed thoroughly. Next, the base must be wiped and dried to get rid of wet marks.
If puttying was done, then you need to use alcohol tincture or vodka as a solvent.
If there are stubborn contaminants left, you can get rid of them using table vinegar.
Background for painting furniture
You can determine that interior items require repairs by their appearance. A change in appearance during long-term use is the first sign. Darkening appears at the place of the carving, and a mesh forms on the surface of lacquered furniture.
Sometimes minor damages add value to interior items and they become real antiques. If the flaws, abrasions, or other visual defects are more significant, the furniture requires restoration. You can entrust it to specialists or do it yourself at home. It is possible to update the furniture so that the wood structure remains visible as before. You can repaint it a different color, and the product will look completely different. The only caveat is that the texture of real wood in this case will be hidden under a layer of paint. In order for the products to look beautiful, it is necessary to properly prepare the surface and select dyes. It is important to familiarize yourself with the mistakes that craftsmen often make and do everything to prevent them.
Stage four - coating with paint and varnish material
“Before taking this step, you need to thoroughly prime the surface of the polished furniture with a colorless primer.
Priming should be done over the entire surface area, since this way you can reduce paint absorption and increase adhesion.”
The painting process occurs in this order:
- To prevent drops of paint from accidentally falling on handles and other parts, they must be protected with masking tape (this way you will not waste time washing off paint marks);
- It is necessary to treat each element separately with paint and varnish material. To ensure that the paint applies evenly, it is advisable to use a roller. In particular, careful painting is required for drawers and shelves, which then need to be dried separately and put back in. Be sure to pay attention to the absence of paint drips.
- Once everything is dry, apply another layer of paint to consolidate the result.
- At the end of the work, you can put everything back together and put the furniture in its original place.
Do-it-yourself painting without removing varnish
You can do the restoration of lacquered furniture yourself. The main thing is to choose the right coating materials, prepare the base for painting and never paint wet slabs.
What you will need
For painting you need the following tools and materials:
- brushes with synthetic bristles for acrylic (2-3 pieces of different sizes);
- foam roller (for acrylic coatings on water);
- roller on a fur coat with short pile (for solvent-based enamels);
- spray gun (for a more even and uniform application of paint and varnish);
- roller tray;
- masking tape for gluing the surface and protecting it from paint;
- primer (for acrylic coatings - acrylic, for alkyd - alkyd);
- fine-grained sandpaper (3-4 pieces);
- acetone or white spirit for degreasing and removing stains;
- polyethylene oilcloth to protect floors and furniture;
- sponges, rags;
- Screwdriver Set.
Surface preparation
Main stages of surface preparation:
- remove all objects and things from the surface to be painted;
- disassemble the furniture into its component parts (remove the doors);
- unscrew the handles;
- cover the floor in the apartment where painting will be carried out with plastic film;
- sand the furniture boards with fine-grained sandpaper without removing the varnish layer;
- create roughness for better paint adhesion;
- fill cracks and scratches;
- degrease the surface, wipe with acetone or solvent;
- Using a roller or brush, apply primer over the surface.
Staining order
Rules for painting lacquered furniture:
- paint can only be applied to a completely dry base;
- It is better to paint doors in a horizontal position using a roller;
- It is recommended to paint furniture in 2-3 layers;
- After applying each layer of paint, you need to maintain the required drying interval;
- The paintwork must be applied in a thin layer so that there are no sagging or smudges;
- It’s better to make 2-3 thin layers than one thick one;
- The paint must be applied in vertical or horizontal stripes.
Drying
Painted furniture should dry naturally (in the open air). You should wait 6-12 hours before applying a new coat of paint. In the instructions or on the label, each paint manufacturer indicates the interval for drying between layers.
How to properly dry furniture structures
Generally, acrylic, latex or water based paint takes a long time to dry. It is necessary to think in advance about the place where to put only painted furniture so that it does not cause inconvenience. It often takes 12 to 24 hours for each ball to dry.
It is worth considering that some enamel products can be toxic, so during the drying period it is extremely undesirable to be in such a room, especially for children and pets.
The ideal temperature conditions for drying are 20-23 degrees (this way the surface will dry within the time indicated in the instructions).
If the temperature indicators are slightly too low, then the drying time will accordingly be extended.
How to paint furniture made from various materials
How to paint furniture at home?
This is an important question when the furniture has lost its attractiveness and its appearance has become boring. With the right approach, models change beyond recognition. For example, you can give it a classic or vintage style. It is not too difficult to perform such operations, the main thing is to know and follow the technology, apply diligence and show imagination. The article will tell you how to do it yourself, the basic principles of performing operations.
Frequent difficulties and oversights during restoration
We present to you a list of mistakes and difficulties that restoration amateurs often encounter:
- poor quality cleaning of the primary paint layers - if you ignore the remnants of the initial coating, you can forget about the attractive appearance of the new one;
- violation of the proportional ratio when diluting paintwork materials - to achieve the expected result, you must strictly follow the instructions, otherwise you will get unwanted defects in the form of bumps, drips, colorful drops, etc.;
- allocating little time for drying - if you touch or use under-dried polished furniture, then unsightly stains will form;
- skipping preparatory work - if you don’t sand and putty the furniture first, then don’t be surprised at the appearance of damage and reduced adhesion.
Background for painting furniture
It is not difficult to identify problems with old furniture - they are clearly visible from the outside. By the appearance of the products, you can determine that they need painting: the top layer of polish begins to separate, and the coating itself darkens. During long-term use, the entire glossy surface of the wood becomes covered with mesh and cracks. Also, chips, scratches, abrasions, and other defects may appear on the furniture. If the furniture is antique, minor defects do not change its value. But such problems greatly spoil ordinary interior items.
A change in appearance for the worse is the first sign that the furniture requires restoration. You can repaint varnished furniture yourself, because hiring a specialist will cost much more. Even at home, it is possible to paint objects so that the wood structure remains the same. If desired, the texture of the furniture can be hidden by giving the base a new color - dark, white or even bright.
What do the professionals recommend?
There are masters who manage to paint furniture, ignoring the preparatory stage of painting. This has a right to exist, provided that the surface is ideal without any defects.
As an experiment, try to apply paint on an inconspicuous place, and once everything dries, see what happens. If everything worked out well, without the formation of drips or build-ups, you can safely apply the material to the entire remaining part of the surface.
True, such luck happens in rare cases, and often the appearance of a polished old piece of furniture is not pleasing to the eye.
If you want to achieve the desired result, then be sure to get rid of the old varnish layer, and adhere to every step of the technology described in this article!
What will you need for work?
Has the glossy surface lost its distinctive shine, dulled and lost its original appearance? Then you need to take care of painting the aged piece of furniture. To do this, you just need to apply a new coating. Let's start with what materials and tools you will need:
- acrylic based paint;
- glossy or matte varnish;
- roller and brush for applying paint;
- scraper and metal brush to remove the old layer of varnish;
- sandpaper (or sanding machine);
- primer solution (for repainting wood surfaces);
- solvent and detergent;
- protective composition for wood (antiseptic).
To varnish or not
The varnish coating fixes the color, protects the surface of the furniture, and the product looks antique and well-groomed. Be sure to protect with varnish the furniture that is often opened and closed.
For varnishing, use specialized furniture (not parquet) matte or transparent varnishes. The second layer is applied 24 hours after the first coating.
Alcohol varnish is used when restoring antique objects.
New, popular acrylic varnish, odorless, suitable for indoor and outdoor use. Economical product - water is used for dilution.
Durable alkyd varnish film withstands abrasion. A solvent is used for dilution.
Little oil varnish is used; it is often used to cover the floor. For dilution you need drying oil that dries for at least a day.
Polyurethane (ship) varnish has increased wear resistance due to the appearance of a protective, quick-drying film.
Nitrovarnishes are inexpensive and form a durable protective film. No special primer is required before coating. When applied, it is diluted with a solvent.