Installation of plasterboard sheets on the frame is not the final stage in the construction of partitions in the premises of the apartment. It is also important how well the seams between the sheets of drywall are sealed before finishing. The gypsum board joint is the most sensitive and susceptible to destruction place. Cracks most often appear between the drywall, worsening the appearance of the walls. Surfaces for painting should be prepared especially thoroughly, although cracks become noticeable under the wallpaper. How to seal seams on drywall will be discussed below.
Sequence of work
Those people who seal seams and cracks in drywall need to know in what order they need to work. The process is divided into several stages, such as:
- Surface preparation.
- Primer of seams.
- Laying the putty mixture between the seams.
- Then the first layer of putty is applied to the seam.
- After this, you need to seal the seams with reinforced tape.
- The dried layer of putty on the joints is rubbed down using sandpaper.
- Then a second layer of putty is applied.
- It should also be sanded with sandpaper after drying.
Surface preparation
Before starting work on filling seams and joints on gypsum plasterboard, it is necessary to prepare the surface. To do this, clean the coating from dust and dirt. This can be done with a rag or by running a roller over the surface of the seams.
Preparing the surface for putty
Primer
It is necessary to prime the seam. The primer mixture will help protect the surface from moisture, fungal growths, and rotting. The mixture is applied in a thin layer to the surface of the seam. One layer is enough to achieve the desired effect.
Primer of drywall joints
Laying putty into the seam
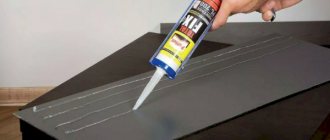
The prepared putty mixture is immersed in the place where there is a seam or crack between the sheets. Since the layer will be quite thick, you need to wait time for it to dry completely. Therefore, you should mix the putty only so that there is enough of it for laying in the seams.
Laying putty into the seam
It is better to mix the rest of the mixture immediately before filling the surface itself, because the solution must be used within 30 minutes after mixing. The video shows the process of putting putty into the seam.
First layer
The surface of the seam is puttied with a layer of approximately 2-3 millimeters. To do this, you will need two spatulas, different in diameter.
- use a smaller spatula to scoop up the mixture, then transfer it in an even layer onto a spatula with a larger diameter;
- then the mixture is transferred with smooth movements to the surface on which the seams are sealed.
Plasterboard wall putty
Important nuance
It is impossible to apply a perfectly even layer of the mixture to the surface, so you shouldn’t complicate your life and do unnecessary work.
Grout
When the putty material has hardened on the seams, its surface must be rubbed down. This will give the plane evenness and aesthetics. To work, you will need two types of sandpaper (with small stones and with large ones). First, coarse sandpaper is used to sand down the large protruding sections.
Grouting seams with sandpaper
Afterwards, you need to use fine sandpaper to remove small irregularities from the coating.
Second layer
The top (finishing) layer of joint putty must be done especially carefully. For a good result, you need to go over the entire surface again to give the structure a completed look. The grouting process is no different from the first
The main thing is to walk across the surface slowly, so as not to damage the integrity of the coating.
The grouting process is no different from the first. The main thing is to walk across the surface slowly, so as not to damage the integrity of the coating.
Each stage of puttying joints on a plasterboard surface must be completed. In fact, there is nothing difficult in the process of creating a smooth, even surface without cracks and seams. The main thing is not to disturb the sequence of actions and work slowly, precisely. Every owner can cope with the task.
Sealing corners with mesh
The greatest trouble comes from sealing internal corner seams, which are formed when joining plasterboard on the ceiling and wall. The technology is quite simple, but it requires certain skills and accuracy, because if done incorrectly, further finishing will be almost impossible.
Photo - the principle of sealing seams
Step-by-step instructions on how to seal plasterboard seams with serpyanka and Knauf Uniflot mixture:
The first step is to clean the work area using abrasive paper. This is necessary in order to level the surface. After grouting, additionally blow the seam area to remove dust and dirt; Next, the drywall is primed with special compounds. Experts recommend using a medium-depth primer. After applying the liquid, you need to wait 24 hours for the surface to dry completely; Now, if this was not done during installation of the sheets, you need to chamfer. They are produced in sizes 3–5 mm at an angle of 45 degrees. At the same time, keep in mind that in no case should you cut the sheet “to resemble the serpyanka”, otherwise in the future a rather large crack will appear in this place, which can only be removed with plaster;
Grouting of joints can be done with special mixtures, such as SEMIN or Knauf, but you can also use simple Shitrok putty. Dilute the mixture according to the manufacturer's instructions; it should have a plastic consistency so that all problem areas can be easily repaired. If you mix a very thick composition, it will not fit properly on the mesh, and in a liquid state there will be too much consumption; This method of sealing drywall seams begins with applying a base layer of adhesive, in our case it is putty. It is very important to thoroughly rub the mixture into the gap between the sheets to ensure maximum adhesion of the material. You need to apply a fairly large layer so that it does not dry out before the second stage. You need to work quickly, but at the same time, carefully, trying not to protrude too much beyond the boundaries of the drywall surface;
After this, a mesh is installed over the seam. It consists of fiberglass threads, so it will help ensure maximum rigidity of the grout, this is necessary to avoid the appearance of cracks
Installation is carried out carefully, it is glued in an even layer; Now you need to wipe it thoroughly with a spatula so that it goes inside the first layer of adhesive. Afterwards, if the room is being prepared for painting, you need to work with finishing putty
It will help level the surface;
When sealing internal seams indoors, after applying the second layer, you need to additionally level the mesh. During installation, it most often bends a little, forming depressions on the wall; to remove them, simply carefully stretch the mesh along its entire length using the protruding ends. The gaps between the fibers must be immediately re-grinded; When the putty layer dries (this will happen in one to two days at normal room temperature), you need to wipe the corner again with sandpaper. Protruding threads are cut using a simple knife.
After this, you can begin finishing the room for decorative work. The price of a serpyanka for sealing drywall seams varies between 600–1500 rubles, depending on the size, brand and density of the cells.
Photo - installation principle
How to putty drywall: level the planes
To putty surfaces, you will need a large spatula - with a blade of 40 cm or more and a narrow one - 10 cm. The first layer is applied with starting putty. It is applied in a layer of about 5 mm (the maximum should be checked in the instructions for the specific putty) and hides all the unevenness. Dilute it with water until it becomes thick sour cream, stir thoroughly so that there are no lumps.
These spatulas are needed to putty drywall over the entire surface.
The technique for puttingtying the surface of drywall is simple: take a large spatula, at its end using a small spatula, lay out a roller of putty. We press the blade to the surface and stretch the composition. We repeat several times, filling some part of the wall or ceiling. Then we clean the blade and run it over the newly puttied surface, leveling it. You need to level it as carefully as possible - less time will be required for grinding.
When you have finished puttingtying the drywall, wait until it dries. Then you take a familiar tool - a block with a mesh - and smooth out all the flaws. Sanding is completed, remove the dust, and cover the surface again with a deep penetration primer. After drying, begin applying the second layer.
This is how you hold the spatula
Next, you need to putty the drywall with a finishing compound. As they wrote, it can also be gypsum-based, like the starter one, or it can be polymer-based. Both are suitable, but some are more difficult to work with - they quickly begin to roll and harden.
The finishing putty is made more liquid and applied in a thinner layer. The application technique is the same, nothing changes. Besides the fact that it is more difficult to work with, it spreads worse, but you need to stretch it in a thin layer and quickly level it. Everything is much better with a primer, but without it, the bottom layer quickly draws moisture out of the fresh plaster and it begins to roll off. After applying the finishing putty, wait until everything dries again, then begin leveling. But this time they do not use a mesh - it leaves noticeable grooves, but fine-grained sandpaper. It is not so convenient to work with - it clogs quickly, but the surface is smooth. If you are preparing the surface for painting, we light it from below or from the side and you can use an LED lamp rather than an incandescent lamp - all flaws are visible. Even very small ones.
It is difficult to describe in words how to putty drywall - the movements are difficult to describe. In the video you can see how to hold the spatula, how to move it, how to apply or remove the solution. See the video for more details on the technology.
Selection of materials
To putty joints you will need the following tools and devices:
- A pair of spatulas - narrow (100 millimeters) and wide (300-400 millimeters).
- Rubber spatula.
- Two corner spatulas, which we will use to process the outer and inner corners.
- Container for mixing the solution. The volume of the cookware depends on the area of the surface being processed.
- Serpyanka tape, with which we will reinforce the seams. An alternative to serpyanka is perforated paper tape.
- Sandpaper, which we will use to sand the coating, or a sanding construction float.
There are mixtures on the market designed specifically for puttying joints of plasterboard sheets. If possible, it is recommended to purchase drywall and putty from the same manufacturer, since in this case it is easier to achieve compatibility of materials.
Uniflot mixture
This putty for drywall joints allows you to do without reinforcing or perforated tape. However, the cost of Uniflot is quite high. The mixture is sold in 5 and 25 kg bags.
Method of preparation and use of the mixture:
- For 2 kilograms of powder you will need 1 liter of water. The components are stirred until a creamy consistency is obtained.
- Apply the solution to a surface that has been previously cleared of debris and dust.
- The coating hardens after 15-20 minutes.
- The consumption of the solution depends on how the edges of the sheets are prepared, but on average about 300 grams are spent per square meter of millimeter coating.
- Unused powder should be stored in a sealed bag in a dry place.
Fugenfüller mixture
The Fugenfüller putty composition is produced on a gypsum basis. Components are added to the mixture to delay the hardening of the coating. The composition is packaged in containers of the same volume as Uniflot. When working with Fugenfüller, reinforcing tape or perforated paper is used.
The mixture is used not only for joining seams, but also for the following purposes:
- installation of plasterboard sheets on a flat surface;
- hiding all kinds of defects on drywall;
- fixing corners on gypsum boards.
To prepare the solution you will need 2.5 kilograms of powder per 1.9 liters of water. The solution is thoroughly mixed. The final hardening of the coating occurs after 30-35 minutes. The putty is demanding on the lower temperature threshold: the room must be at least 10 degrees Celsius. Dry powder should be stored in a dry place on a wooden pallet.
Note! "Fugenfüller" cannot be mixed with other putty compositions, as this will lead to a deterioration in the performance characteristics of the solution
Fugenfinish mixture
Putty for drywall joints of the Fugenfinish trademark contains a gypsum base and fine additives. It is used primarily for puttying large areas and leveling minor unevenness on plasterboard sheets.
- high plasticity;
- ease of application;
- The coating is very smooth.
The solution is prepared by mixing 1 kilogram of putty with 500 grams of water. Then the solution is brought to a uniform consistency by stirring and left for 2-3 minutes to swell. After this, the solution is stirred again. The putty coating dries within 24 hours.
How to seal
Sealing joints on a plasterboard surface involves 3 steps:
- Purchasing materials and assembling a set of tools.
- Preparing the seam for reinforcement.
- Step-by-step plan for completing the work.
To reinforce joints you will need a set of tools:
- brush;
- putty knife;
- a clean container for diluting the mixture;
- construction knife with a sharp blade.
- Sandpaper.
Materials needed:
- primer;
- reinforcing mixture;
- reinforcing tape, corner (aluminum corner profile PU 25x25);
- clean water at room temperature;
- mixture for joints.
All tools and containers must be clean. Working with a dirty tool is difficult and does not give the expected results.
There are several options for reinforcing tape:
- Serpyanka is similar to a medical bandage and is durable due to its composition.
- Paper - manufacturer KNAUF. When wet, it does not lose its properties.
- Non-woven - contains fiberglass.
- Tape with a metal insert - used to reinforce the corners of gypsum boards.
After collecting everything you need, you can begin preparatory work with the joint. It consists of several steps:
- The seams must be chamfered and clean. Use a brush to clean the border of the sheets from dust, and carefully remove small pebbles of plaster.
- Cover the seams with a clean brush and primer mixture. This must be done carefully so that the primer fits well into the seam. The corners of the plasterboard structure are also treated.
- You need to give the primer mixture time to dry.
After drying the joint, the main work begins.
To do this, dilute the mixture for reinforcing joints according to the instructions on the package. Mostly they buy Knauf Fugen.
Next, using a medium-sized spatula, apply a thin layer of the mixture to the joint. Glue the tape on top so that it lies centered along the seam. Using a clean spatula, press it slightly into the damp putty on top, thereby collecting the excess.
The next step is to cover the tape with the same mixture. Without waiting for it to dry.
The remaining putty is used to cover the fasteners. The caps of the screws are “recessed” into the drywall by 1 mm. All areas are treated with primer.
Self-adhesive sickle tape is fixed to the plasterboard surface without putty. After gluing, it is covered with a putty mixture.
How to cover seams
KNAUF Uniflot mixture is used for sealing joints without reinforcing tape. Its differences:
- The strength of putty is comparable to cement.
- It is light in weight, so it is used on plasterboard surfaces.
- The putty does not allow or absorb water.
The diluted solution is applied to the joint in one layer. If there is a gap of 2 mm between the plasterboard sheets, then apply 2 layers. Work with the mixture for 25 minutes, after which it hardens.
If you intend to hang a heavy object on a wall made of GC sheets, then the craftsmen recommend using Knauf paper tape with this putty to make the structure more durable.
Another putty mixture is JS weber vetonit. It is a polymer composition that has a strong adhesion to the plasterboard surface.
The principle of operation is the same as with KNAUF UNIFLOT. However, craftsmen do not recommend using putty mixtures without reinforcing tape.
Sizing with serpyanka in the corners of plasterboard walls
The corners of the plasterboard structure are carefully reinforced, since they bear a large load.
Internal corners may become deformed due to building subsidence.
External corners are subject to mechanical stress (impacts).
Before applying serpyanka to the inner corner, it is cleaned of dust and thoroughly treated with a primer.
Using the mixture to reinforce the joints, glue the serpyanka and cover the top with putty.
Serpyanka is used in small corners - created niches, podiums, shelves. To reinforce the internal corner from the ceiling to the floor in the room, use a tape with a metal insert.
The outer corner is best protected with a perforated corner corner. Putty is applied to the cleaned, primed corner. They put a corner on it and “sink” it in well. From above, without drying out, the corner is covered with the mixture. Everything should dry out. This will take no more than 10 hours.
Conditions for high-quality seam sealing
It is very important to properly prepare the frame before installing drywall. To do this, it is necessary to follow the technology of its assembly, which includes the use of the required number of wooden blocks or metal profiles, compliance with their pitch, correct fastening, placement of the profile exactly under the joints of the sheets, etc.
Drywall is attached to the frame with self-tapping screws. Sheets are used with chamfered edges. If the drywall is installed with a cut edge at the joint or does not have a factory chamfer, it is necessary to create one using an edge plane. Tilt angle – 45°. It is not always possible to remove the chamfer in a timely manner, so it can be done locally after installation using a painting knife. Putty will subsequently be placed in the resulting recess.
When there are no chamfers at the ends of the drywall sheets, the sealed joint forms a convexity. In the future, the entire surface of the sheets will have to be leveled, which will lead to significant costs of labor and material.
When the joints are processed, dust is removed from them and the quality of the screws is checked. They are wrapped to the depth of immersion of the head by 1 mm in a sheet of plasterboard (paper base).
USEFUL INFORMATION: Decorating walls with decorative bark beetle plaster
It is advisable for beginners to visually familiarize themselves with the technology for preparing drywall sheets (video, photo).
How to seal seams between sheets of drywall: description of the process
The technology for grouting joints is quite simple; if followed, it can be achieved that the construction work will be completed quickly and “painlessly”
It is only important to follow certain rules and not deviate from the proposed scheme
Apply the putty mixture to the seam very carefully and thoroughly.
- Applying putty solution. The seam must be sealed across the seam. Strokes must be thorough and neat. The mixture is placed on the seam so that the entire thickness of the gypsum board is filled.
- Excessive thickness on the surface of the seam is a prerequisite for quality work. Excessive thickness of the putty mixture will prevent it from drying out too much. If the length of the seams is very long, then for ease of work it should be divided into small sections.
- Applying reinforced tape or tape on top of the putty solution. Reinforced tape should be embedded in the solution as deeply as possible. This technological process allows you to make the seam more even, while avoiding the formation of cracks.
- Grouting the putty mixture with a spatula. In this way, a smooth and flat surface can be achieved.
Following such technological work, corners are also processed.
Caulking seams at corners
Processing fillet welds may seem quite difficult at first. But you can easily cope with it if you were able to seal simple seams. The principle of operation is the same, but you will need metal corners for reinforcement and an angle spatula.
Apply one layer of plaster and secure the metal corners to it by pressing them into the mortar. Remove excess and apply several more coats of putty.
You can also cover the seams at the corners using serpyanka. Take a one-sided spatula and spread the putty on one side of the corner, and then on the other. This way you will avoid wasting putty.
Cut a piece of tape to the required length, fold it in half, and attach it to the corner. Apply putty alternately to both sides of the tape, stretch with a spatula.
In the same way you can seal the internal corners along the ceiling.
How to mix putty?
Since we are moving directly to the question of how to seal the seams between the slabs on the ceiling, we need to learn how to make putty for this job. Typically, the solution is prepared from a certain proportion of water and a mixture that manufacturers indicate on the packaging. It must be stirred until it becomes thick sour cream (this is best done using a construction mixer or a drill with a whisk at a speed of 600 rpm). Afterwards, the putty is left for 5 minutes for final softening and mixed again. The mixture is ready!
It is important to remember that once the solution is mixed, it must be used in about 2 hours, because dried putty can only be thrown away. Any attempts to restore it with water or add it to a fresh batch will lead to the appearance of grooves on the ceiling that cannot be eliminated
Also, to seal the seams, you will need serpyanka - reinforcing tape, which can either be glued from the very beginning (the base of the tape usually allows you to do this), or pressed into the first layer of already applied putty. The order here is not particularly important, the main thing is that the seam is in the middle of the tape. The solution is applied to the seams using a spatula, which must be rubbed through the tape into the joint. To make it more convenient to take the putty in small portions, it can be placed on the falcon.
Excess solution is removed, and the tape is covered with another thin layer of putty.
It is important to level all layers with a spatula. When it dries, the final layer is applied and the joints are allowed to dry for about a day.
The seams must be even and level with the plasterboard sheets. You can check and control the evenness of the surface using a building level.
Sealing drywall seams
Processing corners of plasterboard slabs
Knowing how to seal regular seams on the ceiling, you will be able to cope with the processing of corners, because the principle of operation is approximately the same. The difference is that metal corners are used here as a reinforcing element (you can also use serpyanka, but it won’t be as reliable). They are attached to the first applied layer of plaster, pressed into it, excess mortar is removed and covered with several more layers. For such work, it is recommended to use special corner spatulas.
Angle spatulaWhy seal seams?
The joining part of the sheets can become a problem; it is necessary to cover the area well so that these joints do not appear through paper wallpaper, painting or other thin material. When installing the material, a beginner may encounter the following difficulties:
- The end parts can crumble and break due to mechanical load;
- Deformations may form at the edges where the gypsum boards join;
- A change in temperature indicators can lead to expansion of the material, as a result, cracks will appear on the sheets, and the base may swell;
- If the joint is not treated, then moisture will accumulate in it, over time this will lead to biological formations and change the appearance of the finish;
- Errors in this area lead to unevenness on the walls and ceiling.
For these reasons, if you do not seal the joints, the result may be damage to the decorative data of the finishing material, and the drywall itself may also be damaged.
Sealing of drywall joints is carried out taking into account the necessary conditions described below:
Correct installation of plasterboard sheets, the correct location of the profiles and the reliability of the frame structure are important. The seam should be located in the middle of the U-shape profile, so the edge parts should be kept on a rigid platform, and the sheathing should be made stable, this will help avoid deformation from vibration;
- The sheets must be fastened firmly so that the joints do not separate;
- Evenness of sheets;
- The width of the space, try to avoid a distance greater than 7-10 mm;
- The presence of a chamfer helps to increase adhesion and create the required distance for joints.
Without meeting these requirements, it will be difficult to obtain a reliable design, and it is unlikely to be able to avoid problems during operation.
The joining part of the sheets can become a problem; it is necessary to cover the area well so that these joints do not appear through paper wallpaper, painting or other thin material.
What can you use?
The joints between plasterboard boards can be sealed with different materials.
Let us consider in detail the most common of them.
Paper tape
This material is sold in rolls. The length of the tape is most often 50, 76 or 153 m, width - 52 mm. Such materials are made from special paper, which is characterized by increased strength. It is reinforced with fiberglass in both longitudinal and transverse directions. As a rule, the surface of the paper tape has a rough texture, which provides better and more reliable adhesion to the putty on the plaster.
The paper tape has a special pressed insert located in the center. Thanks to this element, using such material is very easy and convenient. In addition, paper tape is perfect for sealing areas in the corners of the structure. This material is not subject to stretching and creasing, unlike simple masking tape.
Of course, paper tape is not an ideal material. It also has its own weaknesses. These include a rather labor-intensive installation process, especially when compared with the installation of a conventional serpyanka. This material is susceptible to the formation of air bubbles if the base is not covered with an insufficiently dense layer of putty.
Self-adhesive serpyanka
Most often, when sealing seams between drywall, craftsmen use a serpyanka. It is sold in rolls 45 and 50 mm wide, 20, 45 and 90 m long. Self-adhesive serpyanka is ideal for sealing joints between plasterboard panels that have a thinned edge. Additionally, this material can be used to seal cracks in the base or small holes. Currently, in stores you can find many options for high-quality and durable serpyanka, which is very difficult to tear.
There is such a network:
- self-adhesive;
- not self-adhesive.
When using self-adhesive sickle tape, you need to take into account one important detail: an already started roll of such material should be stored only in a plastic bag so that the adhesive layer does not dry out and lose its properties.
putty
This is another important component required for sealing drywall joints. Experts recommend covering the joints with high-quality putty, which does not shrink or crack over time. In addition, the putty mixture must form a smooth and durable surface on the gypsum base. Branded formulations produced by the Knauf brand meet similar requirements.
Primer
This composition is necessary to protect the material from mold and mildew. In addition, drywall coated with primer is not so afraid of contact with moisture. As a rule, the primer is applied to the base in 2 layers.
Plaster
Plaster serves as a finishing coating, creating a perfectly smooth and neat surface. In addition, the plaster mixture can provide drywall with additional protection and high adhesion to the following coatings applied.
Recommendations
Let's consider a few practical tips that will help you carry out the work correctly:
- Do not make the solution in large portions unless you have a mixer. Such a solution will be difficult to mix, so there will be a lot of lumps in it. It is better to make the solution in small but uniform portions - such a solution will be of high quality and reliable.
- Some people place a heating device next to the structure after applying plaster. However, this is not recommended, since the combined effect of the liquid solution and temperature changes can negatively affect the strength of the drywall.
- The prepared gypsum/plaster gradually hardens, and after 30-40 minutes the mixture becomes hard enough to make its application impossible. Therefore, do not hesitate - after preparing the mixture, immediately apply it to the seam/surface of the drywall.
Putty with paper tape
Much stronger, you get a seam that is covered not with mesh, but with paper tape with perforations. With it, the connection of two parts is more accurate, and its strength increases.
First you should apply putty, as in the previous method. While it dries, we work on the reinforcing material.
Depending on the manufacturer, drywall reinforcement tape may require pre-soaking in hot water before use. Be sure to take into account the time it takes for it to get wet.
It’s better to thoroughly wet any of its varieties with water. Next, you need to apply an even and not very thick layer of PVA glue to the surface of the paper. It is best to do this with a brush with not very stiff bristles.
The cut and applied tape is folded with the adhesive base facing inward, as when gluing wallpaper. The finished strip is set aside, followed by the next one. This is done until the required amount is collected to seal those joints that are planned to be leveled at a time.
The dried surface of the seam needs to be grouted. This is not difficult to do; a grater is used for grinding. After this, the joint itself must also be coated with glue, and tape must be immediately applied to it. You need to level it using a spatula. Be careful not to press too hard on it as it may tear the tape.
When the tape dries, it will take the shape of the seam and become much thinner. Now you can treat the joint with putty again, and sand it again with a float.
Despite the apparent fragility of the connection, paper tape for drywall seams firmly holds two sheets of drywall together. After gluing the tape, the seam is guaranteed not to crack.
Why do seams burst?
Before sealing the seams in the drywall between the sheets, you need to understand the reasons why cracks may form. Otherwise, it will be more difficult to obtain a high-quality result, because it will not be clear what mistakes should not be made.
It is often said that the reason is the shrinkage of the building, but still this is not the only reason; other factors can also influence. So the following points can be highlighted:
- The choice for creating a frame structure is too thin profiles, as well as suspensions;
- Seams are sealed in violation of work technology;
- They do not monitor temperature and humidity indicators, then drying is carried out at the wrong pace.
So, it becomes clear why knowing the rules of how to rub seam areas on a material is a prerequisite for obtaining a long-term and high-quality result.
The cause of cracks is the shrinkage of the building, but this is not the only reason; other factors can also influence it.
Possible damage to drywall
We talked above about how to properly putty drywall joints. Now we will talk about what to do in situations with damage to areas of plasterboard boards.
One of the possible defects is bubbles at the joints of the plasterboard. We cut the bubbling areas with a painting knife. Small bubbles can be removed completely. Next, we put tape around the area around the bubble and cover the defect with putty. Level the surface with a spatula. A day later, we treat the area with a finishing compound and clean the area with a fine-grained abrasive.
Protrusions at the joints of plasterboard sheets should also be sealed. First, we protect the protruding part of the joint, trying to level the surface of the material as best as possible. Next, take a spatula and apply a thin layer of putty to the joint. Let the coating dry completely (about a day). In the future, we apply additional layers of putty (if necessary, depending on the size of the defect).
Cracks on the tapes located at the joints must also be sealed. First, remove the putty layer from the damaged area. After this, apply a little putty to the defect and press the tape there. We give the putty a day to dry completely, so that later we can correct the surface if necessary. If necessary, apply an additional layer of solution.
Proper sealing of seams is only one of the stages of puttying drywall, however, without high-quality seams, all further work becomes meaningless. Therefore, you need to treat the puttying of seams with all responsibility.
Types of seams
GKL joints can be factory-cut or cut.
Joints with factory and cut edges.
- The factory edge of the drywall is rounded, so when joined, a recess is formed, which is filled with putty.
- Trim edges appear when sheets are cut to fit the meter. These edges are chamfered at an angle of 25 - 45 degrees. The chamfer is made with a knife or a special plane for drywall. If there is no chamfer, the putty will be squeezed out of the sheets - a bump will appear on the joint surface, which will need to be compensated with a layer of finishing putty.
Methods for puttingtying drywall seams with tape
Depending on the depth and width of the seams and their locations (horizontal, vertical, corner - internal and external), various methods of sealing (puttying) drywall seams are used, such as single-layer and double-layer putty, using reinforcement mesh (serpyanka) or paper perforated tape, perforated metal or plastic corners.
It is necessary to prepare all the necessary tools and materials.
Tools and materials used for sealing drywall joints
- - container (bucket) and mixer (drill) - for preparing and stirring putty;
- - roller and cuvette - for applying primer;
- - deep penetration primer - to improve the adhesion of the putty to the base;
- — serpyanka and/or perforated tape for reinforcing seams;
- — special putty for joints;
- - construction knife;
- — a set of spatulas for applying and leveling putty;
- - a grater with a set of meshes, or sandpaper for sanding putty surfaces.
Sequence of preparatory work
- — clean the seam from debris and dust;
- - treating drywall seams with a primer for better adhesion of the putty to the base;
- — preparing seams for putty;
- — applying the first layer of putty;
- — application of reinforcing mesh (serpyanka) or perforated paper tape;
- - embedding sickle or tape into the first layer of putty using a spatula;
- — applying, if necessary, a second, finishing layer of putty;
- - sanding putty areas.
Sealing drywall joints
Inspection of edge condition
This is the first step in sealing drywall joints. In the process of manufacturing various structures, plasterboard sheets have to be cut, which means the appearance of smooth rectangular edges. Sealing the joints of such edges is not easy.
For high-quality sealing of seams, it is necessary to make chamfers along the cut line. The chamfers should be about fifty millimeters wide and made at an angle of 45°. In this case, the joint will take a V-shape, the angle will be 90°. This manipulation is mandatory; it allows for improved adhesion of the putty to the drywall. The same should be done if the edge of the drywall sheet differs from the factory one and has chips, cuts, or plaster is visible.
Priming surfaces before puttying
Before puttying, it is necessary to treat the surfaces of the plasterboard sheets with a primer. The locations of seams, joints, abutments and corners require special care in priming. One of the most popular and frequently used primers for drywall is Knauf Tiefengrunt. It is designed specifically for highly absorbent surfaces.
Having primed the entire surface, you must wait until it dries completely, then apply the primer again to the joints. By doing this carefully, you will reduce the consumption of putty.
Primer functions:
- — improves adhesion (adhesion) of two materials. As a result, when puttying, the likelihood of blistering and material peeling is reduced.
- — equalizes absorbency. The result is a reduction in material consumption during the puttying process and a leveled surface. Therefore, it is not recommended to skip the primer application step.
You can apply primer to drywall using any method suitable for you - with a brush, roller, sprayer. However, make sure that the application is even and that the layer thickness is at least 0.05 millimeters.
Puttying drywall seams
After the soil has completely dried on the surface of the drywall, you can proceed to the next operation - filling the joints. This stage of work includes:
- - prepare a mixture for sealing joints;
- - cover the screw heads with putty;
- - apply an excessive amount of putty to the joints so that it penetrates deep;
- - Fill the entire length of the seam with putty.
- - fill the seam space as much as possible with a spatula;
- - Use a spatula to carefully remove excess mixture from the wall and let it dry.
Putties for sealing seams
Construction tapes for puttying drywall joints
A special tape is designed for high-quality strengthening of joints. To treat drywall joints, it is optimal to use special tapes:
Serpyanka for putty
It is a fiberglass mesh. Convenient to use. As a rule, it is self-adhesive. Suitable for longitudinal joints. It is not recommended to use for transverse joints, especially susceptible to cracking. Suitable for seams of any width and length, because... has standard sizes.
Paper tape
This tape is reinforced with fiberglass and has a special fold in the middle (to facilitate puttying corners). Gives a very strong reinforced connection.
Tools
- Spatulas are a must-have tool for laying putty. For convenience, you need to have 2 - 3 spatulas of different sizes with you: 8 cm, 10 cm and 20 cm. A large spatula should have a hard blade.
- Containers for mixing the solution should not contain remnants of old mixtures. To prepare putty, it is better to take a small container.
When using a contaminated container to mix putty, particles of the dry mixture will fall under the spatula and leave behind furrows. Read more about mistakes when working with putty in the article “11 mistakes beginners make when putting putty on walls.”
- Brushes or rollers for applying primer; it is better to use a brush, as it is easier for it to penetrate into the depth of the joint.
- Tape for reinforcing joints strengthens seams and also hides cracks when they appear. To strengthen the joints, use serpyanka mesh tape or solid perforated paper tape.
- Sandpaper will be required for final sanding; for convenience, it can be secured to a grater or a regular wooden block.
How to mask seams in corners
It is recommended to use a serpyanka 10 centimeters wide.
This will prevent the coating from peeling off during use.
For greater convenience, it is recommended to level the composition with an angled spatula (both external and internal corners).
The tape should be cut with a small margin so that it can be bent and folded in half.
After the composition has dried well, it should be sanded with sandpaper.