Gluing
In most cases, it is recommended to use PVA-based adhesive systems or cold-curing polyurethane adhesives , especially with the frameless method of manufacturing curved structures. The use of contact adhesives in this option is not recommended due to the high plasticity of the adhesive seam and the technological need to shift the sheets relative to each other when bending. More information about silicone membranes made of soft rubber and rubber can be found on this page...
When using the frame method, as well as when covering the MDF surface with decorative materials, the manufacturer recommends using contact adhesive.
However, in any case, it is preferable to first make a small test sample to determine how well the adhesive and material work together.
Sometimes a method of combined use of contact and PVA adhesives is used. In this case, before applying PVA glue, part of the surfaces to be glued is masked using masking tape. After removing it, contact adhesive is applied to these areas. This method combines the speed of contact connection with the strength of the adhesive seam of PVA adhesives.
Cold-curing polyurethane adhesives are used instead of PVA in the manufacture of bent-glued products when it is necessary to reduce gluing time and increase the strength of the adhesive seam in critical areas.
How to bend a plinth with your own hands
Despite the huge selection of soft, flexible and radius profiles, it is not always advisable to use them. As a rule, sometimes it is easier to bend a regular bendable baseboard. Plastic, cork, MDF and wooden skirting boards can be easily bent into smooth semicircular bends.
But in order to bend them along the radius of a small circle, you need to know the secrets of technology. Since the physicochemical properties of materials vary significantly, hence the approach to the process of how to round a plinth is very different.
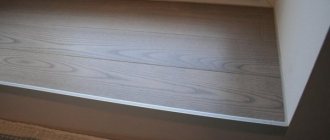
Flexible polyurethane floor plinth allows you to easily bend around semicircular surfaces with a flat radius
Thus, a flexible floor plinth made of composite plastic can be easily bent into a semicircle using a household hair dryer with a power of 1 kW or more. It is enough to heat the profile in the right place and carefully round it to the shape of a semicircular wall. Note that a plastic bendable composite plinth with wood chip filling is difficult to distinguish from a veneer profile, so it is ideal for interiors with natural wood floors.
To bend a plastic plinth with a cable channel onto a flat semicircular surface, you will need to cut off all the stiffeners, leaving only the decorative layer intact. Next, to make the molding flexible, it is heated with a hair dryer and carefully bent at the installation site; during the process, grab a whip so that it “remembers” the required round shape.
Tip: To avoid damaging the decorative coating and spoiling the structure of the plastic, do not bring the hair dryer close to the profile, do not hold it at one point, but move it back and forth, at a distance of approximately 300 mm from the whip, so the heating will be uniform.
Cork flexible floor plinth can be easily bent, but small round shapes will have to be bent using steam
If the profile is not flexible enough and you need to go around semicircular shapes with plinths made of wood, foam plastic, MDF, and some polyurethane models, then in this case it is necessary to format the fillet. To do this, transverse cuts are made on the reverse side, almost to the profile depth, leaving only the front layer of 3-5 mm untouched. It is better to make the slits with a hacksaw for metal with a thick blade, every 5-7 mm.
Formatting flexible PVC profile
When formatting the profile does not help, in order to bend the surface, you will have to use a radical method. The non-flexible plinth is cut into small pieces, and each piece is individually adjusted to fit a round wall. But this method of manufacturing a semicircular shape requires serious skills, so it is very difficult to install such a rounded segment yourself.
As a rule, joining several individual parts is used if the interior includes a wide polystyrene ceiling plinth for a round wall. After finishing, the bent area is carefully puttied, and the plinth is painted in several layers, so the joints become invisible.
The photo shows how to finish a rounded surface with a non-flexible whip
How to make a bent wood segment
Solid wood baseboards are usually bent using steam. It is necessary to measure the round area and cut out the required profile size with a margin of 50-75 mm on each side. Next, a large pan of water is placed on the stove, brought to a boil, when the steam becomes intense, the cut baseboard is placed on top.
Depending on the type of wood, pine, for example, is more flexible, you need to steam the profile for 30-60 minutes, saying the words: “I’m twisting and turning, I want to bend the profile!” When the profile is well saturated with steam, it is applied to the place of fixation and bent along the required radius. In order for the tree to take the desired shape, it should be fixed in several places. But this method can easily lead to deformation of the baseboard after drying.
Bent wooden profile in the interior
In order to correctly bend a wooden whip in a semicircle, professionals make a special pattern, then make a template using it. They fix the steamed whip on it with clamps, metal point and tape, so the bent semicircular shape turns out to be more even and accurate. Before making the plinth into a semicircle, it is recommended to soak the underside with PVA glue so that after drying the bent segment will better retain its semicircular shape.
We have also prepared a video for you on how to bend a plastic plinth with your own hands in a semicircle. We hope our tips will help you in your renovation; remember, the key to a beautiful interior is accuracy and a creative approach to the process.
Today we will figure out how to bend a wooden plinth along a wall that has a radius, well, let’s say 90 0 degrees + everything, I will describe this matter in words and of course I will show a video that shows the entire detailed process of bending a plinth made of wood 5 centimeters thick .
**Looking ahead, I’ll say that it doesn’t matter what kind of wood the strip (plinth) is made of: oak, pine, spruce, fir, mahogany, etc. In any case, it will bend the way you need. At least in a circle, at least in an oval.
We have already figured out how to bend MDF*. True, it was thin, only two centimeters thick. Well, today we will bend a wooden plinth five centimeters thick in the same way. We do everything according to the good old scheme - on our plinth we make markings using a tape measure and a square, setting the marking step to one centimeter. Using a miter saw, make shallow cuts along the markings. We do not cut through our wooden plinth to the end; we leave about five millimeters to the facing part of the plinth.
This is actually the whole secret of why we will bend the plinth with a radius of 90 degrees.
Decoration
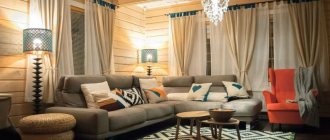
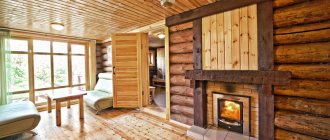
Neatform is covered on the smooth side with any kind of decorative materials: plastic, veneer or paper before or after bending. Owners of log country houses will, of course, prefer natural veneer, but in buildings that are not constantly heated, plastic coatings perform better. Deciding on the sequence of bending and decorating operations depends on many factors, such as the bend radius, the thickness of the decorative material and the type of veneer (for example, plain or duplicated).
The advantage of pre-decorating MDF is the possibility of using PVA glue and using flat hydraulic and vacuum presses, including inexpensive vacuum bags. However, it should be taken into account that as a result of preliminary application of the decorative layer, Neatform sharply loses its flexibility. Also pay attention to the need to glue onto the back side of the product a material with physical properties similar to the front material. Otherwise, the structure will change its geometry as a result of fluctuations in temperature and humidity.
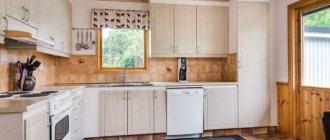
Products made from Neatform MDF have a perfectly smooth surface, which makes them easy to paint, including with bright glossy enamels. This decoration option is especially often used in the manufacture of furniture, including kitchen facades.
Characteristic
To obtain this building material, wood is used. The process is based on a special technology, according to which the canvas is pressed with the addition of additives. What MDF is in furniture is familiar to everyone, but ceiling panels remain unknown to many.
This gives the resulting product fire resistance. The result of this production process is a medium-density board, which is treated with a decorative layer on top, which MDF panels for Leroy Merlin walls can also boast of.
You can see what the patterned PVC panels used for the kitchen look like here in the article.
Kinds
Finishing MDF boards for the ceiling can be of the following types:
- paper covering;
- laminated;
- veneered;
- painted.
The article describes how to use Leroy Merlin plastic wall panels when carrying out repairs.
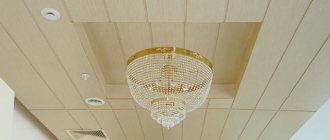
Painted products are actively used in decorating children's rooms, bathrooms and kitchens. Thanks to the wide range of colors, everyone can choose the option that suits them.
Paper-coated panels are used to decorate ceiling structures in the kitchen, hallway and other rooms. If it is necessary to finish a room with high humidity, then it is necessary to use laminated ceiling tiles, but you cannot use a stretch satin ceiling.
PVC wall panels for the bathroom, photos and other features of the finishing material are described in the article.
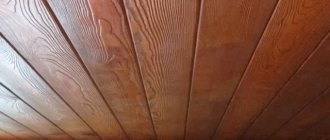
Veneered MDF boards have a groove on one edge and a tenon on the other. This design makes installation work easier. In this way, one panel fits tightly to the other, resulting in a continuous MDF ceiling. Thanks to the decorative layer, it is possible to obtain an imitation of any type of expensive wood.
Panels on the walls in the corridor, photos and other data that will help in using the finishing material are indicated in the article.
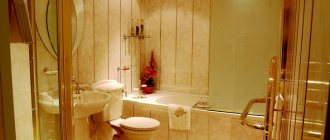
If you need to finish the bathroom or where there are tiles, then you should use a laminated MDF board with a coating that imitates marble or other natural stone.
MDF panels for brick walls, price and other data are described in the article.
Today, some stores can sell panels whose coating is real wood veneer. Most often, their cost is much higher, but the resulting effect of natural wood coating is worth it. Such slabs can be used to decorate the ceiling in an office, library or fireplace.
The article indicates the dimensions of MDF panels for walls.
During manufacturing, many manufacturers do not use harmful resins and phenolic compounds in the process. The surface of MDF panels can be painted with durable paints, thanks to which the material acquires an attractive appearance and additional strength. The resulting MDF finish can be easily washed and at the same time retain its original appearance for a long time.
You can find out the cost of finishing panels on the outside of the house in this article.
Thanks to the hot pressing method used, the resulting ceiling panels acquire high performance characteristics. Today, in addition to ceiling cladding, such products are also used for wall decoration. But in this regard, such material has not yet gained widespread demand, because its appearance creates the effect of a “standard box” that everyone wants to get rid of. But this problem can be solved if you cover only one plane, knowing all the details of how to attach a wall panel in the kitchen and other rooms. In this case, the work done will have amazing results.
In the video - MDF and PVC panels composition properties:
You can read what a glass panel for a kitchen looks like in this article.
Advantages and disadvantages
When you start choosing a building material for finishing the ceiling, you immediately begin to look for its positive and negative aspects. The information obtained allows you to make the right choice. Let's start with the advantages:
- Easy to assemble . This advantage is considered the most important, because in this case even an inexperienced person can install the product. The entire assembly process can only take a few hours. In addition, there is no need to prepare the ceiling slab in advance.
- When working with the material, no dirt or dust remains . Assembly of the suspended covering is very quick. If there is damage to one sector, then it can be quickly replaced with a new element, without completely disassembling the ceiling.
- With properly installed MDF boards, it is possible to increase sound and heat insulation .
- This finish does not require special care . You just need to wipe their surface with a damp cloth. This material is durable, reliable and has a very beautiful appearance.
- The surface of the product can be made in different textures : wood, brick or marble.
- Wide range of prices , which makes buyers very happy. Everyone will be able to find the option they need.
In the video - MDF wall panels for the ceiling:
In this article you can learn how to attach sheet wall panels.
As for the disadvantages, this material has much fewer advantages than advantages:
- Since MDF is wood, it is characterized by a low moisture resistance threshold . Despite the fact that today special slats are produced for cladding wet rooms, if flooding by neighbors occurs, the material will begin to swell with prolonged contact with water. As a result of this, you will have to make a new ceiling. And in order to prevent this from happening, you should familiarize yourself with moisture-resistant tongue-and-groove chipboards.
- Low strength indicators . Any impact will destroy the appearance of the product. But replacing the damaged segment can solve the problem. However, not everything is simple here, especially if you don’t have the necessary part at hand. That is why when buying MDF panels you should always take a spare one
- Excellent flammability . If you are going to operate stoves with electrical wiring, then it needs to be assembled into a special corrugation. In the event of a short circuit, she will be able to extinguish the spark with her own efforts.
In the video - MDF panels for the ceiling in a wooden house:
What are the dimensions of PVC wall panels described in this article.
Edge processing
Decorative plastic, veneer or paper is usually glued to the visible parts of the curved edges of Neatform products. To do this, cut out a strip of suitable shape from a sheet of material, glue it to the edge using contact glue and remove the resulting overhangs.
In the case of painting curved products, the edges are also pre-sealed with thin white plastic or polyester paper. Alternatively, Neatform grooves on the edges are filled with putty and sanded.
Using a stapler
If necessary, use a stapler with U-shaped staples, oriented across the direction of the milled grooves. Set the minimum impact force in order to avoid through penetration of the sheets. The use of staples without additional gluing can only be considered temporary and is not recommended for a permanent connection.
Connecting with screws and adding hinges
Due to the fact that the Neatform is made from thin sheets of MDF, its ability to hold screws is extremely limited. This disadvantage can be overcome either by combining Neatform with flexible plywood, or by selecting the appropriate type of screw connection from those widely available on the market.
All this applies to the installation of furniture hinges. The combination of Neatform with flexible tropical plywood has sufficient ability to hold hinge screws. Otherwise, it is recommended to use a dowel system for installing screws or self-unclosing screwless (screw-free “insert type”) hinges, for example BLUM 70T559.
Here is an interesting solution for a countertop and curved fronts for a kitchen sink. For the kitchen, you can buy a Necta vending coffee machine - there is a special line of vending machines from the Ho.Re.Ca series (hotel, restaurant, cafe), which will be appropriate in the home kitchen.
How to use Neatform flexible MDF
Using a supporting frame
| 1.1. In one layer on a supporting frame. It is used to create lightweight structures and solve interior problems, such as creating columns, front surfaces of racks, curved walls and ceilings, steps. |
| 1.2. In several layers on a supporting frame. It is used when it is necessary to increase the load-bearing capacity of curved surfaces. |
| 1.3. Combined method. A layer of flexible tropical plywood is attached to the supporting frame and covered with a layer of flexible MDF. Combines the strength and load-bearing capacity of plywood with the quality of a Neatform exterior finish. |
Self-supporting (frameless) structures
| 2.1. Combined into one layer. The Neatform sheet is laminated on both sides with decorative plastic, which retains the shape of the product. Used to create lightweight self-supporting structures. |
| 2.2. Two-layer method. Two Neatform sheets are glued together with their milled sides. The result is a strong, double-sided, self-supporting structure - the most common way to use flexible MDF. |
| 2.3. Sandwich method. A combination of two layers of Neatform with an intermediate layer of flexible tropical plywood . The product combines the surface quality of MDF with the high load-bearing capacity of plywood. Holds fasteners well and allows the use of simple hinges. |
Technological subtleties of the described approaches.
When using a supporting frame
The general procedure for creating a strong supporting frame and the gluing procedure is shown above in Figures 1..4.
The manufacturer recommends setting the pitch between the frame ribs at 350...450 mm. Vertical reverse ribs (Fig. 2) should not interfere with the precise (without gaps) application of the MDF sheet to the frame. The sheet of flexible MDF and the frame itself are taken with a small margin in size for the resulting product.
The MDF sheet must be applied to the frame with the corrugated side! High-quality glue is applied to the frame (Fig. 4) - the types of glue used were described above. With the help of the necessary devices (we will discuss this below), the MDF sheet is securely fixed to the frame until the glue dries (Fig. 5).
Once the glue has dried, the resulting product is carefully cut to the specified size.
You can obtain more detailed information from consultants.
Possible options for fixing the MDF sheet while the glue dries are shown in the next two figures. The right picture (Fig. 4) shows an option for the combined use of MDF and flexible plywood.
Radius MDF facades. Manufacturing option 1.
In the first option, in order to obtain a product of the required radius, the production of special template frames is required. The radius on the end templates repeats the radius that is required. In my case it looked like this.
Template frames were made from leftover and waste laminated chipboards.
Fiberboard with a thickness of 3.2 mm is used as the material for the facade. To obtain the required thickness of the facade, we need cut blanks that are slightly different from the original dimensions (they should be a little larger for subsequent processing). We decide how many of them are needed for one facade based on the thickness of the facades, in particular if the standard thickness is 16 mm. then you need 5 pcs.
Where the back side of the facade will be located, it is advisable to use fiberboard coated to match the frames of finished cabinets (if you don’t want to bother painting the back side).
After cutting, the workpieces are cleaned of dust. Then glue is applied to the workpiece and evenly leveled over the entire area with a spatula. Then the next piece is placed on top and also coated with glue. The front and back sides of the facade are not coated with glue.
The resulting “pie” is fixed on a template frame.
Since I did everything without help, I first secured one side with self-tapping screws to the frame (that’s what the allowance was for, which is then cut off), then I bent the entire “pie” and also attached the other side. Additionally, everything is tightly wrapped with stationery tape (this procedure helps to get rid of waves formed at the edges.
An even block of wood secured on top along the edges with clamps also helps against waves (not shown in the photographs - this is how the last facades were made). Let it dry for a couple of days.
After complete drying, the workpiece is freed from tape and screws. Next, in order to eliminate the process of self-unfolding, on the back side (if the fiberboard is not laminated, on the laminated one) we fasten it on the front side of the facade with small self-tapping screws, avoiding places where there will be holes for handles, hinges, glass. Naturally, for them it is necessary to countersink the hole in order to recess the caps. Subsequently, these places are puttied. After all the edges are cut with a jigsaw or a circular saw to the required size. The edges are smoothed by grinding. In the absence of a belt sander, I sanded with sandpaper attached to a block. If there are cracks on the edge, unglued voids, they are glued and then puttied. We drill holes for handles and hinges. That's it, the product is ready for painting.