/Furniture/Set, wardrobe, rack/
Wall shelves can open up new storage options or provide a cute backdrop for home decor. Small and large, book and kitchen, with hidden fastening and cantilever - almost any shelves can be made with your own hands, rather than bought in a store. In this material, we presented 3 simple and budget-friendly ways to make shelves for various purposes, as well as 70 photo ideas for inspiration.
Types of shelves in the house
Depending on the installation location, shelves can be wall-mounted, floor-mounted or hanging. If the floor shelf has a large height - from a meter and above, it is often called a rack. A few words about hanging ones: usually these are decorative structures that hang on a pipe or a specially driven bracket. This option is popular in rooms where heating pipes run under the ceiling: they just beg to have something hung on them. Shelves are hung on the pipe in the kitchen and bathroom: it’s convenient there.
These hanging kitchen shelves are convenient and functional. You can use the same pipe to make a story made by yourself.
They are made of wood, plywood, laminated chipboard, fiberboard, and there are glass shelves. The same materials are used as stands, but they are also made from metal, plastic and other absolutely incredible things - for example, pipes or bottles.
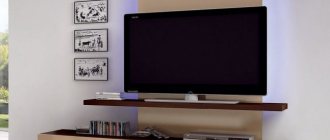
In living rooms, it is not so important what material the shelf is made of. It is important that its design is in the same style as the interior. Even functionality is not always important: some play a purely decorative role. If they have anything on them, it’s only one or two items. Their role is to give the interior of the home a special style and flavor.
The intimate atmosphere of this room is emphasized by cozy pillows and dark wood shelves.
A laconic style of apartment design and the same laconic shelves in a contrasting color. In this interior they are the main element. The free space above the sofa is organically filled with shelves to match the walls. The shelf can serve as a separator for zones in the room.
Light interior in light colors and the same shelves The shape and color of the shelves repeats the shape and color of the table drawers
If we talk about shelves in technical rooms - the kitchen and bathroom, in particular, then in addition to aesthetic considerations, practicality requirements are almost universally added. Even decorative shelves in the kitchen should be washed well. For bathroom shelves, the requirements are generally high: periodically there is very high humidity and materials are required that can withstand it without any harm. There aren't many of them. These are plastic and stainless steel. They also make bathroom shelves from MDF, but they can be used normally if there is good ventilation in the bathroom.
Functionality of shelves
There are many small items that cannot be put in a drawer or closet in every home. I want the necessary little things to always be at hand; shelves are used for this purpose.
You can decorate the wall or floor space in an original way using a shelf. Place a designer vase or books, figurines or victory cups, a collection of objects or photographs.
You can use the shelf in the bathroom, children's room, kitchen, bedroom, living room, and in each room it will fulfill its role.
Shelves on the wall
In any room there are places on the wall where you just need to hang something. After all, most modern furniture occupies only the lower part - sofas, tables, couches. The upper part remains empty and dissonance arises: the lower part of the room is overloaded and the upper part is half empty or completely empty. These voids on the walls are organically filled with shelves.
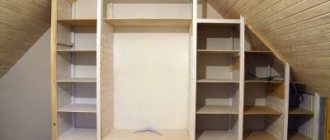
The whole system, and the most “dead” space is used - the corner
Structurally, most shelves consist of the actual shelves and lintels. But these components are combined into so many options that it is impossible to count. A simple design is good: you can make any shelves with your own hands. Moreover, these products may be the first self-made things. It's really simple.
How and what to attach it to
It’s not for nothing that we start with fasteners. The design of a wall shelf largely depends on the type of mounting. Or maybe it’s the other way around. It depends on what to dance from...
Traditional hinges
Traditional hinges for hanging shelves
There is a traditional way - on hinges. It is suitable for wood and fiberboard, any other material that is thick enough to attach. Screwed onto the sides with self-tapping screws. Then the distance between the centers of the loop holes is measured and marked on the wall (make sure it is horizontal). At the marked points, holes are drilled for the dowel, the dowel is inserted and a dowel-nail with a small head is screwed into it, which fits into a loop or bracket (a pin slightly bent upward). Then a shelf is hung on them.
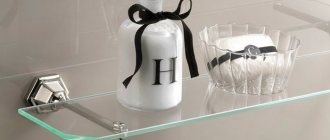
Not all materials can be drilled. For example, glass shelves. You definitely can't screw anything into them. Fastenings for glass shelves are special: they consist of two parts, between which glass is inserted. Often elastic pads are installed between the holders. The bottom mount usually has a small clamping screw to secure it in place.
Fasteners for glass shelves
The most popular mount for glass shelves is called “pelican” - for its unique shape. It looks good on its own and is available in different colors. The thickness of glass that it can hold is from 8 to 34 mm. You can insert not only glass into it, but also any other material of such thickness. It just looks stylish with glass.
It’s easy to make glass shelves on the wall with it: you buy a mount, order pieces of glass with processed edges of the required size and shape from a glass workshop (or cut them yourself, if you know how). All that remains is the assembly itself:
- Attach the pelicans to the wall. Two dowels each. The case is collapsible - the decorative trim is removed, and there are two holes in the mounting plate. One is higher in the body, the second is lower. We secured it and put the decorative trim in place.
- Glass was installed.
- Tightened the screw. All.
Holder for a glass shelf on the wall
There are other forms of similar fasteners. The photo below shows a few of them.
Some mounting options for glass (and not only) shelves
Decorative brackets
Another type of fastening is brackets. They are reliable, some are decorative, so much so that they themselves are decorations.
Wall shelf brackets
Concealed installation - shelves without support
And the most amazing device for hidden installation. It makes it possible to hide the fasteners. A seat for the pin and the holder body is cut out at the end, and the shelf is simply put on it.
Hidden fasteners for shelves
As you can see, even a simple board or piece of glass on such mounts is not bad. But there is still a sea of all sorts of ideas.
Read about how you can update old furniture here.
Creative designs from scrap materials
Shelves are not too difficult to make yourself, using standard designs, traditional materials, or armed with your own imagination. If you have the desire, taste and certain skills, it is possible to create a unique piece of furniture without investing significant funds and using something that could easily be scrapped.
Important! When making shelves with your own hands, it is important to remember that they must simultaneously perform a utilitarian function and serve as an interior decoration, located in a prominent place.
Original shelves made of pipes
For the production of products, you can use old, unnecessary boards, scraps of pipes, pallets used for transporting goods, etc. Homemade interior items can be installed in rooms for various purposes.
Hallway
In hallways, where there is usually not enough free space to install massive furniture, shelves of various designs are relevant, used to place hats, shoes and various small items. If you don’t have the funds to purchase finished products, or if you simply want to bring your fantasies and ideas to life, you can arm yourself with a simple tool and assemble a necessary household item with your own hands. Pallets are perfect for the production of all kinds of structures designed for storing shoes.
Shoe shelf made from pallets Shoe shelf made from pallets
Another option for a shoe rack made from pallets
As shown in the last example, when installing the tray vertically, a storage area for shoe care accessories can be arranged at the top of the rack.
All you need to make shelves is the pallet itself and the simplest tools, fixtures and materials.
| Tools/materials | Photo |
| Hacksaw (or any other saw) | |
| Sandpaper (or sander) | |
| Screwdriver | |
| Roulette | |
| Pencil | |
| Brushes | |
| Self-tapping screws, antiseptic impregnation for wood, paint, varnish (the composition of decorative products is selected individually) |
Armed with the necessary devices, it is enough to simply make a structure of the required size from a pallet. For shoes that are not too large, you can make a simple design from sections of sewer pipes. To assemble a shelf, you need to saw off pipe segments of the same length, sand the cut area, fasten the structure together and install it in the corridor (it is advisable to additionally fix it using, for example, a corner, to the wall).
Shoe racks made from PVC sewer pipes
A similar model can be assembled from cardboard pipes. If you want to decorate it, you can use decorative compositions in different colors. To fasten the pipes, you can use glue or a stapler. The only negative is that it is not recommended to store wet shoes in such compartments, otherwise the cardboard will become deformed over time.
Instead of gluing, sections of the shelves can be tied with cord or assembled with tape. This shoe rack can be made floor- or wall-mounted.
Metal pipes and fittings are an excellent material for the production of shelves designed to store shoes. They are distinguished by strength, durability and resistance to mechanical and climatic influences. But such designs will not look harmonious in all interiors.
Metal pipe construction
Kitchen
You can install attractive homemade structures to store spices, utensils and decor in the kitchen.
Cardboard shelf decorated using decoupage technology
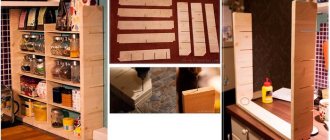
For a kitchen, especially a country kitchen, a shelf made of cardboard would be a good option. The production of such a design is worth considering in detail.
Step 1. To make an interior item, you will need a box from which the necessary sized parts are cut out - the frame of the shelf and the walls that reinforce the structure (back, side and base).
Parts are cut out of the box
The sides are rounded, 2 more layers of corrugated cardboard are glued to all edges.
The sides are rounded
Step 2. Decoupage of the finished structure begins. To do this, all surfaces (with overlap) are sealed with scraps of newspaper. PVA glue is used for fixation.
Decoupage of the finished shelf
Step 3. The shelf is covered with pieces of glossy magazine pages.
Glossy magazine pages are used
Step 4. The dried shelf is treated with a sponge soaked in solvent.
Solvent
Step 5. Two layers of varnish are applied to the surface of the finished structure (to apply the second, you must wait until the first layer has dried).
The varnish is applied in two layers
To secure the shelf, you can use, for example, keys from aluminum cans. Such a simple design is quite capable of supporting objects placed on it, the weight of which does not exceed 2 kg.
Shelves for storing dishes made from boxes. From used boxes, after decorating them, you can make an attractive shelving unit.
Shelves for dishes from drawers
Bathroom
An unnecessary box, hung by a belt on hooks, can become an excellent shelf for towels and other accessories.
Original bathroom shelf
Two scrap boards and a couple of ropes will form the basis of a functional and stylish bathroom shelf.
Construction made of boards and ropes
A broken wooden chair can find a completely unexpected use. Its back and part of the seat can be used as a shelf and towel holder in the bathroom. Of course, subject to appropriate treatment with a decorative composition.
Product made from an old chair
Living room
Shelves for the living room can be made from the materials discussed above. In modern interiors, wooden boxes can be used to place decor, interior items and equipment, and in large quantities.
Wooden boxes in the interior
The boxes can also be used to make storage places for shoes, as shelves for children's things, a rack for household supplies and flower stands. It’s easy to add attractiveness to buildings by painting them and decorating them with appliqués or other decor. I would also like to dwell on devices for storing books.
Bookshelves
Often shelves are needed to accommodate fiction and technical literature. It can be placed on open-type structures made independently. If you have unnecessary water pipes (preferably metal: copper or steel) and fittings in your house, you can make a very stylish structure for storing books. You will also need metal paint to make the structure decorative and protect it from corrosive processes.
Creative bookshelf Creative book shelf Loft style shelf
A simple hanging shelf can be made from straps.
Shelves with straps
A more practical option is to install a base, for example from a board, between the secured straps.
DIY hanging shelf made from belts
You can place anything you want on such a shelf. Self-made shelves can be installed not only in residential premises.
Workshop
From pieces of plastic pipes, cut at an angle and secured with self-tapping screws, you can make a convenient shelf for storing equipment needed in the household and construction.
Holders for brushes and pencils in the workshop
Each craftsman keeps a large assortment of tools in his utility room. They are often stored in disarray. It's easy to fix the situation.
In any household there is an unnecessary board. It will require minimal processing - grinding and protection with special impregnation from climatic influences. After this, you need to drill holes of different diameters (using different drills, including a feather drill), into which you can install various tools, from screwdrivers to hammers. To secure the shelf, you can use wooden stops or ordinary metal corners.
Shelf for screwdrivers
The biggest problem in the workshop is storing hardware. Typically, screws, screws and nails are stored in such a way that it can be difficult to find the necessary fasteners. Regular wide-necked plastic bottles will help keep things organized. To do this, you need to secure their lids to the board with self-tapping screws, and then screw on the containers with the contents.
Organization of a workplace in the workshop
What other structures can be made from the most seemingly unsuitable objects?
- Wine rack made from pipe sections. Installing such a rack allows you to store bottles in the correct position. Wine rack made from pipe sections
- Shelf from an old suitcase. Instead of throwing this item in the trash, it can be used to make a wall structure where small items, such as medicines, will be stored. Refinement of the suitcase consists of installing dividing shelves. Shelf from an old suitcase
- Pallet rack for flowers. On such a structure you can place many pots with plants. The only thing is that they should not be very large. Pallet rack for flowers
As you can see, unnecessary things should not always be rushed to the landfill. From them you can make, with a minimum of effort, utilitarian and stylish shelves for any room.
Bookshelves
There are strength requirements for bookshelves: they can hold significant weight. Therefore, the fastening, materials and design must be reliable. Traditionally, bookshelves are made of wood, laminated or veneered fiberboard. And then fiberboard with a long span (more than 90 cm) sag over the years.
When planning shelves for books on the walls according to your own dimensions, keep in mind that the distance between the supports should not be more than 90 cm. Then even when fully loaded it will not bend. There are two types and varieties of shelves: wall-mounted and floor-mounted. Both of them can be angular.
In the simplest case, it is a board secured in one of the following ways. Some options, especially when presented correctly, look very good.
The simplest design of a shelf at the bottom of a wall for books (a secret fastening is used)
And with imagination, several planks turn into a very interesting thing, which can even be the main element of decor. Ideas for DIY are collected in the photo gallery.
And this is a serious way to expand the space due to the corners between two windows
A very interesting idea of using corners for small shelves. Corner wall shelf for books. Attached to pelicans)) Due to the contrasting color, this shelf is the center of attention. Nothing complicated: it’s easy to assemble such a bookshelf with your own hands, and the look is non-standard. Non-linearity - they are always interesting, and on such a shelf you can put books of different heights
Small system with pipe jumpers
Floor bookshelves can be loaded more seriously. Here the forms are different: there are racks to which shelves are attached. The highlight can be a broken or unusual line of shelves, as well as interesting racks.
Simple design benefits from color and bracing Unusual counters adorn this floor-standing bookshelf
This is more like a bookcase or even a cabinet, but the essence does not change - the original color and interesting small shelves in the central part and the structure looks interesting. Easy to make and original
A very interesting idea - non-linear shelves and lintels made of thick glass. This is more of a system of shelves
Read about the manufacture of fountains (both small indoor ones and more substantial ones for a country house, personal garden or garden plot) here.
Original shelf designs
Quite often, shelves play only a decorative role when they are mounted on the walls. In this regard, it makes sense to work on the shape of these shelves so that they attract attention and also harmonize, creating an overall impression of the design as a whole. Naturally, these shelves are not intended for placing heavy things or interior elements on them. Their task is to attract attention with their interesting appearance and shape.
The shelves are purely decorative
An equally interesting idea is glass shelves. If you install one glass shelf, then it will not be so interesting, but if you create a whole ensemble, in combination with wood or metal, then it will already look like something. Glass is still a heavy material, so it is better to opt for metal.
Glass decor
Systems made of glass and metal are often found in retail outlets, but this does not mean that they cannot be used in residential premises. Glass and metal are modern and stylish.
Made of glass and metal
Shelves can have a very original look, since they can be made from anything, and here everything depends on the possibilities of a person’s imagination. Even from pipes, both metal and plastic, you can build a designer item. To do this, you can use various remnants from repairs.
From the remains of pipes
In short, people with imagination are able to create something extraordinary, and the main thing is that no one will have something like this, even from unnecessary trash.
Hanging
Not very numerous, but an original type. The most important thing is that it can be done easily: a few planks, four ropes or two belts and you can get to work.
Old leather straps can also become the basis for a suspension system
This is a complex system of blocks...and the shelves can be located at any level. Two planks, four ropes and half an hour of time are all that is needed to make this shelf. How to make a hanging shelf - graphic step-by-step instructions
DIY corner shelf made of wood
Corner shelves can be of various heights and have a different number of levels.
Let's consider the sequence of manufacturing a wooden corner shelf from 20x50 mm slats.
- After examining the slats, you need to choose the smoothest ones, with the minimum number of knots - 2 frames will be made from them, measuring 40x70 cm. To make them you will need:
— 4 parts 70 cm long;
- 6 parts 30 cm each.
- It is preferable to glue the frame parts together using clamps.
- Now it's time to make the shelves. They can be done:
- type-setting, gluing together several slats, from which parts of the desired shape are then cut out and edged on the outside with a figured lath;
- from a sheet of plywood;
- made of laminated chipboard. In this case, the cut needs to be sanded and pasted over with furniture edge or in some other way, at your discretion;
- from a fragment of old furniture, if the front part is flat.
- The shelves are screwed to the frames and varnished.
- All that remains is to fasten the hinges and hang the finished shelf in its place.
For a corner shelf, a set of 2 hinges, as in the illustration, is best suited. If you hang the shelf on a loop with a wide eye, then you can then move the shelf along the wall and put on the second loop.
To the nursery
While the child is very small, I want functional shelves, but with children's drawings. But where can you get these? Do it yourself. Any shelf of the configuration you like can be covered with non-woven wallpaper or thick wrapping paper (glued with PVA). After drying, coat twice with water-based varnish. Such shelves can be washed, but what’s most interesting is that the shelf can change with the child. You tear off the old decor, glue on the new one. The idea is simple, it works perfectly.
Here's what can happen
For children, the shelves are not very different in design. If we talk about floor or shelving, then they must be strong, taking into account the fact that older children will definitely want to climb on them. Therefore, often even those shelves that stand on the floor are additionally attached to the wall: so that they do not collapse and crush young climbers. Based on these considerations, they are not made tall: even if they fall, it’s not scary.
The shelves in the children's room also differ in color - they are brighter, can be made in the form of letters, and boxes for toys can be installed in them: this makes it easier to keep them in order. In general, functionality and security must be combined.
System with drawers - cleaning will be quick Children grow, design and colors change
A combination of open and closed shelves - convenient for preschoolers. Fairytale town will appeal to both boys and girls
Read about developing a children's room design here.
Advantages and disadvantages of making wooden shelves with your own hands
Wood is the leader in environmental friendliness among all materials. Of course, wooden details in the interior refresh it and bring it closer to nature.
The main advantages of wooden shelves:
- Natural wood, even treated with varnishes and special products, collects much less dust than a product made from any other material.
- Wood is a breathable material that does not emit harmful substances into the atmosphere.
- Wooden parts can be easily processed using tools that can be found in any, even small workshop.
- Wood is a classic material, familiar to the human eye and relatively inexpensive (unless, of course, you use the most expensive and rare types of wood).
- The availability of wood still surpasses all other materials for making shelves.
But for all its advantages, wood also has a number of disadvantages:
- Precious types of wood are quite expensive.
- During production, a lot of waste is generated: shavings, sawdust, bark, etc.
- If poorly treated or not specially treated, wood can leave splinters on a person’s skin when using the shelf.
It is, of course, up to the owners to make a choice about using one material or another, but in this article we will look at several options for making wooden shelves with our own hands.
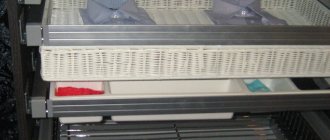
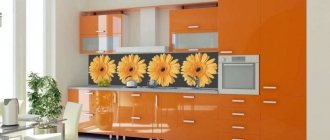
Shelves and shelves for the kitchen
Say what you like, but in the kitchen the main thing is functionality. There is not much free space even on the walls: the cabinets take up a large area. Therefore, one of the tasks is to make the most of free space. There are interesting ideas for small or even very small gaps between the wall and the refrigerator or other household appliances. Strictly in size, you can make a pokka on wheels, which can be pulled out and completely hidden there. It is wide and narrow (see photo).
It’s easy to make such a retractable shelf-rack on wheels for different jars. Everything you need is at hand and out of the way
There are also interesting ideas for saving space. If the sink or station is located near the window, you can take the sides. There is an interesting hanging option - a grid on chains to which all sorts of utensils are attached. But such a shelf is possible if the desktop is not against the wall. Another option for saving space is if the kitchen-dining room is zoned with a counter, you can also make a shelf above it, which will be partially hanging. One part of it rests on the wall, the second on the counter or “hangs” on the ceiling.
We take up all the free space Shelves near the window in a different style
Hanging shelf for small items There is also unused space above the counter
Read about ways to arrange kitchen furniture here.
Covering the entire wall above your desk with cabinets is not the best solution. They look heavy. The problem can be solved by using glass doors, but not everyone likes this. The solution is to make open shelves between the cabinets. They will add more lightness to the interior and the work area will not put so much pressure on the rest of the space.
Glass and open shelves will “lighten” the interior
Stylish accessories won’t hurt There’s also room for glasses Different style – same idea Closed and open shelves in one system – convenient and unconventional
How to choose the right shelf mount
It is worth taking into account both the weight of the piece of furniture itself and the weight of what is supposed to be placed on it.
Corner shelves
To install them, any method will do. You just have to be very careful when selecting the size of fasteners.
Corner shelves will help fill all the corners of the room.
Glass shelves
They are mounted on pelican brackets or special decorative holders. What is special about the latter? Since it is impossible to screw screws into the glass sheet, it is clamped between two planes.
Glass shelves are very fragile.
Wooden shelves
For their fastening, a secret installation method is often used. It's easy to screw self-tapping screws into wood or make holes in it.
Plastic shelves
They are not heavy, so they can be attached to any holders.
Plastic shelves can fill space on the wall.
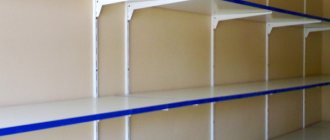
Metal shelves
To fix such shelves, metal corners are used. But the load capacity of the latter is low, therefore, if the structure is heavy, frames made of metal slats are used.
Metal shelves can withstand heavy loads.
Decorative and original
Often, shelves on the wall play a purely decorative role. They are designed to attract attention and this goal is achieved by an unusual shape, contrasting with the walls and color. You can’t bet much on it: one or two things, but how interesting they are.
There are only three rectangles, but due to the color and binding they look very stylish. Another option from different rectangles and squares, and even painted in bright contrasting colors. You can’t pass by. A very interesting idea of using corners for small shelves. The theme is the same, the mood is different. And only due to the fact that the contrast between the color of the wall and the color of the shelf is not so bright. Another option for “square” shelves. Two identical sets arranged differently If traditional square shelves are decorated around the edges with curly frames, the style turns out to be completely different
Another interesting topic is glass shelves. Just one glass is not very interesting. Its combination with wood and steel is more attractive. The effects are sometimes unexpected. Glass is assembled on guides: the material is fragile and heavy, and it needs to be held. Steel can do this.
An interesting glass option. You can arbitrarily change the height between tiers
In fact, these systems are intended for creating store interiors, but they also look stylish in an apartment in a modern or loft style.
Also suitable for vintage style
What are shelves made of? Even from pipes. Metal and plastic. Do you have any samples left from the renovation? Put it to work and get a designer item, interestingly, assembled from trash.
This is a floor option. Plastic pipes and no need to paint.
Water pipes, corners, everything is painted with bronze paint
Large diameter plastic pipes installed in a frame. Here's an unusual shelf. Here's an interesting variation of a bookshelf made of pipes
There are examples that simply amaze you. Well, how could you come up with this?
A combination of open and closed shelves. Non-standard shape - rounded corners and a completely new look Forged base looks noble Non-standard corner shelf Can be an interesting partition between zones Something similar can be made from polycarbonate. They come in different colors and bend well. A wild flight of imagination from the author. An idea for those who have a lot of books. Interesting design
For lovers of cut flowers
Cardiogram shelf...
Selection of wood and necessary tools
Wood is practical, versatile, and easy to process. For shelves, novice craftsmen are recommended types of wood with a soft structure (pine, aspen, alder, linden).
When selecting, you need a material with an even outer layer, without deformation. The boards must be well dried, without cracks, voids, knots, or mold damage.
Stands are also made from wood derivatives (chipboard, laminated chipboard). Plywood shelves are economical, durable, and do not require special processing.
The work will require tools:
- roulette;
- table saw;
- sandpaper;
- screwdriver;
- hacksaw or jigsaw;
- grinding apparatus;
- electric drill;
- construction level;
- fastenings (nails, screws, brackets, dowels);
- glue;
- varnish or paint.
Safety regulations require safety glasses and gloves.
Shelf drawings
Basically, the designs are simple: you look at it and have a rough idea of how it should be done. For those who want to make shelves with their own hands, here are a few drawings. Having them on hand, you can easily make the required changes in size. Just remember that from fiberboard with a thickness of 16-18 mm, the span between the supports should be no more than a meter, or better yet, 90 cm. Otherwise, there will be a deflection. The situation is approximately the same with plywood.
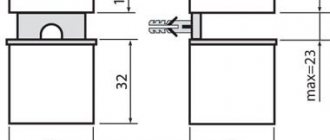
The only thing that may be unclear is how to assemble some nodes. Let us explain with one diagram; the rest of the assembly is similar. All connections are made at the corners. To make the structure reliable, the shelves are cut out intact, and jumpers are attached to them at the corners.
All these connections are made at the corners
The corners are installed from below, two for each connection on the right and left. They are made from metal or plastic. If the load is planned to be significant, install metal; if the shelves are decorative, you can use furniture made of plastic.
Some types of corners
Now you can make your favorite wall shelves with your own hands (and floor ones too).
Hinged design for spices on belts
The kitchen space requires compact stands for herbs, cereals, and spices; The spice rack is made according to standard drawings or an original design. You will need 1-2 boards, laminated on the outside, and steel fittings for a hanger. Plywood spice racks are a budget option.
After measuring the dimensions of the shelf, the boards are marked and cut. The elements are connected into a single structure using an adhesive base. It is necessary to secure the parts of the shelf with clamps and leave them to dry for 12 hours. The elements are additionally connected with self-tapping screws. The boards are sanded and painted.
A hole for fastening is drilled in the wall or ceiling surface, and the hook or bracket is secured with dowels. Ropes or belts are pulled into special openings. The homemade spice rack is adjustable and fixed at the desired height using a dowel.
DIY wooden shoe rack
In a furniture store, shoe racks are not cheap. In order to save your budget, wooden shoe shelves can be made at home. No special carpentry skills are required for this. It's never too late to take on your hallway and build an original shoe rack. For such work, the master uses the following devices: a chisel, an electric drill, a wood saw, a grinder, and a screwdriver. To make a drawing or marks on wood, you will need a ruler and a pencil.
Before starting work, you need to take into account the design of the future craft, its dimensions and functionality. Corner and round designs are the most popular. Most often, ready-made elements purchased in a store are used; “raw” wood is used less and less. In addition to the above tools, you will also need wood glue, metal corners, sandpaper, varnish or paint, and self-tapping screws.
First, the side walls of the required height for the verticals are cut out of the boards. Then the bars for supports and transverse blanks are prepared. Immediately cut out four shoe shelves (elements). All workpieces are processed using sandpaper. The bars are attached to the side walls with self-tapping screws. Metal corners are attached to the end of the product. Each shelf is placed on these bars in turn. When the product is assembled, it is coated with varnish or paint of the desired color.
A wooden shoe rack can also serve as a comfortable ottoman. To do this, the upper part of the shelf is covered with a layer of foam rubber, which is secured with thick fabric or leatherette.
Design and purpose of manufacture
Earlier it was said that shelves are wall-mounted, hanging and corner. Each of them differs from the other in the installation method, which also affects the design. Moreover, when combining materials, the functionality of the finished product also increases. You can make a closed structure with opening doors where you can store food; with the open type, the shelf benefits from its openness for placing souvenirs or vases with beautiful flowers.
Before starting work, you need to decide on the design of the shelf
In any case, at the first stage it is necessary to understand for what purpose the structure will serve, what material to choose and what tool to choose. This sequence will help resolve the issue with the design solution and reduce the time for preparatory work.
For those who do not think about distant difficulties, near troubles await Confucius
Safe work measures are the key to success in any business
Unfortunately, not everyone sharpens their attention at this point in the preparatory operations, which sometimes leads to dire consequences. If such significant efforts are being made to realize creative plans, then why not slow down so that these creative dreams do not turn into a tragic reality? In addition, it is elementary and practically inexpensive.
PPE is an indispensable assistant in work
When it comes to power tools, it is worth accepting the fact that 220 Volts is not just an unpleasant shaking, but possible death. Therefore, work should be carried out in dielectric shoes, after first inspecting cords and extension cords for the presence of bare areas. It will not be difficult for anyone to use electrical tape and eliminate the danger.
When working with an angle grinder, it is wise to stock up on construction glasses with yellow filters. The cost of purchasing them will be small, but it will serve as a guarantee of clean eyes from chips. Don't ignore hand protection - gloves will not only protect your skin from cuts, but will also help avoid unwanted stains when painting.
When installing the structure, if necessary, you should use the services of an assistant. This is especially true if you need to fasten the product at a height; there is no need to buy a construction helmet.
Safety is a process, not a result Bruce Schneier