Vadim
2231 0 0
Vadim February 26, 2018
Furniture made to order is always unique and very comfortable, because it is prepared for specific conditions and for clearly defined purposes. Professionals charge serious money for such work, but it turns out that you can assemble some things yourself, without losing quality, and then we will construct a four-tier retractable cart in just 9 steps.
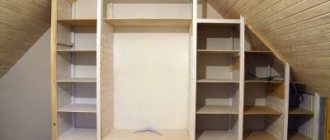
Drawers and baskets for wardrobes
Additional equipment of the standard shelf filling with various types of roll-out mechanisms makes the operation of the furniture more convenient. Drawers and baskets for wardrobes can have different designs, shapes and sizes. The price range is so wide that in any case you can choose an option according to your budget and functional requirements.
Differences between roller and ball guides
Whether it’s a basket, a drawer or another “container” for a wardrobe – it doesn’t matter. The main thing is that the extension mechanism provides it. These can be roller or ball (telescopic) guides.
- Roller guides are metal slides coated with powder paint (usually white) with a pair of plastic or metal wheels moving inside. An extremely simple and practical design, quite reliable in operation. Refers to budget equipment options.
- Ball guides are of a more complex design, with built-in ball bearings inside the rails. Provides smoother movement for drawers and baskets in wardrobes and is designed for greater loads than roller ones. It can ensure full rollout of the container outside the cabinet body (unlike roller guides that roll out a drawer or basket 2/3). The telescopic mechanism is more expensive, but fully justifies its cost.
The differences between drawers and baskets equipped with roller or telescopic guides are immediately visible and, perhaps, do not require explanation.
Different price categories, different assortments and levels of comfort.
Drawers for wardrobes, pros and cons
The materials for the manufacture of drawers are the same as for the body of the wardrobe. The box can be of different depths and widths, with a variety of internal designs.
Separately, you can highlight inset drawers: a secret narrow drawer with an internal front with a lock is convenient to use for storing documents.
As well as internal filling in the form of many partitions - for convenient storage of various accessories (rolled ties, belts, jewelry, etc.).
Additional partitions and increased depth of drawers increase the weight of the structure itself. This means that the guides must be reliable and of high quality.
- Among the advantages, it is worth highlighting the low cost of drawers and the ability to make them in different sizes - from small to the most voluminous.
- The disadvantages are increased requirements for the strength of fastening the bottom to the walls of the box, the design of the handles (they should not stick out so as not to cling to the compartment doors) and the load-bearing capacity of the guides.
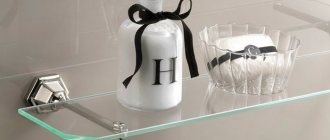
Kitchen decoration - decorative shelves
Decorative shelves for the kitchen serve to create coziness, but this does not mean that useful things cannot be placed on them.
Often decorative shelves are a complex designed in the same style, where you can store serving dishes, vases and figurines.
Advice! Small shelves can be hung using beautiful ready-made mounts. Contrasting combinations look impressive - white shelves on colored consoles, rough wood on black brackets, etc.
Decorative shelves can be fixed in the apron area instead of rails, placing here various useful things needed in the cooking process. But make sure that their finish is strong enough.
If you mount the structures on the wall near the dining area, you can decorate them with collections of wine bottles or charming Provençal porcelain.
White mesh baskets for wardrobe
The most inexpensive option for mesh metal baskets are the white classic models on roller guides. The cells of the mesh structure can be large or small. Baskets are also distinguished by three sizes - the height of the container, its depth and the width of the base. You need to be especially careful with the last size. If a drawer can be made to fit any size section of a wardrobe, then the baskets are built into a “base” of a certain width.
However, baskets can be assembled into separate racks using additional fittings and placed separately.
This option is especially convenient for dressing rooms - you can always move the rack with baskets to the right place.
For convenience, they can be equipped with wheels. And the baskets themselves have partitions inside.
- The advantages of white mesh baskets include affordability and similarity to the design of mesh shelves. And also lightness and spaciousness.
- The disadvantage is insufficient load-bearing capacity. This type of basket is not designed for heavy loads; you can store light items and linen in them. And also monotony in design.
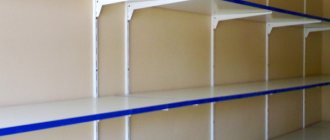
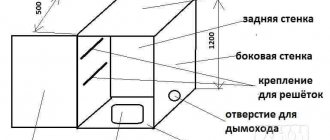
Limiters
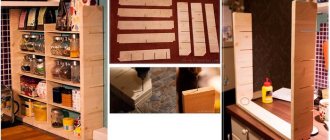
Each shelf needs stops to prevent the contents from falling out. I decided to make them from aluminum tubes with a diameter of 1 cm , cut into 14 pieces with a hacksaw.
Yes, I know the picture shows 12 limiters. A little later, I made changes to the design and installed two rows for the bottom shelf so that I could store both tall bottles and low cans on it.
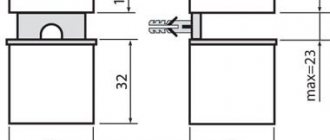
According to my idea, the rods are inserted through pre-drilled holes in the rear wall and fit into grooves (holes underdrilled by 1 cm) in the front wall. Therefore, we cut the rods 1 cm shorter than the total depth of the shelf.
14 (or 12) rods with a diameter of 1 cm and a length of 57 cm
Important: if the diameter of the tubes is 1 cm , then to drill holes for them you need a drill of the same diameter or a maximum of 2 mm thicker. If you take it much thicker, the rods will dangle in the grooves. I used a ten from the cheap drill set in the photo.
Metal mesh baskets for wardrobes
Durable metal rods and reliable fastening, equipped with high-quality telescopic guides allow you to store quite heavy things in mesh baskets of this type. In addition, there are many more design and content options available.
Classic metal baskets are also built according to the principle of a box - into a “base” of a certain size. By base we mean a certain width and depth of the niche for installation. But, since manufacturers produce similar content for sliding wardrobes in series, you can choose additional pull-out storage systems for the baskets in the form of trouser racks, shoe shelves, drawers for storing various accessories, and rods of a similar design.
No less conveniently, you can store shoes on special pull-out shelves.
The role of a tie maker can easily be played by a pull-out shelf with compartments. Convenient for storing belts.
Use drawers and baskets for your wardrobe - this will help you store things more neatly, conveniently and organized.
Installation of structures and materials used
It is best to give preference to the sliding method of installing a mortise drawer. It is more convenient and allows for the smoothest opening. You can also easily take out all the contents.
If we talk about materials, it is not necessary to use too expensive products. In this situation, you can save money without sacrificing quality. It is better to choose poplar wood for the drawers. It is distinguished by its strength and lightness. At the same time, it has a relatively low cost. For the bottom it is worth purchasing six-millimeter birch plywood. It is strong and will not begin to change its original size over time, which often happens with more massive wood. In this case, the thickness of the birch plywood will be uniform around the entire perimeter.
An important question for those who have a kitchen with a plinth higher than 10 cm. That is, for almost everyone
When do you need a base box?
First, briefly about what the drawer under the oven is for. Its depth usually does not exceed 10 cm, so nothing bulky will simply fit in there. Its main function is to store baking sheets, racks, and shallow baking dishes. Naturally, it is always packed to capacity, and deeper forms, baking paper, foil, etc. are stuffed into other cabinets. This is one of the reasons why many owners strive not just to put a drawer under the oven, but to combine it with a plinth or add another one - a plinth drawer.
By the way:
You can install drawers around the entire perimeter of the kitchen plinth (example in the photo below). They are not made only under the built-in refrigerator: there is a place for a ventilation grill so that the equipment does not overheat.
The plinth strip is attached to the cabinet legs using clips. It covers wires and hoses, and sometimes ventilation grilles are installed in it. On average, a kitchen plinth eats up 8–13 cm of usable space. This figure reaches up to 20 cm if the task is to raise the tabletop above a meter. Of course, I want to use this space under the cabinets somehow.
A base drawer is a logical solution for a kitchen with a high base. If there is less than 8 cm under the cabinets, the woodwork is not worth the trouble, only the appearance of the plank will suffer.
How else can you use the space under the plinth?
In the basement box you can make a mobile platform for cat or dog bowls
Fact
: If you're not a fan of reclining, it's best to only use the plinth for things you don't need on a daily basis. Animals will still have to refresh water and feed every day.
You can also use the space to install a retractable step - in case the children come to help in the kitchen or the owners have a big difference in height, and both love to cook. The same step is made in the bathroom - see photo.
Types of drawers: under the oven and in the base
The most expensive thing in a plinth box is the fittings (guides, baskets, fasteners). High-quality sets of European brands cost over 10 thousand per box. Fittings for base boxes are supplied by Blum, Hettich, ELCO, VOLPATO, Hafele. There are Chinese guides - they are several times cheaper.
Important:
You “overpay” not for the brand, but for the carrying capacity of the box. Inexpensive fittings can usually withstand up to 20 kg, expensive ones - up to 70 kg. If you plan to store only pots, Chinese guides are sufficient. But if we are talking about stocking up on groceries or storing folding chairs in a box, it is wiser to take European components for the base box.
Should I order it right away or finish it?
A basement drawer is one of the options for increasing the “capacity” of an already ordered kitchen. You can modify any set, even one that has been in your kitchen for more than 10 years.
Or you can order a base box right away: when purchasing a new kitchen. Factory-made base boxes are produced for cabinets with a width of 60–90 cm. There are options for a high base (up to 15 cm), and there are options for a low base (10 cm).
Types of basement boxes
Drawers in the base are divided into two types: those that are built under the bottom of the kitchen module (pictured on the left) and those that are built under the oven, combining the lower and base drawers (next photo).
The combined option is more convenient - you no longer need to sit down at the box. It is twice as spacious (pots included). But, unfortunately, it’s three times more expensive. When such a drawer is pulled out, a special mechanism lifts it slightly above the floor, and when closed, it lowers it. The price of high-quality models - for example, Tandembox from the Austrian company Blum - reaches 15 thousand rubles.
To insert such a “double” drawer (under the oven + base), you will need a special case. In a standard design module, the bottom (lower horizon) will interfere. But there is a way out here too. The bottom of the cabinet and legs are removed, the side walls of the cabinet are tightened using intersectional furniture ties (6 pieces per wall) with adjacent cabinets. The legs are placed directly under the double walls. And the former bottom of the cabinet will be useful as the bottom of the basement drawer - if you decide to build it on the basis of the old one that was under the oven. Using this technique, you can make a drawer under the oven with your own hands, saving on expensive fittings.
Deciding on the size of the box
In order for the product to be of high quality and fit perfectly, for example, in your closet, you should correctly calculate its dimensions. First of all, measure the width and height of the opening. As a rule, a full extension telescopic guide has a thickness of no more than 12.7 mm. In this regard, the resulting indicator of the opening width should be reduced by about 2.5 cm. The height of the drawers can be completely different, it depends on where you are going to install it: in a closet or use it as a separate container.
If you decide to use tongue-and-groove joints, then reduce the width and length of the box by 38 mm. The result obtained will be the length of the parts used.
Conclusion
I tried to convey to you the step-by-step principle of assembling a movable shelf. The sizes of tubes and support boards can be selected individually, plus no one forbids you to take a different model of wheels, the main thing is not to change the order of actions and you will succeed.
Did you like the article? Subscribe to our Yandex.Zen channel
February 26, 2022
Accessories,Kitchen design,Kitchen
If you want to express gratitude, add a clarification or objection, or ask the author something, add a comment or say thank you!
How to make a part for drawers
Experts advise using stops rather than a tape measure to mark the required size of parts. If you are going to make several parts at the same time, then the parts should also be cut at the same time. All walls must be combined into separate groups.
Then make a couple of extra pieces to help you set up the tongue-and-groove joints before you start installing them. To install a groove in the side walls, you need to cut out six-millimeter hardboards or a plywood spacer, the width of which will be 7.6 cm. It is important that the size of the spacer matches the size of the longitudinal part of the sawing machine.
After installing the groove disk, we place the longitudinal resistance six millimeters from the disk itself and at the same height. To quickly adjust the grooves, use several scraps. It is important to make sure that they fit tightly enough to each other.
Rebates are cut out at each end of the back and front walls. To ensure that the joints are as tight as possible, it is worth using a special sanding block on which there will be sandpaper No. 120. We make sure that the connection is of sufficient density and that when the ridge enters the groove, it is necessary to apply little effort.
To prepare the sawing machine for selecting a tongue into which the plywood bottom will then be inserted, you need to remove the overhead wooden part from the longitudinal part of the stop, without moving it even a millimeter. Then the tongues are cut out on all four walls of the drawers, always on the inside, to check the alignment of both the side and back walls, you can use a piece of plywood. After collecting the walls of the finished product, it is worth measuring its dimensions again.
It is worth adding 11 mm to the resulting dimensions of length and width, and then cutting out the bottom from plywood. To assemble the drawers, you need to use a special glue that is applied to the grooves on the side walls. After this, you can insert the front and back parts into the grooves, then insert the bottom and the second side wall. Then all corners are securely fixed. In order to make sure that the sides of the finished product are equal, it is worth measuring both diagonals.
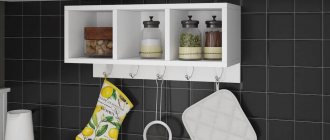
DIY pull-out shelf for working tools
Let's make pull-out shelves from under the tabletop for various small items and tools that are needed during the work process.
I usually have a bunch of different auxiliary tools, bobbins, extra presser feet, threads, needles, and the like accumulated on both sides of my sewing machine. All these little things cling to the fabric and constantly fall to the floor, sometimes right into the trash can standing near the table. I was tired of all this and finally got around to making two shelves on the right and left under the table in order to move everything there and free up the work surface once and for all. I had this idea for a long time because I didn’t know how to secure these shelves under the table. But one fine day, I saw on the Internet guides for a shelf for a computer keyboard, and not simple ones, but fixed to the tabletop with special corners.
These guides turned out to be available at the nearest construction hypermarket, where I bought them, as well as boards and slats for the shelves. To make a shelf we will need:
- Ball guides for computer keyboards;
- board 20x40 cm, thickness 1.8 cm (the size of the shelf can be any, it all depends on your needs, but practice has shown that the depth of the future shelf should not exceed 25 cm);
- slats 40x5mm;
- a handsaw, but not necessary, I was able to cut with a utility knife;
- sandpaper;
- PVA construction adhesive (I used regular stationery adhesive, it worked too);
- crosshead screwdriver;
- screwdriver;
- ruler;
- pencil.
And here are the same guides that we will use. They come in two pieces per package, right and left, plus corners and screws in a bag for them:
The first thing I did was to cut off slats 40 cm long with a stationery knife - 2 pieces. Or rather, I first tried to saw them off with a handsaw, but it turned out very rough. Then I took a hacksaw for metal, it turned out better, but there was also a lot of hassle. In the end, I decided to try cutting off the slats with a utility knife, which turned out to be faster and easier.
Pine slats are quite soft, and considering that the thickness of the slats is only 5 mm, the knife can cut through it 1-2 mm in depth.
Then I broke the rail in half, cut off all the irregularities with a knife and sanded the edges with sandpaper:
We glue the cut pieces of the slats to the board on both sides:
After 10-15 minutes the glue will set and you can proceed further. Place the strip on the shelf and mark with a pencil where to cut.
We also glue these side panels with PVA glue and wait for them to set.
Here's what happened:
Now, so that everything does not fall apart during operation, we fasten the narrow sides of the shelf with screws. You also need to slightly widen the holes for the screw heads so that they don’t stick out too much. I don’t have such a device and I used a cross nozzle:
Next, we attach the guides to the shelf. We make marks with a pencil so that the screw hits the base of the shelf so that everything holds tightly:
Tip: before drilling, to prevent the drill from jumping off, you must first make small indentations using a nail and a hammer.
We fasten the corners. You can adjust the height of the shelf from the tabletop level closer or further by selecting the desired hole in the corner.
And here I was very mistaken, and I realized this only when I started writing the master class and looked at the photographs with fresh eyes. For some reason, I attached the corners to the guides inside the shelf, although it should have been the other way around. Please do not do this, it greatly complicates the fastening. But what's done is done, but I've become smarter :)
We turn the table over and attach the shelf to the tabletop.
We remember that the corners should stick out, and not, like mine, inward. We make marks, drill and fasten. As you can see, I did everything in a different order. First, I somehow made marks with a pencil, unscrewed the corners from the shelf, screwed the corners to the tabletop, and screwed the shelf back to the corners again. I'm still in shock why I did that. Apparently some kind of eclipse has come over me!
When I attached everything to the tabletop, my discovery was that the shelf cannot be pulled out completely, since the guides do not allow this. Therefore, a shelf length of 40 cm is too much for such a guide; ideally, the depth should be no more than 25 cm. Because of this, I decided to expand the second shelf and attach it to the guides on the narrow side so that it extends completely and becomes more functional. Maybe the same guides exist in nature, but with full extension, then it’s better to use them.
But, despite all the mistakes, no matter what, I got the shelves, which I’m very happy about. It’s really convenient when everything is at hand and nothing interferes with you while working.
I hope my unsightly experience in this direction will be useful to someone. You will take into account all my mistakes and make everything much better and more beautiful.
Thank you for taking the time to read my master class and reading it to the end. I wish you creative success!