Kitchen design plays an important role in the life of every person.
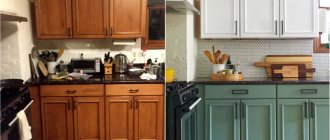
After all, delicious and healthy food is prepared here, and the whole family gathers at the table in the morning, at lunch and in the evening. To make spending time in the kitchen enjoyable and preparing meals convenient, you need to carefully consider the choice of furniture items, of which there are quite a few. In this article we will discuss how to properly make a cabinet with your own hands under the sink.
Selecting a sealant
The sealant plays an important role in installation. The building materials market offers several options for this product:
- acrylic - does not contain harmful substances, is excellent for metal, chipboard and MDF, dries quickly. The main disadvantage is strong shrinkage and rigidity; joints can crack over the years and will allow water to pass through;
- polyurethane - suitable for places with high humidity and unstable temperatures, has excellent adhesion to almost all materials. The sealant is elastic and practically does not shrink, but it is better not to use it for MDF, chipboard, or plastic. The polyurethane composition is ideal for sinks made of stone, granite, and metal;
- silicone - elastic, does not shrink, has excellent adhesion.
Apply any sealant to clean materials to improve adhesion. Without preliminary preparation, cracks may appear and moisture may enter.
Design
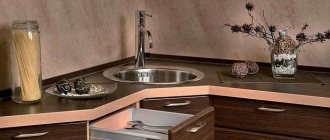
Let's return specifically to my kitchen. As I already wrote above, the choice of the concept of my set was influenced by a washing machine, the main feature of which is the vertical loading of laundry. That is, unlike most washing machines, my “working” plane is the top plane, and all the rest can be hidden from the eyes of an outside observer. This is how the idea of a corner kitchen was born, where the sides of the corner are cabinets and the top is the machine. This arrangement is the most rational and provides maximum functionality.
In the photo above you can already see a new window installed without a window sill and in a reduced opening. The old opening, in my opinion, was too large for such a room, and I refused the window sill because I planned to fit a tabletop in its place. At the same time, electrical wiring was done and socket blocks for household appliances were installed. Later, tiles were laid on the floor and walls, and wallpaper was hung. I approached the final design of the headset with the following picture.
I started drawing the kitchen in AutoCAD because I wasn’t trained in any PRO100, and I didn’t set myself such an initial goal. Although I will not hide that if you master this specialized program, then in the future it will, based on your finished dimensions of the cabinets, itself carry out their detailing and even suggest the optimal fastening element. My AutoCAD drawing turned out to be much simpler, but at the same time quite visual.
Editor's note: for design, you could also use the online designer on our website. No special knowledge is required to use - just take it and draw.
Let's go over the main points regarding the cabinets I got:
- I decided to place the floor row on decorative aluminum legs, with the ability to adjust them in height. In my opinion, aesthetically it looks better than a solid base, and besides, there remains (albeit limited) access under the cabinets (for a mop or rag, for visual inspection for leaks from the water supply or sewerage system). The presence of decorative legs must be taken into account when further detailing the cabinets (see detailing).
- The facades of cabinets 1 and 5.6 (in fact, this is one cabinet, like 2.3, I just thought in its original form that it would be two cabinets, and already left the numbering as is, so as not to change) will open upward using gas elevators.
The facade of the drying cabinet (2.3) will open upward using the Aventos HF system.
- The doors of cabinets 4 (above the washing machine) and 8 (under the sink) will be hinged on regular door hinges with a closer.
- An oven will be built into cabinet 9, so it will be hollow, with only a small drawer underneath for storing baking sheets and a grill grate.
- Cabinets 10.1-10.3 are three identical cabinets with drawers that will be secured with intersection bolts. Why drawers and not just shelves? The fact is that the contents of the retractable drawer are easy to glance at. To get to things located in the depths, you don’t have to carry out archaeological excavations. Shelves often turn into a “cemetery” of dishes and supplies, which the owners simply forget about.
Determining the optimal installation location
One option is to install a new sink in the same place where the old plumbing was located. But this is not always possible, since the cabinet box most often does not fit into the previously allocated space. And moving the location of plumbing fixtures during repairs is not uncommon. Therefore, it is best to think through the location of all plumbing fixtures, as well as pieces of furniture, at the renovation design stage. To do this, the bathroom is conditionally zoned into several areas, in each of which a device is installed (bathtub or shower, toilet, sink, washing machine).
Based on the planned location of the plumbing, water supply and sewerage pipes are laid, because the optimal supply points are different for each plumbing fixture. When supplying hot and cold water, the location of the fittings for connecting flexible hoses must be calculated so that they are located between the shelves. This will ensure convenient connection and replacement of hoses during operation.
As for the siphon and connecting the corrugated sewer pipe, you often have to cut holes in the shelves to connect it. It is for this reason that it is better to calculate everything in advance and bring the sewer pipe to the level of the connection points to the water supply.
To avoid having to cut holes in the shelves of the cabinet, all supply points must be brought out in advance to a place convenient for connection.
Additional open shelves
It's a good idea to store items and products that are often needed on them: everything is in sight, easy to find and use. True, you will have to place everything on them in cute packages and jars so that the filled shelves look beautiful and make the kitchen cozier.
But you can find a lot of places for open shelves and shelves even in the smallest kitchen. Plus, a variety of models and variations are possible that can be adapted to your needs.
You can place dishes and spices on the shelf, and hang rolling pins, ladles, skimmers, knives and other useful kitchen utensils from below.
The shelf may be small, as in the photo below. But an additional tier is created, on which it will be possible to place a dozen of the necessary jars. Compact, roomy and organized.
Additional open shelves fit perfectly on the side surfaces of kitchen furniture. Towels, napkins, a set of products, a whisk with a rolling pin will fit perfectly there, and horizontal surfaces will be unloaded.
Sometimes it seems that it is difficult to find a suitable place for additional shelves. But it is not always the case. Take a look at the following photo: this is how you can organize as many as 7 shelves at once in a small space. Quite functional and aesthetically pleasing.
Sometimes it's good to use the area around the window. The result will be not only smart, but also cozy storage.
Here's how you can play up the space around the doorway. Dishes, vases, and books were not only conveniently placed in the kitchen, but also transformed the interior.
Organizing space for small items
Since such a cabinet contains elements of communication networks, it is difficult to store large items in it. Therefore, usually all sorts of little things are contained here, and different methods are used to organize space for them:
- a folding door can be made at the top of the cabinet, and sponges or brushes are stored in the opening space;
- attaching small-sized shelves to the door of the product, which are intended for storing small kitchen utensils;
- the presence of hidden drawers or blocks that are retractable and spacious, so even products can be placed here.
Thus, kitchen sink cabinets can be presented in numerous types. They are made from pine or other materials, and also have different sizes, shapes and prices. The choice depends on the existing kitchen set, the wishes of the users and their financial capabilities. The design must fit well into the room, and must also be convenient for constant use.
Making a cabinet
If a person who has no experience in creating furniture wants to make a kitchen cabinet on their own, then for this purpose it is advisable to select diagrams of simple wooden structures that do not require special skills. A kitchen cabinet made of wood will fit organically into any interior; you just need to choose the right dimensions, and then just follow all the rules and recommendations.
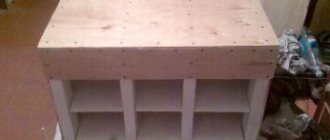
You can make a kitchen cabinet with your own hands
Tools and materials
All types of carpentry work, especially the manufacture of a kitchen cabinet, require a certain preparatory process. This is not only about obtaining a drawing of a future design, that is, about information preparation. It is also necessary to take care of tools and materials, without which it will not be possible to make a cabinet with drawers.
Preparing the necessary tools
First of all, you need to purchase material for the future cabinet. In our case, chipboard is used, although other materials can be used. The main tools that will be required for the job include:
- crosshead screwdriver;
- construction level;
- stapler for working with wood;
- a hand saw or electric jigsaw, if available;
- pliers;
- small hammer;
- metal square;
- ruler, tape measure or other measuring instrument;
- a simple pencil;
- safety glasses and work gloves.
Manual stapler
To make reliable and durable shelves for the cabinet, you need to purchase a special set of fasteners, which includes the following elements:
- self-tapping screws;
- mounting rails;
- furniture nails;
- corners;
- anchors and dowels.
Furniture nails
Step-by-step instruction
Step 1: Calculate the height, width and depth of the base box and cut pieces of plywood for each side of the structure. To make the cut line as smooth and neat as possible, it is recommended to use a jigsaw.
Details of the future design have been cut out
Step 2. Glue edges of the same color as the panels themselves to the edges of the cut out parts. They will be visible from the front of the cabinet. Buy edging from your local hardware store - you shouldn't have any problems with this.
The ends are covered with edges
Step 3: Use a power drill to drill holes in the various parts at specific locations as shown in the picture. A hole spacing of 15cm will provide adequate strength for the finished product.
Next you need to drill the holes
Step 4: Use a special strip set up to drill additional holes. Use it to make a hole for each pin.
It is convenient to use a special bar
Step 5: Check that the dowel holes are made correctly. It is recommended that you dry fit the pieces first without using wood glue to avoid problems in the future if the holes do not line up with the dowels.
It is worth checking the correct location of the holes
Step 6: Install the drawer slides on the inside of the side panels once all sides of the structure are assembled. Assemble the slides before assembling the box, this will make the process of attaching them much easier.
Guides installed
Step 7. Make drawers for the kitchen cabinet. The width of the drawer should be equal to the distance between the inner sides of the product minus the required distance between the drawers, which must be present.
Ready-made drawers for kitchen cabinets
Step 8. Attach special slats to the sides of the drawers on which they will slide out. The attached part should look something like the photo.
Metal slats are attached to the sides
Step 9. Once all the drawers are ready, install them in place. In this case, the kitchen cabinet is equipped with four drawers.
The drawers are installed in the cabinet
Step 10. Screw the handles to the drawers and decorate the finished structure if necessary. As legs for the cabinet, you can use rubber wheels, which you can buy at a specialty store, or use regular legs made of wood or metal. When the cabinet is ready, place it in the kitchen and place dishes, napkins, condiments or other items in the pull-out shelves.
This is what the finished kitchen cabinet looks like
Product processing
After assembling the product under the bathroom sink with your own hands, you can begin processing the finished structure. It needs to be made smooth. For these purposes, you need to stock up on putty, which must be applied to the chipboard. The composition should be carefully leveled using a spatula.
Varnished cabinet
For such purposes, it is better to use a special tint varnish. It must be carefully applied to the finished surface using a brush in two layers. When the product is completely dry, you can begin its actual installation.
To make the bedside table look aesthetically pleasing, it is recommended to make its doors from glass. To do this, the material is marked and the required shape is cut out. To give the product a matte finish, you need to pour a little sand on it and, placing another glass on top, thoroughly rub it, after moistening it.
Functionality
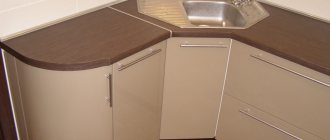
The modern design trend is a combination of beauty and functionality. A corner cabinet with a sink in the kitchen meets these requirements. The L-shaped layout makes the space more comfortable and optimized even in a small, non-standard or combined kitchen.
We list the main positive features of a corner cabinet with a sink:
It’s easy to install and hide necessary communications there, for example, connections to the sink, filters, heaters
In addition, the space can serve as an excellent place to store household chemicals or a trash can; this solution is the most compact, but at the same time roomy - this is very important in small kitchens, for example, in a Khrushchev-era apartment; the corner section visually unites the space; it just looks beautiful.
But there are also negative sides. For example, inexpensive kitchen sets with a corner sink have a countertop made of laminated chipboard, which means that the joints in the corner will be in danger:
- Laminated chipboard is a very weak material that is constantly looking for a reason to swell;
- splashes from the sink will fly anyway.
Therefore, the joints will have to be additionally protected, for example, with sealant or aluminum strips. If the countertop is cast, for example, from stone or acrylic, then there will be no such problem.
The third negative point is that the reliability of corner structures can be significantly lower than conventional ones. This is due to the non-standard shape of the cabinets. It might be worth thinking about strengthening the sidewalls.
The fourth disadvantage is the inconvenience of using the sink, because it is sometimes located too far away. This drawback is easy to avoid: the main thing is to monitor the height and depth of the countertop.
And the last negative point is the high cost compared to ordinary cabinets, which is why most craftsmen assemble such cabinets with their own hands.
What are corner sinks made of?
When choosing your ideal sink, it is important to pay attention not only to the design and price of the product, but also to the material from which it is made. Under the conditions of its use, and in the kitchen they are quite harsh, this directly affects how long it will serve you. There are different types of materials
Each of them has its own pros and cons:
There are different types of materials. Each of them has its own pros and cons:
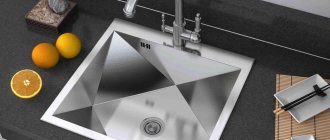
Stainless steel. This option is the most popular and obvious. Metal products are low cost and universal due to their simplicity of design. This sink will go well with any design solution. Also, it is not susceptible to metal corrosion, which is why it received the name “stainless steel”. The sinks are available in glossy and matte versions. You can easily install the product yourself, which is also a plus. The disadvantages include noise - you will hear the water pouring throughout the whole house.
Ceramics. The sinks have a presentable appearance, neat and beautiful
It is important to note that there can be any color options, not just white. The biggest advantage, however, is not the design, but the durability - the sinks are resistant to water and household chemicals
The disadvantages include the large weight of the product, which makes delivery and installation difficult, as well as the tendency for cracks and chips to form as a result of impact.
Natural and artificial stone. This option is suitable for those for whom the issue of saving money when purchasing is not important. The most expensive will, of course, be a sink made of natural stone. However, even artificial sinks can be quite expensive. Bowls made of natural granite are of the highest quality and will last as long as possible. They are distinguished by a stylish design and high durability: water, chemicals and high temperatures are not dangerous for them. They also muffle the sounds of running water. The disadvantages are their considerable weight, even more than that of ceramic products, as well as the price, which was mentioned above.
Materials
The durability of the product is determined by the materials used.
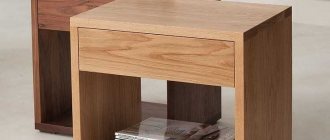
Tree
An array of dense rocks is the most moisture resistant. The tired articles about merbau, “mahogany”, and yacht teak are far from the realities of amateur craftsmen. Oak and larch are worthy candidates, proven over centuries. Other local lumber requires particularly careful moisture protection.
Solid oak panel.
Larch
The benefits of wood are known:
- Strength.
- Durability.
- High resistance to pulling out nails and screws.
- Hygiene.
- Natural beauty of texture.
The optimal thickness of the shield is 40 mm, the shelves are usually twice as thin. Considering the presence of cutouts and dampness, a shield made of solid longitudinal bars is preferable.
Once you've forked over the cash, get ready for painstaking work that requires skill. Haste will ruin the workpiece: take into account moisture, hardness, fiber direction, and the presence of defects.
Wood-based substitutes
Budget chipboard is allowed only in laminated version - laminated chipboard. Pay special attention to the quality of the edge edges. The boards swell due to water penetration along the peeled melamine film.
The imaginary well-being of a laminated facade.
The initial stage of cracking of the coating.
In terms of performance in a humid atmosphere, it is inferior to laminated MDF. High density samples (more than 700 kg/m³) are preferred. “Loose” chipboard holds fasteners worse than MDF, not to mention solid wood. The result is falling fittings, doors, moisture saturation, peeling protective and decorative layer, formaldehyde emission.
The negative is partly brightened up by low cost and good workability. Cut MDF sheets, due to their microporous structure, do not crumble and are easily sanded, surpassing the performance of laminated chipboard.
The running thickness of chipboard sheets is 20 mm. Waterproof grades of plywood and fiberboard go to the bottoms of the boxes. Vulnerability is mitigated by coatings. An analogue is a plastic sheet 3–5 mm thick.
Drywall, glass
Built-in furniture is often made from plasterboard. The galvanized frame is sheathed with gypsum board sheets, the profiles are screwed to the wall in order to increase the rigidity of the frame and save construction. The bedside table turns out to be stationary.
Fast processing, minimum required tools are attractive; democratic price. The plasterboard countertop is tiled over waterproofing. The solution provides water resistance, hygiene, and stylish design.
The disadvantages are similar to those of particle boards: hygroscopicity, loosening of hardware. Drywall needs two-sided finishing. It is interesting to cover the façade with flexible PVC panels and paint the inside.
Glass is potentially traumatic. Glass doors and shelves are suitable for living rooms; do not take risks by placing glass, even tempered glass, near the bathtub floor.
Assembling the cabinets
All cabinets have a depth of 500 mm, and with a tabletop depth of 600 mm. we get a front overhang of 50 mm. and, accordingly, the free space between the wall and the cabinet is also 50 mm. Is this too much or normal? 18 mm facades will be added to the front, but there will also be handles - in my case 30 mm, so the overhang is 50 mm. quite justified.
The pipes, hose for the hob and, in addition, the gas meter pass with a gap of 50 mm to the wall. (if we take into account the thickness of the tiles on the apron and the pressure of the countertop is not zero, then all 60). But the desire to gain a couple of centimeters of depth that arises at the design stage is not justified. For the section with drawers this does not matter, but with the rest of the cabinets it will only cause confusion. We simply order 12 sidewalls for six cabinets, all of the same size, convenient and understandable.
There are 3 connections in the corner cabinet, two of them are in the area of the back wall and are located vertically. The third, when positioned vertically, will reduce access inside, and when positioned horizontally, it will have to be sawn through along with the countertop to install the sink. I took the second route and had to shorten the confirmations, but when opening the door there is no bar closing the opening.
All cabinets are assembled according to the principle of a false bottom, that is, the sides stand on the base. Each cabinet is installed on 4 adjustable supports (under the sink - 6 pieces), which are subsequently closed with a plinth. In order not to rest your feet when approaching the kitchen work area, the base is recessed.
The distance from the front edge of the cabinet to the base of the support is 55 mm, which in practice gives a normal appearance and ease of use.
Having assembled all the cabinets on one side of the corner, they can be leveled and tied together with ties.
How to make a sink cabinet with your own hands
The process of making a cabinet for a sink is not much different from the production of any cabinet furniture. The main thing is to decide on the material, calculate all the details, purchase materials and components, check that all the necessary hand tools are available and you can start!
Material selection
You can make a sink cabinet with your own hands from two types of material, choosing a cheaper one for the body and an expensive, presentable one for the front part (doors). What the facade will be like is up to you and the choice here is huge. The facade can be made of the same material as the body, it will be cheaper.
The most budget-friendly and easiest-to-process material for making the body of a sink cabinet with your own hands is laminated chipboard
In order for a chipboard sink table to last for a long time, it is important to carefully cover the ends and treat them with sealant to protect them from swelling. MDF is much more resistant to moisture, but also more expensive. Most often, MDF is chosen to make a sink cabinet in the bathroom, since the humidity there is higher than in the kitchen
Those who know how to work with wood will prefer to use solid furniture panels, timber and plywood to make a sink table. Here the set of tools will be slightly different, designed for planing, grinding, priming and painting solid wood
Most often, MDF is chosen to make a sink cabinet in the bathroom, since the humidity there is higher than in the kitchen. Those who know how to work with wood will prefer to use solid furniture panels, timber and plywood to make a sink table. Here the set of tools will be slightly different, designed for planing, grinding, priming and painting solid wood.
In the first two cases, you can get by with a minimal set of simple working tools.
Hand tool
To make a sink cabinet with your own hands, you will need fasteners, hand tools and available materials - in general, everything that any home craftsman has. The set may vary depending on the chosen material and the work that you are ready to do yourself or delegate to the guys from the furniture workshop.
- To cut the parts to size and sand the edges, you will need a jigsaw, sandpaper and a sander. Or you can order ready-cut chipboard or MDF parts to size.
- To cover the ends with an edge, you will need an iron, a utility knife, sandpaper and melamine tape. You can also order a cut along with gluing the ends with PVC edges.
- For marking and adding (drilling assembly holes) you will need a square, tape measure, pencil, awl and electric drill with a confirmation drill, as well as 5mm and 8mm drills.
- To assemble a sink cabinet with your own hands, you need a screwdriver, a ratchet with hexagon bits and a Phillips screwdriver.
- In the case of a mortise sink, you will also need a jigsaw and a drill with a thick drill bit.
Parts calculation
The key to correctly calculating the details of a table-cabinet for a sink is a well-drawn drawing. The calculation takes into account the thickness of the material (in the case of chipboard 16mm, MDF 18mm). Be sure to check yourself - the sum of the lengths of the internal parts and the thickness of the ends must be equal to the external dimensions.
Also, based on the drawing of the sink cabinet, you can make a list of the fittings necessary for assembly. It will include kitchen adjustable legs, furniture hinges, confirmats, 4x16 screws for attaching hinges and legs, handles with screws, silicone sealant, etc.
How to assemble a sink cabinet with your own hands
If you have dealt with assembling any cabinet furniture, you will be able to assemble a sink cabinet with your own hands. To connect the body, furniture confirms and eccentrics are used (rarely). The legs are screwed into the bottom of the cabinet using self-tapping screws. The facades are installed on furniture hinges, which are then adjusted.
Installing a sink on a cabinet with your own hands differs depending on the type of sink itself:
- If the sink is mortise. The table top is attached from the inside of the cabinet using regular metal corners. But first you need to embed a sink into it. First, determine the location of the cut so that the bowl “fits” completely into the cabinet body without touching the sides and strips. Then outline the hole for the cut-in according to the template. Mark the boundaries of the cut with a thick drill and go through with a jigsaw. Carefully grind the cut-out, treat it with sealant or paint it for moisture resistance. Next, the sink is pulled onto clamps with a seal around the perimeter (included in the kit) or “sits” on the silicone.
- If the sink is an invoice. Installing a sink on a cabinet with your own hands in this case is much easier. The adjacent ends of the sidewalls are treated with silicone or painted. A fastener is placed on them from the inside, and the sink is attached to it.
Preparatory stage
In order for the work to go smoothly, it is necessary to prepare all the tools in advance, decide on the materials, and take measurements. These efforts can provide half the success if you do not ignore the preparation stage.
Choosing material
The optimal material for such a product is different for everyone. Let's look at the features of the most popular ones:
- Wood is a classic, durable and very “cozy” material, quite heavy and massive, which is worth considering when making hanging models. Must have a moisture-resistant coating. Quite an expensive option.
- Drywall is a common and inexpensive material that is easy to work with, and waterproof sheets are available for sale. However, it is quite fragile and frame reinforcement will be required for mortise sinks.
- MDF - its advantages are moisture resistance and strength, which is reflected in the cost - not the cheapest option.
- Plastic is an excellent option for the bathroom; it is not afraid of water, however, it requires reinforcement of the structure, because it bends easily.
- Glass is a rather difficult material, it is worth choosing if you are confident that you can handle it. Alternatively, individual structural elements (internal shelves or doors) can be made from glass, which will look great, for example, in combination with natural wood.
If a cabinet is one of your first projects, we advise you to choose a simpler and cheaper material option: plasterboard or MDF.
We take measurements
The dimensions of the cabinet directly depend on the size of the sink being installed, as well as on the availability of free space in this area of the room. The countertop can be exactly the size of the sink, or it can be much larger, depending on the available space around the sink.
Height usually varies between 70–100 cm.
Required materials and tools
The list of necessary tools will largely depend on the material chosen, but you will definitely need:
- screws;
- screwdriver;
- drill;
- screwdriver;
- hacksaw or jigsaw;
- hammer;
- pliers.
In addition to parts made from the main material, you will also need fittings - hinges, handles, as well as brushes, varnish and paint, if you need to further improve the aesthetic properties of the cabinet.
Auxiliary elements such as pencil, tape measure.
Main types
The variety of cabinet models is sometimes confusing. It is better to understand all the nuances before purchasing so as not to make mistakes.
Design form
Depending on the size of the room and the amount of space allocated for the sink, the kitchen sink cabinet can be:
Basic shapes of kitchen cabinets
The most convenient model is straight. Such a bedside table with a sink can easily accommodate various elements: drawers, shelves, large household appliances (washing machine, dishwasher, boiler). At the same time, access to the internal contents is most convenient. This type of cabinet can be placed anywhere on the work surface in a straight line. This model is typical for a kitchen with an island.
The corner sink cabinet is ideal for small spaces. The location at the junction of the walls significantly saves space. The main disadvantage of this model is the lack of ease of use of the internal space. The large depth and non-standard arrangement forces the use of additional devices: carousels, drawers, brackets.
The trapezoidal cabinet has a large amount of space that can be used both for communications and for various things
The trapezoidal cabinet under the kitchen sink is considered the most spacious. The wide space under the sink allows you to place a lot of things. The cabinet may have several doors and be divided into compartments. The large table top is easy to use.
Material of execution
Most often, sink cabinets are made from materials that are used to make the rest of the kitchen furniture. Usually this:
Basic materials for making products
Laminated chipboard has the most reasonable price. Products made from this material are practical, durable, and come in a wide range of colors. The main disadvantage is the possibility of opening the protective laminating edges, which entails the evaporation of formaldehyde
When purchasing, you should pay attention to the level of quality and environmental safety of the material. For the kitchen, it is advisable to select moisture-resistant options
MDF cabinets are considered more environmentally friendly. Particle boards are connected with natural-based components. The material is dense, holds its shape well, and the connecting elements. For the kitchen, it is better to select furniture equipped with a protective layer. This coating will provide a wide choice of colors, moisture resistance, and protection from damage.
Cabinets made of solid wood have high environmental characteristics and have a presentable appearance. The high price and impracticality of kitchen furniture often stops people from purchasing such products. Unprotected wood is subject to rapid wear (drying out, swelling, damage). Products made from this material require increased attention: care, restoration.
Types of cabinet products
Depending on the installation method, all bedside tables can be divided into the following groups: floor-standing, hanging and corner. As the name suggests, floor tables are placed on legs on the floor, which makes it capable of supporting large amounts of weight and, for example, storing heavy packages of washing powder.
It’s always a pleasure to receive an original item and create a unique interior.
The advantages of hanging models include the fact that it can be installed at any height, that is, in accordance with the height of the owner. However, it is better to attach such models to a load-bearing wall, since even the structure itself, together with the sink, weighs quite a lot, not to mention the contents of the shelves.
A do-it-yourself sink cabinet can be designed and made by almost any amateur craftsman
Corner cabinets are in demand among owners of small apartments, as they allow rational use of bathroom space.
Sink cabinet options:
The cabinets can also be divided by type of sink:
- For built-in washbasins. In such models, a sink is embedded into the countertop at one level. The obvious disadvantage is the reduction in usable space inside the bedside table;
- For semi-recessed washbasins. With this option, the upper edge of the sink rises above the countertop by several centimeters, or the countertop may be completely absent. In addition, the front part of the sink, as a rule, protrudes some distance above the front facade of the cabinet, as if overhanging. This allows a person to come close to the washbasin;
- For a countertop sink. It looks like a regular chest of drawers, since the washbasin is placed on top of the countertop. Inside the cabinet there is only a siphon, hoses for water supply and a sewer drain.
There are a large number of types of sink cabinets.
Manufacturing and assembly process
Let's focus on the most common cabinet design - a direct one for an overhead sink. Before making a cabinet for a kitchen sink, make an accurate drawing with calculations of the dimensions of each part. The sketch will depend on the dimensions of the selected sink.
Drawing
Necessary parameters for the sketch:
- width of the structure (from 400 to 800 mm);
- the dimensions of the sidewalls remain standard: bottom depth – 530 mm, height – 814 mm;
- the total width of the doors is equal to the width of the cabinet;
- the height of the doors is calculated based on the height of the structure and the width of the façade planks;
- the length of the facade strip is equal to the width of the sink, and the width is 150 mm;
- the length of the spacers and the lower plinth is equal to the width of the bottom, and the width of these elements is 80 mm.
A parameter such as the width of the bottom depends on the width of the entire structure with a double deduction of the thickness of the material. For example, if the thickness of the chipboard is 14 mm, and the total width of the structure is 800 mm, then the width of the bottom is 800 - (14x2) = 772 mm.
To correctly calculate the doors, subtract the width of the lower plinth and the facade strip, which is attached above the doors, from the total height of the structure. That is, 814 - (80+150) = 584 is the height of the doors.
To calculate the width of the doors, divide the width of the cabinet by 2 and subtract the thickness of the end edges on both sides (this is approximately 2 mm). Also subtract the gaps between the doors and adjacent modules (2x2 mm per door). In addition, deduct an additional 2mm for installation. The calculation for given dimensions looks like this: 800/2 - (2x2) - (2x2) - 2 = 390 mm - this is the width of one door.
Cut lumber and mill doors for fittings according to the dimensions strictly specified in the drawing.
How to install in the kitchen? Instructions
To install an overhead stainless steel sink you will need:
- sealant;
- the cabinet itself;
- brackets;
- metal corners;
- wooden beam.
The installation procedure will look like this:
Markings are carried out at the required height from the floor.
After the first marking, a second marking is made, which should correspond to the thickness of the rear walls of the sink. This way you will calculate the line for attaching the brackets.- Now we measure the distance between the brackets and draw lines.
- We drill holes in the wall and attach the brackets.
- Now we install the sink on the brackets.
The easiest way is to install an overhead sink on the pipe . Then you only need to install a sink on the sides of the pipes, pre-treated with sealant. This way you will completely hide the fins of the pipes. Once the sealant has dried, the sink will be locked in position and ready for use.
If you think that the brackets alone are not reliable, you can additionally secure the sink with furniture corners and wooden blocks. Wooden bars are placed in the sink box, and metal corners are attached along the entire perimeter to the bars.
Tip : it is also worth making a table and a sofa for the kitchen. And if you are ready to experiment, then try making a tabletop from epoxy resin and a comfortable bean bag chair.