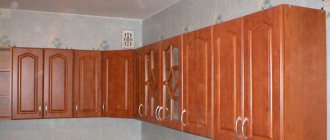
For proper and compact placement of things and arrangement of space in rooms, racks or shelves are used. They are especially appropriate if the room is small and there are a lot of things. These designs are not only practical, but also used as a design element. When choosing products, you need to pay attention not only to aesthetic characteristics, but also to the fastening of the shelving.
Installation and dismantling of structures is a simple process and takes little time. There are several ways to fix shelves and racks, each of which differs in implementation technology, accessibility, reliability and type of fastening devices used.
Some tips for attaching a shelf to a wall
Home improvement is not always a matter of several weeks, and quite often, additional elements such as shelves, racks and other decorations are hung on the wall after all repair work in the house has been completed. Therefore, almost everyone faces the question of how to hang a shelf on the wall without damaging the finish.
- Types of shelves and fixtures
- Where are shelves most often used?
- Which shelf mounts should I use?
- What tool is needed to attach the shelf?
- Shelf installation process
- Shelf in the bathroom
- Useful tips
Mounting methods for wall shelves
When planning wall shelves, the type of fixation is decisive. Once you familiarize yourself with the mounting method, you can easily choose the option that suits you.
Using invisible fastening . By choosing this look, you will hide the fasteners, and the wall structure will look light and elegant, no matter what room it is hung in. It is desirable that the wall be concrete or brick. Wall partitions made of plasterboard less than 10 cm are not recommended.
How to properly fix a shelf on the wall so that it fits perfectly into the interior?
You can use a variety of materials for wall shelves.
Using brackets . In this case, you cannot hide all the elements; they will always be visible. You can save money by purchasing metal or plastic corners. If you want to add beauty and originality to a piece of furniture, buy decorative fasteners, but always in pairs. It is necessary to take into account an important point - the brackets are not suitable for every interior.
They are attached to absolutely any room.
Working with it is not difficult, and its mass is small.
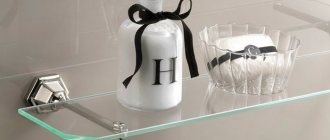
On holders for glass shelves . In such fasteners, rubber or silicone gaskets are used to protect the plane at the fastening site. Shelf holders can be of different sizes and shapes; there are options with suction cups. They are attached from below, and the upper surface remains open.
Anyone can do this work if they want to.
How to attach a shelf to a wall?
Using loops and corners . This is the most common method - easy, efficient, does not take much time, and will fit into any environment. The format of loops or corners allows for a decrease or increase in the load on the shelf. Attachment to guides or metal posts. Not all types can be put into practice on your own. In some cases, it is worth contacting specialists.
When planning wall shelves, the type of fixation is decisive.
To hang a shelf on a brick or concrete wall, you need to make markings using a level.
Sequence of work
Before you attach the shelf to the wall, you need to know that the thicker the shelf, the thicker the support should be. A hole is drilled in the end part an average of 5 mm below the surface. All holes for shelves in the wall must match, otherwise attaching them will be quite problematic.
Attaching the shelf to the wall:
- A strip of the required length is considered a template. It is applied to the end of the shelf and a hole of the required diameter is made, after which it is applied to the wall.
- The next step will be drilling, which must be done with maximum precision.
To attach the shelf you will need:
- electric drill,
- threaded coupling,
- brackets,
- lath - template,
- carpentry glue,
- screws.
Installation of a corner shelf (video)
Step-by-step guide for installing wall brackets
An empty shelf is placed against the wall, mounting points are marked below, and a level check is performed.
Depending on the type of base, holes are made or not made with a drill. The thickness of the drill must match the diameter of the dowels and anchors.
The horizontal elements are first fixed on the shelves: they are “baited”, then the screwing is checked for evenness, and then they are tightened until it stops.
Preparation for installation
A dowel is inserted inside the wall holes and a shelf is attached, checking that the holes are made correctly. If everything is correct, the shelf is screwed on. First they “bait”, check the even position, then pull it all the way.
Small products are not always screwed to the walls; most often it is enough to secure the holders firmly and simply place the stand on top.
An example of fixing a shelf with your own hands can be seen in the following video:
Installing a holder without visible fastening
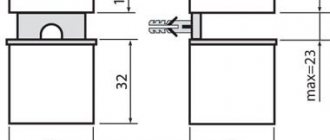
Hidden fastening implies absolute marking accuracy.
Installation on the rods is carried out in stages. First, the mounting plate is fixed in a horizontal position to the wall using self-tapping screws and dowels with pre-drilled holes. Then the product is put on firmly fixed protruding parts of the fastening.
The plates are screwed to the reverse side with self-tapping screws. In this case, you need to use a router for the notches or place the back wall so that it is slightly recessed into the shelf. This is necessary so that after installation there is no gap between the two planes.
Recesses are cut out under the hidden hinges using a milling machine so that the hinge is flush with the edge. All fasteners are fixed with self-tapping screws, the finished elements are hung on pre-installed screws and dowels. All that remains is to hang the product by the loops.
Features of installing glass shelves
Glass cannot be drilled, so hinges or similar fittings cannot be used. You can't just lay glass on top of the fasteners because of the slippery surface.
The optimal solution is to install mensolo holders or “pelicans”. The advantage is that the fasteners are securely hidden behind decorative overlays, increasing the attractiveness of the shelves.
Example of installing a glass shelf
First, the parts are disassembled, holes are drilled, fastening parts are installed, and the installation is checked to see how smoothly the installation is done. The last step is to put on the decorative plugs, insert them, and fix the shelf.
How to do the job on plasterboard walls
GKL sheets do not differ in their ability to firmly fix shelf holders. In such a case, you need to take care of reinforcing the base.
At the assembly or cladding stage, additional profiles made of metal or wood are attached to the frame. Then, when installing the shelf, the fasteners are screwed not into plasterboard, but into a metal profile or wood, which strengthens the position of the product.
Metal dowel for drywall
When the workspace has already been covered with plasterboard and no additional reinforcements have been made, there is a way out in the form of special fittings. Umbrellas, butterflies, Knauf Hartmut, Moli Driva or Legs are suitable.
How to attach heavy objects to drywall in a void
Often, plasterboard structures may be too far from the load-bearing wall, or the partition may be completely framed. In this case, anchor screws will not work, much less use standard plastic dowels. The anchors, due to the lack of support, will not provide fastening and will create a large load on the wall with its further destruction. And the plastic one will fall out immediately. What to do in this case, how to ensure that heavy objects are fastened to drywall in an almost empty space.
You can use special fasteners for gypsum boards specifically for problematic fastenings of heavy objects:
- Mounting on brackets or hooks.
- Four-segment dowel.
- Butterfly dowel.
- "Driva".
- Dowel type "umbrella".
- Dowel moth (Molly).
Of course, as an option, you can use a method such as attaching it to frame posts. To do this, you need to know where they are and screw the screws into the profile. But this way you can hang objects of relatively small area and weight, for example a painting.
Useful tips
Here are some useful tips that will come in handy while working.
- If the wiring has not been changed for a long time, it will not be superfluous to determine its location before drilling. After all, if it is damaged, a short circuit may occur that can damage household appliances. The apartment may also be without power. The location of the wiring is determined using a special device that can be purchased at a hardware store. They are led along the wall. If there is wiring nearby, the LED on the device lights up. It is better to start your search from places where wiring is certain (sockets, switches).
- When it comes to a wooden wall, there is no better fixation than ordinary screws. Dowels will be completely unnecessary for them. Wood can hold even quite a lot of weight well without them.
- You can make a shelf with a hidden fastening with your own hands from an ordinary one. To do this, you need to purchase the fasteners themselves, and then drill holes for the pins in the piece of furniture using a drill.
- It is better to purchase dowels with antennae located on the sides. They hold up much better. This is especially true for concrete walls.
- To achieve the correct horizontal position of the shelf, it is better to use a building level. Of course, you can try to install it by eye. But then deviations are possible. And they don't look very nice.
- When using metal corners, they need to be decorated after finishing work. The best option is to stick a PVC film or a small piece of PVC plate onto the mount. However, for a high-tech interior, you can leave bare steel, in which case it will look organic.
Ikea against Russian politics
The furniture company tries to stay out of politics, but despite all its efforts, it has not always been able to successfully balance between European values and Russian legislation.
Last year, the company decided to stop publishing its Russian-language advertising magazine to avoid incurring charges of violating a law banning the promotion of homosexuality to minors.
A year earlier, the management of the world’s largest chain of furniture and interior items stores decided, just in case, to remove a photograph of people in colored balaclavas from the company’s Russian website.
The company's management explained their decision to remove the photo by saying that colored balaclavas had become a symbol of the punk group Pussy Riot, and “IKEA is a commercial organization that operates outside of politics and religion.”
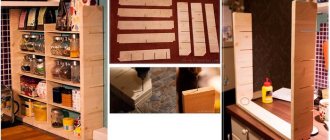
Assembling a rack for a workshop or garage: material, shelves, components
The more order in the garage and workshop, the safer it is to work there. In this article, we have collected useful tips on how to organize space for storing tools, spare parts, consumables and materials. We help you choose racks and components.
Shelving material: wood, metal or plastic
First, let's decide what you will store on the shelves. Heavy objects: winter tires, electric wood splitter, circular saw require a metal rack. The wooden structure will withstand small and medium-sized plumbing and carpentry tools. The plastic version is suitable for boxes with nails and screws.
Advantages and disadvantages of shelving made of metal, wood and plastic:
Please note: wooden racks are less stable than metal racks. The wooden shelves and side walls are connected to each other with self-tapping screws; the structure is not rigid enough - therefore, we recommend attaching wooden racks to the walls.
Rack: do we buy ready-made or make it ourselves?
Now let's decide what to choose: buy a ready-made rack or make it yourself. Each option has its own advantages and disadvantages. A homemade rack will cost less than a purchased one. But at the same time, you will spend time on drawing, selecting materials and components, cutting and assembly. The ready-made option is suitable for those who want to set up a garage or workshop as quickly as possible.
Ready shelving
If you have a standard room where a factory rack can conveniently fit, choose ready-made options in the Leroy Merlin Storage department or on the website in the Storage section. The width of structures made of wood, metal and plastic is from 60 to 100 cm, height is from 143 to 200 cm. One shelf can support from 30 to 150 kg.
Ikea Kallax shelving unit as a nursery divider
Recommended Posts
Recently viewed by 0 users
No registered user is viewing this page.
How to find a place for a schoolchild in a small space?
Children's wallpaper in the interior: 60 interesting options
Carpets for a children's room: which one to choose?
The best articles on the IVD website
- Construction and repair
- Foundation
- Roof
- Walls
- Window
- Doors and partitions
- Ceiling
- Balconies and loggias
- Internal structures
- Floor
- Water supply and sewerage
- Heating
- Ventilation and air conditioning
- Gas and energy supply
- Lighting
- Plumbing equipment
- Security and home automation
- Baths, saunas, swimming pools
- Construction Materials
- Decoration Materials
- Tools
- Technique
- Laws and finance
- TechnoNIKOL
- Design and decor
- Apartment
- Bedroom
- Kitchen
- Dining room
- Living room
- Bathroom, toilet
- Hallway
- Children's
- Attic
- Small rooms
- Workplace
- Wardrobe
- Library
- Decoration
- Furniture
- Accessories
- Vacation home
- Landscape
- Redevelopment
- Catalog of houses
- Magazine
- News
- Events
- about the project
- Advertising on the website
- Advertising in a magazine
- Terms of use
- Contacts
- about the project
- Advertising on the website
- Advertising in a magazine
- Terms of use
- Advertising on the website
- Advertising in a magazine
- Terms of use
- Contacts
Are you a professional architect or designer?
IVD. Repair and finishing
Are you a professional architect or designer?
The IVD.ru website is a leading Internet project dedicated to the issues of reconstruction and interior design of residential premises. The main content of the site is the archive of the magazine “Ideas for Your Home” - exclusive author’s articles, high-quality illustrations, practical tips and lessons. A team of professionals is working on the project in close collaboration with famous designers, architects and leading publishing experts.
On our website you can choose comprehensive design solutions; view detailed reviews of the market for construction and finishing materials, furniture, machinery and equipment; compare your own ideas with design projects of leading architects; communicate directly with other readers and editors on the forum.
Are you a professional architect or designer?
How to Attach Shelf Mounts to the Wall: Step-by-Step Guide
The standard method of attaching wall shelves is using brackets. The procedure for installing them:
- Mark the mounting locations for the brackets on the underside of the shelf. Check with a ruler (level) that the markings are correct.
- Screw the horizontal parts of the brackets to the shelf with self-tapping screws. At first, do not insert the screws all the way - you need to check the correctness of their position. After making sure that the fasteners are installed level, screw in the screws until they stop.
- Attach the shelf with brackets to the wall.
- Drill the first hole with a drill. Select the drill to match the wall material, the diameter to match the size of the dowels or anchors.
- Insert the dowel.
- Place the shelf and screw in the first screw not all the way.
- Mark the remaining holes. Check the markings with a level.
- Move the shelf, secured with one screw, to the side. Drill holes according to the markings and insert dowels.
- Do not screw in the remaining screws completely.
- Check that the shelf is positioned correctly. If the fasteners are installed level, then tighten the screws completely.
How to attach a holder without visible fastening
When installing hidden fasteners, the accuracy of marking is of particular importance. Features of various methods of hidden installation:
- On the rods. The mounting plate located at the end of the rod is screwed horizontally to the wall using self-tapping screws and dowels. The shelf is “put on” on the protruding parts of the rods fixed in the wall.
- On the plates. They are screwed with self-tapping screws to the back of the shelf. To do this, recesses are made with a milling cutter or the back wall is installed so that it is “recessed” relative to the sidewalls by a few millimeters. Then there will be no gap between the product and the wall after installation.
- On hidden hinges. For them, grooves are cut out at the end of the shelf using a router so that the loop is flush with the edge. The fasteners are screwed in with self-tapping screws and the finished product is hung on screws in dowels pre-installed in the wall.
Are Americans the only ones who don't follow instructions?
“The chests of drawers are only being recalled in the US and Canada. In other markets where IKEA furniture is sold, and there are more than 40 of them, this furniture is not being recalled, including Russia,” an IKEA representative in Russia told bbcrussian.
According to him, the furniture is no different from what is sold in the United States. A mandatory safety requirement is to secure the furniture to the wall; special brackets are included in the kit.
“The company is recalling chests of drawers in the United States because the company may want to understand why American customers are not following the instructions, which is leading to such unfortunate incidents. “No such cases have been registered in Russia or other countries except the United States,” the Russian division emphasized.
What influences the choice of fastening
There are different options for hidden fasteners, which differ in price, type, shape and other characteristics. In any case, when using this method of fixing structures, you need to consider the following points:
- Wall thickness. This indicator is especially important when it comes to pin fastening. It can be used only if the thickness of the concrete wall is 10 cm or more, the thickness of the brick wall is from 25 cm. For bases that do not meet these parameters, it is better to choose a different type of invisible fastening or use additional fittings. If you do not strengthen the fasteners, then only the lightest items can be stored on the shelf - a couple of jars of cosmetics, jewelry.
- Shelf thickness. For small loads, it is enough to install a product 3 cm thick; for heavier items, you will have to buy shelves 4.5-6 cm thick. It is important that the structure is strong, solid, with a flat surface.
The number of fittings also needs to be thought out in advance. For shelves shorter than 1 meter, only two fasteners are sufficient.
Important! If the length of the product is longer, you must add fasteners - this will allow you to evenly distribute the load.
Installation of fasteners
Installation of fastening the shelf to the wall with your own hands is carried out according to the following algorithm:
- choice of fastenings;
- preparation of instruments;
- fixing the shelf to the wall.
Selection of fasteners
When choosing fasteners, consider the following parameters:
- the material from which the wall is made. You can hang shelves on brick and concrete walls in any way. For plasterboard walls, it is recommended to select stronger fasteners;
- the material from which the shelf is made. Massive fasteners are not suitable for glass shelves, as they make the structure too heavy. For metal shelves, external fasteners are best, and for wooden shelves, internal fasteners are best;
- thickness and other overall dimensions. For massive shelves, it is recommended to select similar types of fastenings: large brackets, hidden metal rods, and so on. For light, thin shelves intended for storing souvenirs, cosmetics, and so on, it is advisable to use small corners.
Additionally, it is worth considering the number of fasteners. If brackets, corners or hinges are used, their number cannot be less than 2 pieces, located on each side of the shelf. If the shelf length is more than 1 - 1.5 m, it is recommended to increase the number of fasteners.
Preparing tools
To complete the installation work, you will need to prepare the following list of tools:
- ruler, tape measure and marker for marking;
- building level for leveling in a horizontal position;
- drill. If installation is being carried out on a brick or concrete wall, then it is recommended to use a hammer drill instead of a drill;
- screwdriver or screwdriver, hammer;
- dowels, screws and other fasteners.
Additional recommendations from professionals
In order for the design to serve for a long time and be reliable, you should listen to the recommendations of professionals:
- All fasteners: brackets, corners, hinges, shelf holders must be firmly fixed.
- The dimensions of the fasteners must correspond to the planned loads.
- Structural elements can be fixed in any area of the cladding if its thickness is more than 18 mm.
- All hardware must be correctly selected and protected with an anti-corrosion coating.
- The location of the holes should be checked with a building level to avoid the slightest distortion.
- When fastening the shelf in two places, it can support a load weight of 40-70 kg.
- When purchasing fasteners, take into account the material of the wall to which the structure will be attached.
To feel safe in your home, you should take the choice of fasteners and installation of the structure seriously. Professionals use fasteners only from the world's leading brands. When purchasing, you should ask the sellers for quality certificates. It is necessary to check on the spot what material this or that element is made of.