It's good when a house or apartment is tastefully furnished. You come home from work and plunge into a cozy atmosphere. But there are feelings that something is missing, there are definitely places where you need to hang something. Maybe a cabinet, but it somehow doesn’t fit into the interior or isn’t the right size. Then the best option would be a shelf. It will fit perfectly into the overall decor of the house and, importantly, will help save a lot of space.
You can keep various items and literature on the shelves.
After it has completely hardened, a shelf is put on the pins.
You can keep various items and literature on the shelves. They are attached to absolutely any room. How to properly fix a shelf on the wall so that it fits perfectly into the interior? It's not difficult as it may seem. Anyone can do this work if they want to.
Mounting methods for wall shelves
When planning wall shelves, the type of fixation is decisive. Once you familiarize yourself with the mounting method, you can easily choose the option that suits you.
Using invisible fastening . By choosing this look, you will hide the fasteners, and the wall structure will look light and elegant, no matter what room it is hung in. It is desirable that the wall be concrete or brick. Wall partitions made of plasterboard less than 10 cm are not recommended.
You can use a variety of materials for wall shelves.
Using brackets . In this case, you cannot hide all the elements; they will always be visible. You can save money by purchasing metal or plastic corners. If you want to add beauty and originality to a piece of furniture, buy decorative fasteners, but always in pairs. It is necessary to take into account an important point - the brackets are not suitable for every interior.
Working with it is not difficult, and its mass is small.
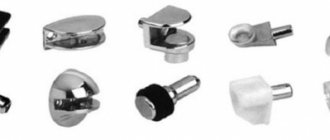
On holders for glass shelves . In such fasteners, rubber or silicone gaskets are used to protect the plane at the fastening site. Shelf holders can be of different sizes and shapes; there are options with suction cups. They are attached from below, and the upper surface remains open.
Anyone can do this work if they want to.
How to attach a shelf to a wall?
Using loops and corners . This is the most common method - easy, efficient, does not take much time, and will fit into any environment. The format of loops or corners allows for a decrease or increase in the load on the shelf. Attachment to guides or metal posts. Not all types can be put into practice on your own. In some cases, it is worth contacting specialists.
When planning wall shelves, the type of fixation is decisive.
To hang a shelf on a brick or concrete wall, you need to make markings using a level.
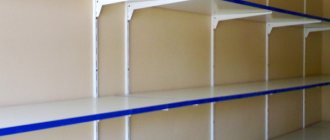
Mesh metal shelves
Most wardrobe systems for wardrobes involve storing things on mesh metal shelves. And this is quite justified and reasonable: thanks to their cellular shape, mesh shelves allow air to pass through perfectly and promote good ventilation, eliminating the possibility of a musty smell inside the cabinet.
Also, mesh metal shelves increase the viewing angle inside the cabinet. For example, in the hallway:
- All the shoes on the lower shelves are clearly visible through the bars. Therefore, it is recommended to make shoe racks from metal shelves (in addition, they are easy to clean).
- You won’t have to “rummage” with your hand in search of a headdress on the top shelf if it is mesh. You can clearly see what lies where above eye level.
However, metal mesh shelves also have a weak point. This is not such a strong attachment to the frame as with blank shelves made of chipboard and MDF. It is also not recommended to heavily load the grids.
Methods for attaching mesh shelves
There are two types of fastening of metal shelves: wall or side.
In the first case, the shelves are attached to the wall, that is, to the back of the wardrobe, using special brackets and guides.
The installation can be strictly horizontal or tilted if these are shelves for shoes.
The front edge can be reinforced using special support posts.
You can also purchase special canopy holders for hanging the barbell under hangers.
Or dividers-partitions for deep shelves. This will allow you to more accurately store various small accessories and items.
Shelves with side fastening are installed in the same way as regular ones, with emphasis on the partitions. To do this, the shelf is cut to the size of the allocated niche and secured using special stop holders.
There is an option for mounting on special runners. Then the mesh metal shelf can be retractable.
You can also install dividers on it for optimal zoning for storing small items.
Attaching shelves to the wall without visible fasteners
There are a number of points that you need to familiarize yourself with in order to hang a shelf in an invisible way.
- Wall thickness. The shelf should be mounted on an invisible mount if the thickness of the brick partition is 250 mm, and the concrete partition is 105 mm. If the dimensions are smaller than the given data, then additional parts will be needed. When the wall is made of plasterboard or cinder blocks, and the thickness does not exceed 100 mm, then invisible fasteners are acceptable if the shelf will be used as decoration and light objects will be placed on it.
- Shelf thickness. It should not be massive or, conversely, thin. It is desirable that the material does not sag, is dry and has a good finish. If there will be light items on the shelf, then the thickness of the shelf should be at least 30 mm; if you store literature or heavier utensils, it should not exceed 60 mm, but should not be less than 45 mm.
- Selection of fasteners. To choose the right mount, you need to take into account the second point, and also know what function is intended for the shelf. The invisible fastening consists of hanging loops and metal rods. The loops are attached to the back side of the shelf and markings are made. Using the necessary tool, holes are made in the wall and a plug is inserted there. Then screws are screwed in to a sufficient depth and hinges are placed on them.
If you use metal rods, you need to remember that the diameter of the fastening element should be 10-12. The first thing you will find out is the length and width of the shelf. Mark this data on the wall and drill holes. The same holes will need to be made on the shelf. Depending on the load, the required number of pins will be required. They are inserted into the wall half the length of the hole and fixed with glue. After it has completely hardened, a shelf is put on the pins.
Once you familiarize yourself with the mounting method, you can easily choose the option that suits you.
Use a hammer drill to make the required holes.
How do you install shelves in a closet?
The whole process can be divided into several stages:
- Performing markings. When performing this work, it is very important to monitor the horizontal levels. Therefore, this is necessary to prevent items on the shelves from moving around in the future. If the weight is distributed unevenly, it will increase the load on the fastener. This may cause the supports to break and the shelf to collapse.
- Choosing a mounting method. If you choose corner support as one of the easier options, use furniture corners. They make the connection stronger. The downside is that corners cannot be hidden.
- If aesthetics are of paramount importance to you, you should choose a non-standard method - the "helicopter" method. This method involves the use of Euroscrews (three in total are required).
- Screw the screw into the center of the first floor, secure it to the partition, but do not tighten it too much. Rotate the surface 180º around the longitudinal axis to find a point to secure the adjacent element.
- Secure the adjacent frame with the remaining two screws. Try to lift them well, then return the first plane to its normal position.
- Fully tighten the shelves from the outside of the frame.
If any point remains unclear, look at the photos on our website to understand the situation, do the job efficiently and equip the cabinet with side shelves. The result is a durable and reliable structure that will last a long time.
Furniture screed is a special type of fastening used exclusively in the furniture industry. Such fasteners not only make furniture assembly much easier, but also become “invisible” after installation. In this article, we will look at the different types of fasteners that are used to assemble wooden furniture.
Fastening for a shelf to a plasterboard wall
There are different types of fastenings to plasterboard walls. Here are some of them:
- Embedded beams are the optimal variation. Attached directly to the gypsum board when mounting to the wall. Beams of the required thickness are fixed in the place where you will attach shelves or equipment.
- Fastening is carried out to the gypsum board. This option is not difficult, since the fixing elements - butterfly dowels, umbrellas, Molly fasteners - easily pass through the plane and are screwed into the wall.
- Using profiles. In this case, you will need a magnet, preferably a powerful one, this will ensure fastening strength. In the place where the metal profile passes, make holes all the way through. The self-tapping screw should be 5-6 mm longer than the thickness of the gypsum board sheet. Then we fix the shelf to the plasterboard wall.
- Anchor fittings. Used to attach shelves that can support significant weight. Their diameter should be from 6 mm to 1 cm.
Using the necessary tool, holes are made in the wall and a plug is inserted there.
We make sure that the drill and hardware are the same size.
Brackets are of the following types:
- Fixed. They are used in cases where TV will be watched from one point, for example, in a bedroom or public place. The TV is mounted strictly parallel to the wall. Most often, this type of fastening is used for large panels.
Fixed bracket
Inclined. They are movable and make it possible to adjust the tilt of the TV plane. In this case, regulation can only occur in the horizontal plane. It is used most often in private use.
Tilt bracket
Pan-tilt. Such mounts allow you to rotate the plane of the TV, which makes it possible to give it almost any angle. The limitation in this case will be only the distance from the plasma panel to the wall. Not applicable in public places.
Pan & Tilt Bracket
- Movable. With their help, you can move the LCD panel away from the wall. This type of mount is ideal for rooms with complex wall shapes and difficult squaring of rooms, as it gives complete freedom to choose the angle of the TV. This option is the most expensive.
Fortunately, the mounting system for LCD TVs is now completely standardized - any model of support uses the same interface. It's called Flat Display Mounting Interface (FPMI), so the panel manufacturer doesn't matter when selecting mounting hardware. However, you shouldn’t completely ignore the individual features of the LCD panel, because some TV models can be made for completely non-standard mountings. Also, the connectors may be located slightly differently, which eliminates the possibility of using conventional brackets. In this case, it is necessary to select a special variety.
Necessary materials
For wall shelves you can use a variety of materials:
- GKL. Designers often use plasterboard in interior design, especially if shelves made of this material are assigned one of the main places in the room.
- Tree. Most often used for balcony shelves. Working with it is not difficult, and its mass is small. When used correctly, these shelves can last a very long time.
- Chipboard or chipboard. Moisture-resistant material, withstands temperature changes, wear-resistant.
- Glass. Very common in use. Glass shelves look very fashionable.
- Plastic. The publicly available material, since it is inexpensive, is not susceptible to mold.
- Metal. When working with it, you will definitely need a welding machine.
Then screws are screwed in to a sufficient depth and hinges are placed on them.
If necessary, we make adjustments.
Required Tools
The tools you will need are: a level, a drill, or better yet a hammer drill, a screwdriver, dowels, self-tapping screws, a jigsaw, wood glue, a fastening set, a set of drills, a pencil, a hammer, and a wrench for anchor bolts.
If you use metal rods, you need to remember that the diameter of the fastening element should be 10-12.
Upon completion of all stages of work, we attach the shelf.
Fastening process: step-by-step instructions
How to attach a shelf to a wall? Before you start installing the shelf, you need to remember that the holes in the shelf on the back side are made 5 mm lower, and also make sure that the holes on the shelf and on the wall completely coincide.
The first thing you will find out is the length and width of the shelf.
When positioning the shelf, align it with the fasteners.
To hang a shelf on a brick or concrete wall, you need to make markings using a level. Use a hammer drill to make the required holes. We carry out the work carefully, avoiding chips on the wall. We make sure that the drill and hardware are the same size. Then we attach the fastening elements and check with a building level. If necessary, we make adjustments.
Depending on the load, the required number of pins will be required.
Using bolts and nuts, self-tapping screws or self-tapping screws, secure the shelf.
Upon completion of all stages of work, we attach the shelf. If you did not make it yourself, but purchased it in a store, then all the necessary fastening elements are included. When positioning the shelf, align it with the fasteners. We make sure that there are no gaps between the shelf and the wall. Next, mark all the holes with a pencil. Using bolts and nuts, self-tapping screws or self-tapping screws, secure the shelf.
They are inserted into the wall half the length of the hole and fixed with glue.
If you did not make it yourself, but purchased it in a store, then all the necessary fastening elements are included.
If necessary, we make adjustments.
Sequence of work
Before you attach the shelf to the wall, you need to know that the thicker the shelf, the thicker the support should be. A hole is drilled in the end part an average of 5 mm below the surface. All holes for shelves in the wall must match, otherwise attaching them will be quite problematic.
Attaching the shelf to the wall:
- A strip of the required length is considered a template. It is applied to the end of the shelf and a hole of the required diameter is made, after which it is applied to the wall.
- The next step will be drilling, which must be done with maximum precision.
To attach the shelf you will need:
- electric drill,
- threaded coupling,
- brackets,
- lath - template,
- carpentry glue,
- screws.
Installation of a corner shelf (video)
Types of shelves and fixtures
Everyone, even those who have never encountered such a task, knows that attaching a shelf to a wall can only be done with the help of fasteners. In stores and along with shelves you can find dozens of types of fasteners, which may differ in both appearance and design. But they can be divided into two main types, with hidden fastening and external.
In addition, the shelf mounting itself can also serve a decorative role, creating the desired design effect.
The shelves themselves are also very diverse both in their appearance and in the material from which they are made, and they also do not have a clear classification; they can be single-tiered or multi-tiered and intended for any room. The type and material of the shelf depends only on your needs or tastes. If you wish, you can even make a homemade shelf.
Brackets, fasteners, corners
If the wall is not strong enough, it is not possible to install a shelf with a hidden fastener, then use conventional visible fasteners. When installed correctly, it can withstand a load of up to 50 kg, so for hanging structures on which books are supposed to be stored, it is preferable to use just such a solution.
Types of fastening shelves to the wall:
- Bracket holder. The most durable fastener. It can have a variety of shapes and designs and is made of metal, plastic and other materials. It is advisable to select it taking into account the decor of the room and the color of the interior.
- Loops. They are fixed on the wall, the shelves are hung on them using furniture screws.
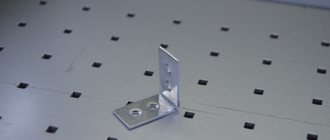
- Corner. Metal corner fasteners are practically invisible, but provide high-quality support for suspended structures.
Where are shelves most often used?
The main place where you simply cannot do without a shelf is the bathroom. This is where shelves are a must-have attribute, as they allow you to conveniently store bathroom accessories. In most cases, even several shelves are used, but fixing a shelf in the bathroom is the most difficult, since the wall covering here is ceramic tiles, which must be handled very carefully.
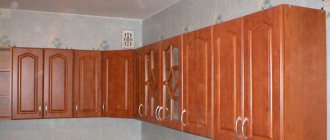
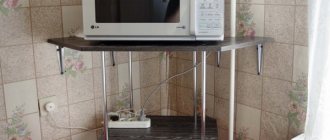
You can’t do without a shelf in the kitchen, since it greatly increases practicality and you can place on it all the accessories that the housewife constantly needs at hand.
In the bedroom or living room, shelves mainly serve not a practical, but a decorative role and serve as a stand for souvenirs, jewelry or books.
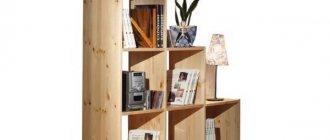
Corner shelves for books
You can often see corner shelves used to store books. It is not only convenient, but also beautiful. Such shelves complement the interior of the apartment and make it more aristocratic. The design itself can be varied; imagination will help make them original and practical.
A shelf made of wood looks impressive, parts of which are attached either on one side of the corner or on the other. It looks like a ladder. Such shelves are ideal for books, which, thanks to their shape, will fit perfectly into the right place.
Taking into account all the tips, making corner shelves yourself will not be difficult. This kind of work will only take a few hours. And the finished shelf will serve you for many years, delighting you with its beauty and practicality.
You might be interested in the following materials:
Which shelf mounts should I use?
To attach racks and shelves, you can use different types of fasteners, depending on the material of the wall on which they are attached.
For walls made of bricks, blocks and other traditional building materials, you can use:
Anchor bolts, the newest and most reliable fasteners. It can withstand significant loads and is even suitable for aerated concrete or foam blocks, which can crumble during operation. In addition, anchor bolts are easy to work with.
Dowels are also a fairly reliable way to attach a shelf. But they have one drawback: under heavy operating loads, the plastic can wear out and the dowel will simply begin to gradually crawl out of the wall. Therefore, dowels are a cheap way to secure shelves with little load. Usually these are shelves that are used to store souvenirs.
The oldest, but also unreliable method is to simply nail the shelf to the wall. But it is not recommended to nail it if you want the shelf to stand for a long time. In addition, when nailing a shelf, you always risk damaging the finish, and this is undesirable, even if the shelf itself will hide these flaws.
For wooden walls, it is best to use special screws, although in some cases you can limit yourself to nails if you do not plan to use the shelf often.
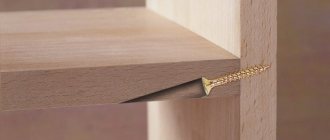
Through fasteners (with drilling) for confirmations
Confirmations are most common through closing shelves. To install, you will need to drill a hole in the end of the shelf with a diameter of 5 mm and on the front side of the side wall of the bedside table with a drill with a diameter of 8 mm. It is best to use a special confirmation exercise. Because it also requires a countersink under the confirming head to “sink” the screw itself flush with the surface of the side wall. In addition, the cap is hidden by a special self-adhesive cap, matched to the color of the chipboard.
Gradient - depending on the thickness of the side walls, the length of the confirmation is selected. For standard thickness of chipboard and MDF 16-18 mm, a 5x50 Euro screw is used, for thicker panel materials - a longer one, up to 70 mm.
- Among the advantages of attaching shelves to confirmations, it is worth highlighting the ease of assembly and the low cost of the fastener itself.
- The downside is that it requires drilling. Not everyone likes the “losing” aspects of furniture in an aesthetic sense. Self-adhesive dowels, although color-matched, are still visible. In addition, furniture assembled by confirmation no longer “values” assembly and disassembly.
Shelf installation process
If you bought a shelf along with fastenings in a store, then the first thing you need to do is read the instructions on how to attach it. After all, some modern models have their own algorithm for attaching the shelf to the wall. You should especially carefully look at the instructions if the shelf has invisible fasteners, since in this case you need to use exactly those fasteners that the manufacturer recommends, otherwise you won’t be able to hide them.
Video on how to quickly hang a shelf Before attaching the shelf, you need to choose a place where it will be located. But you shouldn’t rush to drill into the wall right away; before fixing the rack, you need to measure everything so that it hangs beautifully and evenly.
The first thing you need to do this is to attach the shelf to the wall, and mark with a pencil on the wall the place where one of the bolts will be and put a mark there. Be sure to mark the center of the holes.
After this, we measure the distance between the centers of the fastenings, and from the mark made we measure the same, and put a vertical line.
Type of fastening
Then we simply apply a level to the wall and place a horizontal line in the area of the previous mark. The intersection of these lines will be the center of the bolt hole. You can check this by simply placing the shelf back against the wall.
Then you need to carefully make holes in the wall. To do this, you need to use a drill of the same diameter as the fasteners. If you take a smaller drill, the bolt simply won’t fit into the hole, and if you take a larger one, it will simply wobble and fall out.
In addition, when drilling, it is important to keep the drill level so as not to widen the hole, since in this case the fastening may also fall out, especially if you are using dowels rather than anchor bolts. Additionally, the hole should be deeper than the length of the mount you plan to use. After all, the drill does not remove all the debris from the hole, so you need additional space inside so that you can easily install the shelf.
When the mounting points are ready, you can hang the shelf. This also needs to be done carefully; if the fasteners do not fit into the hole, then you just need to lightly tap them with a hammer. First you need to install the shelf itself, and then install the fastenings. It's much simpler and easier.
Well, in the end you just need to tighten the anchor bolts or dowels until they stop.
The fasteners attached in this way will hold the shelf securely and firmly.
Shelf in the bathroom
The bathroom has its own nuances when working with shelves. If the walls are covered with tiles, then you can fix the shelf only at the seams. After all, if you try to drill a tile in the middle, vibration may cause it to crack or even fall off. Of course, there is special equipment that allows you to drill tiles, but it is expensive and it is not economically profitable to buy it. Even at seams, you need to drill the tiles carefully, and it is not recommended to turn on the vibration function until the drill reaches the wall. Only when you get to the base, then you can drill like a regular wall.
If you have a corner version of the shelf, then, as for a straight one, you must first make markings. But in the bathroom it is not necessary to use a level, since the anchors will still be in the seam, and even if it is uneven, it will still not be possible to retreat.
What information do you need to provide to start working on the project?
We need to receive your terms of reference, but if you don’t have it, then at least the following preliminary information:
- warehouse plan, which specifies the dimensions of the grid of columns, the presence of links to doors, gates, windows, and designated communications;
- information on permissible loads on floors, floor materials and their condition;
- description of the stored goods (container, dimensions, weight, packaging units, frequency of movements, etc.);
- data on existing warehouse equipment or planned for use (load capacity, lifting height, width of the working corridor, dimensions, model, etc.);
- information about the mandatory organization of areas for acceptance, packaging, shipment, and others (if such areas are already organized, then information is needed about their configuration and area);
- indicate, if any, specific requirements for the racking system.
Useful tips
Even if you think that you don’t know how to hang a shelf correctly, you shouldn’t immediately call a professional. All you need to do is show a little effort and diligence, and you can easily get the job done. If, for example, you also need a shelving unit hung in the closet, then you can first practice on it, and then move on to working in rooms where there is finishing.
In addition, the greater the planned load on the fixed rack, the stronger the fasteners should be used. After all, over time, they may weaken, and the shelf will fall with all its contents. And this is extremely undesirable. Therefore, it is not recommended to skimp on bolts, as this can have negative consequences.
It is absolutely impossible to imagine an apartment or a house, and even more so an office, without shelves. These are very multifunctional pieces of furniture that are used both for decorating space and arranging various souvenirs, and for convenient storage of various things. Often they fit so well into the interior that they are able to emphasize its style and individuality . But hanging shelves is sometimes not so easy. Often apartment owners want to secure them so that the fastenings are not visible. This is done in order to maintain the integrity of a particular style or for a number of other reasons. However, attaching shelves to the wall without visible fasteners is not such a difficult task as it seems at first glance.
Safety rules for installation
Even before attaching the bracket to the wall, you must do the following:
- Find out where the electrical wiring is in the room. Obviously, you should not hit an electrical wire with a drill.
- If the structure is attached to an absolutely smooth surface, you can glue tape to the fastening points - then the drill will not slip.
- If you think that you cannot handle the installation yourself, contact an experienced technician.
To successfully install a complex structure, you need to follow the simple rules that we have given in this article. If you do everything correctly, your TV will sit securely and securely on the wall.
Shelves in a modern interior
In any house, if a person lives in it, there are always a lot of different jars, bottles, maybe books, souvenirs, photo frames and much more. And in order to keep order in the house, it is recommended to put each thing in its designated place. And often a wall shelf acts as such a place. It usually serves two functions - it is a convenient stand for something decorative or useful, and it can also be the highlight of a certain design.
Wall shelves in the interior
Depending on the room in which the shelf is installed, it can perform a very different role. So, in the kitchen there may be a set of spices on it or some elements of utensils. In the bathroom , a shelf is a must-have for arranging various bottles and bottles. A shelf is also needed in the bedroom , where you can place on it various things you need before going to bed. Of course, these interior elements are also in the living room - books, flowers, and souvenirs can be placed on them. Often they are able to significantly save space, as well as overcome clutter in the room, because from now on everything will be in its place. That is why this piece of furniture is absolutely irreplaceable, despite the fact that there may be many wardrobes or chests of drawers in the house.
On a note! The shelf is appropriate and functional in absolutely any interior, regardless of its style. The main thing is to choose the right and suitable option and place it in a place where the shelf will look organic and as part of the interior.
Moreover, it is important to choose not only a shelf that suits the style, but also one that you will like and look aesthetically pleasing when hung. When creating certain styles, it is important that the fastenings on it are invisible. In general, there are several variations of fixing shelves on the wall.
Prices for different types of shelves
How can I mount a shelf on the wall?
To hang a shelf, you do not need to have great skills and abilities. Sometimes it is enough to have the shelf itself, a hammer drill and a building level on hand. Next, the work will go quickly and smoothly - hanging the shelf will take five minutes. However, these interior items can be fixed in different ways. This is often influenced by the type of shelf, the owner’s desire to use visible or invisible fasteners, and a number of other factors. Sometimes the type of fastener is important.
Table. Methods of fastening shelves.
| Mounting option | Short description |
Bracket or holders
Concealed shelf holder
How to buy shelf supports in Moscow
Our resource helps residents of the capital - new residents, interior designers, builders and foremen - find and receive the necessary furniture fittings in the shortest possible time. For your convenience, the site includes functions for sorting and comparing the presented models.
We sell any shelf holders in Moscow at affordable prices. You are free to order them at retail or wholesale in a complete set. If you place a large order, use the delivery service to deliver your purchases to your home or facility.
Mounts without visible fasteners
Many people now choose fastenings without visible fasteners, since this option involves completely invisible fixing of the shelf on the wall , without unnecessary elements. It is the reluctance to see additional elements on the walls for one reason or another that drives the owners of shelves and apartments to choose this option.
Brackets for mounting shelves in the wall
There are three options to secure the shelf to the wall so that the fasteners are not visible.
- Using small hanging loops . In this case, the fixation is carried out using small loops that are attached to the back of the shelf and remain almost invisible. They are put on screws screwed into the wall in advance. In this case, it is important to apply the markings correctly and hang the shelf evenly. This fastener option is not suitable for products that do not have a frame as such, that is, shelves consisting of one board. Otherwise, the shelf will not hold up.
DIY zigzag shelf made of chipboard
Fastening with metal pins
The most reliable option for fixing the shelf is with metal pins, as this will provide the ability to seriously load the shelf. Moreover, this is the most inconspicuous option, even in comparison with other methods related to secret ones.
Prices for different types of bars
Modern types of furniture fasteners
Specialized departments offer many types of furniture fasteners. Almost all of them belong to the same type, this is a threaded screw. The design consists of a wide bolt and nut. During the assembly process, they tightly fix the various parts together. They are used to make kitchen tables, cabinet and upholstered furniture.
- bolts with driven nuts. The main advantage of such products is their reliability. The product is strong;
- confirmation It belongs to the screw type of fastener. The principle of operation resembles self-tapping screws or a hex screw. These products ensure quick assembly of the furniture structure, as well as its aesthetic appearance;
- eccentric couplers. Almost all high-quality products consist of such elements. They provide good fixation of each part. In addition, they allow you to increase the speed of assembly;
- wooden corners. This type was used more than ten years ago, but due to their reliability they are used for the production of modern furniture.
The stores offer a catalog of furniture fasteners. It concentrates more than 100 types of metal products for the production of one or another type of furniture paraphernalia.
How to choose a fixation type?
This is not an easy task, since when choosing a method for attaching shelves, several factors must be taken into account. And they are the ones who will influence the final decision.
- The thickness of the wall itself on which the shelf is fixed . This is one of the main factors to consider when choosing a mounting option. The fact is that it is not always possible to use, for example, a hidden pin fastening. It is better to avoid it if the wall is made of soft materials such as plasterboard. The thickness of the partition should not be less than 10.5 cm if it is made of concrete, and less than 25 cm if it is made of brick. If the wall does not meet these parameters, then it is better to choose another fixation option. In relation to drywall, a shelf can be hung using a hidden fastener only if the wall thickness is at least 10 cm, and only light souvenirs and nothing heavy or giving a serious load will stand on the shelf.
Brackets for mounting shelves in the wall
Relationship between shelf depth and load on each mensolo holder
Important! You can choose the right mount only if you know the answers to the questions: “What will stand on the shelf?” and “Which wall will the product be fixed on?”, only then can you make the right choice.
It is also important to estimate the number of fasteners in advance. So, if the shelf is shorter than 1-1.5 m, then a couple of fasteners are enough. If the length is greater than the specified parameters, then it is better to increase the number of fasteners in order to evenly distribute the load on the product and the wall. Moreover, again, the number of fasteners can vary greatly depending on the thickness of the shelf itself and its quality.
The free space above the sofa is organically filled with shelves to match the walls
Details and elements
How to make shelves in a closet or how to build a closet from scratch? Here are the answers to the questions:
Required tools:
- screwdriver;
- screwdriver;
- drill;
- hex wrench;
- roulette;
- pencil, square or ruler;
Parts for cabinet directly:
- laminated chipboard sheets with a width of 70 to 40 cm - for the frame and internal partitions (false sheets or panels 10 cm wide - for framing the contour along the top and side walls in the case of a built-in wardrobe when attaching elements to the wall);
- The same shelves for the wardrobe;
- doors with a sliding mechanism - usually 2 or 3 (you can order ready-made ones or assemble them yourself - all components are sold in stores);
To secure shelves in a finished closet or assemble a built-in closet, you will need the following parts:
- Pins. With their help, the frame elements are attached to each other;
- Furniture corners, eccentrics, shelf brackets or European screws. One of the options for attaching shelves to a frame or wall. With corners and Euroscrews - it doesn’t look very nice, it’s quirky - it’s more complicated, but the brackets for the shelves are practically invisible from both sides.
- Drawer guides;
- When choosing drawers, pay attention to the mechanism. The box should not completely unwind and fall.
- Drawer handles should not interfere with opening. To do this, handles are made in the wooden canvas or slots are left.
Fixing the shelf on the wall using hidden fasteners
Step 1. In order to fix a shelf on the wall using a hidden fastening option, you will need to prepare a hammer drill with a drill of a certain section, 2-3 special titanium pins, a building level, a square, a drill and a bit, the shelf itself, and a pencil for marking. The pin is a metal rod that is threaded on one side and smooth on the other. The threaded part will screw into the wall, and the smooth part will need to be fitted with a shelf. Typically the pin diameter is 10-12 mm. The drill is selected with the same diameter as the purchased titanium.
Special metal pin
Step 2. First of all, you need to apply markings to the shelf itself. By the way, you can make it yourself from any part of other furniture that has served its age, rather than buying new one. Using a ruler, you need to set aside the required distance from the end edge of the shelf. In this case, a distance of 12 cm was chosen.
Step 3. Having chosen the distance, you need, using a square and a pencil, to draw a line perpendicular to the plane of the shelf at the end where the hole for fastening will be drilled.
A perpendicular line is drawn at the end
Step 4. Next you need to find the middle of the end of the board and make a corresponding mark for the drill. It is important to understand that if the shelf consists of two sheets of chipboard glued together, then in this case it is better to drill a hole for fastening not in the middle, but with a slight offset towards one or another board (better - towards the bottom, it will be more reliable).
A mark is placed for the drill
Step 5. Similar markings must be applied on the opposite side of the shelf.
On the other side the same markings are applied
Step 6. Next, to the end of the shelf where the markings are applied, you need to attach a building level and directly on it make marks parallel to those previously applied to the board, as well as marking the edges of the shelf itself. The level cannot be moved while the marking is being transferred. Pencil marks can then be easily erased from the surface of the level, but this technique of transferring markings will make it easy to make markings for drilling holes in the wall.
The level cannot be moved while the marking is being transferred.
Marks are made at the level
Step 7. Then you need to select the approximate location of the shelf on the wall. Having applied it to the surface, you need to mark the boundaries of the product directly on the wallpaper with a pencil.
The shelf is attached to the wall
The boundaries of the shelf are marked
Step 8. Now you need to take a building level with markings and, attaching it to the wall in the selected and marked place, align and transfer the markings from the level to the wall, also using a pencil. In this way, you can easily and quickly make precise markings for the locations for drilling holes for the pins without unnecessary movements.
Transferring markings from level to wall
Step 9. Next, in the end part of the shelf, in the designated places, you need to drill holes for the pins. They should be the same depth as the length of the part of the pin on which the board will be placed.
A hole is drilled in the end
The depth of the hole should correspond to the part of the pin on which the shelf will be placed
Step 10. Now you need to take a hammer drill with a drill of the same diameter as the pin and make holes in the wall in accordance with the previously made marks. To prevent dust from concrete from falling onto the floor, it can be removed immediately using a switched on vacuum cleaner, the hose from which will be held by an assistant.
Holes are made in the wall
Step 11. Both titanium pins need to be installed in place, that is, inserted into the holes in the wall. If they are difficult to enter, you can carefully knock them out with a hammer or screw them into the wall using a key.
The pins are inserted into the holes
Step 12. All that remains is to put the shelf on the pins in the wall, aligning the holes with the metal fasteners. The shelf is installed. By the way, for better fixation, you can add a little glue to the holes of the shelf - then the connection will be even more reliable. This mounting option will allow you to achieve an effect where it seems as if the shelf is supported on the wall by itself.
The shelf fits onto the pins in the wall
Prices for popular hammer drill models
Video - How to install a shelf with invisible fasteners
Hidden
Hidden support for shelves is a solution for interiors in high-tech, minimalism or modern style.
To install shelves on the wall use:
- Hidden loops. They are suitable for products of different thicknesses and from different materials (chipboard, solid wood, plywood). Using a building level and a marker, mark points on the wall surface and drill holes for fasteners. Then the dowels are inserted and the rings are fixed to the self-tapping screws. At the end of the shelf with which it will be connected to the wall, it is advisable to make a recess to the size of the ring so that there is no free space between the wall and the shelf due to protruding joints.
- Metal rods. This type of fastening applies to the console. Usually it is sold complete with the shelf itself, in which holes of the required diameter and depth are already drilled. The mounting method can be different: screwed to the wall with a dowel or mounted on flat hinges or strips. Reliable fastening is guaranteed only by fittings with a diameter of at least 10 mm.
- Wooden beam. Used for installing closed shelves. Using a level and a marker, draw a line on the wall along which the auxiliary fasteners will be placed (it should go under the shelf). Then the plank is fixed with dowels and screws. Hang the shelf and secure it with an additional strip.