Despite the abundance of original and unusual flower pots in stores, many women prefer to decorate them with their own hands. Of course, the most ordinary plastic pot will look unusual and attractive with a beautiful flowering flowerpot. But the decor of handmade flower pots gives any room an indescribable homeliness, warmth and joy.
A way to decorate flower pots at home Source yandex.ru
DIY flower pot decor at home
You can decorate flower pots, both plastic and clay, with your own hands, using any available materials that you can even find at home, or buy specially.
To work, in addition to the pot, jar or bucket itself, you will also need sandpaper, surface degreasing liquid (solvents, white spirit, acetone, nail polish remover), glue, acrylic paints.
Suitable materials for decoration:
- beautiful fabric
- jeans
- sackcloth
- paper
- newspapers
- twine, threads
- paper napkins
- twigs from trees
- pencils
- CDs
- broken plates and cups
- eggshell
- shells
- clothespins
- buttons
- cereal
- lace and knitted napkins
- bugles
- pebbles
- nail polish
- paints
- and much more that your imagination suggests. And mine told me to use the rhinestones left over from the diamond mosaic.
Preliminary preparation
Before gluing decorative elements to the surface of the pot, it must be prepared in order to get rid of existing coatings and patterns on plastic jars, excess fat and ensure better adhesion of the material. Otherwise, this may result in cracking of the paint layer, delamination and deformation.
- Therefore, first of all, the pot needs to be cleaned, washed and dried.
- Then sand it thoroughly using sandpaper.
- Degrease the surface with any solvent.
- In most cases, it is advisable to coat it with white acrylic paint or paint of a different color to match the material being decorated.
I made a selection of the most interesting, in my opinion, photos of pot decor, which I took from freely accessible Internet sources. I didn’t do my own master classes, but only selected videos with interesting ideas.
Interestingly, many ideas and technologies are similar to those that we considered for decorating Easter eggs.
What materials and tools will be needed for the job?
Despite the simplicity of decoupage technology, a home craftsman will not need a large arsenal of tools and materials. The main ones include acrylic paint and varnish, a napkin and the container itself, but the most important thing remains the idea, the implementation of which will become the main creative and exciting process.
Flower pot
When replanting flowers with your own hands, you often lack beautiful and unusual containers, so even the simplest plastic pot can be decorated with your own hands:
- plastic pots;
- glass jars;
- clay pots.
In such containers, decorated using the chosen technology, the flower will grow well and delight all residents of the house or apartment for a long time. Choosing the right pot depends on the plant being grown, and this depends on the skills of home gardeners who grow their own domestic and exotic plants.
Napkins for decoupage
A napkin with any pattern can be used for work; most often, multi-layer napkins with beautiful patterns are chosen. It is important that the print on the paper product is combined with other decor or interior decorations, which will help maintain a unified design concept.
Specialized art supply stores sell decoupage kits, where you can choose napkins with different prints. Special cards for decoupage are especially popular; they depict thematic drawings printed on thin napkin paper.
Tools for work
A home craftsman can get by with a simple set of tools that are often used for handicrafts:
- sharp scissors or a stationery knife, you can use scissors with curly blades;
- wide brushes for applying varnish and glue and brushes for painting with acrylic paints;
- foam rollers for applying glue; they can be replaced with a cut dishwashing sponge.
All these tools are actively used by those who are already engaged in needlework, so you will not need to spend money on purchasing them.
Decoration materials
Decoupage cannot be done without the use of certain consumables; for the creative process, the master will need:
- PVA glue, if the adhesive composition is too thick, it can be diluted with a small amount of water;
- Water-based acrylic varnish, this coating dries quickly and does not leave an unpleasant odor.
Acrylic paints can be useful if you need to paint on the applied design or emphasize bright accents on it.
Decorating flower pots with paints
The easiest way to update a flower pot is to simply paint it in two coats.
But even here you can get creative: draw peas using a pencil with an eraser; stripes, diamonds with a thin brush or felt-tip pens; paint with silver spray paint and make “metal” pots; paint in ombre style.
Even children can take part in this process and draw dots with paints or leave their fingerprints in the shape of a butterfly.
Smooth wide stripes can be made if you first stick some electrical tape on, then you can safely go over it with a brush.
Marble painting is easy to do by diluting several paints combined together with water.
In this case, you can use not only acrylic paints, but also nail polish.
I really liked the design that can be applied using a rubber stamp. Paint is applied to the patterned stamp and then it is applied to the surface little by little in sections.
How to paint a bucket with flowers
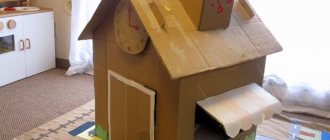
It is not always possible to choose a suitable pot for a large indoor plant, for example, a palm tree, monstera, or money tree. A bucket works well for this purpose. It can become a flowerpot or an independent container, but in any case it should be quite decorative. You must remember to drill several holes in the bottom in advance.
If the bucket is plastic, it can be decorated with a mixture of putty and glue. Pour the mixture into pastry cutters and apply patterns to the surface.
An iron bucket is covered with cement, reinforced with mesh, and again covered with a thin layer of cement on top. Then this surface is decorated with shells, beads, and stones.
The surface can be covered with polymer clay or gypsum and various patterns can be created. The top is covered with acrylic paints.
An iron bucket can be painted with regular white paint, then painted with various patterns using stencils or brushes.
Making large buckets for flowers Source nusantarafood.me
Painting an aluminum bucket Source www.youtube.com
Any pot can be easily decorated using a regular marker or nail polish. The surface is painted with white paint, dried well, and patterns or inscriptions are applied on top with a marker. Eyes with eyelashes look original.
Petunias in a pot Source m.51ztzj.com/
You can simply cover the surface of the bucket with self-adhesive paper, paint it with light paint, and make an applique.
DIY bucket pot Source mycrafts.ru
The pot can be made from a plastic mayonnaise bucket. The surface is degreased, rubbed with sandpaper, and covered with glue. Next, you can decorate the bucket in the same ways as regular flower pots.
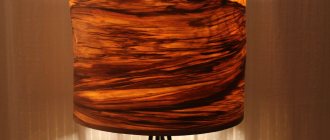
Beautiful flowerpots like wood Source www.youtube.com
How to decorate pots with fabric, paper, newspapers
I was surprised to learn that you can decorate a flower pot with fabric. But it looks very beautiful.
Proceed as follows: measure the height and diameter of the pot and, in accordance with these dimensions, adding another 5 centimeters, cut out a rectangle from a beautiful fabric, even old jeans and burlap will do. Only on the last one, it seems to me, it will be necessary to make additional decoration with coffee beans, lace, and twine.
Apply glue to the prepared surface of the pot and carefully, slowly, glue the fabric. This should be done gradually, applying glue in small areas.
If it is a cylindrical plastic bucket, then the cut will lie flat without any problems. But on a classic cylindrical pot, you will have to glue pieces of fabric overlapping each other, and cut off the excess in the upper part after finishing the work.
You need to make several cuts at the bottom of the fabric, fold them over and glue them to the bottom of the pot.
In the same way, you can decorate a pot with paper and even newspapers. But I think that clay is not very suitable in the case of newspaper, since it is porous, moisture will be released and the newspaper will get wet. Maybe I'm wrong, but these are my thoughts.
Why make your own pots?
Given the availability of a wide variety of containers for flowers in stores, a reasonable question arises - why bother making them yourself if you can buy them? It's simple. Reasons for making homemade pots:
- desire to save money;
- love for handicrafts;
- the desire to give old things new life;
- selection of unique interior items;
- a special style of room for which it is impossible to find a suitable pot.
Flower pots made from mayonnaise jars. DIY decor
The pot can be painted in an interesting way, creating a degraded effect
It’s not at all difficult to make a flower pot in the shape of a strawberry. A pot in the shape of a pineapple from self-hardening clay
Stylish decor of pots with twine
Twine as a material for decoration has also already gained popularity. Objects decorated with it look so stylish!
My works: Crocheted jute twine basket and Twine box
You can wrap the pot around with twine, placing the threads tightly together. It is better to start from the bottom, and apply enough glue only in the lower and upper parts.
Instead of twine, you can also use knitting yarn.
I already have this kind of decorating experience. I still have a large plastic bucket wrapped in yarn, decorated with buttons along the top edge, and the Cyperus lives in it.
But I have already thrown away the small flower pots, once decorated with twine. And all because the lower part of the pot was constantly in the water that forms in the pan during watering, so this part of the twine acquired a dirty, untidy appearance. Keep this in mind and it is better to decorate with twine not the entire pot, but only part of it.
Requirements for containers for flowers
The most important function of a flower pot is not to decorate the interior, but to protect the root part of the plant from external influences and create a certain “island” of soil in which the bush will feel cozy and good. When choosing pots and flowerpots for house plants, you should not focus on their appearance, although this is certainly a very important factor, no matter what. But if caring for plants comes first (after all, they are also living), then it is important to pay attention not only to the appearance of the container , but also to its other features - how suitable is the pot for growing plants in it? In order not to make a mistake in choosing, and also to make a suitable and correct pot with your own hands, you need to know what the right pot for a plant should be.
DIY flower pot decor
Original flower pots
When choosing containers for plants, you need to focus on:
- shape;
- size;
- material of manufacture;
- practicality;
- appearance.
There are a number of criteria for choosing flower pots
Attention! Any pot should not only be beautiful, but also be suitable for the plant being replanted, taking into account all its requirements for growing conditions.
Idea for beautiful decor of flower pots
Unusual flower pots made of wooden clothespins
In order to choose the right container, first of all you need to study the literature regarding the flower being transplanted. Some plants prefer large and spacious pots, while others prefer small and cramped ones. There are variations with wide diameter but low pots, as well as, conversely, narrow and tall ones. All advice regarding containers will be specified in the recommendations for the growing conditions of a particular plant.
Original DIY flower pot decor
The basic requirements for flower pots can be studied in the table below.
Table. Requirements for pots and flowerpots.
| Requirement | Description |
| Presence of drainage holes | There should be a drainage hole in any pot, and it does not matter which plant is being transplanted - a moisture-loving one or one that prefers dryness. In clay pots there is usually only one hole and is located in the middle of the bottom. Plastic ones may have several holes across the entire bottom area. And some plants even need drainage on the sides of the containers. |
| Easy to clean | Often, when a plant grows out of its pot, the container, after replanting the previous resident, is “inherited” by another, smaller flower. Here, before planting in an old pot, it needs to be thoroughly cleaned and rinsed. It is bad if the material cannot be thoroughly cleaned of old soil, and doubly bad if a diseased plant lived in it before. |
| Volume, shape, size | The pot can be of any shape, although it is preferable to choose square or round. As for volume and size, they are selected depending on the plant being planted. Regarding the size, you can focus on the parameters of the root part - it should not be cramped, otherwise the roots will not develop correctly and will no longer fully perform their functions. |
| Sustainability | In any case, the pot should be as stable as possible. If it accidentally falls, the plant may lose its above-ground part, and then there is a high probability of death of the green pet. Moreover, for plants with a large above-ground part, it is very important to take stable pots and preferably with a wide bottom. |
| Material | From time immemorial it has been known that the best material for making a pot is ordinary clay. But any breathable porous material will also work. The roots of the plant must be able to breathe; they also need air. In some cases, you can use metal or plastic pots, but this is not always a good option. |
Photos of DIY flower pots Spectacular and unusual flower pots
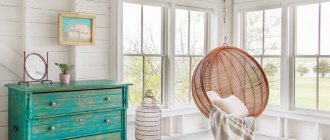
Hanging flower pots
Decor of lace pots in vintage style
This idea appeals to me the most. If not all, then at least a couple of these vintage pots could be made. It would just be a shame to use napkins that I knitted myself; I’ll have to see what’s available in fixed price stores.
I recommend watching: Modern interior decor with lace
The technology here is the same as for decoupage: we apply strips of lace to the prepared surface and cover it with glue.
I also like the pots in the next photo: first you need to cut out the lace elements and paint them with acrylic paint, and then glue them.
Another pot is decorated around the edge with lace cut from a round napkin.
Plant materials
Cereals and seeds are a wonderful and accessible way for everyone to diversify pots. The effect may be similar to that achieved with aquarium soil, or completely different.
- The surface is densely painted with a neutral color suitable as a background.
- Glue is applied to a certain area, and cereal is sprinkled on top. The pattern can be sketched out in advance or acted on inspiration.
- At the end everything is varnished. In this case, it is better to use a spray.
Mosaic on flower pots
Do you know that you can’t use a cracked porcelain cup or plate, much less even one with small chipped pieces? But they can be used by making a mosaic on a flower pot.
But the work here is not very pleasant, because you will have to break off small pieces from the plate using wire cutters. This must be done very carefully.
Next, glue these pieces onto a pot covered with paint in a chaotic manner.
The gaps between the mosaics need to be filled with construction grout: apply it directly on top of the porcelain pieces, and after drying after 30 minutes, wipe off the excess on the surface with a dry cloth.
I don’t know if anyone would want to tinker with plates, but old CDs that no one needs now can be used for such a mosaic; they can be cut very easily with ordinary scissors.
Knitted pots
Those who know how to knit will certainly like the idea of “dressing up” their flowers in this way. The yarn is knitted into a sleeve-shaped piece to fit the size of the pot and put on top.
It can be decorated with knitted flowers, satin ribbons, beads, or simply sew on multi-colored buttons.
- A similar result can be achieved without even knowing how to knit.
- It is enough to tear up unnecessary knitted items and sew them into covers for pots.
- You can also use original wool socks.
The convenience of this decor is that it can be removed at any time to wash or simply put away. This could be a seasonal decoration.
Pot decor with eggshells
Mosaics can also be made using eggshells.
To do this, lay the egg shells on a napkin, cover with a second napkin and run over it with a rolling pin.
Only a clay pot is suitable; the shell will not hold well on a plastic one. It is coated with glue and dipped into shells.
If you need to lay out some kind of pattern, then you will have to use tweezers and glue the shells one at a time.
But there is another interesting simple and convenient way - using tape. See for yourself in this video:
Use artificial flowers
This idea gives you countless options. You can simply stick flowers, you can give the pot the appearance of a woman’s face and decorate it with a wreath. Use your imagination and make beautiful flower pots.
Twitter CEO Jack Dorsey's first tweet sold for $2.9 million
Rules for parents: raising a child without the word “no”
You can’t look at someone else’s plate: without which it’s useless to fast
Preparing the pot for decoration
Old flower pots and new flowerpots must be carefully prepared before decorating. The process consists of the following steps.
- Cleaning the surface from dirt and limescale – preference is given to the dry method; if necessary, you can wash the container. After this, it is allowed to dry.
- Removing the glossy layer is done using fine sandpaper or an abrasive block. The treatment increases the adhesion of the decor to the flower pots.
- Degreasing the surface involves wiping the work area with alcohol-containing products. The easiest option is medical alcohol.
- Primer coating - the composition increases adhesion between the finish and the base.
Many people are concerned about the question: is it necessary to remove the plant and soil mixture from the pot? This operation is not required if there is no need to replant the flower or replace the substrate. The specifics of the chosen technique are also taken into account. The decorating process of some techniques does not allow working with a filled flowerpot. Of course, it is more convenient and faster to perform manipulations with an empty container. But a living organism should not be subjected to stress again.
If there are pathogenic microflora in the soil or on the plant itself, disinfection procedures must be carried out. To destroy pathogens or pests, it is recommended to use fungicides.
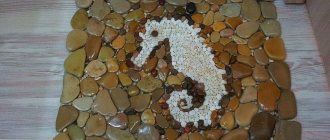
Marine motif
Everyone in their home who has ever been to the sea has a collection of seashells, pebbles, and colorful pieces of glass. These are the souvenirs that can be used to decorate flower containers. Sea pebbles and glass can be found in any store, now this is not a problem. It is quite beautiful to combine sea souvenirs with various small objects (coins, buttons, fragments of broken dishes, tiles).
It is very important that before gluing the shells to the flowerpot, be sure to wash and degrease them. It is best to glue parts to the surface of the container with construction adhesive, which has a high viscosity and dries fairly quickly. In order to better strengthen shells, stones, glue must be applied to objects and to the pot. After applying the glue, the decorative elements must be pressed onto the surface of the container and held for a couple of seconds.