Unique designer and unusual items are and will continue to be in high demand. It's all about their uniqueness - only with your own hands or the hands of a skilled designer can you bring to life something that no one else will have.
These things include a table made from cut wood, which you can make yourself . And despite the fact that many people have already brought this idea to life, such a table will still be unique and one of a kind, because nature will certainly not repeat the pattern of the inside of the tree.
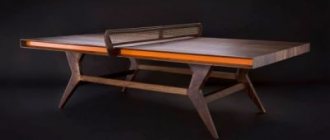
Table made from cut wood
What is good about a table made from sawn wood?
Before we talk about how to make such a table yourself, you should understand why you need to pay attention to it in the first place. So, first of all, it should be noted that furniture made of wood is an environmentally friendly and natural product. To make such a table, you only need a tabletop, the role of which will be played by the end cut of a thick tree trunk, as well as what will play the role of legs. These can be metal supports or supports made of wood.
Table made from cut oak
On a note! Sometimes you can take a whole piece of driftwood suitable for the parameters and make a table directly from it, where the root part will serve as a kind of support, and the even cut itself can be decorated and made into a tabletop.
Table made from cut birch bark
Another undeniable advantage of a table made from cut birch bark is that it can fit into a number of different interiors. So, it will look good in an ecological style, country style, it will fit perfectly into the kitchen or living room, and in the country it will become the optimal addition to the house.
Coffee table made from cut wood
It is also worth understanding that the pattern of the tree, although it will be similar to other cuts, will still remain unique and inimitable. And it will still be different for different trees.
Making a table from cut wood yourself is quite simple - you don’t have to resort to the help of craftsmen and designers. It is enough to allocate a little time and make some efforts, and a unique and inimitable, unusual and beautiful product will appear in the house.
Making a table from cut wood yourself is quite simple.
Important! Such a table will look wild in some interior styles. So you must definitely decide in which room it will stand and whether it will fit into its style, if the decision was made to make such a table.
What types of wood are slabs made from?
For the production of slabs, different types of wood are used - valuable and not very valuable, the main thing is that the trunk fits the parameters, the cut has a pronounced texture, and an original pattern. But preference is given to durable, dense wood. And, if in the production of other materials the absence of knots, cracks, chips is valued, then in a slab, the more such flaws, the more interesting it is for the designer.
Previously, only longitudinal cuts were called this; now transverse sections of large diameter are also referred to as slabs. Very beautiful transverse slabs are obtained from boxwood, apple, juniper, pear, and Karelian birch wood. Longitudinal cuts are made from larch, ash, oak, including stained oak, elm, pine and mountain poplar, rosewood, teak and sycamore, cedar, walnut and others.
A little about forms and parameters
The first step is to decide what shape the table will be made. This will largely determine what shape of saw cut will need to be found, and how the work itself will be carried out. So, as for the countertop, it can be:
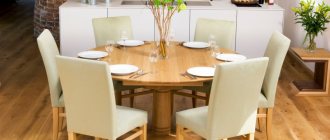
- round , which will require quite a lot of space around the table. But this furniture looks great. However, it is important to take into account that to make such a table you will need to find either a very large saw cut in diameter, or you will need a lot of end cuts of more modest parameters. These tables look best in spacious rooms;
Coffee table made of natural wood
- oval , which is perfect for use in a large family. It is comfortable to sit at the oval tabletop, and due to its large size, you can place a lot of things on it;
- rectangular , which means the table will fit perfectly against the wall and take up less space than a round one. But in this case, the cuts will have to be taken not end-wise, but longitudinally. Although you can make such a tabletop from many small cuts, choosing the optimal shape. The same can be said about square tables.
Wooden coffee table
On a note! It is not necessary to make a large dining table from sawn wood. You can limit yourself to a small magazine or coffee one. It all depends on the desires and capabilities of the person who will make the furniture and then use it.
Also, immediately “on the shore” you need to think about the number of legs. So, round, square and rectangular tables usually have 4 supports. But there are variations using three legs located at a certain angle, or even one support, but with a wide, stable base. Whatever one may say, the most stable option will still be a table with 4 legs.
Cross-cut oak table
Leveling the board with a plane
The method is quite simple. Use a plane to remove wood from the uneven area until the surface is level. It should be borne in mind that the thickness of the board will decrease. Therefore, this method is suitable for correcting small curvatures.
Important: take a plane with a long sole.
This is necessary to avoid the appearance of waves on the board from the plane.
Where can I get the saw?
Having decided on the basic parameters of the future table, you need to prepare the necessary materials. And the most important material that will play a decisive role in the process is a good quality cut of wood that fits the size. It seems that everything is simple here - I went into the forest, took the first log I came across and sawed off a round piece from it. But in reality everything is much more complicated.
Safety precautions when working with a chainsaw
Preparing saw cuts is not entirely easy. First, you need to find a good tree of the required diameter as well as quality. Secondly, mistakes should not be made during sawing. The slightest mistake - and you will have to look for a new tree and do all the work over again.
Wooden cuts
For the manufacture of tabletops, saw cuts with cracks are almost unsuitable (except in certain cases). Also, the wood must be treated before use. The easiest way is to buy ready-made saw cuts - it turns out that they are sold, but finding a supplier is not so easy.
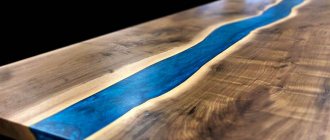
Table made of saw cuts and epoxy resin
If you prepare saw cuts yourself, then you need to look for one that will have a beautiful wood color, will not be cracked, and will have a beautiful pattern. If several cuts will be used for the tabletop, then it is important to ensure that the pattern is similar, or at least use cuts from the same type of wood.
Important! The pattern of the tree on the saw cut is the highlight of the future table. And therefore, the selection of wood patterns must be treated with utmost care.
Wood cuts
It is best to take wood cuts that are already dry for making a table, moreover, they should be made from a type of wood that is less afraid of moisture than others. It is better to choose those that do not have knots and other defects that can break off over time and ruin the product. The cuts must be of sufficient thickness and not too thin or too thick.
Thus, only at the stage of preparing the cuts can you stall. But it’s worth it - a unique table made from sawn wood, created by yourself, can become the highlight of the interior. In addition, as a rule, such tables are very durable and can serve for many years without complaints.
Coffee table made from cut wood
Grinding
After successful pouring, the countertop is sanded. A layer of approximately 2 mm is removed from both sides, then the ends are polished. Processing takes place using an eccentric machine. Replaceable round tips have different grain sizes: 80,120,180, 240, 320, 400, 500, 600, 700,1000 microns. The higher the indicator, the finer the abrasive. For better oil absorption into wood, 180 microns is sufficient. For hardened resin - from 120 -1000.
At the final sanding stage of the epoxy, polishing pastes are used.
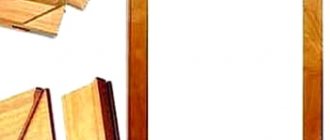
Materials and tools
In addition to the fact that you will need wood cuts as a base for the tabletop, you will also need other materials, and, of course, tools. But here a lot will depend on what table manufacturing technology was chosen. Thus, a saw-cut table can be made either using epoxy resin or without it; varnish, corners and various fasteners may be required. Tools that will be useful are a grinder, a plane, a saw (preferably a chainsaw), as well as a drill, drills, brushes, etc.
On a note! You should not use nails to secure the legs - the connections obtained in this case are not reliable. It's best to buy self-tapping screws.
DIY table made from cut wood
Table. Something you can't do without.
| Material, tool | Explanations |
| Spil | The cuts for the tabletop can be either end or longitudinal - it all depends on the selected table model and its appearance. The table can be made from one large-diameter saw cut, or you can also join together many smaller cuts using epoxy resin or wood putty. Here everything depends only on the imagination of the master, but it is important to choose high-quality cuts, the choice of which was discussed above. |
| Carpenter's glue | This substance may be needed for repairing/fastening various wooden elements. |
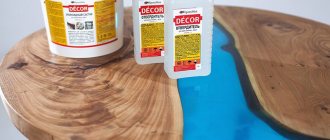
| Epoxy resin | A substance actively used in construction and repair work, as well as to create all kinds of products. It is necessary to fill empty spaces if the table is made from a mass of small cuts; it can also be useful when filling in recesses. The resin must be mixed with a hardener. |
| Grinding tools | Materials must be sanded, and the best assistant is a sanding machine. However, if you don’t have it, but you have time and patience, then you can limit yourself to a block and sandpaper. |
Features of wooden slabs
- This is a single slab, without any joints;
- The thickness varies from 5 to 15-20 cm, the width depends on the diameter of the trunk. The wider the slab, the higher its value. Therefore, slabs are made from that part of the tree that is closer to the roots, where the diameter can reach one and a half meters or more;
- During production, the bark may be preserved, natural holes, chips, cracks are not sealed, the presence of knots and curling is encouraged. All this creates a unique pattern, making a separate slab a unique work;
- Due to its significant thickness, the product is famous for its strength and durability;
- As a rule, saw cuts are not tinted, but at the customer’s request they are coated with natural waxes, oils or varnish to clearly reveal the texture.
A slab is essentially a semi-finished product, a blank with which further actions can be performed. It combines perfectly with other materials (metal, natural stone); designers use this property to create original furniture.
How to make a small table for coffee from sawn wood?
Let's see how to make a simple small coffee or coffee table from a medium-diameter end cut. As we remember, to make tables you can use many cuts at once, but in this case you will use one, but a large one, which will become a full-fledged tabletop.
Step 1. First of all, you need to get the saw cut itself. The easiest way is to buy a ready-made one, but in this case the master decided to go into the forest and prepare it himself. It is best to do the cutting in the summer in very dry weather. “Winter” cuts may become deformed during drying or crack. So, you need to find a large and beautiful tree - walnut or oak, etc. And then you need to use a chainsaw to cut off a section from the trunk in the thick part of the required thickness. The saw chain should be sharp and the wood should not be rotten. The cut itself needs to be dried well for some time and only then can you start creating the table.
Suitable wood is being cut
Preparing a tree cut
Step 2. Next you need to carry out rough general processing of the cut. You need to use a plane to cut off all the irregularities from the surface and remove the bark.
Rough processing of saw cut
The bark is removed
Step 3. After roughing, you need to sand the surface of the future table well.
Sanding the saw cut
Step 4. There may be cracks on the saw cut, and in theory such a cut is not used. But sometimes the problem can be solved - the cracks just need to be strengthened. To do this, you need to purchase a small piece of wooden board and cut out “butterflies” from it, as shown in the picture.
The butterfly is marked
Then it needs to be cut
Step 5. Next, the butterflies need to be attached to the cut in the area of the cracks so that both sides of the tree relative to the crack look like connected butterflies, and then you need to outline them with a pencil.
The butterfly is outlined with a pencil
Step 6. Now you need to cut out the notches for the butterflies on the cut itself.
You need to cut notches on the saw cut Another photo of the process
Step 7. All that remains is to insert the butterflies into the places prepared for them and cut off their upper part so that it does not protrude above the cut surface (if necessary).
Excess butterfly is cut off
Step 8. Now you need to secure the butterflies with epoxy resin. You can also glue them with any wood glue.
Fixing the butterfly with epoxy resin
Step 9. After this, the tabletop must be carefully sanded again until perfectly smooth.
Re-sanding the countertop
Step 10. Next you need to coat the wood with a layer of varnish or epoxy resin. Can be applied with a brush. After applying the paint and varnish material, its layer must be thoroughly dried before further work.
Wood is varnished
Step 11. Now you need to drill holes in the underside of the tabletop to fix the legs. The markings must be applied in accordance with the location of the holes on the leg mount.
Holes are drilled in the tabletop
Step 12. The final stage is attaching the legs for the table themselves. In this case, metal ones were used. They need to be screwed to the tabletop, and the table is ready.
This is where the leg will be attached. Attaching the legs
Areas of application of slabs
Slabs are very popular among designers who work with natural materials. First of all, because all the products made from them are exclusive, there will never be another one like it. The saw cut can be used in decoration, as an independent element of the interior, or you can create a unique product from it.
From slabs, just like from solid wood, any cabinet furniture is made - luxurious chests of drawers and cabinets, tables (dining tables, coffee tables and even computer tables), armchairs and sofas, chair seats, shelves, benches, headboards, bar counters. Slabs made from dense wood are used for stair steps; furniture for the bathroom and kitchen is made from larch; it is not afraid of water and can serve without changes for decades.
How to make a table from several end cuts?
Above are instructions for making a table from one large end cut. Now let's see how you can make a table from many small cuts using epoxy resin.
Step 1. The first thing you need to do is make a base on which the pattern of end cuts will be laid out. To do this, you can take a sheet of plywood or chipboard and draw on it the shape of the future tabletop. Two contours are drawn - external and internal. The inner one should be the same size as the final tabletop, the outer one should be a little larger.
The future tabletop is being drawn
Step 2. Now the base needs to be cut out using a jigsaw according to the applied markings (along the outer contour).
The base is cut with a jigsaw
Step 3. You also need to cut several strips of small height from fiberboard to create edges around the base for the tabletop.
Strips are cut for the sides around the base
Step 4. You need to attach the fiberboard sides to the base of the tabletop using glue and small nails. This will create a unique shape for the tabletop. It is better to seal the joints with tape.
Fastening the sides
The sides are fixed
Step 5. Inside the mold you need to lay many end cuts of various diameters so that the desired pattern is obtained. The saw cuts need to be laid close to each other - this will affect the consumption of epoxy resin.
Saw cuts of various diameters are laid out
The cuts are arranged as tightly as possible
Step 6. Now you need to prepare the resin itself, mixing it with a hardener, and apply it to the end cuts, as well as pour it into the mold and be sure to level it as much as possible.
Resin is applied to saw cuts
Result of work
Step 7. The tabletop must be left alone until the resin has completely dried.
The resin must dry completely
Step 8. You need to remove the sides from the fiberboard. They are no longer needed.
The sides are removed
Step 9. Next, you need to sand the surface of the tabletop well using a grinding machine, removing all the unevenness.
Sanding the table top
Step 10. You need to cut the tabletop along the inner contour using an electric jigsaw.
Trimming the tabletop
Step 11. The edges of the tabletop need to be rounded.
The edges are rounded
Step 12. Next, you need to cover the perimeter of the tabletop with masking tape. This is necessary so that during the process of coating it from the wrong side with varnish or epoxy resin, the compositions do not get onto the end parts.
Painting tape is applied around the perimeter
Step 13. All that remains is to cover the inside of the tabletop with paint or another composition, dry it well and screw the legs to it. The table is ready for use.
Painting the countertop
Video – Sawed table
Lining
Most dachas and country houses 30-40 years ago were “decorated” with this board from floor to ceiling. It had a luxurious red color, thanks to a thick layer of varnish, which was supposed to emphasize the beauty of the wood, but more often than not irritated it. So, if you have just such a story in your house, you can change it quickly and easily by simply painting the lining in the current color you like! We do not remove the varnish; it acts as a primer and will not allow the resin from the boards to appear on the walls or ceiling through the paint.
A fast, affordable and affordable way to take the leap into interior design 2021!
What it is?
The fashion for natural, unprocessed materials came from the USA, where they are known as woodslab and are in great demand. A slab of wood is not a transverse, but a longitudinal section of the trunk.
The non-standard cut section allows for full disclosure of the natural beauty of the material. At the same time, the slab usually retains a debarked layer along the edge, which is especially valued by designers. The production of such materials is fundamentally different from other methods of cutting wood. A solid massive cut is valued higher than an ordinary board or timber.
The distinctive features of slabs include the following characteristics.
- Complete absence of any unnatural inclusions. Solid wood has a solid structure without any traces of gluing or joining.
- The thickness of the slab is in the range of 50-150 mm. This indicator is very important because it affects the strength characteristics of the material.
- Raw edges. They remain natural, with an uneven texture and a unique pattern.
- Special cut location. Only those areas of wood that are as close as possible to the roots are suitable for slabs. They are highly valued for their increased diameter, clarity of pattern, and strength.
- Unique shape. The material is valued higher if the tree trunk itself has a heterogeneous structure, sagging and other unusual elements. Even in the same initial slab, the outline can change as it gains height.
Much of its characteristics depend on the breed that is used to make saw cuts. Not every option will meet the established requirements and standards.
Can you do it yourself?
Before becoming a unique product, a slab goes through several stages. This is a saw cut that has gone through all stages of processing and is used as furniture or additional decor.
Most often, saw cuts are used as a countertop or table.
Making a slab is a labor-intensive job that takes a lot of physical effort and requires a large amount of financial costs. Before starting the manufacturing process, you need to think about the entire process. The process of creating a slab yourself is the key to obtaining an exclusive product.
Wood polishing process
We carry out polishing with a shellac compound that we ourselves prepared or bought)
Add a couple of drops of vegetable or linseed oil to the tampon with the polish composition for easy gliding. We make smooth circular movements on the surface. It is important that when pressing on the tampon, the polish immediately evaporates from the surface. Too much composition threatens the appearance of drops that dissolve the primer.
After the first layer, let the surface dry completely. Next, 2 more layers, with intermediate drying. After the third layer of polish has dried, we go over the surface with fine-grain sandpaper and remove the dust. A slight glossiness should already appear on the surface.