The fish rots from the head, and the kitchen set from the countertop. The working surface of the table takes all the impacts. It resists moisture, stains, scratches, and aggressive detergents. If you do not help her in this struggle, the result will be disastrous. First of all, the countertop needs to be protected from moisture. The second important point is proper care.
How to coat and treat chipboard from moisture
The low cost of chipboard, high performance characteristics, and versatility of use have made them a very popular material.
The most common areas of application are furniture production and construction. The main enemy of these slabs is water - the chips increase in volume, the slab swells, warps and crumbles.[contents] Even at the very beginning of production, sawdust and shavings are impregnated with formaldehyde resins after drying. After pressing, the surface of the boards is laminated, sometimes even varnished.
But protecting the surface does not prevent the penetration of moisture from the ends through which it enters. Accumulating inside, water gradually begins to penetrate the wood fibers, which leads to the destruction of the slab. Consequently, the ends must first be saved from liquid penetration during operation. If they are tightly sealed, the service life of the slabs will be much longer.
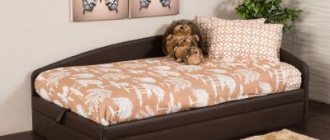
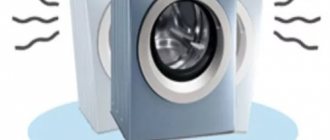
The photo shows the effects of water on a chipboard countertop.
Why are the ends the starting point for destruction? Yes, because the production of slabs of the required standard sizes, as well as the preparation of pieces of material of different sizes, requires cutting. In this case, the integrity of the wood fibers is compromised.
Thus, chipboard protection from moisture is carried out in three directions:
- impregnation of wood fibers with resins;
- special surface treatment;
- end sealing.
What tools to use?
If the question arises of how to cut a tabletop, then first of all you need to decide on a cutting tool, and most often several tools are used.
For example, using a circular saw, you can get the perfect result, but this is quite an expensive pleasure, because a high-quality tool costs a lot of money. Therefore, this unit can be found mainly only in special factories.
Grinder - has similarities with the previous tool, but the result will be far from ideal. When working with an angle grinder, many chips may form.
Usually, to cut a tabletop, two main professional and interchangeable tools are used - a jigsaw and a jigsaw.
Construction specialists divide blades or, as they are also called, saws into two main categories:
- tearing little by little on both sides;
- tearing strongly, but only on one side.
When working with a tabletop, you will need the option that breaks on one side.
Before starting the main work, it is necessary to thoroughly sharpen the blade of the tool so that chips do not form during the work. With a sharpened blade, before you start cutting the material directly, you need to make a groove, the depth of which will be about 2-3 mm. This will make it possible to complete the job without injuries or chips.
Surface treatment of plates
The front and back surfaces of the slab, as the largest contact areas, without any protection, can pass through and absorb, accordingly, the largest amount of liquid. It would be a good idea to cover these surfaces with something moisture-proof. Some of the methods of such coating are possible only in factory conditions, some are also possible at home.
One of the main methods of protection is lamination. In this case, a melamine film is laid on sanded chipboard at high pressure and high temperature. The essence of this process is not pressing, but the fact that under these conditions the film polymerizes the surface of the slab, becoming one with it.
There is another method that is performed in the factory - laminating. Pressure and heat are also used here, but more gentle. The already hardened film is pressed against the glue-coated slab. If lamination is a chemical process, then laminating is a mechanical process.
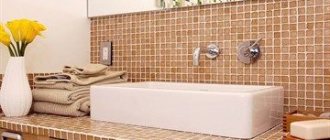
Components of laminated chipboard
At home, non-laminated chipboard is often coated with several layers of paint for protection. Before painting, pre-treat the surface:
- dust is carefully swept away and washed off the surface;
- for the first time, the plate is coated with hot drying oil;
- then this is done with cold drying oil until an outer crust forms;
- the top is painted. With any painting method, you must remember that each subsequent layer of paint is applied to the already dried previous one.
There are several other ways to protect yourself from getting wet. For example, a surface that will not be subject to mechanical stress can be protected as follows: rub it with stearin, then heat it with a hairdryer. Let cool and repeat this a couple more times. Or: one part of bitumen varnish is mixed with five parts of drying oil. Coating is carried out twice.
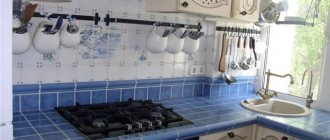
How to treat the cut of the countertop under the hob?
The cut of the hole for the hob (and, in principle, for anything on the kitchen countertop) must be treated with sealant. There is absolutely no difference what color the sealant is. In this operation, the most important thing is to properly seal the cut so that moisture does not get into it.
Interesting materials:
How to cover a tennis court? What is the body of a fish covered with? What are welding electrodes coated with? What are the benefits of Ivan chai tea? How is celandine beneficial for the skin? What are the benefits of napping for teenagers? What are the benefits of lychee fruit? How is potassium humate useful? What are the benefits and harms of tomato juice? How is isotonic drink useful?
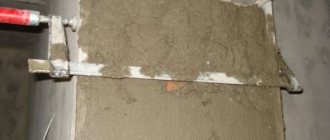
Processing joints and edges
Water always looks for the lowest place, the depression. And what, if not a recess, are joints on horizontal planes? There are especially many such joints in cabinet furniture, which is made from chipboard. Kitchen furniture in general is like on the front line: there is plenty of water and enough evaporation. The most susceptible to moisture are the sink, cabinet with dryer, countertop, and furniture near and above the stove.
The taps all start to leak at some point. So, the most potentially dangerous place in the sink is where the faucet crashes into the countertop. This is the point of contact between metal and wood. It is possible not only for the faucet to leak, but also for water to condense at the contact point. Therefore, this place is cleaned and dried with a hairdryer. Next, a layer of PVA glue is applied, after which it dries - silicone. You can use construction sealant, this is also a silicone mass; it even seals window frames against leaks.
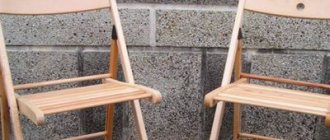
The edge not only protects the chipboard from moisture, but also reduces emissions of harmful substances
In the dish cabinet, you should check the presence or absence of a tray: if it is not there, the liquid, flowing to the bottom of the cabinet, will ruin it. For all kitchen furniture where it is possible to get wet, you need to make it a rule: degrease this area and then do not skimp on the sealant.
To seal the seams, it is better to use sanitary silicone of a suitable shade: dark mold spots will not appear on the surface.
Non-laminated edges of the tabletop are covered with connecting or end strips. They come in metal or plastic. The protection is not so great, so the end of the tabletop should first be treated with silicone. Another method of protection is to apply furniture varnish or PVA glue to the cut area. Self-adhesive films or tape offered by the construction market cannot be called reliable protection.
Furniture is swollen from water, what should I do?
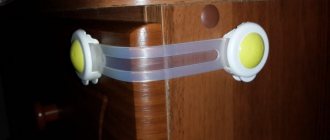
One of the most common troubles that can happen to kitchen furniture made from chipboard is excess moisture getting on it and further swelling (swelling). There can be many reasons for such disgrace. For example, a favorite flower in a pot is conveniently placed on the top shelf of the cabinet.
If you do not properly protect the surface from moisture penetration (and you need to water the flower regularly). As a result, we can get this picture.
In our case, the structural qualities of our chipboard shelf (cabinet) were not damaged; only the edge of the shelf was swollen and deformed. There is no talk of replacing it with a new one. Moreover, this means actually remodeling and disassembling the entire cabinet completely. We only need to fix the aesthetic, visible part of the shelf, swollen from water. This is what we will do. We will not disassemble, remove or replace anything. Our shelf will remain in its original place.
The most acceptable, non-labor-intensive and low-cost way out of this situation is to decorate (cover) the end of our shelf that is swollen (swollen) from water with a plastic corner. It’s simple and completely doable with your own hands.
DIY chipboard shelf repair in the kitchen
What should you do if the edge of a chipboard shelf in your kitchen furniture is swollen? Cosmetic repair of swollen chipboard.
We will need a plastic corner of the desired color (in our case, white) and glue.
We used Dragon glue, which was quite suitable for our purpose. But there may be other options at your discretion.
Next, measure and cut the corner along the length of the shelf or edge of the cabinet, coat the inside of the corner with glue and apply it to the area of the swollen chipboard.
If you have such a useful thing as clamps, use them to secure a corner to the edge of the shelf and leave it for a day.
This way our decor will stick tightly to the edge of the shelf.
If there is no clamp, you can simply press the corner with something heavy (for example, a stack of books) until the glue dries completely.
This is what our decorative repair of swollen chipboard in the kitchen looks like.
We managed to correct the aesthetic picture.
At the initial stage of the problem (as an ambulance), you can use regular nail polish.
Just dry the swelling area thoroughly with a hairdryer, and then coat the problem areas with colorless varnish. After drying and absorbing, it prevents moisture from entering and serves as a waterproofing agent. But this only helps at the early stage of soaking to slow down the process for a short period of time
But for the future, it is necessary to eliminate the source of unwanted excess moisture. If this is a pot with a living flower, you need to place a tray under it (for example, a regular plastic tray). And in the future, try to prevent water from getting on such a moisture-sensitive surface.
We will tell you how and how to cover (protect) the top of the kitchen from grease, dust and moisture. Simple techniques will help you keep your kitchen clean without much effort or expense.
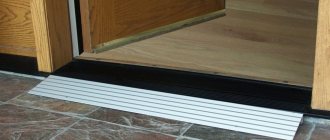
Sealing chipboard joints on the floor
The difficulty lies in the fact that the slabs on the floor are constantly subjected to significant physical stress; they “play” relative to each other. For this reason, the putty does not want to stick. There are several popular ways to seal such seams.
The seams are covered with epoxy mixed with sawdust. The sawdust is first finely sifted. The composition sets very quickly, so it is not worth preparing a large volume of such putty at once. Such protection serves for a long time and reliably. But the price of epoxy is high, and sealing joints is expensive.
You can replace the epoxy with hot wood glue. You need to mix sawdust in it and go through the seams.
The effect is achieved even greater than with epoxy, since the hot glue penetrates deep inside. This method also saves from moisture, and the joint stops “playing”. True, it is advisable not to walk on such a floor for several days, since wood glue takes a long time to dry.
This method is much cheaper. And if the floor is covered with linoleum on top, then you can completely forget about damage to the chipboards.
Chipboard after a flood - what to do?
Good afternoon After a flood, as a result of which chipboard furniture was left in a few centimeters of hot water for several hours, I’m wondering what to do. Wait until the chipboard dries - but it has already split in half everywhere. all this is the bottom of the furniture, its basis. the rest of the furniture, despite the fact that the air humidity was almost 100% for several hours, seems like nothing yet. but what to do with the swollen base? The closet has swelled about 3 centimeters from the bottom, see two at the chest of drawers and shelving. Is there a way to at least extend the life of furniture after such an accident? cut down what is swollen due to the base? any other ways?
Cut above the swollen area. And don’t wait for it to dry completely, because... residual moisture will rise higher “through the capillaries”. You know it yourself - the water will find a hole. It will not be possible to shrink the swollen area to the original 16 mm. In principle, furniture can stand on swollen “legs” for a long time, but the appearance is still the same.
Another option is to order new panels to replace the damaged ones. But getting the color right may not be easy.
tatoops wrote: Is there a way to at least extend the life of furniture after such an accident? cut down what is swollen due to the base?
If the base is structurally a separate element, then only change it on all the furniture and it doesn’t matter if the color doesn’t match, the main thing is that it will be the same everywhere (like this trick). If the damaged furniture stands on the sides (the legs are a single part with the side part), then try (if possible) to cut off the damaged part and build a plinth on which to install the cut furniture. The design must be adjusted to the location. If this does not work, then replace the damaged parts entirely. I had a flood, but it was cold water in the kitchen, about 1 cm of water within 1 hour. I managed to fight it off by clamping the lower parts through the boards with clamps and drying them with a hairdryer
. Moreover, you have to do everything quickly; if it dries before it’s compressed with clamps, it won’t work anymore. It turned out tolerably, I only changed the front panels covering the base. Good luck .
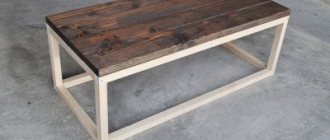
How to make a seamless wide tabletop with plastic coating with your own hands
During the holidays, mothers and grandmothers have to spend all day in the kitchen. Things go faster if everything is at hand. And everything is at hand when the cutting table, stove and sink are conveniently located and united by a wide, solid tabletop.
Today we have heard a lot about “kitchen islands” covered with marble or granite slabs. At furniture exhibitions and at friends’ houses, we touched countertops made of artificial cast stone and saw mosaic cladding. Everyone knows laminated chipboard countertops with their undeniable advantages. But there is a more interesting idea. A solid tabletop can be constructed from non-laminated chipboard or MDF and covered with sheet decorative plastic. It's not as difficult as it seems. It's worth trying to get the perfect exclusive.
What is a Countertop Edge?
The main task of the chipboard edge is to protect it from moisture. This is especially true in the kitchen and all ends of the kitchen countertop need to be covered. The edge also protects you from the release of formaldehyde from the chipboard (chipboard) countertop. As an alternative to edges, special end caps for tabletops are sold.
Interesting materials:
What are the earrings called? What are hoop earrings called? What are wide sweaters called? What are women's wide trousers called? What are pants with a low waist called? What are pants with elastic at the bottom called? What are the names of the states in Germany? What are lilac daisies called? What are the terms of multiplication called? What are the names of the modern territories of compact settlement of Indians in North America?
Choosing plastic for making countertops
There are also plexiglass on sale with its tempting transparency (we do not recommend it, it will quickly get scratched) and PVC sheets (harder than PVC linoleum). There is decorative paper-laminated material HPL (high pressure laminates - high pressure laminate is very popular among furniture makers), and decorative cladding made of impact-resistant polystyrene, and polycarbonate-based plastics... The choice, as always, is based on a study of the properties, and is determined by availability and circumstances applications. Theoretically, you can even use a homogeneous PVC floor covering, but in our case the cladding is made of HPL.
How to properly update and care for your countertop
You can update your countertop in different ways. Here everything depends on the author’s imagination. One of the simplest methods is painting and decorative painting. You can also cover it with decorative tiles, such as mosaics. Using tempered glass is the most expensive method. To ensure that the results of the restoration are pleasing for as long as possible, be sure to use cutting boards and hot mats for cutting food. And for washing, use gentle cleaning products.
The advantages of such a homemade countertop
The proposed technology has two advantages. Firstly, you can create an absolutely seamless front surface even with an angular location of the working area - this effect cannot be achieved with laminated chipboard. Secondly, the decorative range of sheet plastics is generally disproportionately wider than that of ready-made laminated countertops. In addition to plain items and traditional decor imitating wood or natural stone of various species, unexpected geometric patterns, animal prints and textile motifs are offered. Install the countertop yourself and feel a pleasant sense of pride in your work!
TOOLS FOR HOME AND GARDEN, HANDCRAFTS, ETC. PRICES VERY LOW
When processing the countertop and the upper edge of the apron, the router guide will move along the laminate, and it is very important that the tool does not stop. When it stops, the cutter will go deeper into the laminate. To avoid damage, you can lubricate the edge of the surface with petroleum jelly.
Can I cut with a jigsaw?
The tool is suitable for making small cuts. You will need a tool for working with metal, with fine teeth. The cut is made along the front side: this way there will be fewer chips on it, and there will be small irregularities on the back side.
When working with a jigsaw, the cut is made from the reverse side due to the direction of the teeth on the file.
When working, the tool is not set to maximum speed, but slightly above average. The tool must be moved with smooth movements, with light pressure.
Important! The method is not suitable for cutting long materials, since it is difficult to maintain an even cut line.
Dull saws need to be replaced.
Do-it-yourself tabletop - work progress in the photo
1. Having cut out the necessary parts from chipboard (apron, tabletop, lining) to size, fasten them together. The master did this using a construction stapler, with 0.6 cm staples 3 cm long at a distance of 12.5 cm from each other - no glue is required in this case.
2. The standard hole for the sink is 54 x 82 cm. But perhaps you have a different one? Before grabbing the tool, measure its dimensions and draw an outline with a pencil.
3. The surfaces of the chipboard base parts may be at slightly different heights, but the joint must be perfect. Apply a few pencil strokes to the joint and sand it until the pencil marks disappear.
How is the work going?
First of all, you need to prepare the place of work. It should be well ventilated, the furniture nearby should be covered with a cloth so that dust does not fall on it when cutting. It is also necessary to protect your hands, eyes and respiratory organs: use a respirator, mask or goggles, closed clothing.
Source nikastroy.ru
Having decided what to cut the decorative stone with and having prepared, you can get down to business. The cutting process consists of several steps:
- First, you need to place the artificial stone on a solid and level surface from which it will not move, and secure it. It is important that the cut part falls on the floor or the master’s foot and does not break off on its own, leaving the edge uneven.
- Then apply the markings with a pencil or using construction tape.
- Next, using a grinder with a diamond blade, saw through the tabletop. If its thickness is greater than the diameter of the saw blade, make a cut, then carefully break off a part along this cut. When using a hacksaw, you usually cut right through.
- At the end, the cut is ground and cleaned if necessary.
To drill stone, use a drill, screwdriver or hammer drill. The latter is especially effective in operation. If desired, you can cut the stone using these tools: just make holes along the cut line and break the blade. However, experienced craftsmen do not recommend doing this, since the cut turns out uneven, with notches.
Source stonecraft24.ru
Tips for making countertops
It is possible to cut the end cladding with metal scissors, but it is difficult. It will be perfectly smooth only with a certain skill. You can use ready-made end tape, or get a special tool. The laminate cutting machine comes with a guide for making strips with a width of 1.25 to 11 cm. A milling cutter will also help.
It is convenient to cut out the cladding of the table top from HPL sheets with a circular saw. Place a board under the sheet to prevent the saw from touching the floor. Place masking tape on the bottom surface of the saw base to prevent scratching the laminate.
HPL adhesive is very toxic, be sure to use a respirator, keep the window open and turn on a fan. The glue is applied to both surfaces to be joined (clean them thoroughly first). Apply glue along the perimeter with a brush, and then spread it over the rest of the area using a piece of laminate.
Laminate adhesive sets instantly; Once two coated surfaces touch, they cannot be separated. But it is difficult to lay a large flexible sheet accurately and accurately. Cut the remaining laminate into strips and use them as dividers so you can slide the laminate sheet along them.
If you are replacing the tabletop on factory-assembled tables (stands), the chipboard base will need to be raised. Use slats as linings or cut 1.9 cm thick chipboard blocks. Then the top drawers will not touch the countertop. Instead of pads, install a board at the junction of two tables.
Cut the hole for the sink after installing the chipboard base. But before you lay down the plastic cladding!
Before installing the chipboard base, cut a groove 0.6 centimeters deep in the apron, which will allow you to move the sheet along the tabletop.
TOOLS FOR CRAFTSMAN AND CRAFTSMAN, AND HOUSEHOLD GOODS VERY CHEAP. FREE SHIPPING. RECOMMENDED – 100% CHECKED WITH REVIEWS.
Below are other entries on the topic “How to do it yourself for a homeowner!”
Subscribe to updates in our groups and share.
Let's be friends!
3 reviews
From time to time you have to cut laminated chipboard. To ensure that the cut comes out smooth and without chips, I use the following techniques. The grinder is a universal tool; it can cut almost anything. To get a beautiful edge, without cracks or chips, when cutting, I turn the laminate board with the front surface up. I use discs for metal, concrete or ceramic tiles. The disadvantage of using an angle grinder is the large amount of dust that is released during cutting and the smell of burnt wood, so it is better to work on a balcony or outside. Hacksaw. I don’t use the usual one for wood - its teeth are large and “bite” into the slab, rather than cutting it, leaving decent chips along the edge. I use a hacksaw for metal - it has finer teeth. I use these techniques for small volumes of work, but if there is a lot of cutting, it is better to order cutting from a specialized company.
How to care for furniture made of chipboard and mdf so that it lasts a long time?
First of all, you need to take care of the correct arrangement of furniture in the room. You should not place it near heating devices and use it in rooms with temperatures below 2 “C. The relative humidity in the room should be maintained between 45 and 70%. Do not place hot objects on the surfaces of parts and allow prolonged exposure to sunlight. The durability of furniture depends on the quality of the initial assembly, which must be done by a professional. To remove various contaminants from the surface, use special compositions for cleaning furniture. During operation, it is worth periodically checking the reliability of all connections and the condition of moving parts (doors, drawers, etc.), and if necessary, perform broaching. Do not overload the shelves inside cabinets and cabinets, especially if the former are made of glass.”
Dishwasher protection
If a dishwasher will be located under the countertop, it must be protected from moisture and steam. When the dishwasher doors are opened, fumes rise. Typically, a protective element is included with the equipment.
- In Bosch machines, the protection is a metal plate.
- suggests protecting the tabletop with a special adhesive-based film.
- If for some reason there is no native protection, you can glue thick self-adhesive foil or mounting tape to the place where the steam entered.
All about laminated chipboard countertops in questions and answers
- Why are chipboard countertops so popular? Primarily due to the price. If you decide to actually save on this important part of the kitchen set and ordering kitchen furniture in general, then you have no choice at all! All other materials for kitchen countertops are many times more expensive. In addition, countertops made of laminated chipboard are not difficult to find, the choice is very large, it is an affordable material that is offered by almost all manufacturers of kitchen furniture;
- What is laminated chipboard anyway? This is simply a chipboard, which is covered with decorative and protective layers on top and laminated. The chipboard is covered with high pressure plastic (HPL). The surface layer consists of glued sheets of kraft paper for strength, decoration and overlay, the very top protection. As a result, a countertop made of laminated chipboard is not afraid of moisture and lasts quite a long time;
- What is the overlay responsible for, that is, the protective layer of plastic on the chipboard? Because the tabletop will retain its original appearance for a long time. In addition, thanks to the overlay, the surface of the laminated chipboard is not afraid of impacts, scratches, sunlight and cleaning agents. True, such a tabletop can withstand temperatures up to +240°C for only 20 seconds. So we urge you not to place hot frying pans and hot pots on chipboard, use stands;
- What decorative possibilities do laminated chipboard countertops have? They are very wide. Manufacturers offer a color range of up to 150 shades. Laminated chipboard can imitate wood and natural stone, look like a mosaic, or have an ornament. Using digital printing, any design can be applied to your countertop, so you can realize your fantasies and get a very original kitchen;
- What is the weakest point of a chipboard countertop? Edge! This is where the overlay layer, the protective plastic, peels off first. And if moisture gets on the chipboard without protection, the board will simply swell, and your countertop will lose all its qualities and attractiveness;
- How do you protect the edge of a laminated chipboard countertop? There are two ways:
- Postforming. Using this technology, HPL plastic is simply folded over the base. It is better if the bend angle is 180 degrees, and not 90, as happens. In the first case, the plastic is bent not only at the end, but also under the tabletop, there is less chance that it will start to come off. Postforming will allow you to get fairly reliable edge protection, without seams. The only drawback is that this technology can only be used on countertops of a strictly rectilinear shape;
- If the tabletop is rounded, curved, or of non-standard thickness, then edging is used. That is, simply gluing a special edge that comes separately from the main laminated chipboard. You can match the edge to the color of the tabletop, but this is not necessary - you can always play with contrast and get a more interesting option. Edges are most often made from budget plastic, but you can choose acrylic stone, wood and even aluminum. The downside to edging is that there are seams and there is a greater risk of peeling over time. But you can change the edge if necessary;
- What is the optimal thickness of a chipboard countertop? As the portal Rmnt.ru already wrote in an article dedicated to practical and durable kitchens, the best reviews from homeowners were received by countertops with a thickness of 38 millimeters. 28 millimeters is another standard thickness for a chipboard countertop - too little! There are also non-standard countertops that are made to customer sizes. They can reach 100 millimeters in thickness;
- What is the depth of a chipboard countertop? Standard - 600 millimeters. This type of countertop is most often found in ready-made kitchen sets; it allows you to provide a fairly spacious and comfortable work surface. But you can increase the depth to 650 millimeters so that the edge of the tabletop hangs over the handles of the lower row of cabinets and you do not cling to them. Some manufacturers are ready to offer slabs with a depth of up to 1200 millimeters if your kitchen is non-standard or, for example, the countertop will lie on the kitchen island;
- How to care for a countertop made of chipboard? Remember this is a plastic surface. We do not recommend using abrasive and aggressive products containing acid, acetone, or gasoline. Dishwashing detergents to remove grease, glass cleaner and floor cleaner are quite suitable. You should choose soft sponges, and after wet cleaning, you should walk over the surface with a dry cloth.
Sawing with a router
A great way to get a clean cut. First, the material is cut with a jigsaw at a distance of 2-3 mm from the marking line. Then a cutter is used to align the line according to a pre-prepared template. A cutter with a bearing is suitable for the job.
When cutting simple chipboard, no complications can arise, but with laminated chipboard everything is much more complicated.
This method can be used to make not only straight, but also curved cuts, and to produce radius parts.
We select a saw blade with the largest number of teeth to ensure an even cut.
Among the disadvantages of the method: it is necessary to apply precise markings, file the workpieces in advance and place the template under the router. That is, it is inconvenient for the tool to cut off several identical parts.
How to bring chipboard sets back to normal condition?
- Log in to reply to this topic
#1
- Advanced user
- 21 messages
- City vjcrdf
There was a flood in the kitchen not long ago, the kitchen set is made of chipboard, and from contact with soda, the DOP began to swell and flake. Do you need advice on how to eliminate the consequences of contact with water?
- 1
- New York City
- 5
#2
- City Vitebsk
#3
- Vologda city
I had the same problem, the bottoms of the tables began to swell. I had to saw them off, and twisted a rectangular frame for each table separately from a planed board. These frames were covered with stain and furniture varnish to match the desired color. I screwed the set onto the furniture corners of the tables. They stood like that for more than one year, but then I remade the set entirely from pure wood. Now there are no such problems.
#4
- City of Barnaul
You can also replace the facades on the set; they are sold for every taste and size. You already have the fittings. A little effort in replacement and there will be no trace of the consequences of the flood. True, you will have to spend money.
#5
- Kanash city
Repairing moisture-swollen chipboard furniture cannot be restored in full, if at all. I had a similar case in practice. I cut off the entire lower swollen part of the furniture at the same level, and overlapped it with slabs of the same color, but of a larger size, fastening them with self-tapping screws. The furniture has been standing for many years.
#6
- Moscow city
You can replace swollen parts with new ones. It's difficult but possible. Find an organization that will produce these parts according to the dimensions of the old ones. And then collect everything.
#7
- Irkutsk city
If the chipboard is fastened with self-tapping screws, it will be possible to somehow level the surface. And to give it a more or less aesthetic appearance, you can cover it with self-adhesive film, which is sold in any hardware store.
Chipboard furniture repair and chipboard repair
Probably each of us has seen swollen chipboard. Most people think that after swelling this material cannot be restored and products made from it must be immediately disposed of. However, in practice it turns out to be completely different and repairing furniture made of chipboard is possible if you have certain knowledge.
Restoring moisture-swollen chipboard
Surely many people are familiar with the picture when chipboard swells after exposure to moisture. Most people in such situations immediately despair, but in fact it’s in vain, because repairing chipboard furniture after swelling is possible. To do this you will need:
- Furniture glue (you can use simple PVA);
- Sharp stationery knife;
- Several bars;
- Carpenter's saw (it will be needed for deepening and milling);
- Clamps;
And this is the process itself:
First, you need to heat the swelling area with a hairdryer and tear off the edge from it. Then you need to make a depression in the center at the site of the swelling using a circular saw (the height and depth of the milling must be greater than the site of the swelling).