/Furniture/Dining group/
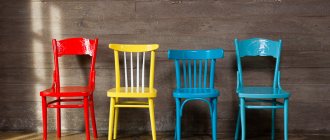
There can be a great many reasons to renew old chairs or decorate new ones with your own hands. This includes the need to adapt furniture to the interior, the desire to correct design flaws, to restore chairs inherited from a grandmother or found for next to nothing at a flea market. In this material we will talk about 4 ways to transform “four-legged friends” (including office and garden chairs) beyond recognition, and also present 70 cool photo ideas for alterations.
See also: 3 easy ways to update your kitchen set
Preparation of tools and materials
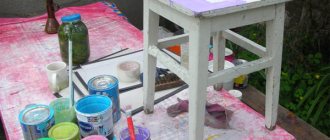
To restore a wooden stool, you need high-quality tools; you don’t skimp on this to get a good result.
For painting work you will need:
- brushes for painting, primer;
- handles for rollers and replacement attachments for them;
- construction hair dryer;
- scrapers - removing old layers;
- rubber spatulas - sealing minor wood defects;
- emery No. 40, 120, 240 - sanding after puttying;
- containers for diluting paints, rags;
- Prepare a respirator, safety glasses, and rubber gloves for work.
Brushes are common tools for painting; when painting a stool, most of the work is done with them, and with a roller they pass over the surface of the seat. Choose natural hair brushes for any paints, and artificial bristles are suitable for water-based compositions. The shape of the tool can be flat or round.
Nozzles for the roller are chosen with a velor coat or with a little fur. Foam rubber paints work with water-based compounds, while oil, nitrocellulose, and alkyd paints will corrode the material halfway through the job. Instead of emery, you can take diamond meshes (the numbers are the same), which are put on a special machine.
Materials you will need:
- dye;
- primer of the paint type;
- wood putty (ready-made in small jars);
- paint remover;
- paint thinner;
- varnish, wax
If they are doing decoupage , they prepare newspaper pictures, text, magazine clippings, and ornamental compositions on paper. Special napkins with patterns and colors, which can be purchased at a regular household store, are suitable.
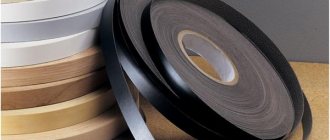
To replace the trim you need a stapler, tape measure, scissors, upholstery fabric and filler. New upholstery is sewn together using a sewing machine if pieces need to be joined.
Frost stool for children - swing, bicycle and sled
These simple IKEA Frost stool ideas are for the truly DIY dad. And children will be happy to watch the construction and use such toys!
Painting an old wooden stool
Restoration of a Soviet stool begins with surface preparation.
The process includes:
- Stripping old paint if the layer is falling off. The layer that holds tightly is not removed. Use a remover and heat it with a hairdryer. After one of the methods, the softened film is scraped off.
- Putty the surface . Only seal the cracks or use a spatula to cover the entire surface of the seat.
- Sanding dried deposits and primer for painting.
- Repeated puttying and priming if the mass retracts when drying and there are depressions on the surface.
Ivan Bokorezov
Furniture columnist and designer
Ask a Question
Painting begins from the bottom; to do this, the product is turned over with the seat down. Brush over the surfaces of the legs from different sides, cover the crossbars and slopes so that there are no unpainted gaps. It is better to work in daylight, otherwise the reflection of the paint from the lamp will prevent you from seeing the uncoated areas.
Don’t wait for it to dry, but carefully turn the stool over to its standard position and continue painting:
- pass along the plane of the seat with a roller;
- with a brush, those parts of the legs, lintels, and drawers that were not covered the first time are painted.
Use a multi-color version, for this you need masking tape. They separate the boundaries of different colors. They work with the second shade only after the previous color has dried - remove the tape and re-glue it along the new contours.
Sometimes the surface is decorated like marble or wood. To do this, paint the main background, when it dries, apply a contrasting or tint color. Use crumpled rags, shaped rollers, foam sponges, and other available items.
Advantages
- Durable and stable legs
- Convenience and speed of assembly of folding stools, maximum saving of usable kitchen space
- A wide range of different models - solid, folding, step stools
- Possibility of purchasing stools not as a set, but separately
- An excellent combination of stools with a common set
- Various dimensions (manufacturers offer stools for both small and spacious kitchen spaces)
- Great appearance, high quality material
- The ability to independently decorate chairs using pillows or removable covers
- Affordable prices
Kitchen stools from Ikea are an excellent solution for furnishing kitchen spaces with a small area.
Upholstery of a soft seat
Stools are most often covered with a material that is easy to clean and does not absorb water (leather, artificial substitute) - ordinary kitchen furniture. In the rooms there are models with fabric upholstery.
Use for new seat:
- vinyl artificial leather, stretch leather, eco-leather, dermantine;
- drape, tapestry, velor, silk;
- genuine leather.
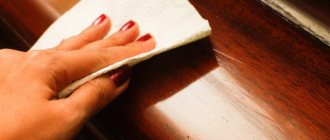
First, remove the old fabric; to do this, pry the staples from the back of the seat with a knife or chisel, and use an anti-stapler. The material can be glued - to soften the composition, areas are treated with steam or ironed with a heated iron. Old material is not thrown away immediately; it will still be useful. Remove the soft gasket.
Step-by-step reupholstery procedure:
Smooth out the removed sheathing with an iron and use a spray bottle on the folds to even out the sample.- The finished pattern is applied to the new fabric and pinned.
- They trace the outlines with chalk, remove the pins and the old piece.
- According to the size of the seat surface, a soft padding from batting, foam rubber, padding polyester is cut out.
- You can place the padding on top only, or roll up the edges to get soft sides.
- Glue the filler to the plane, wait for it to dry, you can do two layers.
- New upholstery is placed on top, the edges are turned over, the stool is turned over with the seat down.
- They are nailed with a stapler so that the step between the staples is 20 - 25 mm, the staples are placed parallel to the edge.
- Sometimes the surface under the folded part of the fabric is coated with glue.
For the top, you can sew an original version from two or three pieces of fabric or leatherette. They use the patchwork technique if they want to make a geometric pattern. It is recommended to sew removable covers to prevent the upholstery from getting dirty.
Frost stool from Ikea - how to come up with decor?
The main advantages of the Frost stool are:
- Excellent compactness and the ability to stack one stool on top of another to save space.
- Very affordable price.
- Stylish look.
- No corners.
- Possibility of further varied decoration.
Let's try to fantasize about possible design solutions that the round seating surface and magnificent legs of a stool that can support a weight of 94 kilograms can encourage us to do.
Decoupage technique
The method involves gluing drawings, pictures, or a cut-out pattern to the surface. The resulting collage is treated with varnish to secure and extend its service life. The work is performed in one of the styles: Victorian, Provence, ethno, military, country, simple city, shabby chic.
Step by step execution:
If the coating is porous, it is puttied to make it smooth. For grinding, first use mesh nos. 240, 320, and finally finish with mesh nos. 600 and 800. Be sure to prime the surface.- The base is usually painted in a light shade, for example, beige, baked milk, dull blue, but it all depends on the chosen style; most often they choose a white color.
- On the flat surface of the stool, the napkin is glued whole; if there are uneven spots, this will not work; you need to cut or tear the edges of the pattern.
- For gluing, use varnish, PVA glue, pencil glue or egg white; it is more convenient to work with a polyvinyl acetate composition.
- The glue is diluted 1:1 with water or the pattern is placed on the undiluted composition; in the first case, the napkin will get wet and tear faster.
- The picture is pasted on, carefully smoothed with a soft brush for drawing and fingers; after straightening all the folds, the collage is dried and varnished.
Ivan Bokorezov
Furniture columnist and designer
Ask a Question
For work, acrylic paints and similar varnish are often used. Inspired natures additionally tint the drawing after drying with paints and add bright details. A primer before gluing is needed to reduce absorption - in this case, the napkin will slide and align more easily.