Over time, furniture that is subject to intensive use - stools, chairs - loses its attractive appearance. But this does not mean that it has served its term and its place is in the landfill. Many items are made of high-quality, durable material and require only cosmetic updating.
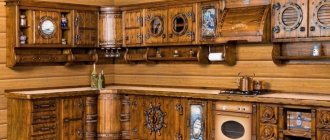
Restoring chairs with your own hands is a fascinating, creative event that allows you to refresh the appearance of your favorite furnishings or change it beyond recognition, giving it a second life in a new interior. Today’s material is about the sequence of work and popular techniques for restoring chairs.
DIY chair restoration
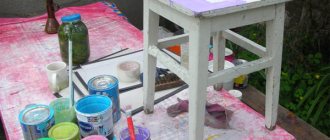
Preparation of tools and materials
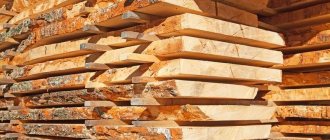
Restoring wooden chairs at home is only possible if you have high-quality tools.
Power tools that may be useful:
- jigsaw;
- orbital sander;
- drill or screwdriver;
- construction hair dryer;
- powerful vacuum cleaner.
Required set of hand tools:
- ruler, tape measure, square;
- screwdrivers;
- hammer or mallet;
- steel and plastic spatulas;
- scissors and knife;
- chisels, scrapers;
- brushes, paint roller;
- holders for sandpaper.
For protection, prepare goggles, a respirator or mask, and gloves.
Consumables:
- washes of paints and varnishes of the required composition;
- sealants and putties for wood;
- impregnations and furniture wax;
- paints and varnishes.
Andrey Peregubsky
Furniture handyman
Ask a Question
When purchasing paints and varnishes, pay attention to product compatibility. For example, nitro enamels and oil paints curl upon contact.
Paints and varnishes are purchased at building materials stores. Restoration compounds can be found in specialized retail outlets, such as furniture manufacturers or on the Internet.
Decorating chairs
Sometimes it makes sense to radically change the color scheme of furniture. Chairs painted white or gold look very creative. Often craftsmen choose other colors for the wooden part of the chair: blue or light blue, pink or bright red. But then the upholstery should be pure white or with golden ornaments. The elegance of this design transports people to the times of Catherine the Second, reviving palace luxury.
White furniture can be decorated with gilded ornaments, simply drawn or made in the form of a bas-relief. Blanks for this type of decoration can be purchased in stores or cast yourself from plaster and glued on. Restoring and decorating chairs with your own hands in an antique style will add charm and originality to the design. Sometimes the edges of the upholstery are decorated with beautiful braid and tassels.
Chairs painted in a cubic style will also change the image of the room. And some will prefer floral or plant colors. In any case, surface coating will protect the item from corrosion and increase its service life. Therefore, the practical benefits that such a DIY restoration of chairs will bring are also obvious.
Preparing a chair for restoration
Before applying a new coating, the chair must be prepared:
- completely remove the old coating: paint and fabric;
- level the surface, repair cracks;
- neutralize traces of wood damage;
- repair the structure, paying special attention to the connection points of the parts.
Before painting, the surface is coated with impregnations and primers.
Removing upholstery
Restoring an upholstered chair begins with removing the upholstery.
The fabric is usually secured with wood glue and small nails, and in relatively young furniture with hammer-in staples.
To remove the staples you will need a screwdriver and pliers:
The tip of the screwdriver is inserted under the bracket and one end of the fastener is lifted from the base.
Using pliers, turn the bracket out of the wood completely.
Nails are removed in another way:
- The sharp end of the chisel is placed against the point of contact between the nail head and the surface of the chair.
- With light blows of a hammer, a gap appears between the head and the wood.
- Using a chisel as a lever, they try to increase the gap.
- Use pliers to remove the nail.
The fabric placed on the glue is trimmed with a knife. Remaining glue is removed with a scraper.
Use the same methods to remove the soft lining of seats and backrests, if there is any under the upholstery material.
Removing old paint
Restoring a Viennese chair involves removing the old paintwork.
You can do this in three ways:
- thermal;
- mechanical;
- chemical
The thermal option is suitable for working outdoors, as paints and varnishes emit acrid smoke when fired.
Procedure:
- A small area is heated with a hair dryer until the paint softens.
- Use a scraper to remove one layer of the old coating.
- If necessary, repeat the procedure until all layers are removed.
Andrey Peregubsky
Furniture handyman
Ask a Question
Hot air can easily damage wood, giving it a dark tint. If there is a lack of experience, they try to remove the paint in an invisible place, for example, on the bottom of the seat. Having understood the principle, they begin to clean visible surfaces.
The thermal method requires care and patience; it is important not to try to heat the entire surface, but to work with small areas.
The mechanical method involves removing paint with scrapers or sandpaper. The second option is preferable, since it is easy to cause deep scratches with a scraper. They will have to be sealed with putty, which increases labor costs and material consumption.
The task is simplified by using a grinder with sandpaper attached to it. The top layer is removed with a power tool, and the final processing is carried out manually. Hand process convex surfaces, for example, a Viennese chair - careless movements with a sander can disrupt the smooth shapes of furniture parts.
Chemical removal of old paint is used with caution if the chair is planned to be coated with transparent compounds. Dissolved paint can eat into the wood base.
Apply a wash to the chair, wait until the paint softens and remove it with a spatula, knife or chisel. If necessary, repeat the procedure.
Removing stains
Large and deep damage is removed with sandpaper or a chisel.
Traces of blue stains and surface rot stains must be removed. To do this, use bleaches in liquid form or in the form of pastes. Manufacturers' instructions must be strictly followed.
Grease stains are removed with solvents. If you leave them, the new paint will not apply evenly.
Restoring connections
Loose chairs are being repaired . They use the same method of fastening parts that was used initially. The parts are separated. Old screws are replaced with new ones, which should be slightly thicker.
The areas where the glue is applied are cleaned with sandpaper and glued with a new compound. They use wood glue, of which there are many on sale now.
What you will need
Tools
- coarse sandpaper;
- fine-grained sandpaper;
- different types of screwdrivers;
- stapler;
- mallet and hammer;
- scissors;
- brush;
- screwdriver;
- clamps.
Material
For materials to repair wooden chairs with your own hands, you will need the following items:
- upholstery fabric;
- foam;
- glue;
- screws;
- stapler cartridges;
- dye;
- varnish
For reupholstery
The choice of fabric for covering is quite large. Each option has its own advantages that determine the feasibility of use in certain conditions:
- Tapestry is the most common material in the manufacture of upholstered furniture with a rich texture and texture. Strong, durable, practical, does not fade in the sun, and is easy to wash. And besides, it is antistatic (dust does not accumulate on its surface). An excellent choice for chairs in the living room or bedroom.
- Chenille is another popular option, a beautiful and inexpensive jacquard fabric, the special type of weaving of which ensures its softness and volume. The most practical and durable are samples of mixed composition, containing natural threads and synthetics. A significant disadvantage of chenille - strong hygroscopicity - does not allow it to be used for the restoration of kitchen upholstered furniture. But on chairs for dressing tables, such textiles are irreplaceable - they are velvety and pleasant to the body.
- Jacquard is a fabric with convex patterns obtained by complex weaving of threads. She is not afraid of grease stains and moisture, and therefore do-it-yourself “jacquard” restoration of chairs is the best option for upholstered furniture in the kitchen.
- Flock, or artificial velvet, is not afraid of animal claws, durable, easy to clean and wash, and therefore suitable for any room, including as ottomans in the hallway.
- Velor is a spectacular material, pleasant to the touch, but very impractical due to rapid wear. Good for chairs that are rarely used.
- Genuine leather looks beautiful, is extremely easy to clean, but is very expensive.
Separately, it is worth mentioning the leatherette. Of the various substitutes, eco-leather is the most successful. This material is good for its consumer qualities, and in general is almost as good as natural leather, but will last about 8–10 years. Unlike ordinary fabrics, this upholstery has its own operating characteristics:
- Leatherette does not forgive mistakes - leaving holes from an unsuccessful stitch, some of its types stretch greatly in one direction, but not at all in the other, which should be taken into account when cutting.
- As for genuine leather, it is easiest to work with material up to 1.5 mm thick (maximum 3 mm), since, most likely, you will have to sew several parts together. In addition, the leather must be dry when working to prevent shrinkage when drying.
Features of the “growing” Kidfix chair, tips on selection and assembly
To make the chair softer, foam rubber 40–50 mm thick (density 30–50 kg/m3) is used as a filler. The upholstery will be easier to install and stretch without wrinkles if an additional layer of synthetic padding is placed between it and the foam rubber. The color of the fabric for upholstering a chair depends on the overall palette of the interior.
To minimize material consumption, you should give preference to small patterns or plain textiles.
Tapestry
Chenille
Jacquard
Flock
Velours
Leather
For frame
To restore an old chair, tools are selected depending on the work that needs to be done. To prepare them, use sandpaper of varying degrees of grain or a special mesh to remove old paint and varnish. After that:
- What material are kitchen sets made of?
Kitchens with patina: decor options and tips on color combinations
Kitchen design without upper cabinets: photos of interiors with different layouts and styles
- to preserve the visible texture of wood, stains, tinting compounds and varnishing are used (you will need a long-drying polyurethane varnish, since furniture varnish sets too quickly and is toxic);
- to change the color you will need the paint you like, a tray for it, a spray bottle, a primer, brushes and a paint roller, tape and varnish;
- for the aging effect - a special type of paint, solvent, varnish, rags;
stain
Polyurethane varnish
Dye
Varnish with aging effect
To decoupage wooden chairs, you need to prepare special stencils or paper napkins with a pattern and PVA glue.
Materials for sealing cracks are selected depending on their size:
- for very small scratches - retouching pencils, iodine solution;
- for shallow cracks, use special wax, carpenter's or car putty, as well as flour mixed with PVA glue;
- for deep ones - shoe polish, mastic (a mixture of turpentine and heated beeswax in a ratio of 3:4).
For almost all painting work, brushes, containers for paint, varnish, a respirator, and rubber gloves are also useful.
Napkins for decoupage Wood putty
Corrector pencil
Painting a wooden chair
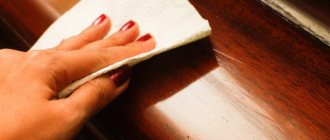
The workplace where painting will be carried out must be well ventilated to remove strong odors and harmful substances released by the paint.
Before work, carry out a wet cleaning of the room , remove dust, which, if settled on the surface of the chair, can spoil the result. It is especially important to achieve cleanliness if you want a glossy finish.
Furniture and floors in the work area are covered with film to prevent drops and accidental paint spills.
access to the chair from all sides to avoid unnecessary touching and moving during painting.
Before painting, they carry out final preparation - they clean the chair from putty deposits, small irregularities, and try to achieve an ideal surface . The first layer when painting is a primer . It should not be dark in color if the stool is light.
After drying, they are treated with sandpaper , removing any roughness that appears. The finishing layer is applied with a roller, brush or spray gun. The latter method is preferable for uneven parts and for painting carved fragments or holes.
If necessary, apply a second, sometimes third layer of paint; before doing this, be sure to allow the previous layer to dry completely.
Andrey Peregubsky
Furniture handyman
Ask a Question
The drying time indicated by the manufacturer does not always correspond to reality; for example, the drying time increases when drying in a cold or damp room. You must wait until you feel sticking when touched.
Wooden chairs can be coated with the following types of paints :
Nitro enamels and nitro varnishes add shine and gloss to the surface, are suitable for outdoor furniture, but are susceptible to cracking from impacts.
Alkyd coatings are easy to apply, flexible, almost odorless and do not emit hazardous substances when dried, but it is better not to use them if the chairs will be exposed to low temperatures.
Acrylic compounds are resistant to the external environment. Chairs should be painted in a well-ventilated area.
The chair is ready for use when the paint is completely dry. At first, be careful when handling a piece of furniture, especially with multi-layer coatings.
Paint coating of chairs
What is a favorite chair? These are wonderful moments of returning to childhood... Or the memory of a loved one... Or even a chair can be a family heirloom, passed down from generation to generation. Or something else, but so dear that you don’t want to part with it.
But, unfortunately, a thing cannot last forever. Scratches appear on the furniture, the varnish cracks and peels. The appearance, alas, becomes unpresentable. However, restoring old chairs with your own hands will help preserve the item for some time.
Often, before varnishing a chair, it is necessary to completely remove old paint or varnish. This process requires patience and perseverance from the master. But the payment for labor will be fully consistent with the efforts invested.
Upholstery of an upholstered chair seat
In Soviet-made chairs, softness was ensured by a durable jute backing. Now other materials are used that caking less and do not lose shape when exposed to heavy objects. In addition, jute is expensive.
New products use the following for seat backing :
- thin furniture foam;
- padding polyester;
- batting;
- coir is a material made from the nut of the coconut tree.
For upholstering chairs at home, foam rubber up to 5 cm thick is best suited for the backing. The top covering is made of any dense fabric.
Work algorithm:
The foam rubber is cut out strictly according to the shape of the seat. Coat the base and foam rubber with glue. If this is not done, over time, bulges will appear on the surface of the chair, and the backing will bunch up to one edge.
Connect and press the backing and the seat, allow the glue to “set.” Thin batting is stapled around the perimeter of the base.
Cut the fabric so that when stretching there is a margin of 5-7 cm on each edge of the seat.
The fabric is attached to the front and back of the seat from the bottom. Use a stapler. The upholstery is carefully straightened at all stages of work to prevent the formation of wrinkles.
When the covering is leveled, nail the material on the left and right sides of the seat. At the last stage, the upholstery is stretched and secured in the corners. Special care is required. Incorrectly driven staples are removed and the process is repeated.
To get the best result, upholstery fabric is nailed on top of the foam rubber and only then the finishing fabric.
When working with nails, additionally place a tape of thick fabric under them. Using a stapler eliminates the need for additional materials.
Causes of breakdowns
Before you look for how to glue a wooden chair together, you need to understand what caused the breakdown. This type of furniture consists of many parts that are attached with glue. Over time, the joints become unstuck. It happens that the legs move away from the harness. They are usually attached using spikes.
Some products may have manufacturing defects. A man sits on a chair with wooden legs and falls because one of the legs falls off. Don’t think that furniture is no longer usable and should be in a landfill. Breakdowns of this type can be easily repaired with your own hands without spending a lot of money on repairs.
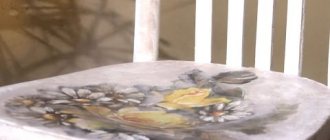
Decoupage technique
Decoupage allows you to hide unevenness and damage to the surface of the chair. In addition, you can choose a print to match any chosen style from Provence to techno.
The technique involves covering a chair with paper or fabric and then covering it with several layers of transparent varnish.
Decoupage with paper
The structure of the paper makes it easy to paste over not only flat, but also curved surfaces, including chair legs.
Work algorithm:
The chair is disassembled and treated with sandpaper, achieving the most even surface possible. Degrease.
If necessary, furniture is painted. If the chair is dark and the background should be light, it is first painted white, then in the chosen color.
Cut out the part of the picture you like. Lubricate the chair with PVA furniture glue and apply the cut out design.
Smooth the paper, achieving a perfect fit. Use rollers or soft cloth. If necessary, the paper is moistened with water to make it softer.
After drying, apply a new thin layer of glue over the design. Decorate with paint if necessary.
The final finishing consists of applying 3-4 layers of clear varnish. Each layer must dry completely.
To decoupage small surfaces, for example, legs, the paper is torn into fragments up to 10 cm in size. You can paint it with paint in the general style.
Decoupage with fabric
Decoupage with fabric is only suitable for seats and backs of chairs; legs cannot be processed.
Operating procedure:
The chair is disassembled and the surface is prepared. The fabric is laid out on the table. Place the seat and trace the edges with a marker or pencil. Make a pattern, departing from the intended line about 2 cm.
Cover the seat with glue: PVA or special for blending. Glue the fabric, carefully level it, remove folds and air bubbles. Apply a layer of glue on top of the fabric.
After complete drying, the material should become rigid. Using a stationery knife, cut off excess fabric strictly along the edges of the part to be pasted.
Apply another layer of glue to prevent premature wear and the appearance of fringe along the edges.
Decoupage with fabric ends by applying 2-3 layers of transparent varnish.
Repairing a broken leg
This structural element breaks quite often due to improper use or too much load.
The problem manifests itself in two ways:
The leg is broken along the grain of the wood; when combined, the parts fit tightly against each other along the break. No small splinters.
Fragments and thin slivers formed. Such a leg cannot be glued or pulled together, because the weak point will break again very quickly.
Repair instructions:
To eliminate the problem, apply an adhesive composition to the ends, insert the legs into the socket, and press firmly. The gluing is strong and of high quality. The problem remains if the wood texture in this area is weak - there is a possibility of a break near the connecting seam.
Using a hand router, a groove is formed with a width of 10 mm, a depth of 10–12 mm, and a cut length of 100–150 mm.
Using a caliper, measure the dimensions of the groove and saw off the strip to size. They make the part so that it fits tightly, but not tightly (if you hammer it in, you can break the leg). The depth is cut with a margin in order to cut off the top that does not fit in after the glue has dried.
Cut the strip to length, place the glue in the groove, insert the fasteners, and wait for it to dry. Immediately remove all remaining glue with a dry cloth.
Press the elements. The clamps are removed after drying, the protruding part is removed with a chisel, and the joint is sanded.
Select the shade of varnish or paint. Apply the coating in several layers, each subsequent after the previous one has dried.
We paint chairs: sanding, staining, priming, polishing
This article is for those who make chairs, cribs and other so-called lattice furniture. For such products, solid wood is mainly used, usually beech, birch, less often oak and other types of wood. Therefore, we will consider the coloring of beech as the most suitable material for such products.
The type of finishing is traditional: impregnated, painted with clear varnish, the pores are closed. We bring to your attention a technical technology widely used in Italian chair factories.
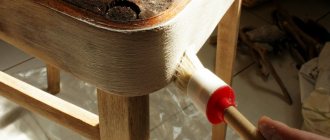
So, before us is an assembled and unpainted chair.
The first thing to notice is how polished it is. Very rough sanding will cause the stain (stain) to be absorbed unevenly and will require a large amount of primer to even out the surface. If you sand the wood too well, you'll get great paint results for less money, but you'll have poor adhesion. As a result, there is a high risk of paint peeling.
Optimal sanding with P150 - 180 or K60 - 80 based on aluminum oxide (usually red).
The choice of dye and method of its application can be completely arbitrary. Many people use solvent-based dyes and apply by spraying. But this does not always lead to uniform coloring, and always to large losses of material.
Water-based ink systems are excellent and have been experimented with and used for a long time. This is a specially developed composition based on organic resins, which ensures uniform distribution and absorption of the dye. Painting is done by immersion or using the shower principle, which generally leads to one result: abundant and uniform wetting of the entire surface. Milesi's assortment includes: CFC 2 (filler) and CFT 1 - 9 (dyes). The proportion of the finished stain looks like this: CFC 2 - 45%, dyes - 5%, water - 50%. As a result, you get a very high-quality, economical and environmentally friendly product, and the amount of losses in this case is almost zero.
The next step is primer
Beautiful photos of alterations for inspiration
Look at how aesthetically pleasing chairs can be made from boring, familiar objects. Sometimes all it takes is paint, fabric and creativity.
And sometimes you should try and approach the matter with imagination, using and combining various technologies.
Remaking chairs is a great way to update your interior with your own hands and get things with a unique design.