When deciding how best to design the ceiling surface, people are increasingly paying attention to plasterboard structures. Especially when it comes to such a key room for any type of residential property as the living room. There are countless options for plasterboard ceilings for the living room, and what makes this material attractive is that, in addition to its practicality, it also makes it quite easy to create a beautiful and unique interior, pleasing to the eye not only of household members, but also of visiting guests. Let's try to stay afloat in this stormy sea of interesting design methods and help you choose among 100 interior photos the most attractive and suitable option for you.
- Pros and cons of using drywall;
- Selection of design type;
- The most popular design methods;
- Using backlight;
- Choice of color scheme;
- Useful materials. Table of color and texture combinations. Video;
- Conclusion.
Pros and cons of using drywall
«+»
- easy to cut, allowing you to create structures of any type and shape;
- installation accessible even for non-professionals;
- can be subjected to additional decorative processing to enhance the external effect;
- reliably hides all traces of communications and any defects in the concrete base;
- allows you to create beautiful and voluminous multi-level structures;
- promotes optimal organization of the lighting ensemble by placing light sources of different types;
- gives a perfectly flat ceiling surface - a real paradise for perfectionists;
- allows you to turn into reality any design whims, including combinations with stretch ceilings;
- durable under correct operating conditions.
«-«
- not suitable for very low rooms due to a serious downward shift in the ceiling level - from 10 to 15 centimeters;
- not recommended for use in newly rebuilt buildings - it may crack after the inevitable shrinkage of the building;
- may deform over time or lose its color due to specific operating conditions (temperature changes, flood).
As you can see, there are significantly more points marked with a perky plus than those marked with a sad and inexpressive minus.
Moreover, even among the voiced disadvantages of drywall, you can, if desired, remove a couple of comments:
- use special moisture-resistant drywall, often available in either blue or green colors;
- install plasterboard ceilings, including for the living room, only after a year and a half after the building has been put into full operation.
In general, of all the options for finishing the ceiling surface, it is plasterboard, which is commercially available in the form of compressed sheets, that is best suited for decorating any room in a house or apartment. Well-chosen plasterboard ceilings in the living room will help emphasize the freshness and uniqueness of your design and saturate the living space to the limit with a healthy family atmosphere.
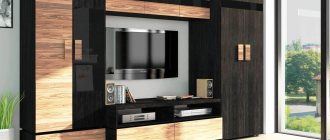
Combined ceilings
When you have a choice between a suspended ceiling and a plasterboard one, you don’t have to give up one of the options. They can be combined. For example, all three-dimensional figures should be made of plasterboard, and the rest of the space should be leveled with a suspended ceiling. Thus, you can combine matte and glossy textures. And this is very beautiful.
Selection of design type
One of the advantages of using plasterboard ceilings in the living room is the ability to create several levels, ultimately giving the room scale and impressiveness. However, this design is only possible if the ceilings in your living room have sufficient headroom. Otherwise, there is a risk of getting the opposite effect: instead of a positive atmosphere of comfort and tranquility, there is terrible discomfort and interior compression that can ruin even the brightest and most rosy mood.
Single-level ceilings
- universal, but more often, for the obvious reason of lack of height, they are used in modest-sized rooms;
- advantageously hide all pipes, wires and other traces of communications;
- goes well with different types of lamps;
- perfectly realize themselves both in classic interiors and in loft and Scandinavian minimalism formats.
In order to decorate such a plasterboard ceiling for the living room, it will not require a lot of time and money. But the return will follow immediately: if single-level ceilings
and cannot compete with other designs in scale and nobility, they have their own, no less interesting trump cards.
Thus, they allow you to create an extremely neat and even ceiling surface, and with the correct finishing,
it is beneficial to highlight the walls or furniture located in the room.
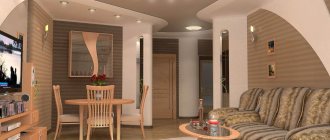
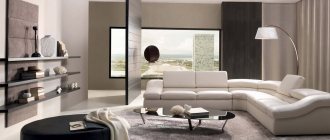
Take a look at how this happens in reality - we offer several photos of plasterboard ceilings for a hall with a successful modern design.
Two-level ceilings
- add sophistication and chic to any living room;
- fits perfectly into any interior;
- can be combined with tension fabrics;
- take an active part in the functional and decorative zoning of the premises;
- directly affect the shape of the living room;
- They have stylistic versatility: they are widely used both in classic interiors and in extravagant art projects.
If you are planning to use plasterboard ceilings for the hall, then you have probably seen photos with two-level structures
and immediately noticed a striking fact: how expensive, modern and noble they look against the background of all other types of ceiling surface design. Of course, everything is relative, and sometimes what is good for a designer is death for a simple man in the street (let us paraphrase a well-known expression), but the first impression cannot be pushed into the recesses of memory so easily.
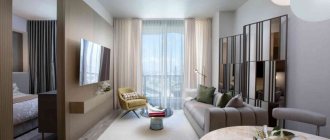
The main disadvantage of using such a design is that installation is slightly more complicated. It is planned to install a frame for the second level, and if, according to the design project of the room, the frame is made of an irregular shape with numerous roundnesses, then it will take a decent amount of time. However, this is exactly the case when the time spent on installation does not matter at all - look carefully at the photos of plasterboard ceilings for a modern living room, suggested below, and make sure that sometimes it’s worth being a little patient if the end result fully satisfies all your expectations .
Multi-level ceilings
- the most technically complex type of plasterboard ceiling;
- there is widespread use of convex elements;
- the number of tiers is limited only by your own design courage and imagination;
- most often, the shape of multi-level plasterboard ceilings in the living room duplicates the interior design;
- the use of combinations with tension fabrics is often noted for greater expressiveness of the project;
- not suitable for small and low rooms.
You can hardly install plasterboard ceilings like those in the photo below for a hall with your own hands. This will definitely require the help of a professional installation team.
In general, such complex ceiling structures are widely used exclusively in spacious private houses, where the living room is a huge room with a sufficient supply of square meters, requiring careful design planning and proper zoning of different areas. In the city apartment format, projects using more than 2 levels are practically not used.
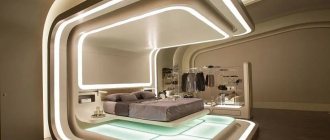
Ceiling soundproofing
If you want to get rid of the clatter of neighbors from above or simply insulate the room, then in this case a ceiling made of plasterboard sheets is an ideal option. After all, there is always a space between the main ceiling and the plasterboard, where any heat and sound insulation ideally fits. Stone wool, for example.
The most popular design methods
The following methods for decorating plasterboard ceilings for a hall are relevant only in cases where you are dealing with a structure of two or more tiers
.
- linear frame framing
is one of the most relevant ways to emphasize the volume of a room; it is used in close connection with accent lighting; - figured frame framing
is also a popular installation method, which differs from the above in complexity - you have to bend the drywall to achieve the desired shape; - with separate segments
- a very interesting way of decorating ceilings for a living room that looks extremely modern and attractive in the photo: mounted individual segments (or one segment) form a niche into which LED strips are later inserted; - numerous combinations with tensioned fabrics
- such a complex design of the ceiling surface can often be found even in modest city apartments, but it still most successfully realizes its potential in the format of large-scale living rooms of private houses.
We invite you to carefully study all the most popular ways to design plasterboard ceilings for the living room using photos.
Here's a great slideshow for those who want more dynamics.
What tools do you need to work with drywall?
A reliable, convenient and high-quality tool largely determines the quality of work. Therefore, to cover the living room with plasterboard, you need to prepare:
Drill. This power tool is used to drill holes for self-tapping screws and other fasteners.
Screwdriver for tightening threaded connections. Usually a screwdriver can successfully replace a drill and vice versa.
Building level. The tool used to determine the vertical and horizontal inclination can be either mechanical (with a water bubble) or laser.
Device for beating the cord. With its help you can get a perfect straight line.
If there is a need to use curved structures, care must be taken to make templates.
Knife. Drywall cuts very well with this simple tool.
Special plane. This is not a carpentry tool, it is intended for processing the ends of plasterboard boards.
Screwdrivers, pliers, wire cutters and other tools usually found even in modest home craftsman's kits.
Experts also advise keeping a polystyrene profile for fastening electrical wires. Wiring often accompanies plasterboard structures, so you need to be prepared to work with it.
Using the backlight
The importance of the interaction of ceilings with various light sources cannot be overestimated. All the more seriously you should take the issue of properly organized lighting. After all, when you get such an effective tool of expression in your hands, if you use it too frivolously and superficially, you can harm the future visual appearance of the living room. But we are faced with a completely opposite task, right?
Among the most common ways to organize the lighting mood in the living room are:
- a combination of a central chandelier and spotlights;
- hidden lighting of niches using LED strips;
- overhead lamps located symmetrically or randomly;
- hanging lampshades for placing the necessary accents in the interior;
- combined use of spots and LED strips in the format of linear and shaped frames;
- use of illuminated tension fragments.
Currently, the main source of lighting in the living room is probably only a chandelier
.
As a rule, it is a rather massive structure and is located in the center. The role of additional lighting is assigned to point (mortise) lamps, which people also like to call spots
, as well as
LED strips
, often stretching along the perimeter of the entire room. The latter are often hidden in niches - in this case, we are talking about a mounted hidden lighting system.
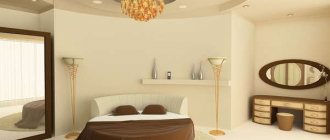
Some examples of the use of chandeliers in combination with point light sources and LED strips can be seen in the following photos of plasterboard ceilings for the living room.
Another common design move is hidden lighting.
not a formed plasterboard frame, but a fragment of a tensile structure. Due to this, the effect of a special depth of the ceiling is achieved, and the conceptual arrangement of LED elements makes it possible to implement the most complex geometric patterns and even artistic compositions in practice. Below are photos where plasterboard ceilings are diluted with successful fragmentary solutions made from polyvinyl chloride film - of course, in the living room format.
Even more photos with examples of using different types of lighting on the ceiling in the living room to give the room greater artistic expression. And if you decide to organize the lighting yourself, then we advise you to read our article: “Do-it-yourself plasterboard ceiling with lighting: all the secrets and the best ideas.”
Shapes and acceptable sizes
The shape of the ceiling can be any, but it depends on the proportions of the room. The most popular ceilings are:
- Repeating the perimeter . Square and rectangular ceilings may look simple, but they fit into any design and are cheaper.
- Round and oval . The absence of corners on the ceiling softens the perception of the interior and at the same time makes it more holistic.
- Original . Wavy, spiral, asymmetrical and other shaped designs are not cheap, but they enliven the design and make it truly unique.
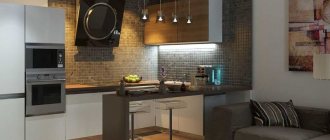
Which ceiling is suitable for the kitchen, living room or hallway depends on the dimensions of the room. The decisive factor when choosing the number of levels will be its height and area. The smaller the room, the more carefully the tiers need to be modeled.
Selecting a recreation area Source sdelaipotolok.com
If you are aiming for a complex project, it makes sense to order it from a designer who will make a preliminary sketch of the ceiling. This way you will be able to see and evaluate the appearance of the room and adjust the details. Working with a designer is also convenient because he will calculate all the dimensions, select colors for the ceiling and walls, and make the layout of spotlights.
If you decide to make do on your own, it is useful to refresh your memory of the following tips:
- The minimum thickness of gypsum plasterboard for flat ceiling structures is 8-9.5 mm, but it is better to use sheets with a thickness of 12.5 mm (wall).
- Thin plasterboard (6.5 mm) is used for arched and complex curved surfaces. This material bends easily and does not break.
- In rooms whose height does not exceed 2.5-2.7 m, it is recommended to limit yourself to a single-level plasterboard ceiling.
- A height of 3 m allows you to decorate a room with a structure with two tiers.
- If the height of the room is 3.3 m or more, there are no fundamental restrictions on the choice of shape, design and number of levels.
Sheets of ordinary drywall Source lesstroy.net
Choice of colors
Lighting is, of course, a powerful tool for expressiveness of the ceiling, which in skillful hands is a real weapon. However, even the most well-organized lighting will not be able to correct the visual appearance of your room if you have chosen the wrong colors for the ceiling design. No matter how hard designers around the world try to tell us that following the laws of shade arrangement is not entirely practical and generally bad manners, often a banal ignorance of the basic principles of compatibility of different color temperatures leads to very sad results in the interior.
Meanwhile, with the help of the right combination, you can radically transform the exterior of the room, as well as hide its shortcomings. If there are any, of course.
Some useful tips that may be very useful for you when installing a plasterboard ceiling:
- the lack of free space in the living room can be perfectly solved by using a plasterboard ceiling that is a lighter tone than the walls;
- if the task is to make an overly tall and large room a little more comfortable, then you can darken the ceiling by choosing black or any other color that is a tone or several shades darker than the design of the wall surfaces;
the use of light shades with a glossy surface helps fill the living room with light - especially important if the room is located in a shady part and does not have good natural light; - if the windows in your living room face the south, then the plasterboard ceilings can be safely decorated in blue, gray or green - this way you will get a more airy and balanced atmosphere in the interior;
- the warm color scheme of the ceiling is an ideal solution to the problem of lack of light;
- be careful when using beige and gray in the design of the ceiling - they act as a kind of whitewash, which means that they necessarily require the presence of compensatory shades in the interior: for example, beige color interacts well with brown;
- white and black are universal colors from the basic ceiling palette that go well with any shades - however, it is worth limiting their use in the interior to a reasonable balance with other colors: a combination of white walls and a similarly whitewashed ceiling can lead to a “hospital” effect, and polar interaction black wall surfaces with the same black ceiling will cause the creation of a gloomy and oppressive psychedelic interior - what kind of family harmony can we talk about here?
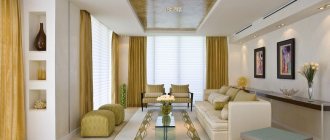
In the photo below we offer examples of the design of plasterboard ceilings for a living room, where all the above rules for selecting color combinations are followed with surgical precision and scrupulousness.
Room zoning
In recent years, there has been a clear trend towards removing various partitions in city apartments.
By dismantling interior barriers, the owners achieve a significant increase in space that can be used universally.
But even for those who agree to endure the smells from the kitchen for the sake of freedom of movement around the apartment, the issue of their own corner is relevant.
In order to create a personal nook in the living room, or to separate the area for some other purposes, drywall is ideal.
It is quite easy to construct partitions, temporary walls and other structures from it, without forgetting to follow the general style concept.
Useful materials. Table of color and texture combinations. Video
| Color/Texture | Successful combination | Influence in the interior |
| Red | White, black, orange | Relieves depression, warms and increases activity |
| Orange | Red, white, beige | Creates a feeling of cheerfulness, contributes to the establishment of a sincere and welcoming atmosphere |
| Yellow | White, red, brown | Promotes activity, but recommended for use only in limited quantities |
| Green | White, light green, mint, beige | Reduces fatigue, increases performance - it is recommended to dilute with lighter shades |
| Blue | White, gray, cream | Creates a feeling of spaciousness and pleasant coolness |
| Black | White Red | Visually reduces the volume of rooms, emphasizes nobility and chic, in excessive quantities can cause headaches and discomfort, definitely requires combination with contrasting white |
| Beige | Brown | Creates a classic homely atmosphere |
| Gloss | With matte surface | In the solo version, it increases the volume due to the mirror image of the floor surface, allows you to diversify the light pattern through the use of glare of light; in a duet with a matte surface it participates in the functional zoning of the room |
| Matte coating | Glossy | Hides ceiling unevenness, creates a calm and cozy ceiling background |
| Stucco molding | With matte surface | Directly involved in the creation of a classic interior, also helps to create a concept in the fashionable shabby chic style |
| Decorative plaster | Apply to the prepared surface, beige color, stucco | Gives solidity, works well in conjunction with stucco, helps fill the room with a homely atmosphere and unique warmth |
An excellent video for those who want to learn the entire process of installing plasterboard structures on the ceiling - from the very first step to installing the lamps. It will be useful if you want to do everything yourself!
And one more visual video demonstrating what can happen if you tackle the installation of a plasterboard ceiling wisely.
Drywall as an interior element
When planning to use drywall to decorate the living room, you should consider combining other elements with this material.
Furniture, lighting, flooring and other components of the interior should look harmonious, expressing the master’s intention through their symbiosis.
Drywall is a material that can be easily used to create an interior in any style, from traditional to ultra-modern.
It goes well with wood, metal, plastic and other finishing materials.
It is also easy to use, so even a home craftsman can create his own masterpiece in his own apartment.
Various technologies
Installation of plasterboard ceilings is carried out using two fundamentally different technologies. These methods were named after the companies - and "Giprok". Both have advantages and disadvantages.
Fastening using Knauf technology
Experienced professionals prefer Giprok, claiming that the suspensions and profiles of this manufacturer are comfortable and durable. And the frame on which the suspended ceiling is attached is made according to European standards.
Components
Since the strength of a plasterboard ceiling is an important parameter, increased demands are placed on the constituent elements of the frame. Fasteners, profiles and hangers must be made of high-quality metal and reliably hold the structure. In addition, drywall sheets should not be allowed to sag as this can cause cracking or bulging. Therefore, the correct technology for installing ceilings and reliable fasteners are so important.
Single-level
Installation stages of a single-level structure:
- Using a level on the ceiling, mark the attachment points for metal profiles. Usually they are located at a distance of 70 cm from each other. Remember that the grid of profiles must be symmetrical.
- A guide profile is fixed along the perimeter of the walls.
- First, long longitudinal ceiling profiles are installed. After this, the transverse elements are fixed.
- The sheets are attached to the frame using self-tapping screws, which are best placed at a distance of 30 cm from each other. The sheets are joined in the middle of the profile.
- At the last stage, the joints and screw heads should be sealed.
A beautiful ceiling will only be achieved if there are a minimum number of joints. Also pay attention to the manufacturer of the material. In one room you need to use sheets from the same brand, since different manufacturers may have different thicknesses and other characteristics.
Number of configurations and 3D designs
Take the choice of the type of two-level ceiling for your living room seriously. If you have any doubts, entrust a specially trained person to handle this difficult task. He will select it taking into account your wishes and financial capabilities. In addition, it is much more reliable than doing unfamiliar work yourself. And let the cozy living room with a two-level ceiling become your pride and favorite place in the house!
See also: Ceiling design selection criteria
Two-level
A two-tier ceiling is created as follows:
- Measure the height of the corners in the room. Determine height differences. The lowest angle is taken as the basis for the entire structure, from which the distance by which the first tier will be lowered is deviated (depending on the size of the lamps and hidden communications).
- Using a laser level, markings for profiles are made.
- First, a profile is installed around the perimeter of the ceiling, then the longitudinal and transverse profiles are secured.
- Self-tapping screws secure the sheets to the profiles. The seams and caps are covered with putty.
- To install the second level, markings for the future structure are made directly on the drywall of the first level with a pencil.
- Install the frame of the desired shape.
- Using special profiles, the frame is lowered to obtain a three-dimensional structure.
- The frame is sheathed with sheets of plasterboard.
- After this, they move on to finishing work.
Provided you have good theoretical training and familiarity with detailed technology, you can make two-level ceilings in the living room with lighting of an original shape.
Some benefits of drywall
A slab of gypsum in a cardboard cover, called plasterboard (sometimes in the common version “gypsum board”), is a very common building material. Let's briefly look at the advantages of drywall.
Popularity is due to the characteristics and properties of gypsum
Drywall is convenient for creating modern interiors in residential and office spaces, in halls and in the kitchen. The main advantages of this material:
- Drywall is easy to work with, its installation is simple, and to decorate a room with it, it is not necessary to invite craftsmen.
You can do everything yourself, following the recommendations and observing the installation technology - The frame makes it possible to hide lighting fixtures under the surface of the drywall and install lamps, which will improve the design. Installation of LED strips
- The interior of the hall will be decorated with additional stylish architectural elements: curved surfaces, niches, half-timbered frames and others, the installation of which can be easily done using plasterboard.
Niche - The frame leaves some space between the surface of the ceilings or walls and the sheets of plasterboard, which allows you to hide electrical wiring and other communications, install insulation and soundproofing materials.
Duct box - The environmental friendliness of plasterboard is undeniable, since gypsum is a natural material
- The material has good sound insulation and fire resistance.
The photo shows a frame for mounting plasterboard.
Special types of plasterboard - moisture-resistant and fireproof - allow you to mount surfaces in various rooms: in bathrooms, kitchens and rooms with a fireplace.