When deciding how best to design the ceiling surface, people are increasingly paying attention to plasterboard structures. Especially when it comes to such a key room for any type of residential property as the living room. There are countless options for plasterboard ceilings for the living room, and what makes this material attractive is that, in addition to its practicality, it also makes it quite easy to create a beautiful and unique interior, pleasing to the eye not only of household members, but also of visiting guests. Let's try to stay afloat in this stormy sea of interesting design methods and help you choose among 100 interior photos the most attractive and suitable option for you.
- Pros and cons of using drywall;
- Selection of design type;
- The most popular design methods;
- Using backlight;
- Choice of color scheme;
- Useful materials. Table of color and texture combinations. Video;
- Conclusion.
Pros and cons of using drywall
«+»
- easy to cut, allowing you to create structures of any type and shape;
- installation accessible even for non-professionals;
- can be subjected to additional decorative processing to enhance the external effect;
- reliably hides all traces of communications and any defects in the concrete base;
- allows you to create beautiful and voluminous multi-level structures;
- promotes optimal organization of the lighting ensemble by placing light sources of different types;
- gives a perfectly flat ceiling surface - a real paradise for perfectionists;
- allows you to turn into reality any design whims, including combinations with stretch ceilings;
- durable under correct operating conditions.
«-«
- not suitable for very low rooms due to a serious downward shift in the ceiling level - from 10 to 15 centimeters;
- not recommended for use in newly rebuilt buildings - it may crack after the inevitable shrinkage of the building;
- may deform over time or lose its color due to specific operating conditions (temperature changes, flood).
As you can see, there are significantly more points marked with a perky plus than those marked with a sad and inexpressive minus.
Moreover, even among the voiced disadvantages of drywall, you can, if desired, remove a couple of comments:
- use special moisture-resistant drywall, often available in either blue or green colors;
- install plasterboard ceilings, including for the living room, only after a year and a half after the building has been put into full operation.
In general, of all the options for finishing the ceiling surface, it is plasterboard, which is commercially available in the form of compressed sheets, that is best suited for decorating any room in a house or apartment. Well-chosen plasterboard ceilings in the living room will help emphasize the freshness and uniqueness of your design and saturate the living space to the limit with a healthy family atmosphere.
Plasterboard niche for TV - photo
Don’t rush into arranging a plasterboard niche for a TV: first analyze all the variety of options, and only then choose the ideal solution. To do this, we offer you our selection of photographs with real interiors!
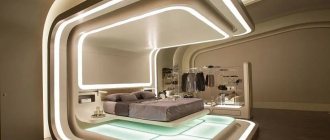
Selection of design type
One of the advantages of using plasterboard ceilings in the living room is the ability to create several levels, ultimately giving the room scale and impressiveness. However, this design is only possible if the ceilings in your living room have sufficient headroom. Otherwise, there is a risk of getting the opposite effect: instead of a positive atmosphere of comfort and tranquility, there is terrible discomfort and interior compression that can ruin even the brightest and most rosy mood.
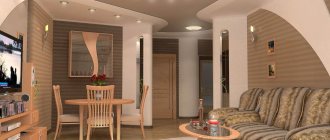
Single-level ceilings
- universal, but more often, for the obvious reason of lack of height, they are used in modest-sized rooms;
- advantageously hide all pipes, wires and other traces of communications;
- goes well with different types of lamps;
- perfectly realize themselves both in classic interiors and in loft and Scandinavian minimalism formats.
In order to decorate such a plasterboard ceiling for the living room, it will not require a lot of time and money. But the return will follow immediately: if single-level ceilings
and cannot compete with other designs in scale and nobility, they have their own, no less interesting trump cards.
Thus, they allow you to create an extremely neat and even ceiling surface, and with the correct finishing,
it is beneficial to highlight the walls or furniture located in the room.
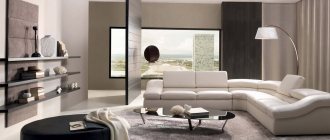
Take a look at how this happens in reality - we offer several photos of plasterboard ceilings for a hall with a successful modern design.
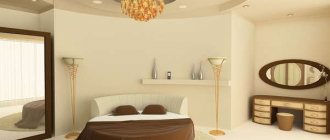
Two-level ceilings
- add sophistication and chic to any living room;
- fits perfectly into any interior;
- can be combined with tension fabrics;
- take an active part in the functional and decorative zoning of the premises;
- directly affect the shape of the living room;
- They have stylistic versatility: they are widely used both in classic interiors and in extravagant art projects.
If you are planning to use plasterboard ceilings for the hall, then you have probably seen photos with two-level structures
and immediately noticed a striking fact: how expensive, modern and noble they look against the background of all other types of ceiling surface design. Of course, everything is relative, and sometimes what is good for a designer is death for a simple man in the street (let us paraphrase a well-known expression), but the first impression cannot be pushed into the recesses of memory so easily.
The main disadvantage of using such a design is that installation is slightly more complicated. It is planned to install a frame for the second level, and if, according to the design project of the room, the frame is made of an irregular shape with numerous roundnesses, then it will take a decent amount of time. However, this is exactly the case when the time spent on installation does not matter at all - look carefully at the photos of plasterboard ceilings for a modern living room, suggested below, and make sure that sometimes it’s worth being a little patient if the end result fully satisfies all your expectations .
Multi-level ceilings
- the most technically complex type of plasterboard ceiling;
- there is widespread use of convex elements;
- the number of tiers is limited only by your own design courage and imagination;
- most often, the shape of multi-level plasterboard ceilings in the living room duplicates the interior design;
- the use of combinations with tension fabrics is often noted for greater expressiveness of the project;
- not suitable for small and low rooms.
You can hardly install plasterboard ceilings like those in the photo below for a hall with your own hands. This will definitely require the help of a professional installation team.
In general, such complex ceiling structures are widely used exclusively in spacious private houses, where the living room is a huge room with a sufficient supply of square meters, requiring careful design planning and proper zoning of different areas. In the city apartment format, projects using more than 2 levels are practically not used.
Dimensions
Typically, plasterboard sheets are produced in a standard size of 2500*1200*12.5 mm. In addition, many manufacturers produce sheets 1.2 m wide and 2 to 3.6 m long. The thickness of plasterboard can also vary from 6.5 to 12.5 mm. To choose the right material, you need to know not only its dimensions, but also take into account the type of surface that you plan to cover with it. For example, to create parts of a complex design, it is recommended to purchase arched plasterboard; its thickness does not exceed 6.5 mm, thanks to which the product can bend to any radius.
In the case when it is necessary to build partitions, niches or level walls , it is better to give preference to wall plasterboard, the thickness of which is 12.5 mm. As for the installation of ceiling structures, ceiling plasterboard with a thickness of 8 to 9.5 mm is ideal for them. It looks no different from ordinary material, but is light in weight.
The most popular design methods
The following methods for decorating plasterboard ceilings for a hall are relevant only in cases where you are dealing with a structure of two or more tiers
.
- linear frame framing
is one of the most relevant ways to emphasize the volume of a room; it is used in close connection with accent lighting; - figured frame framing
is also a popular installation method, which differs from the above in complexity - you have to bend the drywall to achieve the desired shape; - with separate segments
- a very interesting way of decorating ceilings for a living room that looks extremely modern and attractive in the photo: mounted individual segments (or one segment) form a niche into which LED strips are later inserted; - numerous combinations with tensioned fabrics
- such a complex design of the ceiling surface can often be found even in modest city apartments, but it still most successfully realizes its potential in the format of large-scale living rooms of private houses.
We invite you to carefully study all the most popular ways to design plasterboard ceilings for the living room using photos.
Here's a great slideshow for those who want more dynamics.
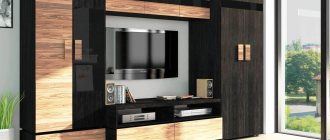
Plasterboard niche for TV in the living room
It is almost impossible to imagine a modern living room without a large TV. Even strict opponents of television do not deny themselves the pleasure of showing their favorite films or clips on the screen.
But finding a comfortable place even in a spacious living room is not always easy, because you still need to fit a sofa, table, cabinets, work area, shelves and books, musical instruments and a lot of other little things. Therefore, modern ergonomic designs come to the fore.
Plasterboard niches can easily replace old, clumsy walls. They will also help you organize space correctly, because it is a powerful tool for visually zoning a room.
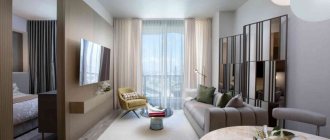
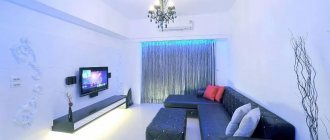
Using the backlight
The importance of the interaction of ceilings with various light sources cannot be overestimated. All the more seriously you should take the issue of properly organized lighting. After all, when you get such an effective tool of expression in your hands, if you use it too frivolously and superficially, you can harm the future visual appearance of the living room. But we are faced with a completely opposite task, right?
Among the most common ways to organize the lighting mood in the living room are:
- a combination of a central chandelier and spotlights;
- hidden lighting of niches using LED strips;
- overhead lamps located symmetrically or randomly;
- hanging lampshades for placing the necessary accents in the interior;
- combined use of spots and LED strips in the format of linear and shaped frames;
- use of illuminated tension fragments.
Currently, the main source of lighting in the living room is probably only a chandelier
.
As a rule, it is a rather massive structure and is located in the center. The role of additional lighting is assigned to point (mortise) lamps, which people also like to call spots
, as well as
LED strips
, often stretching along the perimeter of the entire room. The latter are often hidden in niches - in this case, we are talking about a mounted hidden lighting system.
Some examples of the use of chandeliers in combination with point light sources and LED strips can be seen in the following photos of plasterboard ceilings for the living room.
Another common design move is hidden lighting.
not a formed plasterboard frame, but a fragment of a tensile structure. Due to this, the effect of a special depth of the ceiling is achieved, and the conceptual arrangement of LED elements makes it possible to implement the most complex geometric patterns and even artistic compositions in practice. Below are photos where plasterboard ceilings are diluted with successful fragmentary solutions made from polyvinyl chloride film - of course, in the living room format.
Even more photos with examples of using different types of lighting on the ceiling in the living room to give the room greater artistic expression. And if you decide to organize the lighting yourself, then we advise you to read our article: “Do-it-yourself plasterboard ceiling with lighting: all the secrets and the best ideas.”
Types of profiles
The profile forms the basis on which gypsum board sheets are mounted.
Support and guide profiles
Table 2. Types of profiles.
| Type | Characteristic |
| Guide | U-shaped in cross-section, the side walls are smooth. Used as a metal support for racks. Mounted along the perimeter of the future partition. |
| Installed in the guide profile. It is to this that the sheets of drywall are attached. It is characterized by increased rigidity due to heavy load. The U-shaped structure of the profile is supplemented with stiffening ribs. |
| Ceiling | There are load-bearing and guiding types. The cross-section of metal products is smaller than that of the 2 previous types. Since it does not place a large load on the base of the partition, it is thinner. |
| Arched | The holes in the product make it possible to install them at different angles. |
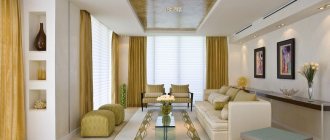
Choice of colors
Lighting is, of course, a powerful tool for expressiveness of the ceiling, which in skillful hands is a real weapon. However, even the most well-organized lighting will not be able to correct the visual appearance of your room if you have chosen the wrong colors for the ceiling design. No matter how hard designers around the world try to tell us that following the laws of shade arrangement is not entirely practical and generally bad manners, often a banal ignorance of the basic principles of compatibility of different color temperatures leads to very sad results in the interior.
Meanwhile, with the help of the right combination, you can radically transform the exterior of the room, as well as hide its shortcomings. If there are any, of course.
Some useful tips that may be very useful for you when installing a plasterboard ceiling:
- the lack of free space in the living room can be perfectly solved by using a plasterboard ceiling that is a lighter tone than the walls;
- if the task is to make an overly tall and large room a little more comfortable, then you can darken the ceiling by choosing black or any other color that is a tone or several shades darker than the design of the wall surfaces;
the use of light shades with a glossy surface helps fill the living room with light - especially important if the room is located in a shady part and does not have good natural light; - if the windows in your living room face the south, then the plasterboard ceilings can be safely decorated in blue, gray or green - this way you will get a more airy and balanced atmosphere in the interior;
- the warm color scheme of the ceiling is an ideal solution to the problem of lack of light;
- be careful when using beige and gray in the design of the ceiling - they act as a kind of whitewash, which means that they necessarily require the presence of compensatory shades in the interior: for example, beige color interacts well with brown;
- white and black are universal colors from the basic ceiling palette that go well with any shades - however, it is worth limiting their use in the interior to a reasonable balance with other colors: a combination of white walls and a similarly whitewashed ceiling can lead to a “hospital” effect, and polar interaction black wall surfaces with the same black ceiling will cause the creation of a gloomy and oppressive psychedelic interior - what kind of family harmony can we talk about here?
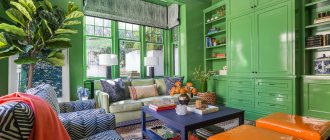
In the photo below we offer examples of the design of plasterboard ceilings for a living room, where all the above rules for selecting color combinations are followed with surgical precision and scrupulousness.
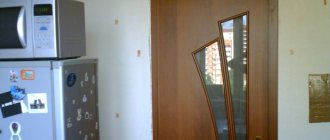
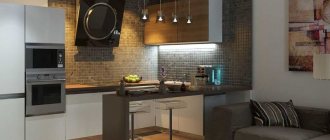
Plasterboard niche for TV in the kitchen
Functionality always comes first in the kitchen, because it is the main workroom in any apartment. But a TV won’t hurt either, because it makes it more fun to do routine things and more enjoyable to spend time with your family watching your favorite films.
But when installing a TV in the kitchen, the most difficult thing is to choose a place. It is important that it does not interfere, is not too close to the stove or sink, so that water and grease do not get on it, and that the protruding structure does not interfere with the passage.
Most often, the kitchen area is limited and not too large, so there is no talk of any cabinet cabinets. Putting the TV directly on the work surface between the food processor and the microwave oven is far from the best option, so a plasterboard niche comes to the rescue.
Useful materials. Table of color and texture combinations. Video
| Color/Texture | Successful combination | Influence in the interior |
| Red | White, black, orange | Relieves depression, warms and increases activity |
| Orange | Red, white, beige | Creates a feeling of cheerfulness, contributes to the establishment of a sincere and welcoming atmosphere |
| Yellow | White, red, brown | Promotes activity, but recommended for use only in limited quantities |
| Green | White, light green, mint, beige | Reduces fatigue, increases performance - it is recommended to dilute with lighter shades |
| Blue | White, gray, cream | Creates a feeling of spaciousness and pleasant coolness |
| Black | White Red | Visually reduces the volume of rooms, emphasizes nobility and chic, in excessive quantities can cause headaches and discomfort, definitely requires combination with contrasting white |
| Beige | Brown | Creates a classic homely atmosphere |
| Gloss | With matte surface | In the solo version, it increases the volume due to the mirror image of the floor surface, allows you to diversify the light pattern through the use of glare of light; in a duet with a matte surface it participates in the functional zoning of the room |
| Matte coating | Glossy | Hides ceiling unevenness, creates a calm and cozy ceiling background |
| Stucco molding | With matte surface | Directly involved in the creation of a classic interior, also helps to create a concept in the fashionable shabby chic style |
| Decorative plaster | Apply to the prepared surface, beige color, stucco | Gives solidity, works well in conjunction with stucco, helps fill the room with a homely atmosphere and unique warmth |
An excellent video for those who want to learn the entire process of installing plasterboard structures on the ceiling - from the very first step to installing the lamps. It will be useful if you want to do everything yourself!
And one more visual video demonstrating what can happen if you tackle the installation of a plasterboard ceiling wisely.
Finishing walls with plasterboard (step-by-step instructions for beginners)
Drywall is one of the most economical materials for leveling and finishing walls. It is quite easy to work with, so even a person without experience can handle it.
Today we will try to look at a process such as finishing walls with plasterboard, step-by-step instructions.
First you need to make a list of the necessary materials and tools. To work you will need:
- Plasterboard sheets;
- Drill;
- Fastening materials;
- Putty knife;
- Putty;
- Stationery knife, ruler and pencil;
- Level;
- Roulette;
- Screwdriver and screws;
- Wooden slats or metal profile, depending on the installation method;
- Rubber hammer;
- Sandpaper.
There are several ways to decorate walls with plasterboard sheets.
Arches
With the help of arches of various types, corners are smoothed out, making plasterboard doorways and other elements of the apartment’s interior softer and more modern. To create an arch, you will need a set of drywall tools and material, which includes an arched profile, drywall, and self-tapping screws.
Plasterboard arches in the interior The profile can be bent by cutting its edges with a certain step. The profile should be secured using self-tapping screws. First you need to attach it vertically, then bend it on top. If lighting is provided in the arch, then you should lay a corrugated wire with wires under the drywall. This must be done carefully. The wires must be solid and not touch metal. The wires are hidden and laid in corrugation. Drywall is applied to the profile. For better bending, you need to take a sheet 9 mm thick. There are several methods for bending gypsum boards. Having chosen one of them, the bent, cut sheet of drywall is attached to the profile with self-tapping screws.
After installing the gypsum board, you should start reinforcing the corners, joints and subsequent decoration. Plasterboard arches in an apartment or house make the atmosphere more pleasant, the room larger and brighter.
Option for a plasterboard arch in the interior of a room
What you need
In order for a gypsum board structure to last as long as possible, it is important to use the right tools to create it. The frame for plasterboard is made from cutter 0270 and U-shaped metal profiles 3-6 m long. Also, installation of the frame involves the use of guide and support profiles, which help create the required angle of the metal structure for drywall.
The structure is fastened with hangers, screws and dowels. The building can be sheathed with SP 551012000 sheets. Working with gypsum boards is impossible without a tape measure, level, tape roller and ruler.
Shower room
A shower cabin made of plasterboard takes up little space, but at the same time it is practical to use. They come to the creation of such a design when there are no appropriate cabin sizes. It can be straight, angular, semicircular.
Shower cabin design plan To produce this design with your own hands, you will need a diagram. Afterwards, markings are made according to the plan. Be sure to indicate the supply of water pipes, sewerage and electrical wiring. Preparing the base for drywall
Diagram for installing a drain pipe in the floor of a shower stall. A plasterboard shower stall starts from the bottom. The pallet is made of brick and cement. In this process, a sewer outlet is manufactured. Afterwards the assembly of the frame begins. The frame must be strong, rigid, and even. It must be covered with moisture-resistant plasterboard. All profiles must be galvanized to prevent metal corrosion.
Creating, covering and finishing the frame of the shower cabin After covering the frame and reinforcing the joints, tiles are laid on the plasterboard surface.
The nuances of covering gypsum board niches
This process has several features.
- When adjusting gypsum boards, try to avoid large gaps, this is especially true in corner areas. After all, even after careful finishing they can crack.
- If the construction of curved surfaces is envisaged, it is recommended to use a special, thinner type of material: the so-called arched plasterboard. It bends much easier than standard wall or moisture resistant.
- To give the appropriate shape, do not wet the sheets; after drying, they become more brittle. It makes more sense to use the “dry” bending method, making transverse cuts and filling the resulting gaps.
- When puttying, the joints are sealed with reinforcing mesh and a special putty compound for seams.