Lighting fixtures are like the icing on the cake when completing an interior design. Although chandeliers are sometimes not given a key role and are not carefully chosen, they play a significant role in the overall feeling of the room’s decor. That is why designers quite often make custom-made chandeliers on their own when decorating residential premises. This is the only way to create a unique and inimitable product.
But you don’t have to be qualified specialists; you can try to make a chandelier with your own hands from scrap materials.
Chandelier made from disposable spoons
This is one of the simplest and most importantly, inexpensive options for a homemade chandelier.
After all, the material for its creation will be very cheap and the process itself will not require special skills. You will need:
- 5 liter plastic bottle;
- disposable spoons;
- glue;
- cartridge;
- sharp knife.
Step-by-step instruction:
- Take a clean and dry bottle, remove the label from it and cut off the bottom.
- Take spoons and cut off the handles, leaving “tails” of about 2 centimeters.
- We glue the spoons with their tails up to the bottle, starting from the base and moving to the very top. We do this in a checkerboard pattern and placing the spoons as close to each other as possible so that there are no gaps.
- We place the cartridge in the neck area of the bottle and fix it with glue and a frame.
- Next, you should wait until the glue is completely dry and begin installing the chandelier.
If desired, the decor of the product can be changed. You can stick spoons up to half the bottle or use them in different colors. You can also paint them yourself, which will add even more originality to the product.
Leaf chandelier
This is a very original product made from plastic bottles. The material for production has a lot of colors, which allows you to approach the process of working with your imagination and show your creativity.
Step-by-step instruction
- From plastic bottles, we cut out blanks in the form of leaves of different shapes and sizes.
- Using a soldering iron, you need to make the characteristic veins on the leaves and make the edges a little more round, which will create a natural effect.
- Using a hot needle, we make holes at the base of the leaves so that we can connect them.
- We make a frame of metal wire and strong branches, previously formed from leaves.
This technology can also be used for lamps that will complement the chandelier, creating a whole set of lighting items in the same style.
Difficulties must be overcome
To make a chandelier, you need to think through everything. The main thing is not to spoil the materials. The first step to creating a masterpiece is to familiarize yourself with the presented master classes, study the photo and video instructions, and only then get started.
This order of work will allow you to understand the sequence of your thoughts, and you will gain skills in working with certain materials. Perhaps while watching you will come up with a unique idea.
Although the work is not difficult, it is painstaking, so no matter what material you take, it is better to do it slowly. The created lamp will serve you for many years. Follow safety rules when working with electrical appliances . Use only high-quality insulating and connecting materials.
Before creating a lamp, first sketch its final result - this develops spatial thinking and allows you to see the subtleties that you will have to deal with. After following the instructions you will not have any difficulties.
Recommended viewing: Butterfly waterfall.
Paper butterfly chandelier
This is an incredibly beautiful handmade chandelier. It is done very simply and does not require material costs. After all, the material from which it is made is paper.
Step-by-step instruction
- As a base, you can take the lampshade of an old chandelier or make a frame in the form of a circle out of metal wire.
- Using paper templates, cut out butterflies of different sizes. Ideally, take a velvet type of paper. Such butterflies look great, and with the help of a vacuum cleaner, they can be easily cleaned of dust.
- Using a fishing line and a needle, we string the butterflies, forming stripes of them. If desired, they can be fixed with glue; the choice remains with the master.
- The finished strips are fixed to the frame and the butterflies are distributed, creating the appearance of their accumulation.
Manufacturing techniques
To make a homemade lampshade for a lamp or chandelier, various techniques are used that are familiar to many housewives and home craftsmen.
Here are some of them:
- gluing;
- sewing;
- knitting;
- macrame;
- origami;
- wood carving.
These and other less common techniques, as well as their various combinations, make it possible to literally create a unique ceiling or wall lighting fixture out of nothing.
Fabric chandeliers
This type of chandelier suggests many types. After all, fabrics are so diverse that they can satisfy the taste of every person.
To make it, you will need to make a frame in the form of two circles of iron wire. Then, cut the fabric to the size of the frame from the selected fabric. While working, keep in mind that the diameter of the base of the chandelier must correspond to the width of the fabric so that the chandelier looks symmetrical. Next, we stitch the fabric, fixing it directly to the frame and then connecting its edges. If desired, you can decorate the resulting lampshade with lace, which will give the product a special design style.
Labels create diagonal patterns
A great idea is to use metal tags designed for knifeless opening of canned food or beer bottles to create lampshades. Look at the photo - with careful work you get a wonderful result! The tongue plates can be laid diagonally, this will add style and elegance to the structure. The cool magical shine can be observed even in the darkness.
Chandelier made of threads and ball
An unusual lampshade, created using various threads and a ball, can be made of any size and in different colors.
You will need:
- 1 meter of dense thread, you can use wool, jute or cotton thread;
- petrolatum;
- brush;
- glue;
- cartridge;
- two balls.
Manufacturing process:
- Inflate the ball and draw borders for the threads at the top and bottom.
- Spread the entire perimeter of the ball with Vaseline.
- We begin to wind the threads around the ball in random order, first spreading them with PVA glue.
- Maintains the product until the glue dries completely. Then, we burst the ball and pull it through the threads.
- We fix the cartridge in the upper hole using a frame.
If desired, such a chandelier can be made in one color or in several. For beauty, elements in the form of butterflies or rhinestone ornaments are added. The ball can be one, large, or several medium, depending on your preferences.
From glass bottles
This is a difficult technology, the implementation of which requires special care. But in the end, you get an original and unusual chandelier, suitable for modern interior styles.
You will need:
- bottle (can be used for champagne or wine);
- sandpaper;
- frame made of metal or wood;
- cartridge;
- glass cutter;
- the wire.
Manufacturing process
- Take a dry and clean bottle and use a glass cutter to cut off the bottom.
- Next, sand the edges of the cut using sanding paper.
- We stretch the wire through the neck of the bottle and install the cartridge.
- We fix the product on the frame.
The final appearance of the product depends on your imagination. You can add various decorations or create a chandelier from several identical or different bottles. In any case, in the end, the result will have an original and unusual look.
Selection principles
When purchasing a finished forged chandelier, you need to consider:
- interior style;
- availability of additional functions;
- possibility of remote control;
- ceiling height;
- intensity of natural light in the room.
The choice of design depends on the interior style:
- Baroque. For this style you need to choose a lamp with decorative elements. These can be branches, petals, bends, rings.
- Provence. You should buy lighting fixtures that are decorated in an antique style. The designs can be supplemented with wooden parts and fabric. Multi-tiered chandeliers are more suitable.
- Modern. This style is characterized by beautiful massive lamps. They should attract attention and delight.
For the loft style, it is better to choose simple, rough chandeliers that are similar to lighting fixtures installed inside industrial premises. Surface colors should be natural - gray, white, black.
Forged chandeliers in the interior (Photo: Instagram / domhome.kg)
Advantages and disadvantages
Positive sides:
- Attractive view. Forged structures can be equated to works of art.
- Reliability, wear resistance, high strength, durability.
- Versatility. Forged elements combine well with different materials.
Negative sides:
- Large weight of the structure. It is necessary to make more fasteners.
- Without an anti-corrosion coating, the metal will begin to deteriorate from rust.
Forged chandeliers cannot be mounted on a ceiling made of plasterboard or plastic panels.
Manufacturers and cost
Manufacturers:
- F-Promo;
- FREYA;
- MW-Light;
- Velante;
- Crystal-LUX.
Price - from 20,000 rubles.
Chandelier made of discs
If you have a lot of disks that you don’t need, but it’s a pity to throw them away, then you can make a beautiful chandelier out of them.
Materials for work:
- two round wooden disks, slightly larger in diameter than the disks themselves. At the same time, the thickness of the wooden disks should be different;
- wooden or metal stand;
- lamp;
- disks;
- starter with switch.
Work process
- In a wider circle of wood, we make a hole and install the starter in it.
- Then we connect the lamp and string disks onto it.
- We place racks around and fix them in a circle of disks.
When finished, such a chandelier will not require careful maintenance. But you should be careful, because the edges of the disks are quite sharp. Therefore, the product should be placed so that children cannot reach it.
Constructive creativity
A lamp can look original even without a lampshade. Instead, the emphasis is on its structural part, which holds the lamp. It can be made of wood, metal or plastic plumbing fittings, plaster or fiber-reinforced concrete.
So we found a use for old kerosene lamps Chandelier for a country interior A plumber's dream
Spider made of plastic fittings
An option made of metal pipes for an industrial interior. Where else to attach a tea strainer, if not on a lamp? Concrete lamp bases
Concrete night light
You can come up with a lot more, but we will bring to your attention three interesting and simple options for making lamps from wood, plaster, and concrete.
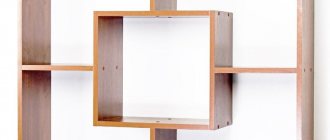
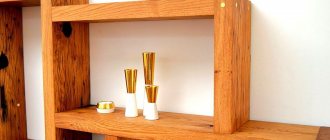
Lampshade made of wooden slats
So, we bring to your attention several interesting options for making lamps yourself. The first is made from wooden moldings with a small cross-section: slats, window beads, door layout. You can take material from laminated MDF, but keep in mind that gluing it will be more difficult.
To work, you will need a minimum arsenal of tools and materials. In addition to the glazing bead, this is a piece of plastic sewer pipe, a reel of LED strip, a miter box with a hacksaw, a glue gun, a tape measure and a stationery knife.
Required Tools
Table 1. Instructions for making a lampshade from wooden slats
| Steps, photo | Description |
| First you need to decide on the size of the lamp. His lampshade will be assembled from frames glued together from these slats. Ideally, their size is 20 cm. Please note! Both edges are cut at 45 degrees, which is why you need to use a miter box. |
| Step 2 – coat the cut areas with glue | After all the blanks have been cut out, you can begin gluing the frames. To do this, apply glue to the cut areas... |
| ... and press the two parts at right angles. |
| If, as in our case, you have laminated material, it is advisable to use two or even three colors. When working with simple wooden slats, you will have to tint them manually. This must be done at the stage of manufacturing the frames, and only after that the lamp body can be assembled from them. They are simply glued together in a perpendicular position. |
| Step 5 - Install the Jumper | Transverse jumpers are installed at the bottom and top of the resulting structure, on which the electrical part of the lamp will rest. But we are not gluing the top frame with such a jumper yet. |
| Step 5 – Cut the pipe | The distance between the jumpers must be measured and the corresponding piece of pipe must be cut to fit between them. |
| We need part of the pipe along with the socket. It is from this that we begin winding the LED strip. |
| Having installed our improvised LED lamp on the lower support, we clamp it with the upper frame, which we only now place on glue. |
| This lamp can be tabletop or hung on a chain. For it to work, just connect the mounting end of the tape to the wire and plug it into the network. |
Plaster lampshade
We have already described above how to use a balloon to shape a lampshade made of threads. The same can be done when working with plaster. To do this, the ball is inflated, placed on the can and firmly fixed to it using masking tape.
The idea is to cover the ball with pieces of gauze soaked in a thin gypsum mixture - you can use ordinary putty. Before starting this work, you need to attach the lamp socket to the top of the ball and circle it with a marker - this circle should remain free.
The ball is attached to the jar with tape
A marker is used to outline the area for the cartridge. The first layer of gauze is applied.
1. Apply the first layer of gauze, trying to make the lower contour uneven - this will be the whole beauty of this lamp. Its surface, by the way, will not be smooth either.
2. After you finish laying the first layer, proceed to the second. Only now you lay out the gauze dry, after which you spread a layer of plaster on top of it with your hand and leave it to harden.
3. After the plaster has hardened, cut off the tape that secures the ball, remove it and begin decorating the lampshade.
Laying the second layer of gauze dry
Apply the layer by hand and leave to dry.
Removing the lampshade from the can
4. The front design of a lampshade is a creative and completely individual matter. In this case, two types of acrylic paint were used to paint it - mint and lemon. First, we walked over the protruding parts of the surface with a sponge, and then over the dimples with a brush.
Applying the first layer of paint with a sponge Drawing the recesses with a brush
Installing the chuck
5. When the lampshade is decorated, you need to install the socket into the hole left in the center, screw in the base and lamp. Note that the lamp here is installed with a large bulb and a mirror reflection.
Plaster lampshade as a table lamp
This version of the lamp is good because it can be either placed on a table or hung from the ceiling.
Pendant lamp with plaster lampshade
Concrete lamps
It’s not for nothing that concrete is called the most versatile material in the world. It can be sculpted into anything and gives the most design possibilities. This also applies to lamps - the main thing is to figure out what to make the formwork out of. And it can be a variety of objects, from Tetra Pak milk cartons to rubber balls and old plastic canisters. As a result, you can get the following products:
Concrete lampshades on a long suspension Table lamp with a concrete base Such a night light can be made in ball formwork
Lamp in the form of a coil
As already mentioned, the most important thing when working with concrete is the formwork. And if you do not find objects suitable in shape and size that could be used for this purpose, you will have to do it yourself.
Table 2. Step-by-step instructions for making a lamp from concrete
| Steps, photo | A comment |
| Step 1 – sketch of the ceiling | You can make formwork from any moisture-proof material, but the easiest way to use ceiling tiles for this purpose. However, before you start cutting it, you need to sketch the lampshade on paper. In this case, it will be a triangular lampshade in the form of a truncated pyramid. |
| Step 2 - transferring the contour of the lampshade to plastic | Then place the paper template on the tile, follow its contours and draw bend lines. |
| Step 3 - assembling the layout | You will have to assemble two of these shapes - a larger and a smaller one. The difference between them will form the thickness of the walls of the ceiling. |
| Step 4 - tube installation | But first you need to figure out the layout. Roll it up as shown in the photo, place it on a backing made from a piece of tile and secure it to it with tape. Place the tube inside that will be needed for the wire and seal it with concrete, making a kind of bottom with a hole. |
| Mix concrete with any light filler: expanded clay, polystyrene chips or polymer fiber. Finding a recipe is not a problem. You can also take a dry cement-based plaster mixture and add reinforcing filler to it. |
| Step 6 – filling the mold with concrete | Coat the outside of the model walls with machine oil so that the concrete does not adhere to it. The main form is put on the model, and the distance between them will be filled with concrete. To do this, you need to use a funnel and constantly shake the mold so that the concrete settles better and the air comes out of it. |
| After a couple of days, you can remove the product from the mold. You remove it from the backing... |
| ... open the mold and take out the tube. Proceed with caution as the product has not yet gained strength. |
| Step 9 – concrete surface treatment | Let the lampshade dry a little more and begin processing it. You can remove the sharpness of the edges and, if necessary, lightly sand the surface. |
| To prevent concrete from absorbing moisture and maintaining its beautiful appearance, its surface should be covered with acrylic varnish for stone. |
| Step 11 - Installing the Chuck | All that remains is to install the socket - and the lamp can be suspended from the ceiling. |
You can do it much simpler - use two flower pots of different sizes as formwork, placing one inside the other. In this case, you will get lampshades of the same shape as in the picture below, and you can come up with a decoration method yourself.
Design option for concrete lampshades
Of course, a concrete lamp will not look good in an ordinary room with floral wallpaper and textiles. Such things are used when decorating interiors in the loft style, which has been gaining popularity for a century now and is especially well suited for studio-type apartments. And since one light bulb cannot adequately illuminate a spacious room, such lamps are used in multiples, hung in groups or rows, and, if necessary, supplemented with spotlights.
Nowadays, few people use incandescent light bulbs; they have been replaced by energy-saving and LED analogues. But they are still on sale, and are very inexpensive. And many people have accumulated a lot of old, burnt-out lamps of various types and sizes. If you like to create new interesting things from unnecessary trash and scrap materials, we suggest you see what you can make from them in a special article.
Shabby chic style
To make lighting in this style, you will need fabric and beads. Such lampshades look elegant and amaze all guests of the house with their sophistication.
Necessary materials:
- metal carcass;
- cartridge;
- beads and beads of different sizes;
- threads and chains for decoration.
In fact, such work does not require special skills. But you will need patience, because the process will take a lot of time. Usually, for lampshades, three rings of iron wire are taken, of the same or different sizes. If they are the same, then we get lighting in the Art Nouveau style.
It is important to consider that before you start decorating the product, you need to paint it and stretch the material around the frame.
Finished lampshade, trimmed with beads and beads, to your taste. If desired, you can decorate with rhinestones.
As you can see, there are quite a lot of options for hand-made chandeliers. At the same time, such an interior element will decorate any room and make its furnishings original and unique, which will show the original nature of the housewife. With this lighting of your home, you can decorate any room and your guests will certainly admire your talent and originality of taste.
Safety requirements for lighting devices
Looking through catalogs of lighting fixtures, it is easy to notice that most of the housings are made of metal, while the shades are made of glass or lighting plastic. This is dictated by safety requirements.
Important! A homemade lampshade or shade for a chandelier with your own hands should not melt when heated. The electrical wire must be insulated as much as possible and hidden behind the decor or laid in prepared grooves.
Although wood is considered a flammable material, it is impregnated with a special composition to prevent fire. Often such lamps are made for a hallway or kitchen in a country style or in the spirit of old Provence.
The shape of the chandelier requires heating from an incandescent lamp, so spherical and pyramidal lampshades must have holes for hot air to escape.
The shape of the lampshade also matters. An ordinary light bulb will be blinding if the dome of the lampshade is pointed downwards. This makes sense when the decorative lighting fixture hangs low over a crib or dining table.
To increase the amount of light from the shades “turned away” from you, you can add a mirror element - a light reflector.
It is important to consider the method of attachment to the socket, where the electricity supply to the light bulb comes from. A heavy metal or wooden base requires reliable fastening to a hook mounted in the ceiling.
If you follow safety conditions, you can make a chandelier with your own hands from scrap materials, including disposable tableware and packaging cardboard.