What is it and its purpose
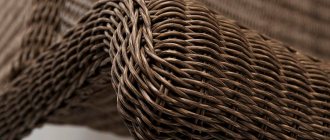
A furniture screw is a special fastener, the main purpose of which is to connect parts made of wood materials by screwing and creating threads inside the product. It is used in the assembly of furniture structures, carpentry and construction products, since such fastening has a positive effect on the quality of furniture, its service life, and aesthetics.
Used for such building materials that are used in the production of cabinet furniture, such as:
- solid wood sheets;
- chipboard;
- fibreboard;
- laminated chipboard;
- plywood;
- thin drywall.
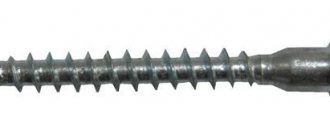
Externally, a furniture screw is a rod made of metal and designed:
- a head of a certain shape, which is part of the fastener and also serves to transmit torque;
- slot - a recess of a certain shape at the end of the hardware head;
- massive, widely protruding thread above the main rod, the lower turns of which are conical and jagged;
- sharp tip.
Thanks to the large thread and rod surface, the stress on the parts to be twisted is minimized. As a result, the assembled structure becomes resistant to any impact. Also, the screws are in close contact with the material being fastened due to the same diameter of the smooth and core parts of the hardware.
In the production of furniture screws, high-quality high-strength carbon steel is used, which, due to its chemical composition and heat treatment, has the necessary set of mechanical characteristics. This allows you to easily remove hardware from the material if it is installed incorrectly. To increase the anti-corrosion properties, the screws are treated with a special composition based on nickel, zinc, and brass.
A furniture screw has advantages and disadvantages. Positive characteristics include:
- reliable and stable fixation;
- the easiest possible installation;
- ability to withstand high fracture loads;
- the ability to connect structural elements one after another;
- tightly tightening furniture parts;
- does not require special skills or complex auxiliary devices.
In addition to the advantages, it is necessary to identify the disadvantages of furniture screws:
- the need to disguise products using a plastic plug in the color of the material;
- Elements connected using hardware cannot be disassembled, since the structure will not withstand repeated assembly.
A furniture screw is responsible for fastening furniture body parts together, fastening shelves, and connecting sections. It determines the reliability of the connection, safety, and the ability to easily disassemble and reassemble furniture without damaging it when moving is necessary.
Mounting angles
The angle bracket is similar to hinges in that it has an eye at the end, but its right angle curved shape allows it to attach to the top of your kitchen cabinet.
The “roof”, unlike the back wall, is quite strong and can easily withstand the load exerted by the furniture with dishes and equipment placed in it. The hanging technology is also no different from the previous one.
The disadvantages and advantages of each system are not as important as the quality of the purchased set as a whole, so choose furniture based on its service life.
Hanging kitchen cabinetry is never a daunting task with an inexpensive household peg-hole drill and matching concrete drill bits. The task became more complicated when traditional Soviet methods of fastening using corners or furniture hinges were replaced by modern ones.
Varieties
The more popular and popular samples used in the production, assembly, and installation of furniture include:
Also in the furniture industry, a number of characteristic screws are used that have blunt ends, large threads adapted for chipboard, and specific heads. One such product is a galvanized steel screw that allows you to attach chipboard sheets at a 90-degree angle.
Universal screw
The product is presented in the form of a cylinder-shaped rod with various types of heads and external threads. Its main task is to fasten individual assembly elements inside furniture structures. The upper part of this screw can have different shapes:
- the countersunk head of the product, which, after screwing, is completely recessed and does not protrude above the materials being fastened, its scope of application is the installation of shelves, handles, hinges, guide runners for drawers;
- the semi-countersunk head, due to the smooth transition from the rod to the thread, at the moment of twisting, goes into the material, as well as the mating part;
- semicircular head, the horizontal plane and the inner base of the surface of the semicircular head of which, during installation, additionally creates pressure on the material being fastened, increasing the strength of the structural unit, thereby eliminating its deformation.
The presence of a special thread makes it possible to easily attach the screw even to the hardest types of wood. Hardware splines can be simple or cross-shaped. Products with a cross-shaped slot have a number of irrefutable advantages:
- a screwdriver or drill is instantly fixed in the head;
- You only need one screwdriver;
- The installation process in hard-to-reach places is carried out without much effort.
When using universal screws, you must equip yourself with a screwdriver and screwdrivers with replaceable bits. To ensure a high-quality connection of materials, you should drill holes during the process of screwing in the screws, the diameter of which will be 70% of the thickness of the hardware, and also choose the right drill.
Confirmat
These products have another name - Euro-screws, which in modern furniture production are considered a more popular type of fastening and fixing devices, as they are among the most reliable, inexpensive furniture connections. Such products are resistant to mechanical stress and fracture.
Confirmat is used for joining structures made of materials such as wood, chipboard, multi-layer plywood, chipboard. In many cases, screws with dimensions of 5x50 mm and 7x50 mm are used. In addition to fastening parts, euroscrews replace a regular angle, performing a body-forming function, while withstanding all bending loads. To make cabinet furniture look aesthetically pleasing, confirmations are complemented with plugs made of plastic. They disguise a noticeable part of the hat to match the color of the furniture product.
Distinctive features of these fasteners are large threads, a blunt tip, a cylindrical head, and a hexagonal slot. When assembling structures, furniture hexagon screws do not require special skills or specialized equipment.
The screw tie is performed using a hex bit, a screwdriver, a special wrench, or a drill. Products designed to accommodate a Phillips screwdriver should not be used. This technology will not allow the connecting elements to be tightly tightened. As a result, the structure will become loose.
Shape and dimensions
A furniture screw is the most popular fastening method in the production and assembly of furniture. There are many sizes and shapes of hardware designed to carry out any technological operations associated with the manufacture of furniture products.
The length and diameter of such hardware are determined in millimeters or by number. The ratio of diameter to length varies for each standard, but these differences do not have much practical significance. The number is determined by a number from 1 to 20; the higher the number, the thicker the product. Diameters with numbers 2,3,4,6 are widely used.
Hanging corner
An old but effective way to attach any furniture to the wall
The system of fastening cabinets using a rigid corner with two holes for fastening to a cabinet and hanging has been known since old Soviet times.
Through holes are drilled along the edges of the frame, in the upper part of the cover, through them, using a bolt and nut, the corners are fixed flush with the back wall, they are hung on self-tapping screws screwed into the dowel. The mounting system is very reliable; it allows you to adjust only the height of the suspension.
How to choose the right one
To select the correct furniture screw, you should consider what material it will be installed in. The choice of head will depend on the force applied and the space available when screwing. It is also important to choose not only the type of head, but also the pattern for the tool used.
With proper selection of bits, a strong grip of the fastening element with the screwing tool is ensured. Only in this case, the screws smoothly and evenly enter wooden boards, drywall, laminated chipboard, MDF.
Some important nuances that will help buyers of fasteners much better navigate their diversity, as well as make the right choice:
- color - screws from the same batch must be in the same color scheme. This indicates that all products have undergone the same processing under similar conditions, and also have the appropriate strength and corrosion resistance;
- parameter - the sizes of one batch of products should not be visually different from each other, and also comply with standards;
- pitch - the load between the threads should be distributed evenly;
- hole - the slot must be clear, symmetrical, and be deep enough;
- marking - the standard designation of screws - is a number in which the first number is the size of the thread diameter, the second is the length of the product from its very head to the sharp tip.
If furniture screws meet the specified criteria, then you can be confident in the quality of the furniture fasteners, which will not break during installation.
In order to efficiently assemble and install furniture elements, you need to use such a convenient, accessible assistant in fastening work as a screw. This type of furniture screed will not only simplify the assembly and installation procedure, but will also be invisible after the installation process is completed, thanks to its unique structure. All structures and foundations fixed with such fasteners will retain their shape, appearance, and properties for a long time.
Video
For the manufacture of furnishings, various elements for connecting parts are used. Self-tapping screws are a popular type of fastener that has its own undeniable advantages. They are especially often used for assembling cabinet furniture, ensuring a sound and durable connection of structural parts.
Self-tapping screws are a popular type of fastener that has its own undeniable advantages.
It is recommended to consult with the seller if you intend to create the furniture yourself.
Self-tapping screws have different types. It is important to select fasteners based on the material and its density, thickness, etc. The selection of self-tapping screws is also influenced by the type of design and the desired appearance of the product.
Self-tapping screws have different types.
What is a self-tapping screw?
This type of fastener, known as a self-tapping screw, is a type of metal screw with a screw thread and a pointed or flat end. The head of the element has a notch (straight, cross or polygonal) for twisting it into the fabric. To more quickly connect parts of a cabinet or other object, for elements with a sharp end, use a screwdriver (in the absence of a screwdriver).
The selection of self-tapping screws is also influenced by the type of design and the desired appearance of the product.
To connect specific parts, elements with different coatings are used.
Self-tapping screws are used to fasten parts without prepared holes or with them. Due to the thread, the screw is easily screwed into a wooden panel or chipboard. For hidden fastening of furniture parts, an eccentric coupler is used, in which self-tapping screws play a major role. As a result of this type of assembly, tables or other objects are neat, without external traces of installation that spoil the appearance of the product.
This type of fastener, known as a self-tapping screw, is a type of metal screw with a screw thread and a pointed or flat end.
Important! The length of the screws can reach up to 50 mm and above. These fasteners are designed for thick solid wood panels.
The appearance of the product is affected by the possibility of installing a hidden connection.
Eccentric coupler
This type of fastening element is used when assembling furniture in a factory environment, due to the complexity of drilling holes for its installation.
The main advantage of the eccentric screed is its concealability, which prevents the appearance of the cabinet or other cabinet furniture from being spoiled.
Also, using this fastening method, it is possible to fix the parts at an angle relative to each other.
Article on the topic: How to arrange furniture in a kitchen of 12 sq.m.
As mentioned above, the installation of eccentrics is carried out in the conditions of factory furniture production, since the sampling depths for their installation are at least 12 millimeters. And this despite the fact that the wall thickness of the laminated particle board has a size of 16 millimeters. Therefore, without the use of special equipment, which is impractical to purchase for a one-time installation of interior items, installation of such fasteners is practically impossible.
Types of self-tapping screws
Depending on the material and features of the design parts, there are two types of fastenings:
- with rare carvings and a sharp end;
- confirmations.
Due to the thread, the screw is easily screwed into a wooden panel or chipboard.
The first type is used for solid wood, chipboard, laminated chipboard and MDF. May vary in length and diameter.
Advantages and disadvantages
For furniture layout, fastenings are of utmost importance. And the appearance of the product is influenced by the possibility of installing a hidden connection.
For furniture layout, fastenings are of utmost importance.
The advantages of self-tapping screws as fasteners are:
- eccentric coupler;
- neat and reliable connection;
- precision in fitting parts.
When purchasing self-tapping screws, it is important to consider many points.
They are especially often used for assembling cabinet furniture, ensuring a sound and durable connection of structural parts.
If a set of self-tapping screws is used to assemble a furniture structure, then if you work with them carelessly, the following is possible:
- distortions of parts;
- loosening of the fastening when screwing in repeatedly.
The base of the screws is steel.
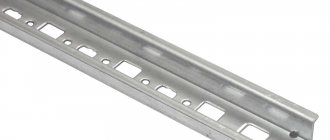
Using the Mounting Bar
The suspension structure is based on a strip of metal with holes prepared in advance in production. It can be up to three meters long, but most often it is cut into pieces of the required length. The strip itself is not flat, but slightly wavy, which gives it rigidity.
It is attached to the wall with self-tapping screws and dowels or anchors if the cabinets are heavy. The furniture itself is equipped with special hanging mechanisms, the legs of which stick out from the back and cling to the bar when hanging.
The big advantage of this system is its ease of installation. One person can easily handle it. The task is made easier by the fact that the mounting bar itself just needs to be leveled, and the attached cabinets can be moved along it.
How to choose?
When purchasing self-tapping screws, it is important to consider many points. The base of the screws is steel. To connect specific parts, elements with different coatings are used. When assembling furniture, you must consider:
- length of fastening elements;
- their diameter;
- cap thickness;
- carving;
- degree of corrosion (depending on the coating).
| Thread width and height | Application |
| Rare and high | MDF, wood, chipboard, fiberboard |
| Frequent and low | Hardwood |
| Combined (two-way) | Combined materials (with different densities) |
To connect specific parts, elements with different coatings are used.
The selection of self-tapping screws is also influenced by the type of design and the desired appearance of the product.
The color of the fasteners is also important when the connection is open. In this case, it is worth choosing elements to match the canvas.
To make a table or cabinet, you may need different screws, so it is recommended to consult with the seller if you are going to create the furniture yourself.
It is worth choosing elements to match the canvas.
Self-tapping screws have different types.
Confirmat is used for a more reliable screed. At the same time, a cap is often placed on the cap to make the fastener look more aesthetically pleasing.
To make a table or cabinet, you may need different screws.
Self-tapping screws are used to fasten parts without prepared holes or with them.
Features of fastening heavy structures to foam blocks
When fixing sliding wardrobes against the wall, the question arises of which screws to use to attach the chipboard to the foam block masonry. If you use the wrong hardware, the cabinet wall may be ripped out of the wall. To prevent this from happening, attach the chipboard to the foam block using special self-tapping screws:
- High-expansion metal dowel. Before screwing in the hardware, pre-drill the chipboard sheet in the desired location and prepare a hole in the wall. The anchoring depth and dowel shape depend on the planned load.
- Metal frame dowel - suitable for screwing heavy chipboard structures, including shelves and racks. A metal sleeve ensures fixation of the hardware inside the hole. An anchor for aerated concrete has structural differences from fasteners for ordinary concrete - keep this in mind when purchasing.
Also, the previously mentioned chemical anchors are used to fix chipboard structures on foam block walls.
VIDEO: Furniture screws
Self-tapping screws for chipboard are universal self-tapping screws for joining chipboard sheets. Such self-tapping screws include GOST 1144-80, GOST 1145-80 and GOST 1146-80, which have different diameters from 1.6 mm to 10.0 mm, and the length can reach 120 mm, which allows you to connect sheets of different thicknesses. Chipboard sheets are widely used in various areas of production from furniture to indoor wall decoration, since this material has a cost significantly lower than other wood products and is easy to install.
The invention of chipboard (chipboard) in the middle of the last century had a purely commercial motive, since waste from wood processing enterprises, mostly sawdust, at that time amounted to approximately 40%. The production of chipboards made it possible to reduce this figure to 10%.
Nowadays, this material is widely used in the production of furniture, various partitions, and interior decoration, both rough and fine. The most popular thickness is 16 mm. May have a laminated coating. Sold both as furniture panels of certain sizes and in large sheets. As a rule, large hardware stores offer on-site cutting for a nominal fee or completely free. Here you can purchase all the necessary hardware for self-assembly of any structures. These are, first of all, self-tapping screws. Let's look at them in more detail.
Screw with drill, torx slot and countersunk head
According to GOST standards 1144-80, 1145-80, 1146-80 are produced in diameters:
The presence of a drill makes the screwing process much easier. It is recommended to drill a hole in the part to be fastened since the threads are incomplete. There are countersinking ribs on the inside of the head. Has the following dimensions:
- rod diameter 4-6 mm;
- length 18-160 mm;
- head diameter 7.5-11.5 mm;
- drill length 3.7-6.7 mm.
Screw with torx slot and half-round head
- rod diameter 3-6 mm;
- length 16-120 mm;
- head diameter 6-12 mm;
- head height 2.3-4.2 mm.
- The carving is complete. Pre-drilling is recommended, especially for end connections.
Self-tapping screw with torx slot and countersunk head
- rod diameter 3-6 mm;
- length 12-100 mm;
- head diameter 6-12 mm;
- head height 1.6-3.6 mm.
- Full thread.
Self-tapping screw with torx slot and semi-countersunk head
- rod diameter 3-5 mm;
- length 12-35 mm;
- head diameter 6-10 mm;
- head height 1.6-3 mm.
- A reinforced version made of higher strength steel is available.
Self-tapping screw with torx slot, wide semicircular head and partial thread
- rod diameter 4.8 mm;
- length 25-60 mm;
- head diameter 12 mm;
- head height 2.5 mm.
Self-tapping screw with torx slot, wide semicircular head and full thread
- rod diameter 6-7 mm;
- length 20-70 mm;
- head diameter 13-14 mm;
- head height 3 mm.
Self-tapping screw with cross slot Pz, full thread and semicircular head
- rod diameter 3-6 mm;
- length 16-200 mm;
- head diameter 6-12 mm;
- head height 2.3-4.2 mm.
Self-tapping screw with cross slot Pz, full thread and semi-countersunk head
- rod diameter 3-5 mm;
- length 12-100 mm;
- head diameter 6-10 mm;
- head height 1.6-3 mm.
Self-tapping screw with cross slot Pz, full thread and countersunk head
- rod diameter 3-6 mm;
- length 10-200 mm;
- head diameter 6-12 mm;
- head height 1.8-3.3 mm.
detailed instructions
Step 1. You need to indent approximately 7-12 cm from the upper and lower edges of the door. In this case, the indentation in the instructions is made at a distance of 8 cm. You need to draw two lines strictly perpendicular to the edge of the door.
An indentation of 8 cm is made
Lines are drawn perpendicular to the edge
Step 2. Next, from the edge of the door to the center of the place where the hole will be drilled, you need to make an indent of 22 mm. This is the standard distance. And you also need to draw lines through the marked point, perpendicular to those drawn earlier.
Bottom space - 2.2 cm
Perpendicular lines are drawn
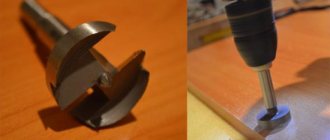
Step 3. Next you need to take a special drill with a standard diameter of 35 mm.
Take a drill with a diameter of 35 mm
Step 4. To make drilling easier and the drill clearly positioned, you need to make small notches using an awl at the intersections of the lines on the markings.
Using an awl to make indentations
Step 5. Now you can drill the holes. You can do this with a drill, or you can use a special router.
You can start drilling holes
Prices for a linear series of milling cutters
Fraser
Result of work
Step 6. Once the holes have been drilled, you can try on the hinge bowl, and also, by aligning the holes for the screws on the ears of the bowl along the line drawn earlier, mark where the drilling will be done, but with a thin drill. Moreover, the points will not be on the line itself, but slightly to the side, with the ears aligned along the line.
Fitting the hinge bowl
Markings have been applied for future holes
Step 7. Now, using an awl, you need to make notches at the designated points to position the drill.
Notches are made to position the drill
Step 8. Next you need to drill holes for self-tapping screws measuring 4x16 mm.
Holes are drilled
Step 9. It is necessary to attach the canopy to the door again, placing the bowl in the hole, and screw it to the facade with self-tapping screws.
Screwing with self-tapping screws
Step 10. Now you can attach the door to the cabinet wall. This is done like this - first you need to attach the door to the wall, choosing the position in which it should stand.
Now you can attach the door
Step 11. When applying markings, you need to ensure that the upper hinge screw, which will be attached to the wall, is in a position close to the door itself.
You need to mark carefully
Step 12
Next, it is important, after taking simple measurements, to set aside 17 mm from the center line on which this part of the canopy lay.
From the center line you need to set aside 17 mm
Step 13. After this, you need to attach the door again and make marks with a marker through the holes in the hinge, aligning them with the lines drawn at a distance of 17 mm.
Markers are used to make marks through the holes in the loop.
Step 14. Now you need to drill holes for Euro screws with a drill.
Holes for Euroscrews are drilled
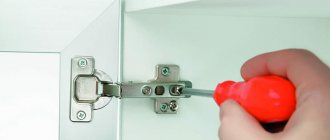
Step 15. Next you need to screw part of the loop to the wall.
Part of the loop is screwed to the wall
Step 16. Then you can attach the door to the wall
It is important to get the front part of the hinge attached to the door onto the screw located on the part of the hinge that is fixed to the wall. Also, under the hinge that is attached to the door, there is a screw with a “heel”, which is important to get into the groove located on the other side of the part of the hinge that is attached to the wall
This part needs to get onto the screw
The door is attached to the wall
It is important to do everything according to the instructions
Another photo of the process
Step 17. To prevent the hinges from coming apart, the outermost screws need to be tightened a little. There is no need to wrap them all the way yet.
The outer screws are tightened a little
Step 18. Now you need to adjust the door. To begin with, you should move it away from the cabinet wall by about 1-2 mm; you do not need to fix it tightly to it. Once the gap has been maintained, the screws can be tightened.
Door adjustment
Step 19. There is another screw that will help you move the door left or right if necessary. In this case, there was no need to adjust it.
This screw in our example did not need adjustment
Why and when is drilling necessary?
It would seem that without it, the self-tapping screw will fit more tightly into the chipboard, creating an optimal connection, but this apparent advantage also has a downside - internal tension in the material. This is especially true when screwing into a narrow edge part of the workpiece. It is also worth paying attention to the peculiarity of chipboard production, when a rather large and solid fraction can get in, which will certainly lead to delamination and can even damage the laminated coating. Drilling, of course, will slow down the installation process, but will undoubtedly save you from such troubles.
In the case of a facade connection, there is a high risk of damaging the coating, thereby ruining its appearance. Pre-drilling and countersinking will also come to the rescue here. Plugs, plastic or self-adhesive, matching the color will help hide the fastening site.
Attaching chipboard to the wall
Chipboard is often used to decorate the walls of a room, either in large full-height panels or partially or in the form of small decorative details. Here it is very important to consider the density of the material from which the base for installation is made. It can be wood, drywall, brick or concrete.
It’s easiest with wood; almost any self-tapping screws or screws of the required size will do, even universal ones that match your color. It is better not to use phosphated self-tapping screws, since there is a high probability of the head breaking, and subsequent careful removal of the fragments is not always possible. Correctly calculate the load on one attachment point. Sometimes using nails is enough. For example, with appropriate decorative hats or without them at all.
In the case of drywall, special dowels should be used. It’s even better if the fasteners are on a metal profile, at least most of the fastening points. A powerful magnet will help you find the profile.
When installing to a concrete or brick wall, plastic dowels are well suited. The choice on the market is very large, so it is possible to choose the best option. Please note that for porous concrete and regular concrete they will differ. There are also different models for hollow and solid bricks.
Remember that the hole drilled for the dowel must strictly correspond to the diameter of the latter, and the depth will be at least 5 mm greater. In this case, when deformed, the dowel will fill the empty space and will not stick out.
Table for selecting a self-tapping screw depending on the load on one fastening point
| Table for selecting a self-tapping screw depending on the load on one fastening point | ||||||
| Load, kg | The standard size of the dowel depending on the wall material, excluding the thickness of the product being fixed | |||||
| Regular brick | Concrete | Tile | Porous concrete | Tree | Drywall | |
| less than 1.0 | 3×25 | 3×16 | 3×16 | 3×16 | 3×25 | 3×16 |
| up to 5.0 | 3×25 | 3×20 | 3×25 | 3×25 | 3×30 | 3×16 |
| up to 10.0 | 4×25 | 4×20 | 4×25 | 4×30 | 3×25 | 3×16 |
| up to 20.0 | 4×50 | 4×40 | 4×50 | 4×70 | 4×50 | 4×16 |
| up to 30.0 | 5×70 | 5×50 | 5×70 | 5×70 | 5×50 | 4×16 |
| up to 50.0 | 6×80 | 6×60 | 6×80 | 6×90 | 6×60 | — |
| up to 75.0 | 8×100 | 8×80 | 8×100 | 8×140 | 8×100 | — |
| up to 100.0 | 10×140 | 10×100 | 10×160 | 10×160 | 8×120 | — |
You can “hide” the attachment points by using various decorative elements, such as moldings, layouts or fillets. Various options for plugs are also widely used.
ADVICE!
Unfortunately, connections in which the self-tapping screw cuts threads directly into the chipboard do not withstand frequent dismantling. Each time they become less and less reliable. First of all, this is due to the peculiarities of the chipboard structure. But during renovation or moving, such a need may arise. It is possible to repair a loose hole. Mix PVA glue with sawdust, preferably smaller ones, the kind you get when cutting wood with a hacksaw or circular saw. Carefully fill the hole with the resulting mixture. Wait a day. That's it, installation can be done.