Despite the fact that today you can buy or order any furniture, many people prefer to make their own furnishings. Most often, furniture is made from wood (solid wood, panels, waste), which has been repeatedly discussed on the portal, but today we will talk about another universal material - concrete. In this article, the craftsmen of our portal pour concrete countertops for the office and kitchen, make a concrete sink, and implement other interesting projects.
The use of concrete in the manufacture of furniture
Typically, concrete is associated with foundations, floors, screeds, stairs and similar massive products that are subject to high loads during operation. Initially, only garden furniture was made from concrete, but today it is also successfully used for home furniture. The most common are monolithic kitchens, in which not only the concrete countertop is cast, but also the partitions. However, there are also:
- concrete kitchen islands,
- sinks with portals for bathrooms,
- coffee tables,
- consoles,
- shelves,
- window sills,
- computer tables.
Such furniture is made either entirely from concrete or in combination with wood or other materials.
The composition of the solution is selected based on the scope of application, but in most cases it is a cement-sand mixture (CSM) with the addition of plasticizers. Depending on the desired result, various fine fillers are also introduced:
- crushed stone,
- granite,
- marble chips,
- coil and others.
In large products, such as countertops or consoles, a metal mesh or reinforcement frame (metal or composite) must be used.
Formwork for pouring is made either from smooth sheet materials (sheets of plywood, laminated plywood, laminate, chipboard) or from boards, but for better formwork, the board is covered with thick plastic film.
There are two methods of casting - direct and reverse, in the first case the formwork is assembled on site, and the top of the pour will be the front side, in the second - the form is assembled and poured separately, when installed, the bottom becomes the top. Backfilling makes it easier to achieve a smooth surface and reduces finishing labor.
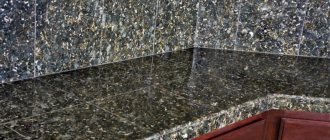
To ensure that countertops, especially those with concrete sinks, look beautiful, repel moisture and are not damaged during use, the concrete is repeatedly ground and treated with special compounds - hardeners and water repellents.
As in the case of sanded floors, this finishing allows you to reveal the structure, add gloss and significantly increase the surface's resistance to abrasion.
On our portal, the topic of concrete furniture was discovered several years ago by a participant with the nickname Dobermax, who shared the technology of pouring a console tabletop with his own hands for a computer desk made of concrete.
Reinforcing frame and installation of supporting structure
The reinforcing mesh or cut wire is laid so that there is a distance of at least 25 mm from the edge of the formwork. It is unacceptable for pieces of the reinforcing frame to stick out from the finished product. Make sure that the height of the frame does not exceed the beams and does not rest against the bottom of the plywood. Otherwise, fragments of wire may remain on the surface of the finished product.
It has the form of a mesh, the cells of which have a size of 25x25 mm. You need to retreat 25 mm from the sheet and from the edges.
Concrete table in red and monolithic consoles
DobermaxFORUMHOUSE Member
There was an old, shabby table in one of the corners of the apartment, and I just needed to rehearse with concrete, and I decided to create a concrete tabletop. I assembled the formwork and reinforcement into the walls, tied it together and poured it. The concrete countertop is ready.
For concreting, the craftsman used a standard DSP, a rough leveling mixture for the floor and a finishing self-leveling floor. The reinforcement is fiberglass, 4 mm thick, “recessed” into the wall by 8 cm (as far as the drill is enough), the frame is connected with a pitch of 15 cm.
First, I poured the necessary base from CPS (sand concrete without filler), so that I did not have to level it under the finishing layer, and poured a leveling mixture on top of the sand concrete. After stripping the surface of the cement countertop, I sanded it well, primed it, and glued polyurethane molding along the edge a few mm above the surface.
It not only protected the edge from chipping, and the household from a rather sharp edge, but also simplified the filling of the finishing composition. Since the “filler” is already tinted and has a pronounced gloss, no additional manipulations with the tabletop were needed.
After the concrete countertop was made by hand, Dobermax also poured a universal concrete “window sill-table-bed” console and something like a bar counter.
Dobermax
The point is that concrete “floats” in the air, being very strong and reliable. The technology is unique, but not much pain: formwork, reinforcement, pouring, sanding, finishing. I like the result.
Creating drawings and diagrams
To avoid possible mistakes in the early stages, take the most accurate measurements possible. Measure all parameters, including the location of the sink, outlets and other nuances available in the countertop area.
Creating a drawing will be required; this step will help to accurately manufacture the structure.
If you plan to make a hole for the sink, check the numbers several times. This is a case where every millimeter is critical. If the tabletop is of impressive size, it makes sense to first divide it into fragments and cast it in parts. It is more convenient to make the joining points at right angles. It is not recommended to make the tabletop thicker than 5 cm.
It is important to carefully measure the space where you plan to install the product with the countertop.
Concrete kitchen countertop
The topic turned out to be in demand, and other connoisseurs of concrete countertops for the kitchen and other homemade products joined the discussion. Dmitrich069 initially planned to use ready-made concrete to pour the kitchen countertop (50 mm thick), but in the end he settled on a regular DSP.
After curing, I sanded and polished the surface.
Dmitrich069FORUMHOUSE Member
Turbo cup, grain 00, is needed for rough processing of concrete for countertops. The diamond grain is very large in size, the slightest awkward movement, and a hole 1-2 mm deep. This happened to me when the casing for a vacuum cleaner was unscrewed and I got a deep hole from a disc in the shape of a semicircle. Then you need to close the pores - cement with water (1/2) and polishing with grain 50. Next, soft discs with rubber knitting (turtles), grain 50, 100, 200, 400, 800, 1500, 3000.
The craftsman advises to first completely sand the concrete (adjustable grinder, 3000-3500 rpm), and then impregnate it with a hardener and polish it, since even small marks cannot be removed after impregnation.
And one more nuance - the sand must be without clay and must be sifted through a fine sieve, otherwise during grinding the foreign inclusions will simply be torn out and shells will remain.
To remove the shells and marks from the diamond cup, I had to remove the entire hardened layer, re-sand with a bakelite wheel and polish (in three approaches with the hardener).
After impregnation with a water repellent, the color of the concrete countertop became richer and the appearance more refined.
Advice from the participants in the topic is to maintain a protective layer over the reinforcement frame; if it is less than 2 cm, cracks may occur. To prevent cracking, it is still advisable to add crushed stone or other stone filler.
Final stage and decoration
Dismantling formwork requires care. Disassemble the entire structure, remove the sides. Turn the formwork over and tap the entire surface with a rubber hammer. This will allow the hardened concrete mixture to easily separate from the plywood sheet.
This table cover is suitable not only for the kitchen, but also for the dining room, living room or terrace.
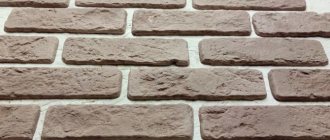
After the concrete has completely dried and you have dismantled the formwork, you need to sand the surface. This will smooth out all the unevenness, remove glue and air pores, and prepare the tabletop for further painting or varnishing. The grinding process also reveals the decor embedded in the concrete texture. All small stones, glass and beads will not “sparkle” if they are not polished first. You can also cover the countertop with decorative tiles or make it look like natural stone.
After sanding, allow the tabletop to dry thoroughly.
Then the surface is leveled and smoothed using an acrylic-cement composition. Mix the mixture to a semi-thick mass and apply to the surface of hardened and polished concrete. This will fill all the cracks and microcracks. The mixture must be applied at least three times, allowing each layer to dry thoroughly. Between stages, sand the surface to avoid the formation of “waves” and unevenness. The last, third layer is not sanded, but left overnight until completely dry. Finally, the tabletop is processed with a grinding machine. Critically evaluate the finished work. Are there any cracks or pores left?
You can also process a concrete countertop manually using sandpaper. But this will require a lot of effort and time.
The polishing step adds attractiveness and smoothness to the countertop. Please note here that the polishing pad must be wet. Then apply primer varnish in one or more layers. Remember that each application of varnish must dry thoroughly. All that remains is to polish the tabletop with wax and, after hardening, clean it with a soft towel. Your tabletop is almost ready.
If you follow the consistency and rules of working with interior concrete, making a tabletop from it will not be at all difficult.
Concrete countertop with bathroom sink and coffee table in black
There is also a ready-made example on the forum of a concrete countertop with a bathroom sink.
Anrushka1FORUMHOUSE Member
The sink is made of concrete, sand, screenings and cement, decorative elements and pebbles are visible on top, I regret that I didn’t add more of them. I made the formwork, reinforced it, poured it, when it dried - sanding with a rough wheel, then with flexible “turtles”. As a finish, it was coated with varnish for exterior use, which I also regretted; ordinary varnish, after prolonged exposure to water, begins to glow with blue highlights. It needed to be coated with polyurethane.
The craftsman first sanded the main surface with a grinder with a hard wheel; for the next stage of work, a grinding machine was required; hard-to-reach parts were sanded manually. For the future, Anrushka1 advises everyone to treat such areas with their hands until the concrete for the countertop has completely set, and only when it has hardened with a grinder. You will have to purchase several “turtles” for fine grinding.
Anrushka1
You need to take from the smaller grains and in order, you need to use everything, jump over only after 800 and then not much, you will kill the turtle quickly. They also come in sizes less than 1500, 2000, 3000, but since I varnished, the last 1000 was enough for me.
After washing, I cast a coffee table with the addition of black pigment, assembled the formwork from 25 mm thick boards, a plywood bottom and everything was wrapped in film. Subsequently, grinding and polishing, in the middle - impact-resistant glass and lighting.
Decorative design
Before pouring the face layer, you can beautifully arrange decorative elements at the bottom of the formwork. Here, various beads, pieces of glass, horseshoes and even memorable souvenirs can be used as decorative elements. Try laying out a wire ornament as decoration. After pouring the concrete, wire fragments, glass or metal texture will appear on the surface of the countertop.
If no decor was used, then the front side is sanded.
When you place the decor on the surface of the plywood sheet, make sure that it does not move. To do this, glue each piece to the chosen place. This will ensure that you end up with the pattern you planned.
Product Features
Before choosing, you must take into account a number of features that will allow you to understand how high-quality the composition you are using:
- when stirring the glue there should be no clots or lumps;
- storage in packaging can reach a very long time;
- high-quality products protect against the formation of fungus and mold;
- it must be safe for health;
- The preparation process is indicated on the package and even a beginner can perform it.
If the glue has all these characteristics, then most likely you are buying a quality product. Preparation of the solution takes no more than 10 minutes.
Color solutions
Associations with the color of concrete are gray and cold. However, modern trends in interior styling also influence the production of materials, and therefore the palette of cement mixtures has expanded by adding various pigments to them.
Light concrete
A light version of a concrete kitchen area is preferable in not too spacious rooms. This allows you to maintain the solidity of the image and at the same time not overload the space with the heavy appearance of the headset.
Kitchens in light gray color do not weigh down the space, despite the visual massiveness of the material
White concrete
Even in such a respectable guise, white color visually creates the impression of grace and originality, and due to the richness of halftones, the scale of execution.
White concrete is not universal and uniform, and therefore will always look unique
Beige concrete
The warm shade of such a cold material has also become available, thanks to modern capabilities in the production of finishing products.
Beige concrete still looks impressive, but does not burden the space with its bulky monochrome.
Warm beige atmosphere in a concrete kitchen
Dark concrete
The effectiveness of such a headset is difficult to overestimate. It seems to be created to attract the attention and delight of everyone. However, dark furniture can produce such a monumental impression only in a spacious room. Otherwise, you risk overloading the room with massive objects and getting gloomy and cluttered.
The dark color of the concrete facades looks very elegant against the background of light walls
WE RECOMMEND! Do not forget about sufficient lighting in such a kitchen area. Pay special attention to the selection of light temperature, since too cold light can make the space too cold, and against the backdrop of too warm light the brutality of the kitchen will be lost.
The purpose of graffiti in the interior
The main purpose of graffiti in the rooms of a house or apartment is not to pay tribute to fashion, but to express your feelings and show them to loved ones. Drawings on the walls make the home bright and give joy to all the people living in it. Decorating walls with graffiti allows you to expand the space of one room to infinity. Three-dimensional drawings can carry you far forward, into the depths of their stories.
Graffiti in the interior becomes the owner's calling card. It reflects his vision of life, art, desires, shows strength of character or hints at his weaknesses. Everyone draws on the wall something that reflects his thoughts, capabilities and even emotional experiences. A unique interior is more of a bonus than a goal. Before you paint graffiti on a wall, it's worth taking a few lessons from an artist who specializes in this form of art. He will not teach you what exactly needs to be painted, but will only tell you how to work with paint correctly and what materials are best to paint.