An old wardrobe or chest of drawers rarely looks attractive, especially after renovation. Replacing furniture is a troublesome and costly task, so the question: how to repaint a cabinet a different color at home remains relevant. We'll figure out how to properly update a cabinet, what you'll need for the job, and what paints and varnishes you can use.
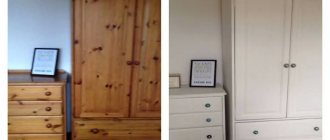
Furniture before and after transformation Source pinimg.com
What we paint
The need to change the color of furniture arises for various reasons. The item no longer fits in with the recent renovation, becomes obsolete, or simply gets boring. Professional restoration is not always available, but anyone who has ever held a brush in their hands can master the basic techniques.
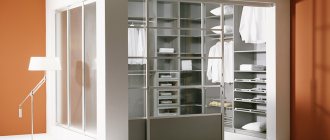
Coloring is the simplest and most understandable process with simple recommendations. Furniture preparation plays an important role in it, and it depends on the type of surface. The easiest way to prepare a wooden cabinet, chest of drawers or bedside table. In practice, solid wood products are most often of Swedish origin and come into the home from the IKEA store. Many of them are sold unpainted, which makes the task much easier.
IKEA furniture is comfortable and versatile, but it is often repainted by those who find Scandinavian design too boring. Most of the remaining items are furniture made of chipboard or MDF in film (for example, a kitchen), or lacquered products. They require longer preparation.
Chest of drawers in the bedroom interior Source pinimg.com
MDF furniture
MDF is also a chipboard material, but it is produced using improved technology. The slab includes small compressed fractions of sawdust. Because of this bonding, MDF becomes a homogeneous, high-strength and safe for human health board. But it costs more than chipboard.
The main difference between MDF and chipboard is its coating. It is pressed into the structure of the slab, which makes it stronger and more resistant to water. These slabs can also be found in a variety of patterns and textures.
Due to its environmental friendliness, furniture for children's rooms is often made from MDF.
This is a fairly dense material, which is why it is indispensable in the manufacture of furniture with an unusual design: elegant lines and roundness.
The disadvantages, in addition to the high price, include low resistance to damage and easy flammability.
What you will need
For work you will need the following tools and materials:
- A dense roller (or a pen attachment with two or three replaceable rollers). The width is chosen depending on the size of the cabinet (chest of drawers), on average 10-15 cm. A roller will help to evenly roll out the paint on a large surface, and the result will be good the first time. Select the tray according to the size of the roller.
- Two or three soft brushes of different sizes with artificial bristles. Hard bristles are not recommended as they will leave streaks that are difficult to get rid of. Brushes are needed for painting elements of complex shapes, where a roller cannot cope.
- Screwdriver Set. You will have to remove the fittings and most likely disassemble the furniture. The work will be more comfortable and of higher quality if you simply remove the doors.
- Masking tape. You will need it to protect small parts that cannot be removed. For example, if there are built-in lamps in the closet, they are removed, but left hanging and protected with tape.
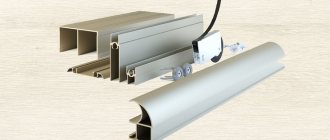
A tool you can’t do without Source pinimg.com
- Sandpaper (sandpaper) of different formats: fine (soft) and coarse.
- New hardware if you are going to change the style of the cabinet or make it more original. The easiest way to find suitable handles is in large and specialized online stores - the choice of accessories there is truly limitless.
- Paint and varnish materials: paint, varnish, and degreasing solvent.
- You always need rags (napkins); polyethylene comes in handy to protect the surrounding area from paint.
Optionally the following items can be used:
- Sander, safety glasses and gloves.
- Spatula and putty.
- If a large area will be treated, a sprayer is convenient.
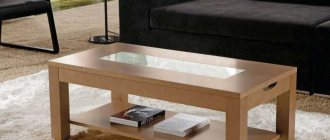
Applying varnish to a countertop Source premium.vgc.no
Materials and tools
To repaint the cabinet, as well as to prepare for work, you will need the following tools:
- Paint roller, spray gun or brush;
- Paper tape;
- Putty knife;
- Sandpaper with a fine or medium abrasive layer;
- A block for fixing sandpaper.
If you have a grinding machine or drill with special attachments, this will significantly speed up the process of preparing surfaces for painting. In addition, you will need a wide container of water and soft cloths for drying and cleaning surfaces.
Thanks to the roller, painting furniture will happen faster.
What to use: roller or brush? This question does not and cannot have a clear answer. Much depends on the habits of the master: some work exclusively with a brush, while others only use a roller. And also on the area of the surface to be painted. It is clear that it is easier to paint a larger area with a roller. On the other hand, when painting small parts and decorative elements, you simply cannot do without a brush.
The most difficult thing is to determine the required amount of material.
It allows you to feel the process and distribute the paint evenly over the product. If you prefer to work with a brush, have several options on hand: larger, smaller, and with different bristles. Regardless of what you prefer to paint with: a brush or a roller, the tool must be of high quality. Otherwise, loose lint will remain on the painted parts, and the paint will not lay down in an even layer.
You can paint the cabinet in different colors, such as a light base and multi-colored details.
You can also purchase aerosol enamel for furniture. Spray paint is very convenient for painting corners, hard-to-reach places and protruding decorative elements. When deciding on the amount of paint, remember that you need to cover the surface with two or three layers.
And in addition to the paint itself, you will also need:
- Solvent;
- Putty;
- Primer.
Paint selection
Paints and varnishes vary in composition and such important parameters as transparency and gloss level. When looking for a suitable option, you should avoid oil paint with its heavy smell and long drying period. Toxic and flammable solvent-based materials are of little use.
In order to repaint a cabinet in a different color, water-based paints that are marked “furniture” are optimal. A common feature of such compositions is environmental friendliness, which is important in the case of repainting objects located in a residential area. They practically do not emit volatile organic matter and therefore do not have a pungent odor. The compositions are fireproof and do not cause allergic reactions.
Paint color is only one of the selection criteria Source kraskidlyamebeli.ru
Acrylic
These compositions are the most affordable and therefore widespread among water-based analogues. The lack of toxicity is combined with wear resistance and the ability to pass air. The latter quality helps the wood regulate moisture (breathe), thereby minimizing the appearance of mold and mildew.
It must be taken into account that acrylic compounds do not always cope with repainting. The main disadvantage of acrylic is that it does not adhere to the surface of furniture made from chipboard. It also makes no sense to buy acrylic paint for glossy (varnished) facades or products previously painted with an adhesive-based composition.
Acrylic dyes dry fairly quickly, but the polymerization process (especially if primer was used) can take more than a month. And, although after repainting the item is almost immediately ready for use, the coating requires careful handling; it can be easily scratched or damaged by accidental force.
Repainting drawers is a quick way to refresh the design Source livejournal.com
See also: Catalog of companies that specialize in paints and varnishes and related work
Acrylic is easy to work with. To achieve the desired color saturation, just dilute the paint with water. It is easy to wash off if you are wrong with the shade and decide to repaint the fragment again.
Acrylic dyes are also sold in aerosol form, which is quite convenient for repainting large surfaces if you know how to use them. When choosing a suitable shade, you can paint over a small area of the surface. This will help you evaluate which color looks best on a given basis.
Alkyd
The basis of alkyd paints is an organic solvent; the compositions resist moisture well, which makes them convenient to use for painting furniture in the kitchen and bathroom. The peculiarity of the dye is that it creates a film coating with a thickness of no more than 0.1 mm. The service life of such coating will be short.
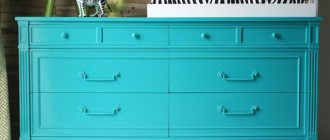
Color completely changes perception Source homeproved.com
Eco-paints
Chalk, milk or mineral paint can be a worthy alternative to acrylic compositions. Eco-paints are made from natural materials, therefore they do not have a strong odor, are hypoallergenic, and do not harm people and pets.
Thanks to their composition, they lie smoothly not only on wood, but also on complex surfaces of laminated chipboard, chipboard, and MDF.
Eco-paint can also be used to paint lacquered furniture, and in most cases the surface does not have to be specially prepared (for example, primed). The composition will adhere well, forming a durable layer, if you sand the furniture a little with sandpaper to slightly reduce the shine.
Other
You can also paint your favorite cabinet with silicone or latex-based water-based paint. The silicone layer is not afraid of moisture, lasts a long time and is interesting because it can fill and mask small cracks.
The latex composition is viscous and resembles oil paint. But at the same time, it does not have a pungent odor, and it lasts much longer. The only limitation of latex coating is that it can crack at low temperatures, but this is not important for home use.
Using chalk paint Source blog.postel-deluxe.ru
Varnishes and tinting impregnations
They change the appearance of furniture, so they can be classified as coloring compounds. This group of paints and varnishes performs not only a decorative, but also a protective function. Penetrating into the structure of wooden furniture, impregnations and varnishes prevent the appearance of mold and pests.
Priming
Experts advise purchasing paint at the same time as the primer, from the same manufacturer and on the same base. This will significantly improve the adhesion of the dye to the furniture surface.
The best results are achieved with a water-based adhesive primer. It is especially helpful in the case of difficult surfaces (for example, chipboard), where the dye does not adhere well and does not adhere well. If you plan to repaint a dark cabinet light, use a white primer; If you want to turn a light chest of drawers into a dark one, you will need a dark primer.
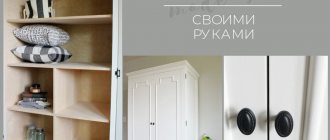
A light primer was used here Source pinimg.com
The primer is the main character
Primer is an important part in the furniture restoration process; with its help you will paint your cabinet with high quality. It will also help the paint dry quickly, as it does not allow moisture to be absorbed into the surface. A positive point is that after priming, the color saturation of the paint will remain the same as when painting.
If you choose acrylic paint for painting, then you need to use an acrylic-based primer.
The painting will be of very good quality, because the elements of the materials for painting are perfectly combined with each other. Before priming, it is important to read the instruction manual and find out how long it takes for the primer to dry, since you only need to paint a dry surface.
Apply it with a roller in a very thin layer, leave it for the time specified in the instructions.
Preparing furniture: where to start
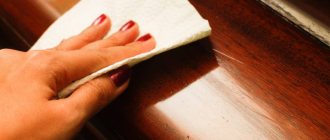
Preparation begins with removing dirt, old stains and odors. The easiest way to do this is with a sponge soaked in washing powder or soap solution. After washing, stubborn stains remain, which can be removed with vinegar, acetone or white spirit. To make it convenient to work, move the furniture away from the wall, put on a protective mask and gloves, and do not forget to ventilate the room.
After washing, the surface is allowed to dry, then the old coating is removed. They do this in one of the following ways:
- Mechanical. The fastest way to do this is with a grinder and a wide spatula. In hard-to-reach places, remove the varnish coating using a flat-tip screwdriver.
- Chemical. To remove old polish, special solvent-based removers are used. The composition is applied to the surface of the cabinet for the time specified in the instructions. Once the reaction is complete, the remaining material is removed with coarse sandpaper or a spatula.
Design in fashionable white color Source gidpokraske.ru
- Thermal. The old varnish or film coating peels off and is easily removed after heating with a hair dryer. If the film does not lend itself, it is left and painted over it, having first sanded it.
After the old coating is removed, the surface is lightly sanded to remove any small residues. If the furniture is wooden, sanding is carried out in the direction of the grain. The task is performed in three steps: first use coarse-grained sandpaper, then use medium-grained sandpaper, and finally use fine-grained sandpaper.
At this stage, the cabinet is carefully inspected so as not to miss any defect. If the item is large, it is more convenient to dismantle it; It is easier to paint individual parts, and the result is of higher quality.
Features of preparing and painting a lacquered cabinet
Varnish is a coating that prevents mixtures applied on top from being absorbed into the base. If you do not remove it, you can decorate the cabinet only with paints that do not require prior priming - chalk and acrylic.
remove old varnish using several methods:
Mechanical - accessible and inexpensive, but requiring time and effort. Various tools are suitable for it - a metal brush, a grinder or sandpaper. With their help, the varnish is gradually removed from the surface. It is important to use construction glasses to prevent coating particles from getting into your eyes.
Chemically , through special removers. The product is used in accordance with the instructions.
Thermal : the varnish is heated with a hair dryer or blowtorch. Then it is scraped off with a spatula. The heated coating comes off easily, without much effort on the part of the technician. However, this method does not remove all types of varnish. During heat treatment, the top layer may not separate, and the furniture itself may become charred.
After removing the old varnish, the surface should be sanded so that it becomes smooth, but slightly rough (this will provide better adhesion to the finish). If necessary, cracks are sealed with putty.
Video description
About updating an old cabinet in the following video:
Preparation for painting: primer
All cabinet parts intended for painting are dusted and degreased. To do this, wipe the surface with a damp cloth, and then with a cloth moistened with alcohol or a special degreaser. At this stage, care is needed: the slightest particles of glue from the film must be sanded off and degreased.
Dining group in a pastel palette Source archidea.com.ua
Identified defects (scratches, cracks and small irregularities) are eliminated using a special wood putty. After waiting for the composition to dry, the treated areas are sanded and degreased again to level the surface. As a result of the work done, the surface of the product should be completely covered with a network of small scratches.
The primer helps the paint composition adhere better to the surface. It is recommended to prime in two layers, allowing each to dry. Then you need to go over the surface with fine sandpaper again; This must be done carefully so as not to remove the soil. Additional sanding will enhance adhesion, if you remember to thoroughly wipe off the dust afterwards.
What paint to paint the cabinet?
When choosing paint, it is best to give preference to acrylic, which has almost no odor, is easily diluted with water and mixed to obtain the desired color. It also washes off well, which makes it possible to correct flaws when painting. When the paint dries, the water in it evaporates and the paint becomes stronger, which must be taken into account when applying layers.
The closet does not have to be monochromatic. It can be painted in two colors. For example, take one paint in a neutral beige color and another in a brighter color. If it is not possible to select the desired paint, then you can purchase white acrylic paint and add color to it until the desired shade is obtained. When choosing a suitable shade, you can try it on a small area of the closet to determine the required saturation.
Padding
Acrylic primer is best suited for priming the surface of a cabinet before painting, since its components combine very well with the composition of acrylic paint.
Applying acrylic primer is easy, but before starting work it is recommended to read the instructions for using this material. It is important to adhere to the drying time of the soil and the calculation of the surface area to be treated.
The primer is applied using a roller (this is faster) in a thin layer and left until it dries completely.
Coloring
The surface is covered with paint in 2-3 layers. If the first layer turns out to be uneven, with bald spots, the defects are corrected during the second painting. After drying, the first layer can be lightly sanded with fine sandpaper. This grinding has two purposes. It removes sagging and grooves of paint, and makes the surface matte, so that the next layer will adhere better.
After the first coloring Source mebelnada.com.ua
How to remake an old cabinet with your own hands: decoupage method, etching, fresco
Remodeling your closet yourself is not only a fun and creative process, but also an opportunity to give your interior uniqueness and exclusivity. You can remake an old wardrobe or wardrobe in many ways, among which everyone can find one that suits them, both in terms of creativity and taking into account financial costs.
The finished fresco is glued to the surface of the cabinet using wallpaper glue.
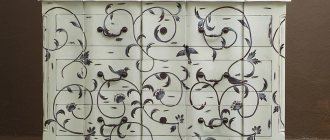
Decorating with a fresco
Not so long ago, with the concept of fresco, pictures of luxurious halls and majestic temples arose in the mind. But modern technologies have made their own adjustments; today, with the help of frescoes, the surfaces of cabinets and other furniture are decorated. The surface of the fresco has become resistant to moisture and light, and as a result, durability.
Stages of decoupage of a wooden surface.
To carry out such decoration, the participation of specialists will be required. An image is applied to the layer of plaster coating using a special printer. The cabinet remodel is completed by applying varnish and grouting with marble chips. The main condition for the durability of a modern fresco is a smooth, dry, snow-white surface.
Tools and materials:
- glue;
- paint roller;
- fresco;
- rubber spatula;
- construction knife.
The modern construction market offers a wide selection of ready-made frescoes, the application of which does not require the help of specialists; It will be enough to use glue designed for non-woven wallpaper. Using a paint roller, glue the surface of the fresco and leave until the composition is absorbed; apply glue to the surface to be glued in the same way. The glued fabric is smoothed using a clean roller or rubber spatula. If the size of the canvas with a fresco has an area larger than required, remove the excess using a construction knife.
Return to contents
"Cotton" technique
A combination of different decorating methods (cotton technique, painting and stenciling) will help update the look of any cabinet.
Decorating using the cotton technique, which involves using textured cotton fabric, will help give an old wardrobe a second life. The selected material is glued to the surface of the cabinet using a brush and glue. When performing this procedure yourself, pay special attention to the joints of the two canvases.
After gluing the canvas, carefully cover the entire surface of the cabinet with a layer of PVA glue and wait until it dries completely. In most cases, 1-1.5 hours is enough. Following the artistic intent, paint the cabinet with acrylic paint of the chosen color.
Secure the tape around the perimeter of the front doors. Before cutting off the tape, measure the perimeter of the doors and add 4 cm. For reliable gluing, it is better to use Moment glue.
For further decoration, you can use large buttons, which will easily give the furniture a vintage feel. To create a “sewn-on” effect, thread decorative tape through the button holes; Having trimmed the ends, glue them to the back of the button. An excessive number of decorative elements can nullify your artistic intent, so give preference to pairing buttons or using identical elements.
At the final stage, varnish is applied to the surface of the cabinet. Experts prefer acrylic varnish, which has a high drying speed.
If you choose furniture varnish, make sure the room is well ventilated.
Return to contents
Surface etching
Sanding the surface of the cabinet removes old varnish and paint.
The etching method is widely used when working with natural wood furniture. With the etching technique, the old layer of paint is not removed, it is simply played out in such a way that the furniture gets an antique or modern look, depending on the color of the paint applied.
Before etching, the surface of the sliding facade must be carefully sanded and washed with hot water with the addition of ammonia. Then primer with acrylic compound using a flat brush.
After drying, you can begin painting the surface: first the first layer of one color, then the second of another, brighter color. The combination of brown and golden colors looks luxurious, blue and silver look elegant, and dark red and yellow look impressive.
As soon as the second coat has dried, but not earlier than two hours later, sand the surface with damp sandpaper. You need to rub the surface carefully so as not to remove both layers - the bottom one should only show through slightly. Sanding ends by removing small pieces of paint with a damp cloth. The last stage: coating the surface of the cabinet with synthetic varnish, which protects the decor from damage.
Return to contents
DIY decoupage
Materials and tools:
- three-layer napkins or illustrations on paper;
- scissors;
- sandpaper;
- tassels;
- decoupage glue;
- acrylic lacquer;
- acrylic paints.
To begin, carefully cut out the design that will serve as the applique. For an aged effect, tear off the pattern along the outline. Apply glue to the prepared surface at the location of the application. Glue and carefully align the pattern. Be sure to let it dry. Varnish the surface with 2-3 layers of varnish.
Return to contents
Remodeling with wallpaper and baguette
The easiest and cheapest way to update an old cabinet is to wallpaper it. The most important thing in this action is to choose high-quality wallpaper. Feel free to experiment with color, pattern, texture. If the wallpaper is colorful, it is better to make the closet plain. You can radically change your wardrobe using self-adhesive wallpaper or using photo appliqués.
Sand the doors with sandpaper and coat them with a layer of white paint. Carefully stick the photo print. Cover the top with clear varnish. For small rooms, it is very good to stick mirrors onto cabinet doors using liquid nails.
If preference is given to a baguette, after cleaning the surface of the wardrobe door from old paint and dust, it is necessary to measure the exact dimensions of the door. After measurements and calculations, cut suitable pieces of polyurethane baguette with a wallpaper knife and cut off the corners so that a frame can be formed from the baguette. Glue the polyurethane molding around the perimeter of the cabinet surface to form a rectangle. When the glue is completely dry, the doors can be painted.
masterpomebeli.ru
Briefly about the main thing
Repainting a cabinet a different color on your own is a simple job that only requires care, time and a set of necessary tools. The process is divided into several stages. The main task is to create a rough surface that helps the paint lie evenly and tightly. The cabinet is first cleaned, defects are repaired and primed.
The main problem may arise when removing the old varnish or film layer. It is solved mechanically, chemically or thermally. The paint is applied in several layers, the number of which allows you to emphasize or hide the texture of the base. For the finishing coat, choose wax or water-based or polyurethane-based varnish.
How to paint a cabinet white
White furniture, including antique furniture, is a popular element of room decor in different styles. It makes the room lighter and visually more spacious. If you wish, it is easy to paint the cabinet white with your own hands.
The choice of paint and its features
Chalk compositions are well suited for such an operation . They are non-toxic, easy to apply, and form a durable and fairly thick coating. On sale you can find white paint of the usual chalk color and color compositions based on it.
You can use acrylic paints and varnishes for furniture. If the cabinet will be in a damp area, the paint must be suitable for use in such conditions.
Ivan Bokorezov
Furniture columnist and designer
Ask a Question
When choosing a shade, you need to take into account the lighting and design of the room. Matte surfaces look softer and more comfortable, glossy surfaces look very bright. White colors can be warm or cold. If the paint has a purple tint to it, the finished cabinet will look pink after a few years of use.
Technology
The painting technology is generally the same as when working with other colors. If the original color of the furniture is very dark, it can be lightened with bleaching paste . The surface treated with this method is then painted in the traditional way.
Is it possible to prime chipboard?
To coat chipboard, it is recommended to use the following types of primers: Water-based acrylic. The composition is quickly absorbed. To avoid destruction of the material, it is best to apply an acrylic primer to an already prepared surface.
Interesting materials:
Why do they raise the refinancing rate? What is iodinol useful for? What is melatonin good for? What is cycling good for? Why is it useful to hold a plank? Why is it useful to do yoga? What are elderberries good for? What are flax seeds good for? What is tetracycline used for? What is the AppGallery application for?