Hi all! I can say with confidence that even old Soviet lacquered furniture has a second chance. It can be restored and given a completely new appearance without changing the design. Today we’ll talk about such a procedure as restoration of lacquered furniture.
We are mainly talking about furniture made of wood. Although we cannot exclude the possibility of restoring structures made of chipboard, veneer boards and other materials, on top of which several layers of varnish were applied.
You can restore polished lacquered furniture to its original appearance, or even improve it, with your own hands. Work carried out at home requires accuracy, attentiveness and consistency. But the result in the end may pleasantly surprise you.
Basic rules for cleaning and caring for polished furniture
In order not to have to learn the rules for cleaning polished furniture, you need to properly care for it. Firstly, it needs to be cleaned of dust every day with a dry cloth. Do not install furniture in a sunny room or in a room with high humidity.
No matter how carefully you care for such furniture, over time, scratches and even cracks will still appear on it.
The point is the possible deformation of the product. Secondly, you cannot place cold or hot products on the surface of the furniture. Do not use cold water or boiling water when cleaning. This may cause the finish to crack and cause white spots.
Old furniture that was made to last is subject to restoration.
Thirdly, due to fear of heat and cold, polished furniture should not be placed next to the stove and windows.
Note! To remove fingerprints from its surface, it is better to use a dry cloth. To remove greasy stains, you will need a soap solution, soda and adsorbents with a soft cloth. For more difficult stains, you can use a washing gum and ammonia mixed with water.
Use the advice of professionals to polish your furniture.
Applying a mixture of olive oil and vinegar
This method is especially recommended in cases where you need to eliminate not so much scratches as extensive abrasions (caused by frequent mechanical damage, constant exposure to moisture and high temperatures, and so on).
The mixture is prepared based on a three to one ratio, that is, three parts olive oil to one part vinegar. The specific amount of product will depend on how large an area you plan to treat. Dip a cloth into the resulting solution, then rub the worn furniture with pressure. After a couple of minutes, the same surfaces must be carefully wiped with a dry cloth. You will be surprised how much your interior items can be transformed after such simple manipulations.
How to restore polish at home
If polished furniture has received scratches, you can restore them yourself using three simple methods:
- Rubbing the damaged area with walnuts, thoroughly polishing the texture with a cloth;
- Using shoe polish (choosing a suitable color, carefully applying the composition to the surface and carefully polishing the texture using flannel cloth);
- The use of special production products for polishing, surface repair or a marker with a suitable color.
When chipped, it is necessary to determine the composition of the polish. This can be a traditional varnish with shellac, polyurethane or polish. The composition is selected through independent visual selection.
You can simply refresh the faded polish on furniture using mixtures you prepare yourself.
Before applying the solution, be sure to thoroughly sand the surface.
Nut rub
This is perhaps the most widely known and simplest option. You will only need one or several walnuts (depending on the length and depth of the scratches), or several pecans, which, by the way, both in appearance and in taste, are quite reminiscent of a walnut.
In order to repair uneven surfaces of wooden furniture with their help, it is enough to rub the damaged area with them. As a result, the scratch cavities will gradually be filled with small particles of nuts, and they will be highly compacted, which guarantees the fairly high reliability and strength that such a seal will receive. After rubbing with nuts, wipe the treated surface with a dry cloth.
Rules for painting polished furniture
Before you paint an object and start thinking about how to restore the polish on furniture, you need to choose a composition. To do this, drop alcohol onto the surface. Polyurethane will not affect the alcohol, shellac will absorb it, and the varnish will begin to swell.
There are special products for polishing furniture.
Before completing the painting work, it is necessary to go through the stage of preparation, priming and painting itself.
Preparatory stage
Before restoring lacquered furniture, it is necessary to carry out preparatory work. The first step is to remove the old polish.
Furniture must be cleaned before polishing.
To do this you need to use:
- special composition for removing polish;
- steel wool, sandpaper;
- paper napkin, spatula;
- wide brush.
Quite often you have to remove the polishing: it is not the most fashionable finish.
In this case, the composition for removing polish can be thick or liquid. Conditions of use: the thick composition is ideal for vertical surfaces. Liquid will be useful in hard-to-reach places.
Use professional polishing products.
The step-by-step instructions for the preparatory stage are as follows:
- first you need to pour the composition into any container, take a brush or an old toothbrush;
- Next, you should remove the old polish in the direction of the wood grain;
- then repeat the procedure for removing the old composition;
- then remove polishing residues using steel wool;
- Apply a thin layer of the product to the cleaned surface, remove it with paper and smooth out any irregularities with sandpaper.
Advice. When removing the old layer, you must use eye and hand protection. Carry out work in a ventilated place.
Apply polishing using special gloves.
Primer
After removing the polishing, be sure to remove cracks and chips with fine-grained wood putty.
Choose a quality primer.
Sand the dried mixture with sandpaper. For high-quality restoration of furniture, it is necessary to apply a primer to the surface.
The surface must be coated with a primer in one layer.
It will provide protection against paint peeling.
The painting process itself
Varnishing should be done carefully, without rushing.
After priming, the table is sanded again.
In this case, you should ensure that there are no smudges with spaces. Use several layers of paint, but if the surface is heavily damaged, apply a third final coat. Apply each layer as the previous one dries.
Varnish the surface of the furniture with high quality.
Note! The better the varnishing is done, the better the result will be. The most important thing is to choose the right paint. You can use stain, varnish, alkyd paint or acrylic paint. In order to restore some of the former shine to the surface, it is recommended to apply a couple of layers of varnish. This is a difficult process that can take a couple of days.
Steam treatment
This is perhaps the most radical way to disguise scratches, the use of which should be approached with extreme caution. Just in case, it’s better to first try steaming some inconspicuous area of the damaged furniture to make sure that such exposure will not damage it.
If your piece of furniture turns out to be immune to such manipulation, you will need to place a piece of wet gauze or cotton fabric folded several times over the scratched area. After this, you need to place a hot iron on the wet gauze or cloth. The essence of this method is also to expand the wood: it should swell under the influence of steam and, expanding, remove the scratch.
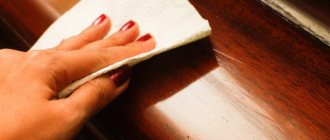
How to remove dirt from polished furniture
To wash dirt from home furniture, you can use a special chemical solution from the manufacturer or improvised materials. You can even wash the surface with tooth powder dissolved in ammonia.
It is also necessary to prepare means for treating the surface of the product.
Preparation of a special solution
To remove dirt from polished furniture, you can use a special solution and antistatic agent for clothing, hair shampoo and several glasses of water at room temperature.
Folk remedies are suitable for preventive cleaning.
The resulting mixture will get rid of stubborn stains, grease and dust.
Use of beer
Beer is an excellent way to remove ink stains, stubborn dirt, grease and paint marks. A dark, intoxicating drink can remove ink, and a light drink with added sugar can remove fat and the rest.
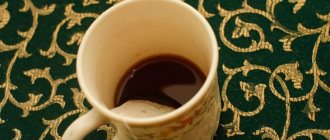
Photo: example of a polished table before and after.
When using beer as a cleaning agent, remember that furniture polishing does not tolerate icy liquids.
Olive oil or wine vinegar
If small scratches appear on the surface, it is recommended to use a mixture of olive oil and wine vinegar (or maybe some red wine).
The oil can be used on almost any surface, except those that are highly absorbent.
After mixing the solution, apply the mixture to the surface and rub it with an old toothbrush. After a few minutes, you need to wipe the cabinet or table with a flannel napkin.
Oil protects wood from moisture.
Burr oil
You can quickly remove dirt, greasy stains or white marks from varnished furniture with burdock and linseed oil. A mixture of pure gasoline, denatured alcohol and the indicated oils will be useful. It will help remove grease, stubborn dirt, scratches, paint marks, pen marks and a number of other troubles.
Polishing furniture improves its appearance and improves many functional characteristics.
In this case, the smell of the infusion will help remove denatured alcohol and a cloth napkin.
Tea brewing
Tea leaves will also be useful in removing dirt and cleaning polished furniture. To use it, you need to wrap the used tea mixture in a paper towel.
Tea leaves will help improve the appearance of furniture.
Use the resulting bundle to wipe the stained area and, as the stains are removed, wipe the table, cabinet and other object with a dry rag.
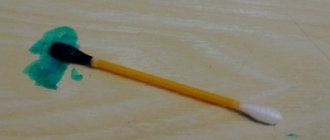
Wiping with machine oil
Machine oil is best for covering up scratches on dark-colored varnished wood. It will need to be applied to the damaged areas in a small amount (using a cotton pad or cotton swab) and left there for a few minutes. Then these same places will need to be thoroughly wiped with a dry cloth.
Let us once again draw your attention to the fact that very little machine oil is needed. Otherwise, you will simply stain the furniture, and you will have to wash everything off it, and then try to remove the scratches again, from scratch.
How to restore lacquered furniture
If you intend to restore small areas of lacquered furniture, you will need regular shoe polish. A universal colorless composition is suitable. You can also use wax if the polished item has dulled over the years and lost its appearance.
Of course, to start polishing and varnishing furniture, as well as restoring it, you will need patience and studying the life hacks presented above. But if you use the methods correctly, the result will be visible immediately.
Caring for matte furniture without polishing is much easier.
Filling with mayonnaise
This method of getting rid of scratches on interior items may seem strange, but it can also be very effective. The reason is that mayonnaise contains some proteins and fats that cause wood to swell. It is suitable for removing small and shallow damage.
Just apply mayonnaise to the scratch, and try to do it so that adjacent areas of the wood are not covered with it, and wait a few days. If the scratch is really not too deep, then during this time the wood will swell and, on its own, will remove the groove that “showed off” on its surface.
Materials
After choosing a decoration method, you need to select the right materials. In specialized stores it is possible to purchase ready-made kits for work. For decoration, you can use what you have at home. To understand what exactly is needed, let’s look at the technology:
- Napkins with an interesting pattern, leftover wallpaper, or old newspapers are perfect for decoupage. When working with paper, it is worth remembering that only the top layer is used, on which the image is directly applied.
- To create a mosaic, tiles that are left after renovation or an old mirror are suitable. To get small pieces, place the selected material between two sheets of damp cloth and lightly hit it with a hammer several times. This will prevent dust and small fragments from scattering across the floor.
- If you have to work with glass, you can opt for a matte material or a surface with a pattern. It’s easy to transform a glass surface yourself. To do this, you will need old lace as a stencil and a can of gold or silver paint.
- For painting it is preferable to use acrylic paints. They can be diluted with water, mixed, and tinted with pigment pastes. After complete drying, they become resistant to moisture. Since they do not contain organic solvents, they do not emit toxic substances.
- You can place various objects under the glass (shells, pebbles, buttons or beads). Sometimes the tabletop is covered with fabric (denim, velvet or canvas). The surface is decorated using jute rope, embroidered edging or old beads. A collage of family photos will look great under glass, keeping your photos intact. The ceiling plinth left in the house can be used as a baguette to create a frame.
- Regular stain is suitable for wood processing. If you clean the tabletop with a coarse wire brush at the preparatory stage, you can reveal the structure of the wood more clearly.
History of decoupage and ideas for its use
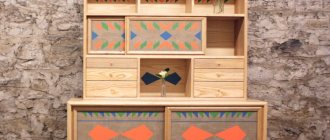
Kitchen project with furniture arrangement
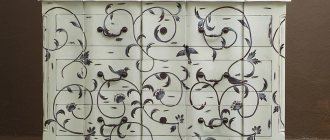
There are many ideas for decoupage. Thanks to this diversity, you can imitate furniture from different periods and eras, create options for several styles, decorate not only tables and chairs, but also accessories for them, creating a single collection.
The demand for imported goods made using this technique became so great, especially in Venice, that local craftsmen adopted the method and began to imitate it by cutting out engravings, gluing them to furniture and varnishing them. This method was called "poor man's varnish."
The word "decoupage" appeared only in the 21st century and comes from the French verb "decouper", which means "to cut".
Do-it-yourself furniture decoupage is a fairly universal method, although vintage items from different eras look best in it.
Pay attention to the photographs of modern furniture decorated using decoupage. From this collection you can choose ideas for your own experiments in this technique.
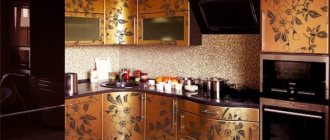
Modern decoupage of chairs
Modern style table decor
Thanks to the decoupage technique, you can create entire collections of furniture and accessories
Even comic books can be used to give old furniture a new look.
Delicate patterns will be an excellent addition to the bedroom interior
Decoupage from personal photos
Next, you can consider several design options for furniture that has been given an antique look.
Artificially aged furniture
Decorating chairs using decoupage technique
Dressing table decoupled with sheets from a music book
Skillfully decorated furniture can look very sophisticated
Choose furniture blanks for decoration and bring them to life, or sand and prepare for decoupage an old table or chairs that you want to continue to use - all this can be turned into new amazing interior items.
RESTORATION OF LOST ELEMENTS
Then the most difficult part began - restoring the lost fragments, eliminating cracks, chips, defects and all the damage, of which this table had a huge amount.
Here it was necessary not only to put the surviving parts in order, but also to tinker with the missing fragments. Alexey Mikhailovich grinds out the lost fragments of one of the legs
And here is a short atmospheric video about how this process took place. Starring Alexey Gladyshev:
The result is this solid oak structure:
Assessment of the degree of coating wear
After looking at countless photos before and after restoration, almost all people are inspired. After this, they try to work on improving their furniture.
I can say that it is no more difficult than restoring a mirror. And it’s no easier compared to repairing wooden chairs. We have already talked about these procedures, and therefore I suggest you follow the links and read our materials, leave reviews and share your personal experience.
The first step of restoration requires a visual assessment of the current condition of the surfaces. The first sign is specifically visual aging. Darkening often occurs near threaded connections, the varnish cracks, and a huge number of chips can also occur. The aging of the varnish and the end of its current cycle are indicated by small nets on the surface. Yes, it’s not always small flaws that significantly affect the overall picture.
But there are also cases when the usual removal of the old layer and application of a new coating cannot be done.
Think about whether there is any point in restoration. If yes, then get to work.
Features of partial restoration
Oak products are quite strong, so restoration of oak furniture is mostly carried out partially. In this case, techniques such as decoupage or artificial aging are used. Let's take a closer look at how to partially restore wooden furniture. To do this, we prepare the following tools:
- adhesive composition for decoupage;
- acrylic based paints;
- scissors;
- napkins with the desired pattern;
- craquelure varnish.
Let's look at how to restore old furniture with your own hands using the example of an antique table top. When updating some areas, they must be fenced off from others. Therefore, we use masking tape to protect the unnecessary surface area. Then we carry out the following operations:
- We paint the selected part with green acrylic paint and give it time to dry thoroughly.
- A craquelure varnish is applied over the paint, and we also wait for it to dry.
- The next layer of paint will be beige in color, after some time the coating will begin to crack. To speed up the formation of cracks, you can use a hair dryer.
- At the next stage, cut out the design you like from napkins. We place the images on the surface of the tabletop and coat the top with decoupage glue.
- When the glue dries, apply a finishing coat of clear varnish.
Important! All work must be carried out with a horizontal surface. This will prevent the formation of smudges and streaks.
As a result, we get a table with decoupage elements, which, by and large, will not differ from antique products.
On video: a chair using decoupage technique.
Professional products
There are also many special products designed to hide damage on the surface of wooden furniture:
- soft furniture wax;
- hard furniture wax;
- the so-called “furniture touch”;
- stain.
Working with some of them requires the presence of certain professional knowledge and skills, with others (for example, with soft wax or a touch) - it allows for the possibility of success even in the absence of experience. The most difficult task if you take on the use of such products will be choosing the right shade. However, it is worth noting that if the scratches on your furniture are very deep and numerous, and “folk remedies” have not helped to significantly improve the situation, perhaps you should entrust the repair of the damage to professional restorers.