Buying a corner cabinet is the best solution for a small apartment. Such furniture does not eat up space, and at the same time hides a significant amount of space inside. In addition, the main advantage of the corner design is the ease of assembly - even a beginner can handle this process, so you don’t have to turn to furniture makers for help.
But the question that many people have after delivery is: “how to assemble a corner cabinet?” Step-by-step instructions for this are needed. We will consider it further.
How to assemble a corner cabinet: step-by-step instructions
Choosing a cabinet design and model
There are not many models of corner cabinets.
There are only 4 varieties:
- Triangular wardrobe. The model differs from others in that the insides (shelves) are not attached to the cabinet wall. Everything is attached to the wall to which the cabinet is placed. That is, it does not use side walls. A triangular cabinet brightens up corners and adds harmony to the room. One of the cabinet subtypes is the “radius cabinet”. The overall design is practically the same, the only thing is that it has a much more interesting door shape. They are made in the shape of a semicircle, which is provided by guides. But the originality of the model does not end there. A door of an interesting shape can also be concave, convex or wavy.
- Trapezoidal. One side of the cabinet has a side wall. Due to this, the whole structure looks very interesting; it has the shape of an irregular trapezoid. The closet space is very convenient to use, as you can place things of non-standard shapes and sizes there.
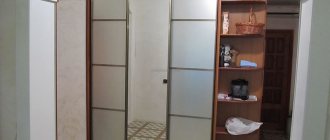
- L-shaped wardrobe. This is the most common type of corner cabinets. They are universal and most often suitable for any interior. The design takes up much less space than other types, which is also a definite plus. The design of the L-shaped cabinet is assembled from two straight lines, so it is the easiest to assemble. It looks compact and concise.
- Five-walled. The structure is made up of several side walls that are connected to each other. Due to its non-standard nature, this variety can rarely be found in stores. But it is quite possible to assemble it yourself. If the desire arises, it can be supplemented with the necessary elements inside.
Minimalism is a trendy style at all times.
The cabinet design is selected to match the interior. The only thing that is important to consider is that corner cabinets will look harmonious only in modern styles. Historical styles such as baroque and classics do not imply the presence of modern interior items.
Dimensions
A cabinet that will fit into an internal corner (except for a single one) begins to be designed and assembled from the corner section, and only after it comes the turn of the wings and the extension stand. Two sections 80x80 (one for outerwear) is the bare minimum, without which there is nothing to talk about at all.
The optimal height is up to the ceiling or slightly lower. For a diagonal cabinet with a triangular cross-section, the sum of the lengths of the sides of a right angle cannot be less than 120 cm; if you have to make one of the walls noticeably longer than the other, it is advisable to prefer a trapezoidal shape. The depth must be at least 40 cm, and typical values are 0.45 and 0.6 meters.
How to assemble a corner cabinet
Assembling a corner cabinet is a simple process if you carefully read the instructions and prepare all the necessary materials.
Preparing parts
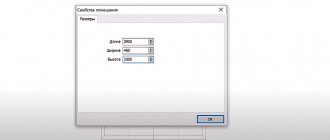
Preparation of parts consists of preliminary measurements. It is important to take into account all the nuances of the design and calculate the dimensions. A cabinet diagram and a drawing of the proposed location are created. It is important to measure everything and put it on paper.
Before you order a cabinet, you should design it.
The usual design involves one large compartment for placing things on hangers. The other section is narrower; it is divided into compartments by future shelves. If desired, you can perform the so-called open pencil case on the left or right side.
Use special programs to design the cabinet.
Each department has its own part prepared. They are made taking into account allowances. If the cabinet has a back wall, then much more material will be needed.
Installation of fittings on corner elements
Installing fittings is one of the most crucial moments. Therefore, everything must be done with extreme caution. Each action is checked several times, only after which the transition to the next occurs.
Fittings are an important element in furniture.
The first fastening element, the eccentric tie rod, is screwed to the lowest part of the cabinet, that is, to its bottom on the sides. In sequence. Then the dowel and lock are inserted. The same procedure is done with the top part, that is, with the “roof” of the cabinet. The fittings are installed on it in the same order.
Preparing the Side Panels
The side panels are the tallest parts of the cabinet as they are the side walls. It is necessary to nail the legs to their bottom so that the future cabinet stands stable. Then the rods are screwed in and the dowels are inserted.
There is a difference between assembling a regular and corner wardrobe.
There is no need to rush; it is better to check everything several times and correct it if necessary. In the first stages there is a good opportunity to dismantle everything, so you need to use it to avoid mistakes. The side of the cabinet is attached to one of the side panels (right first). The hinges are being installed. And on the left side you need to secure several shelf holders.
Internal vertical panels
Metal connecting corners are installed on the rear internal vertical panel. Then the locks and small rods for the largest and top shelves are installed. It is necessary to drive several shelf holders into the adjacent wall and screw in rods (small) for the remaining middle shelves.
You can make a built-in corner wardrobe.
Since this stage involves the introduction of shelf holders into the design, they must be checked for quality of installation. Otherwise, there is a risk that all things may fall off of them as a result.
Installation of the housing structure
The bottom is placed on the previously installed legs. Next, the internal vertical panel is installed. Each one in turn on top. The part adjacent to the inner vertical panel is attached in the center, and the vertical panel itself is attached to the background at the edge. They can be securely connected to each other using metal corners.
Leave the assembly of the structure to professionals.
The next step is to attach the opposite side panel. The locks are closing. The part needs to be held a little. The corner top of the structure is applied and the part with panels that stand vertically is fixed. Since the structure is probably high, you can use a stepladder.
A corner cabinet is a great way to rationally distribute room space in a small room.
The left vertical panel is attached, the locks are all locked immediately. Next, all the shelves are inserted using small rods. Then the back wall is filled according to the principle of installing all the others.
Arrange the shelves in your closet functionally.
After which all the allocated space for shelves can be safely filled.
Hanging a door on a corner cabinet
Hinges are installed on the door and screws are screwed in. Door hinges must be inserted into the hinges. The hinge structure is usually equipped with a special screw, which regulates the correct insertion of this screw into the hinge.
Try to accurately align all the holes, do not force them together by inserting a tie when the holes do not yet line up completely.
All hinges are fixed with screws. The door is adjusted in the required direction and aligned. The last step will be to install the handle on the door.
Manufacturing materials
Traditionally, solid wood is used to make wardrobes. Moreover, after treatment with protective compounds, the natural texture and pattern are preserved. Additionally, the canvases are decorated with carvings. Today, wardrobe fronts are often made from panels made from recycled wood. These include:
- Fiberboard. Obtained from wood fibers. Resistance to moisture is low, so installing a wardrobe made of such slabs in the bedroom is an excellent solution.
- MDF. The slabs consist of pressed wood chips with the addition of glue based on resins of artificial origin, fillers to increase resistance to deformation, biological damage, and moisture. At the same time, 70% of the total volume is occupied by coniferous species.
- Chipboard. Large chips are used as raw material. Furniture is assembled from all types of boards, except extruded.
Furniture panels are additionally coated with antiseptic compounds and decorated in various ways. Common types of facade finishing:
- Coloring. Furniture paints and varnishes are sprayed onto the surface in 2 layers after priming. Photo printing is applied with special inks.
- Lamination. The front side of the shields is covered with paper impregnated with resins. The film is formed with varying degrees of gloss, relief and color.
- Veneering. A thin layer of natural wood is glued onto the canvas. The result is an imitation of solid wood.
The cabinet doors are also decorated with mirrors. As a rule, their dimensions fully correspond to the dimensions of the doors. To prevent fragments from scattering in the event of damage, an anti-shock film is applied to the products. For additional decoration, mirrors are decorated with a matte pattern.
Choosing a wardrobe for the bedroom, interesting design solutions
Wood is not the only design solution for cabinet fronts. Its texture may not fit into modern styles. The following materials are also used:
- Glass. It includes translucent lakomat, multi-colored lacobel, and a tinted variety. Using sandblasting equipment, a pattern is applied that is not erased by mechanical action.
- Plastic. Visually, the facade can be transparent, shiny, and colored to varying degrees.
- Bamboo or rattan. Natural material goes through the stage of drying, rejection and treatment with protective compounds. If desired, such facades can be painted and tinted.
- Decoracrylic. Unbreakable transparent sheets diffuse light. Vegetation, insects, shells, and small artificial decorative elements can be secured between the sheets.
- Leather. Wood panels are covered with natural material or a substitute. The result is a relatively soft facade, which is not only presentable, but also safe for children.
Modern technologies make it possible to implement ideas of almost any complexity. The combination of different materials adds originality. For example, alternating decoracrylic with rattan or inserting glass into a wooden panel looks beautiful on cabinets.
How to make a corner cabinet with your own hands
You can assemble the corner cabinet according to the instructions provided. If you follow it, you will get a standard version of the cabinet. The design will have a swing door. It can be made from any material, even durable glass. The most important thing is to carefully mount it and attach the handles so as not to damage the glass.
Follow the instructions when assembling the cabinet.
If you want a more complex version of the corner cabinet, you can make your own adjustments. Let's say you cut it at an angle to get a trapezoidal shape. This design will look much more interesting and attractive. Well, for lovers of standard options, this instruction on how to assemble a corner cabinet with your own hands is perfect.
The number of shelves in the cabinet is not limited. It can be filled completely or completely, or you can leave space for placing a beam under the hangers. If desired, you can also install a storage structure below.
Design of the lower modules
- Kitchen floor cabinets are usually installed on adjustable legs, the height of which can vary from 10 to 15 centimeters. The legs can be made of either plastic or metal. The first ones, as a rule, are carefully covered with a kitchen plinth (for example, made of plastic) of the appropriate height.
Here the legs of the headset are hidden under the plinth
As for the metal legs, they are rarely covered with a base, since they themselves serve as a decorative element of the set. Also sometimes used is the technique of “recessing” the legs deep into floor-standing kitchen furniture modules - thus creating an interesting effect of the kitchen “hovering” in the air.
Decorative adjustable metal legs
- Modern trends in the design of kitchen sets suggest the use of drawers in simple lower modules, and swivel and rotating mechanisms in corner modules (as in the photo). Such internal equipment allows you to use the furniture as efficiently as possible and provides unhindered access to its contents.
Drawers
Unusual but very convenient corner mechanism
Where to put the closet
Choosing the right place to install a corner cabinet is 40% of the success in its design. If you correctly compare the footage of the room and the dimensions of the future cabinet, then you won’t have to dismantle it later.
A corner cabinet is placed in the corner.
Additional Information! It is important to evaluate the location not only for a few months in advance, but also for several years. For example, triangular corner cabinets cannot be reinstalled or moved. Such structures are installed thoroughly and irrevocably.
For a clear example of installation, you can make a detailed drawing of the room and calculate all possible options to choose the most suitable one.
The cabinet drawing will help you quickly assemble it.
It is worth saying that cabinet furniture can be reinstalled, but this process is very labor-intensive and time-consuming. A cabinet that has all the walls, that is, not attached to the load-bearing wall of the room, can also be easily moved to another location.
Often corner cabinets are built-in.
"DUET LUX"
Wenge/Milky oak Sonoma oak Walnut/milky oak Shimo ash dark / Shimo ash light Wenge/Milky oak Sonoma oak Walnut/milky oak Shimo ash dark / Shimo ash light Wenge/Milky oak Sonoma oak Walnut/milky oak Shimo ash dark / Shimo ash light Wenge/Milky oak Sonoma oak Walnut/milky oak Shimo ash dark / Shimo ash light Wenge/Milk oak Sonoma oak Walnut/milky oak Shimo ash dark / Shimo ash light
Wenge/Milk oak
Sonoma Oak Walnut/Milky Oak Shimo Ash Dark / Shimo Ash Light Wenge/Milky Oak Sonoma Oak Walnut/Milky Oak Shimo Ash Dark / Shimo Ash Light Wenge/Milky Oak Sonoma Oak Walnut/Milk Oak Shimo Ash Dark / Shimo Ash Light Wenge/Milk oak Sonoma Oak Walnut/milky oak Shimo ash dark / Shimo ash light Wenge/Milky oak Sonoma Oak Walnut/milky oak Shimo ash dark / Shimo ash light Wenge/Milk oak Sonoma Oak Walnut/milky oak Shimo ash dark / Shimo ash light Wenge/ Milky Oak Sonoma Oak Walnut/Milk Oak Dark Shimo Ash / Light Shimo Ash
Navigation
Furniture catalog
Payment Methods
Advantages and disadvantages of a corner cabinet
Any design has its advantages and disadvantages. The corner cabinet is very popular due to its multiple advantages.
Corner furniture has many advantages.
The positive aspects of a corner cabinet include:
- Compact design.
- Saving room space.
- Due to the proper arrangement, cabinets of this design are large.
- Spaciousness.
- Convenient storage of all things and their location.
- If the design is carried out independently, then additional storage space is specially installed.
- Versatility.
- Large selection of design solutions.
- Practicality.
Assemble furniture directly at the installation site.
The negative aspects of the design can be considered:
- The cabinet is not mobile.
- A large number of parts will have to be purchased to order.
Specialists know exactly how to assemble the product correctly and quickly.
Self-assembly of a corner cabinet is a labor-intensive process and requires concentration. Any wrong action can lead to a major reinstallation of the structure. It is important to observe all the nuances and follow clear instructions for assembling a corner cabinet.
Let's sum it up
Before you begin the process of assembling furniture with your own hands, you should assess the possible risks. It is recommended to entrust expensive or complex cabinets to professional assemblers. But if assembling furniture gives a person pleasure, then this is a great opportunity to save money.
In a special article, we will look at the advantages of sliding wardrobes, the main nuances of their installation, and give detailed instructions on how to independently assemble a spacious wardrobe for a small hallway.
Options for corner cabinets in the interior in the photo
Examples of kitchen sets with dimensions ↑
The construction and design of a kitchen is always based on the overall dimensions of the room. After all strategic objects (pipes, sockets, protrusions, etc.) have already been placed on the drawing, you can begin arranging cabinets for household appliances. Next, standard furniture should be placed, and only then non-standard structures.
When developing your own kitchen drawing, you can rely on ready-made kitchen designs with dimensions, while correlating the actual dimensions of the room with those indicated in the sketch.
Standard kitchen set with dimensions:
Drawing of a straight kitchen with custom cabinets:
It is recommended to start drawing a drawing of a corner kitchen from the bottom corner cabinet. Next, furniture and household appliances are arranged, and then non-standard cabinets are calculated.
Standard corner kitchen with dimensions:
Standard corner kitchen with dimensions
Designing a kitchen with a trapezoidal corner element:
Kitchen design
Drawings of a corner kitchen of a custom size:
Detailing of main kitchen cabinets: drawings and dimensions
- Calculation of detailing is carried out taking into account the thickness of the chipboard.
- The standard thickness of laminated chipboard for the manufacture of kitchen furniture is 16 and 18 mm.
- The lower kitchen drawers are mounted on adjustable supports 10 cm high.
- It is recommended to make the support bar (lower plinth) one-piece - inseparable for the entire kitchen set.
- The details and drawings of the kitchen below are designed for 16 mm chipboards and a 28 mm countertop.
- The height of the lower tier is 850 mm including the tabletop, the upper tier is 720 mm.
Cabinet drawing: 600x500
| the name of detail | Dimensions | Quantity |
| Side | 500x722 | 2 |
| Bottom | 500x568 | 1 |
| Shelf | 500x568 | 1 |
| Lower plinth | 100x600 | 1 |
The width of the cabinet varies depending on the length of the sink.
Drawing of a kitchen cabinet for a sink 800 mm
| the name of detail | Dimensions | Quantity |
| Side | 500x722 | 2 |
| Bottom | 500x768 | 1 |
| Upper plinth (supporting frame, strip) | 80x768 | 2 |
| Lower plinth | 100x800 | 1 |
The width varies according to the specified dimensions of the room or the wishes of the customer.
Sketch of a cabinet with 4 drawers, size 400x500
| the name of detail | Dimensions | Quantity |
| Side | 500x722 | 2 |
| Bottom | 500x368 | 1 |
| Drawer side slats | 140x500 | 16 |
| Lower plinth | 100x400 | 1 |
The size can be varied in width within the range of 300...1000 mm.
Drawing of a kitchen cabinet with two doors, width 600
| the name of detail | Dimensions | Quantity |
| Side | 500x722 | 2 |
| Bottom | 500x568 | 1 |
| Shelf | 500x568 | 1-2 |
| Lower plinth | 100x600 | 1 |
Sketch of an L-shaped corner section 900x900
| the name of detail | Dimensions | Quantity |
| Side | 500x722 | 2 |
| Bottom, roof (the sink cabinet is made without a roof) | 884x884 with cutting at an angle of 90⁰ | 2 |
| Shelf (there is no shelf in the corner sink cabinet) | 884x884 with cutting at an angle of 90⁰ | 1 |
| Lower plinth | 100x420 | 2 |
| Vertical plinth | 100x806 | 2 |
Drawing of a lower corner cabinet in the shape of a trapezoid 900x900
| the name of detail | Dimensions | Quantity |
| Side | 500x722 | 2 |
| Bottom, roof (the sink cabinet is made without a roof) | 884x884 with cutting at an angle of 45⁰ | 2 |
| Shelf (there is no shelf in the corner sink cabinet) | 884x884 with cutting at an angle of 45⁰ | 1 |
| Lower plinth | 100x600 (cut to size) | 1 |
| Vertical plinth | 150x806 | 1 |
The width of the cabinet varies depending on the width of the hood; the height is calculated relative to the dimensions recommended by the manufacturer of household appliances.
Project of a wall kitchen cabinet for a standard 600 mm telescopic hood
| the name of detail | Dimensions | Quantity |
| Side | 300x720 | 2 |
| Roof | 300x568 (corrugated cutout) | 1 |
| Shelf | 300x568 (corrugated cutout) | 1 |
Drawing of a top drawer with hinged fronts 800x720
| the name of detail | Dimensions | Quantity |
| Side | 300x720 | 2 |
| Roof, bottom | 300x768 | 2 |
| Shelf (not in the cupboard with a drying rack) | 300x768 | 1-2 |
Drawing of a corner L-shaped cabinet 600x600
| the name of detail | Dimensions | Quantity |
| Side | 300x720 | 2 |
| Roof, bottom | 584x584 with cutting at an angle of 90⁰ | 2 |
| Shelf | 584x584 with cutting at an angle of 90⁰ | 1-2 |
| Vertical clamping plinth | 150 x 688 | 1 |
Sketch of a trapezoidal corner upper cabinet 600x600
Installation of the cabinet base
The procedure for assembling a kitchen set is shown schematically in the diagram, but practice shows that it is easier to proceed as follows:
- On the panels that make up the corner base of the working area, the canopy parts are screwed according to the marks.
- Using self-tapping screws, we attach slides to the side walls to ensure the movement of the boxes.
- Wooden guides - dowels - are inserted into the holes drilled at the factory; they are lubricated with wood glue for strength.
- In order to properly assemble the module, we take the bottom, screw the legs to it and connect them to the side walls. When performing this operation, you must carefully ensure that the dowels fit into the holes intended for them. Using a hex wrench, screw the confirmations into place.
- The back wall of the modules that make up the corner kitchen consists of fiberboard sheets cut at the factory. Their inner surface is usually painted white.
The assembly of the base is now complete; all modules of the working corner surface are installed in the places specified in the instructions. The connection diagram for the plumbing fixture - sink - must be prepared in advance: the pipes are laid behind the cabinets that make up the corner kitchen. Connecting tubes and siphons are inserted into the module for subsequent connection to the mixer and drain.
Step-by-step instruction
Step-by-step creation of a simple cabinet from gypsum plasterboard We have already looked in detail at how to make a cabinet from plasterboard with your own hands, but step-by-step instructions will help you consolidate your knowledge. Let this be a kind of action plan in general terms in order to remember the sequence of work.
- We decide on the place where the cabinet will be located until the next major overhaul.
- We make a sketch of the desired design.
- We stock up on the necessary materials and tools. No matter how hard you try, you won’t be able to buy the required quantity of everything at once; it will come out too little or too much.
- We mark the surfaces, indicating the place of attachment of the main frame elements.
- Using a drill or hammer drill, we attach the profiles according to the marks made to the wall, floor and ceiling.
- We install rack profiles and connect them to the guides.
- We install jumpers under the shelves, as well as to strengthen the entire structure.
- We cover everything with plasterboard.
- We prime and putty the plasterboard sheets, preparing the cabinet for the final finish that everyone chooses for themselves.
Assembly sequence
You need to start assembling the cabinet by combining the side panels and shelves, then with its top and bottom parts. We connect all the cabinet parts using confirmations. To do this we use a screwdriver. All the holes on the parts are already present; you just need to connect and tighten the screws according to the instructions.
Then you can mount the back wall, which will give the structure rigidity and stability.
In order to avoid possible distortions and further problems with adjusting the facades using a tape measure, you need to measure both diagonals of the future cabinet: they must be equal to each other.
Compliance with the conditions of equality of diagonals and a design angle of 90 degrees is mandatory in this case.
We attach the fiberboard to small furniture nails, which are usually supplied with the furniture. Be that as it may, if there is a shortage, additional nails can be purchased at any building materials store.
When the cabinet box has already been assembled, you can begin hanging the facades and adjusting them. On the fronts and side walls of the cabinet there are mounting points with holes for hinges. All that remains is to attach the loop and secure it with the screws included in the kit.
Correct installation of facades requires minimal gaps in their closed position and the absence of distortions. Easy and unhindered opening and closing of the facades indicates that they were hung correctly.
Adjustment is made by screwing in and out the screws located on the hinges. turning the adjusting screw brings the façade forward towards the wall or, conversely, moves it further away. By moving the hinge away from you, you adjust the gap of the facade from the end of the cabinet wall. After adjustment, tighten the fixing screw.
At the last stage of cabinet assembly, shelves are installed in the places of the box provided by the manufacturer.
Fastening drywall
The gypsum board is being cut. It is better to use real dimensions taken from the installed cabinet frame, rather than those indicated in the drawing: minor shifts during the assembly process are more than possible.
The individual sheathing elements are attached to the frame using self-tapping screws, the heads of which must be slightly recessed into the drywall.
The corners of the cabinet must be reinforced with perforated metal corners, secured during the process of puttying the drywall. It is carried out in a standard way: the seams are glued with sickle tape, the screw heads are covered, after which the finishing layer is applied.
At the final stage, the surface of the cabinet is finished in accordance with the overall interior of the room.
Design Features
Complaints about lack of space in an apartment or house are very common; Upon closer acquaintance with the home, it often turns out that certain corners are empty and there is no way to use them. Both problems can be solved at the same time if you make a corner cabinet - it is also much more economical than buying it in a store or ordering it from a furniture company.
Almost anyone can draw up a drawing, but professionals should cut out the parts in accordance with the idea, since this is too difficult and troublesome. The height of the section where fur coats, jackets and coats are to be stored should be flexibly adjusted to the height of those who will use the closet; everyone should be able to easily reach the crossbar
Important clarification: by placing the crossbar across the width, you will achieve greater efficiency from the internal space
It is advisable to draw up a diagram while being exactly where the cabinet will be installed - then do not lose sight of any details. Even the smallest components must be reflected in the drawing. Mark the location of roll-out drawers, doors and baskets; the thickness of the material is indicated precisely, and the specification of any element is given. Yes, it is quite difficult - but there is no other way to do the job well. The installation locations of the lamps (if provided) should be noted immediately, both when drawing up the plan and when starting the work itself.
Internal filling
Filling the interior space of a wardrobe is an important point when developing a model of a future design; it is the most functional part of the sketch. Three visually different zones are traditionally installed inside the cabinet: lower, middle and upper. At the bottom there are traditionally racks for shoes or shoe racks, in the middle there are open shelves, rods, hangers for skirts and trousers, drawers, on top there is a rod for long clothes and open shelves for the least frequently used items and things.
The rod is found in all wardrobes and allows you to hang clothes on hangers, including long clothes. Choose two or more rods: the height of one of them should not exceed 80 cm (it is optimal to choose 60 cm): it will be used for everyday clothes, the other with a height of 100 cm will be used for hanging long and street clothes.
The pantograph is the same bar with the ability to lower the structure; they are installed as high as possible. The width of the rod varies up to 90 cm: if the rod is larger, it requires additional support.
- Open shelves are an integral part of any closet; the optimal depth of shelves is from 40 to 70 cm, width - up to 60 cm (it is better to make more shelves of small width), the height is determined based on the personal wishes of the consumer, optimally - 35-40 cm.
- Drawers protrude for storing underwear and hosiery; their dimensions correspond to the parameters of open shelves, because often these structures are located under them.
- Shoe compartments and shelves: Place them at the bottom to make efficient use of space. For ease of storage, you can choose designs with lasts for putting shoes on them or shoe racks: shallow drawers with vertical placement of wardrobe items.
Other types of furniture hinges
Card, piano, and hinge hinges are rarely used for installing cabinet doors. They do not have three-level adjustment and do not lock the door in the open and closed position. An additional fastener is needed. Today they are more often used as an additional decorative element. For example, antique.
For installation of horizontal overhead panels that open upwards.
Mezzanine
Secretaries
Used for hanging downward opening facades.
Secretary room
We have learned in our practice how proper installation and adjustment of hinges affects the operation of the cabinet as a whole. Some time after assembly, the door of the wardrobe or kitchen cabinet stopped closing - the upper part of the door rested on the frame.
To correct the misalignment and use the cabinet normally, I had to readjust all the hinges. Therefore, during installation, it is advisable to prevent any deviations; any gap can lead to deformation of the entire cabinet structure.
Source
Cutting the body parts and rolling the ends
At home, cutting sheet material to the size of blanks professionally and accurately is unlikely to be possible. How to process the ends: gluing the melamine edge with an iron is a better option for country, budget furniture.
Usually, cutting and gluing of PVC edges is ordered from the relevant companies. Typically, these services are offered in the same place where chipboard, fiberboard, and edge materials are sold.
The price for cutting can be calculated in different ways:
Along the length of all cuts, per m.p. The more small parts in the cabinet design in the form of shelves, strips and drawers, the more expensive the cutting will be. For cutting the sheet
It doesn’t matter how many details there are, it’s important to fit it into the sheet. Therefore, it is more profitable to cut large items (for example, wardrobes) according to moldings, and small ones (chests of drawers, bedside tables, etc.) according to sheets.
The rolling of visible ends is calculated per linear meter. PVC with a thickness of 0.4-1 mm is cheaper, and PVC with a thickness of 2 mm is more expensive. Therefore, it is more profitable to roll the internal parts of the cabinet with thinner PVC.
Design Features
Before you start creating a drawing of the future structure, it is important to determine the place where it will be installed. At this stage, the following points should be taken into account: the number of shelves, drawers (if required)
All this will allow us to develop the most detailed project.
It is important to observe the following nuances:
- Not all apartments have standard, smooth walls and ceilings. This is why measurements should be taken from all sides, especially when designing a built-in wardrobe.
- The depth of the finished cabinet should be at least 60 centimeters. Otherwise, such shelves will not be spacious.
- Measurements should be immediately transferred to the drawing in order to correctly calculate the amount of materials.
- If necessary, you should first level the floor in the place where you plan to install the cabinet.
- To apply markings, you must use a building level, a square and a tape measure. Sample drawing with dimensions
Only then do you need to calculate the dimensions of the horizontal parts and the rods (if it is a wardrobe). Most often, large shelves are installed at the top of the cabinet, and a bar directly in the corner. The last step is to add additional designations to the diagram where mirrors, lighting and other elements will be located.
We suggest you familiarize yourself with the Washing machine filled with water and stopped
Unlike its ordinary counterparts, the corner wardrobe is always designed to be stationary. It is created to fit the dimensions of a specific angle and does not imply its movement.
First you need to decide what kind of corner cabinet you need. Main types of construction:
- triangular;
- trapezoidal;
- L-shaped;
- "five-walled"
In addition, cabinets can be built-in or cabinet. A built-in closet is essentially a small storage room. The shelves in it are mounted directly on the walls, and the space is enclosed by a door. The cabinet cabinet has a base, top cover and back wall, at least made of thin fiberboard sheets.
The most space-efficient one is a triangular cabinet: it has no side walls. Its depth will be determined only by the width of the walls that you are willing to “give up”. The remaining cabinets are a little more difficult to manufacture and will have additional depth.
Today, it is popular to manufacture a radius cabinet, the facade of which is made in the form of a semicircle or wave. Such furniture fits harmoniously into a variety of interiors. This type of cabinet is especially good for a large hallway and bedroom. For the kitchen, a corner version made of plasterboard is very popular - it is simple to implement and takes up very little space.
When you make drawings of the interior of such a cabinet, you need to take into account its purpose. If this is a hallway closet, it should have a rod for outerwear, shelves for shoes (possibly high ones for boots), shelves for hats and accessories, space for umbrellas, gloves, etc. In the living room, a wardrobe can serve as storage for books, documents, blankets and bedspreads, and beautiful dishes.
Complaints about lack of space in an apartment or house are very common; Upon closer acquaintance with the home, it often turns out that certain corners are empty and there is no way to use them. Both problems can be solved at the same time if you make a corner cabinet - it is also much more economical than buying it in a store or ordering it from a furniture company.
Almost anyone can draw up a drawing, but professionals should cut out the parts in accordance with the idea, since this is too difficult and troublesome. The height of the section where fur coats, jackets and coats are to be stored should be flexibly adjusted to the height of those who will use the closet; everyone should be able to easily reach the crossbar
Important clarification: by placing the crossbar across the width, you will achieve greater efficiency from the internal space
It is advisable to draw up a diagram while being exactly where the cabinet will be installed - then do not lose sight of any details. Even the smallest components must be reflected in the drawing. Mark the location of roll-out drawers, doors and baskets; the thickness of the material is indicated precisely, and the specification of any element is given.
We cover everything with plasterboard
Before starting work on covering a cabinet with plasterboard, you need to learn a few rules:
- screws are attached in increments of 15-20 cm;
- for work you will need phosphate screws 3.5 * 25 mm;
- There should be small gaps of a couple of millimeters between the drywall joints;
- the edges of the sheets need to be chamfered so that the joints can be puttied better;
- Self-tapping screws cannot be screwed into the very corner or from the edge of the sheet; you must always retreat 5 mm.
- The heads of the screws should be recessed into the gypsum board by a few millimeters, but not too deep so as not to tear the core of the sheet.
When cutting sheets to the desired size, they should always be applied to the frame to avoid jambs in the future. Moreover, it must be taken into account that the joints of the sheets must fall exactly in the middle of the profile. It is in the middle, and not on the edge and not hanging in the air.
The front shelves and partitions are sheathed with plasterboard last
It is advisable that the back wall is already covered with plasterboard, as this greatly simplifies the work.
All parts of the frame are sheathed with sheets of plasterboard so that the profiles are not visible.