Hello, friends! Today we will tell you how to make a durable, reliable end cutting board.
Making a shield
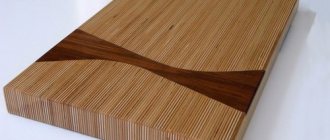
So how are end boards made? Traditionally, first you need to select quality wood. We will use ash and oak - these species are very dense, especially at the end, and are excellent for our purposes.
We need to glue the shield together. I won’t go into details; we have already discussed this issue in one of the previous master classes.
Align.
We file.
We glue.
For the end boards we use Titebond III, a premium adhesive with maximum water resistance that is certified for food contact.So, the shield is ready. Let's align again.
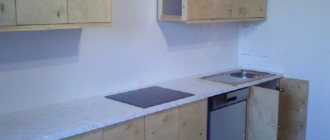
From the table top
A durable and functional cutting board can be made from an old countertop. If the size of the canvas is large enough, you can get a cutting kit. For manufacturing you may need the following materials:
- saw or jigsaw;
- sandpaper;
- mineral oil.
Manufacturing instructions:
- Think over the design of the product and draw or print it on a printer. Trace the contours of the board on the workpiece.
- Use a saw (if the board is rectangular) or a jigsaw (if the shape is arbitrary) to cut out the product. Sand the sides with sandpaper or a rasp.
- Cut or drill a hole for hanging. Sand the inside surface of the hole.
- Treat the sides with mineral oil to protect against moisture.
- Decorate the product by painting, cutting or burning.
The tabletop fragment selected for manufacturing must be intact, without chips, cracks or loose areas.
Parts for the end board - sawing and gluing
Then the fun begins. We need to saw the end elements themselves.
Rotate the parts 90 degrees, with the ends facing up.
And here is the end board itself! Let's rearrange the details a little - sleight of hand, no deception!
All that remains is to glue these parts into another shield and modify it a little. Go!
Conclusion
Plywood is the most suitable material for creating a cutting board due to its high performance characteristics and affordable price. The work itself is not difficult to complete, the main thing is to follow the above recommendations.
DIY plywood cutting board
The video in this article will introduce you to additional materials related to the information presented. Be attentive to the details, and you will succeed. You can ask any questions regarding the topic discussed in the comments.
Bringing beauty
The board is glued, cured and ready for further processing. As you noticed, we glued two strips of waste pine. They will prevent splitting of the material at the outlet during processing in a surface planer. We will cut them off later.
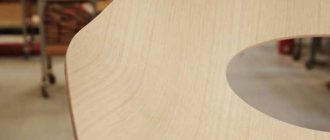
The board is large and heavy, so it is necessary to make handles. We make them using a hemispherical cutter.
We remove the edges.
A little sanding and...
Almost the finish line - we're putting our logo on it.
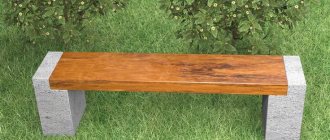
Like in a restaurant: make your own fashionable board for serving dishes
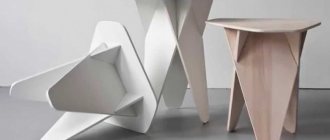
A couple of years ago, a colleague of mine was enthusiastically talking about an expensive restaurant where steaks were served on wooden boards.
The plates for such a dish seemed insufficiently brutal, and the chef decided to serve it directly on the “cutting” boards. Of course, no one will use the same board to cut meat and serve the finished dish, so special ones appeared - serving boards. Spectacular serving of steaks in a restaurant
My colleague and her husband (a professional chef, by the way) were delighted with this presentation. Together we went online and found out that such boards cost obscene amounts of money. I studied the topic and decided to make a couple of things.
This was my first job. The board is sanded and coated with colorless wood oil. Photo by AlexKlimk
Then I experimented with shape and color coating. Photo by AlexKlimk
After the event to make a stool, which was successful and received the approval of relatives, I became interested in the paint manufacturer. I looked at the website and was very surprised that VIXEN makes polyurethane yacht varnish, wood oil and even wax in aerosol cans. I have been working with wood for a long time, but until now I have only applied parquet and yacht varnish to products with a brush. It’s the same with terrace oil: I’ve been using it for a long time, but I’ve never even seen this product in aerosol cans. It was interesting to try them out!
To get an idea about any type of paintwork, it’s not enough to do a test coating on a scrap board - you need to coat a specific product, hear reviews... I won’t look far for inspiration and will make a couple more serving boards. The material for them (a scrap from the roof sheathing) was found in the attic. It was guaranteed dry wood, 25 years of drying.
Tools and materials for making a serving board. Photo by the author
The outline of the boards was sketched by hand with a felt-tip pen. It's better, of course, to use a pencil or chalk so that the dye doesn't soak into the wood, but I was going to remove a fairly deep layer from the board when processing.
I drew the outline of the product. Photo by the author But first you need to try the oil on the trimmings from the fence. I sanded it with sandpaper with P180 grit and degreased it.
The sample board is sanded. Photo by the author I shook the can properly and sprayed it with tint oil from about 25-30 cm. I sprayed the oil. Photo by the author An ordinary household sponge will help remove excess oil.
Excess is normal! Photo by the author
The test was successful: the color is even, there is little excess. Now it’s interesting to see what a wooden product coated with this oil will look like.
Test sample. Photo by the author
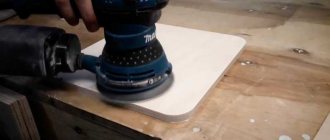
I cut out the first serving board with a hand-held electric jigsaw and then sanded it.
A metal saw is installed to make the cut smoother. Photo by the author
The internal roundings were drilled with a ring drill with a diameter of 15 mm. A cordless screwdriver would have enough power to drill a hole with a diameter of 100 mm.
First we drill, then we saw. Photo by the author
The blank for the board was secured with a clamp. Then I treated it with a grinder with a sanding attachment, the sandpaper was coarse - P40. This attachment is suitable for both an angle grinder and a screwdriver.
The workpiece is secured with a clamp. Photo by the author
I started making the second board by sanding the scraps - and only then I sawed it out.
We sand the board with a grinder. Photo by the author
Blanks for serving boards. Photo by the author
I drilled holes in the boards with the same drill with a diameter of 15 mm and then sanded the blanks with fine sandpaper (P180). If you do not have a workshop with an industrial cyclone, then it is better to grind outdoors.
I didn't sand for long, but a lot of dust settled! Photo by the author
The last stage of sanding: I went through it with an orbital sander with fine sandpaper. I cleaned hard-to-reach places manually.
Now the surface must be wiped with a wet swab. When the water dries, the surface will become rougher again: this is the rise of the pile. After drying, you need to go over the surface again with a sander.
We wet the surface. Photo by the author
Remove any remaining dust with a barely damp cloth and apply oil. I started from the bottom of the board. I shook the can as it was written in the instructions, sprayed it on the board so that there were no gaps, and removed the excess oil with a sponge.
Apply tinting oil. Photo by the author
When painting, you must be careful to ensure that excess oil does not leak onto the end of the board. If drips appear, it will color unevenly. Ideally, areas that will not be painted should be protected with film, but this is impossible to do here. Therefore, we always keep a clean sponge at hand and watch the ends.
Disperse the oil with a sponge and remove excess. Photo by the author
The board turned out a little darker in places where the sanding was rougher. This is logical: a more porous surface absorbs more oil.
Wood texture under oil. Photo by the author
The second board, after sanding, developed a more interesting pattern.
The second board is prepared for oiling. Photo by the author
The oil went on evenly, the consumption was small, the board turned out prettier than the first. I laid the blanket outside and dried it in the sun for half a day. Ultraviolet rays accelerate the process of polymerization (drying) of the coating - after a couple of hours it felt like the oil had dried out. But I decided to dry it for a day, as written in the instructions.
The next day I started varnishing the products. I chose a silky-matte yacht varnish: I think this surface will look more noble. The weather was favorable: it was +23…+24°C without rain. My boards are perfectly clean, so there is no need to degrease them. I shook the can for a couple of minutes and applied the first coat.
The next day we apply yacht varnish. Photo by the author
I usually dry yacht lak in this weather for more than 12 hours. I left the boards to dry on the second floor and went to mow. Under the varnish, the wood texture became more clearly visible.
The left board is covered only with tinting oil, the right board is covered with oil and one layer of yacht lak. Photo by the author
While I was mowing, the idea came to me to re-read the instructions. And it says there that the varnish dries only 30 minutes between touch-and-go layers. Therefore, I applied the second layer of varnish outside, in the sun.
The second layer was applied to the board outside. Photo by the author
I noted the time and checked: the varnish dried in the sun in less than half an hour! After lunch I managed to cover the front side of the boards with three layers, and the back with one. It turns out that VIXEN aerosol yacht varnish dries much faster than its counterpart from a can. The coating came out smooth, semi-matte. With this varnish, you can fully cover the product with three layers in just half a day.
Three layers of varnish were applied. Photo by the author
That day we didn’t have pickles, so we simply “loaded” the board with grass and tomatoes and put it on the table. But my daughter dreamed of how chic it would look to serve good cheeses and dried fruits with wine on such a “dish.”
Testing of the finished product. Photo by the author If the board is not varnished, then you can use it as a cutting board.
Why is it needed?
Such a useful thing in any household can be useful for a thousand different reasons:
Here are some examples of beautiful design for inspiration.
Basic Steps
Decoupage technology is not complicated and consists of several basic steps:
- sanding the surface of the product;
- primer;
- painting with white acrylic paint;
- drawing an image;
- varnish coating;
- sanding layers of varnish after it has dried.
Note! The best DIY decor ideas - interesting home decoration options. 165 photos of the best solutions
What materials will be needed?
I will dwell on this issue in detail, because it is the most difficult in the entire manufacturing process. First of all, because you can take almost any materials, but the result will be different. Now some details.
In order to make a chalk board, you need three things:
- base for painting,
- special paint,
- frame of suitable size with suspension.
We take a ready-made frame, if available, or order it from a framing workshop. If you need a standard format like 70x50 or 30x40, then it’s cheaper to buy a ready-made one at any large construction hypermarket (Ikea, Obi, Leroy Merlin and the like). But in a baguette there will be a richer choice and it is possible to make the desired size with an accuracy of 5 mm. By the way, the finished frame can be decorated so that it fits exactly into the interior. You can read more about this here.
Base for painting
The most interesting thing is that it can be almost anything:
- Fiberboard,
- chipboard,
- plywood,
- binding cardboard with a thickness of 1.2 mm.,
- a metal sheet.
We turned all these materials into slate boards and they behaved perfectly during further use. You can do without such a base altogether and just paint a piece of the wall in the room. The wall must be plastered and well primed. If you paint the wall, you won’t even need a frame. Let's say that what you need is a board. How to choose a material? I will briefly write about the advantages and disadvantages of each. Cardboard is light in weight, usually a sheet of cardboard can be 70x100 cm in size. It is convenient to use, it is easy to find on sale, and if desired, it can be cut to the desired size with a regular breadboard knife. The most interesting thing is that the paint lies evenly on it, forming a thin film on the surface, after which the cardboard itself no longer resists water, so you can wipe the chalk off it with a regular damp cloth. Disadvantages of cardboard:
- limited size,
- without a solid back in the center on large formats it can sag in a bubble, but on 30x40 this will not happen yet, so for small sizes it is almost ideal.
Plywood is a good environmentally friendly material, suitable for large formats, it will not lead anywhere even at a size of 1.5x1.5 m. It is convenient to mount it on the wall. The fasteners can be recessed and the place where the sheet is attached to the wall can be leveled with putty. In general, it’s good for everyone with one exception: - plywood does not provide a perfectly smooth and even surface. After painting, the wood structure is visible in some places. In principle, this does not interfere with drawing, but it is not suitable for perfectionists. A metal sheet is taken in cases where you want to make the board also magnetic, but you have already purchased regular paint, without magnetic primer. The paint adheres well to metal, there are no problems with this, but thin metal can also bend at large sizes. Chipboard and fibreboard provide a perfectly flat surface after painting. The impressive dimensions of the sheets allow you to approach the matter on a grand scale, without limiting yourself to the modest 50x60 or 70x100. The fastening points on the chipboard can also be easily masked with putty. It is more problematic to do this on fiberboard, but with some skill it is possible. A significant disadvantage of chipboard is its heavy weight. Fiberboard does not have such a drawback, which makes this material the most convenient of all the above.