The beauty of interiors and adjacent areas is created not only by construction and finishing materials. They will not look so impressive if you do not complement them with decorative elements, contrasting spots and interesting shapes.
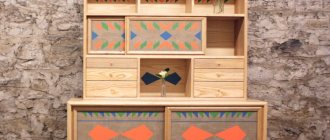
These properties are combined in decorative furniture, for the manufacture of which unusual materials are used. Furniture made from driftwood and branches is worth trying your hand at making unusual tables, chairs, armchairs and small decor.
Working with wood in its natural form requires experience and artistic vision.
Where to get raw materials
You can find natural material in the forest, on the shore, in your own garden after pruning trees, or pulled out of the water. Depending on the location of detection, the pre-treatment of raw materials varies. Anything found on land is sanded, cleaned of rotten fragments, and rotten layers are removed down to the hard wood. What is taken out of the water is cleaned of contaminants and dried.
The jackpot is considered to be the discovery of bog oak. Furniture made from it is considered elite, and dark wood is recognized as the most durable. However, other tree species are quite resistant.
Mandatory requirements for the bench
In addition to the previous nuances in the process of designing a product, it is worth taking into account a certain list of requirements that it must meet. The following must be taken into account:
- Safety
. You should not allow an unreliable design of the product, because this can bring a lot of troubles when using it. To ensure safe use, it is worth choosing only high-quality material, as well as fastening devices and any accessories. - Convenience
. Undoubtedly, such an item in the garden as a garden bench should be comfortable so that nothing interferes with the relaxation process. To do this, you need to approach the project creation stage very competently and carefully and think through all the details in advance. - Immune to influence of external conditions
. To ensure long-term preservation of appearance and service life, it is necessary to select only solid material at the assembly stage of the product. Additionally, it is worth treating it (if made from wood material) with special means that can provide protection to the product.
Style for the creative
An interior containing furniture made from driftwood and branches is called rustic. Some consider it a rough, even brutal variety of country style.
The classic design features wood floors and paneling and dark beamed ceilings. All this visually reduces the size of the room, so it is rarely used for apartments. But in country houses, in the country, in a bar, sauna or as garden furniture, this is the best option. And one hundred percent exclusive that you can be proud of. Fans of everything non-standard will appreciate it. In a modern interior, such things or a wall panel with imitation of living trees claim to be conceptual.
Bench with backrest with tongue-and-groove joints
The next project is an outdoor wooden bench with a backrest. It has a fairly strict appearance and will become a functional decoration in any garden or dacha. The vertical slats of the back give the massive structure visual lightness. Shaped armrests and a curved top bar add Japanese influences to a clean, classic look. It is simply created for carefree contemplation on shady alleys, and will look even more expressive surrounded by greenery and flowers.
If in the previous two projects we talked about how to make benches using simple carpentry joints, then here we will talk about the classic tenon-socket connection. It underlies all design elements of the project. You will have to make a lot of spikes and nests, so it is advisable to think about optimizing this process in advance. The simplest and most affordable option is to use a hand router and a saw table.
Advice! For accurate and quick selection of slots, use a homemade milling template with slots of the required sizes.
Drawing of a bench with a wooden back
Advice! Decorative antique finish perfectly complements the simple design of this wooden bench with a backrest. Use the brushing capabilities to texture individual structural elements - the top crossbar, the middle backrest and armrests. The combination of smooth and aged surfaces will create an original design contrast.
Prepare the details
According to the dimensions specified in the drawing, make the main parts of the bench. To quickly apply markings, use pre-prepared templates. Duplicate parts can be mass produced. After cutting, fasten all the identical parts into a pack and process their ends with a sander, this will significantly speed up the work process.
Make spikes
On the saw table, form tenons on all tenon pieces, following the dimensions from the diagram. Using a groove disc will make this job much easier. This can be done no less carefully with a regular saw blade, followed by trimming the waste with a chisel, as shown in the photo.
Mill out the sockets
Assemble the sidewall
Perform dry assembly of the sidewall. If the joints in the structure are not tight enough, fine-tune them using one of the methods we discussed in the article “Perfectly Fit Joinery Joints.”
Carry out sequential gluing of the structure
After checking the accuracy of the fit of the connections of the entire bench, proceed to sequential gluing of the base elements first, and then the back. After the glue has completely dried, attach the seat strips with self-tapping screws.
What are the benefits of driftwood furniture?
The main advantage of rustic furniture is exclusivity. In nature, there are no two identical trees, trunks or twin branches, so any furniture made from branches, driftwood, or stump will also be unique. There are also advantages:
- Environmental friendliness and absolute safety of the material.
- Reliability: strong roots from which a table, chair or other object is made guarantee its maximum strength.
- The variety of materials allows you to make any product: from an elegant lampshade to a chest of drawers or a bed with branches on the backs.
With proper use, this furniture will last forever.
Can be found under your feet
Much of what can be successfully used for the interior can be found in the forest or even on the street. We have already talked about how saw cuts can be used; but this is not all that can be “borrowed” from nature.
Stump
This “good” can be found both in the forest belt and on the plot. By subjecting it to minimal processing (grinding and varnishing), you can get a table, bedside table, lamp stand or chair. The natural pattern characteristic of wood will highlight your taste.
Branches and brushwood
To understand how to use them in the interior, it is better to familiarize yourself with the numerous photos published on the World Wide Web. So, you can find a photo of a table made in the form of an armful of branches, intercepted with twine in several places.
All you have to do is find a large tree branch and paint it in bright colors. Then you need to secure it to the wall as securely as possible. If the side branches are strong enough, you can hang small toys or colorful patches on them. The child will be delighted with such a bright detail, and most importantly, he will be able to help create it with his own hands.
driftwood
Often in nature you can find driftwood that resembles various shapes. They can also be used in the interior of an apartment.
Picturesque little things
Wood in the interior can be present unobtrusively, but expressively. Decor made from this material will highlight the individual style of the apartment.
This list may include:
- floor vases;
- candlesticks for walls;
- figurines;
- caskets;
- spoons and utensils;
- masks for wall decoration.
Full length
Modern designers offer truly imaginative solutions to the most daring clients. For example, a real tree in a tub. Standard apartments are not suitable for this, but a country house with a large area is just what you need. For example, in Europe, a real fashion trend in recent years is a live spruce in a pot.
The combination of wood and stone in the interior looks natural. Therefore, it is logical to use a small stone if you need to somehow decorate the space inside a tub with a tree.
Manufacturing
As in any business, to begin with it makes sense to practice on simple products: small sculptures, lampshades, photo frames, mirror framing. Once the skill has been mastered, you can begin creating more impressive furniture with your own hands.
Preparatory stage
First, the layout of the product is well thought out in order to clearly understand what the output should be. It will take not only precise calculation, but also imagination to connect disparate fragments by texture or pattern. For example, the backs of chairs, armrests, footboards or headboards of a bed, legs made of curved branches will look more interesting than straight ones.
Then the material is selected. Wood of different thicknesses is used for furniture made from branches or roots: graceful thin knots for a lampshade, thicker ones for a chair or bed. You can use dry or fresh raw materials.
The wood is dried slowly under a canopy, and at the final stage - in a room without heating.
Assembly according to all rules
In order for furniture to serve for a long time and be aesthetically pleasing, when making it yourself, compliance with the rules is required.
The ends of the roots are processed clockwise without pressure: first with a coarse brush, then with a drill, then with a finer brush. After drying, assembly begins.
Furniture made from branches is connected piece by piece in several ways:
- gluing;
- wedge-spike;
- mounting on self-tapping screws or screws.
The joints are sealed with wood glue.
Final finishing
You can make furniture from branches or roots even if they have cracks - this gives the product uniqueness and charm.
However, if such defects do not inspire confidence, they can be easily repaired with dark-colored epoxy resin, and then the product can be sanded.
The most interesting stage - decorating - begins after sanding, assembling and removing excess glue. The product is covered with several layers of stain until the desired shade is obtained.
Processing methods
A stump (stump, log) is a tree. Wood is a natural material and is susceptible to rotting. When it dries, it shrinks; when it gets wet, it swells. They process and protect hemp or logs to create crafts in several ways that can be combined with each other:
- Chainsaw cutting. Shaped cutting with a chainsaw to create crafts from stumps and logs for the garden and home is used to create tables, chairs, stools, and armchairs. Cutting with a gas or electric saw requires certain skills and compliance with safety precautions. You can learn how to operate a chainsaw on our website. Before cutting, it is better to make markings, outlining the contours of the future craft, for which you can use a regular pencil. And then, as with sculptors: we take a log and cut off all that is unnecessary from it.
- Firing with a burner. It will delay the rotting of hemp and give it a beautiful, aged appearance. To do this, after firing, it is necessary to clean the burned surface from excess charred wood using sandpaper, a metal brush or an angle grinder (“grinder”) with a brush or grinding disc.
- Protection. To protect wood before painting, it is necessary to use wood antiseptics, the simplest and most inexpensive of which is iron sulfate.
- Grinding. For grinding, an angle grinder with a brush or grinding disc is most often used. A brush with metal bristles, less often sandpaper. Various grinding machines are also used.
- Painting, varnishing or waxing. It will also delay rotting and give a beautiful appearance, especially when using varnishes and waxes. The varnish must be applied in at least 2 layers, allowing the previous one to dry, or even better, after applying a layer of varnish and drying it, sand the surface before applying the next layer.
Processing hemp and logs with your own hands
Design options
Depending on the size of the raw materials, large furniture is made from stumps and snags or small objects are decorated.
Furniture for all occasions
You can make rustic furniture for your home or garden with your own hands. Here are some ideas:
- Tables, chairs, bar counters and other furniture made from driftwood look unusual. It is easy to strengthen the tabletop using a cut of large driftwood.
- Small branches are suitable for the back of the chair; larger driftwood will be used for the legs. The seat is made from roots held together with hemp or a continuous, even cut.
- The bed of the bed is made of boards or thick branches; thinner branches are used for the backrest.
- If it is possible to find a fragment that has powerful branches, it is used as the basis for a floor lamp. Less solid branches will make an original candlestick or hanger.
- A wide log will make a bar counter or tabletop.
Thus, by selecting the material according to size and diameter, you can make any piece of furniture.
Decorative tree
In Western countries, it has long been customary to decorate your home for one holiday or another. For example, on Christmas Eve you can see themed wreaths on almost every door. It really looks very beautiful, so we suggest making an original version from branches with your own hands.
To work we need the following:
- willow branches;
- cones;
- floral wire;
- twigs of St. John's wort and lotus seed pods;
- twine;
- gardening scissors;
- scissors;
- decorative ribbon.
We cut off the decorative floral wire and wrap several branches in a dense layer.
We connect two blanks into a longer bundle.
For more reliable fixation, we use another piece of floral wire.
We bend the workpiece and give it the shape of a wreath, as shown in the photo.
We fix it with wire, but very carefully so that it does not stand out too much against the general background.
We prepare the cones and attach them to the workpiece using wire.
For a more secure fixation, you can use a glue gun.
We attach several branches of St. John's wort to the junction of willow branches.
Cut the ribbon to the required length.
Wrap ribbon around the wreath and tie a knot. Cut off the ends so they hang down a little.
Cut another piece of ribbon and tie it around the same place. If desired, you can make a small bow for decoration.
A beautiful wreath for Christmas is ready! It looks great as a decor for a door or window.
Stylish candlestick in 5 minutes
In order to make a candlestick from twigs, we need:
- Dry twigs.
- A small glass cup.
- Hot glue gun.
- Candle.
Take a small glass cup and a hot glue gun. Apply glue to each branch with a glue gun and glue it to the cup. Thus, glue each next branch next to each other.
Take a candle of the required size and insert it inside the glass. The candlestick is ready for use.
50 DIY wooden candlesticks
Another option for making a candle holder is to simply take a thick candle and glue the twigs around the candle with a glue gun. Also, if the branches are painted gold, the effect will be more glamorous.
The branches are painted gold
Golden candlestick
You can make unusual photo frames from dry branches with your own hands.
To do this we need:
- Dry twigs.
- Wooden base for frame.
- Hot glue gun.
- Decor (moss).
Then take a decorative material, in our case moss, and stick it in the corner of the frame. The result will be a wonderful composition.
To decorate the interior of your home, we suggest making a decorative tree with flowers.
You need:
- Twigs.
- Decorative flowers (can be made from paper).
- Sea pebbles.
- A piece of foam.
- Moss.
- Hot glue gun.
- An unusually shaped flowerpot (in our case, square).
Step-by-step production of decorative wood
- Take sea pebbles and add them to the bottom of the flowerpot.
- Then place the foam on the pebbles in the flowerpot and insert the prepared twig into this foam.
- Fill it with sea pebbles again to make the branch more stable. Place the moss on top.
- Now let's start decorating the branch. Take decorative flowers and glue them with a glue gun to the branch in a chaotic manner.
- When you glue all the flowers, then your decorative tree will be ready to decorate your apartment or house.
Decorative tree painted gold
Decorative tree white
This is the easiest master class that could be shown. Let's make a decorative wreath on the door from twigs. To start and finish our craft we need:
- Twigs.
- Copper wire.
Base blank for a Christmas wreath
Take copper wire and make a circle with a hook out of it (see picture).
make a circle out of wire
We tie the branches into small bundles
Then we screw bunches of twigs to a pre-prepared circle of copper wire. And so on until the end. Your wreath is ready. You can also decorate it with spray paint, giving it your favorite color.
We attach “bundles” of branches to the base
The wreath can be decorated as you wish. And make it either New Year’s or for another occasion
How to make a Christmas wreath - 5 ways from spruce and pine in this article!
We invite you to familiarize yourself with Soup with frozen mushrooms and vermicelli
Pleasant trifles
A stylish frame of small branches will radically transform a familiar attribute of your home decor:
- vase;
- watch;
- photo frame;
- mirror;
- candelabra;
- shade.
In the last two options, it is worth considering fire safety rules.
Types of benches
Garden benches are traditionally divided into several categories. The criterion for division is location.
They are usually installed near the threshold, which determines the choice of material. Design experts insist that the appearance of the front bench should match the exterior of the country house. Thus, if the structure is made of stone, then the bench, accordingly, should also be made of stone.
water bench
The main purpose is to be able to spend time comfortably near a body of water. For the construction of structures, it is recommended to choose waterproof materials - artificial or natural stone.
Can be located virtually anywhere in a summer cottage. Plastic is usually used as a base, as it is lightweight and easy to maintain.
An indispensable option for hardworking summer residents. Garden benches are installed so that the owners of the site can relax comfortably while working in the garden. To ensure aesthetic pleasure that accompanies relaxation, the structures are located next to flower beds.
This variety can also be called a “solitude bench.” The fact is that it is customary to place them in the most remote places of the garden so that a person has the opportunity to hide from prying eyes. A popular material for manufacturing is wood.
Seasonal bench
This is a foldable design that is lightweight. This greatly simplifies the task of moving the bench from one place to another: in the summer - in the shade, in autumn or spring - in sunny places. The optimal material is plastic.
And even a stump
If a stump has formed on the site, you can use it as the center of the composition, surrounding it with logs. The main thing is that the hemp furniture has an even cut - the table and chairs will be stable. If desired, they are supplemented with backrests made of branches and pillows are placed.
You can even use an old rotten stump as a flower pot. They are placed in the rotten middle only in a pot so that the wood does not completely collapse, and if there is moss and other vegetation on the stump, this is only a plus: they will add decorativeness.
The quirkiness of roots, branches or driftwood creates endless scope for implementing the most unexpected solutions. They are fabulously beautiful and at the same time look cozy, but most importantly: they exist in a single copy.
Other ideas
A properly cut and processed stump can become a chic decoration or a functional component of a garden or vegetable garden. If you want to beautify your plot, you can use hemp to make an original border for flower beds or flowers in pots, or make interesting animal figures (hares and owls are often made).
If you want to build from stumps not just a fence for a garden bed, but a more complex figure, for example, it could be an originally designed goblin, an owl, mushrooms and other “forest” objects, then for this the master must be able to work competently with wood. This is especially true when it is necessary to cut through small and detailed parts in a stump.
If you don’t have the proper knowledge and work experience, you can make an extremely simple, but very cute figurine from a stump. It could be a charming fly agaric. To make it, you only need to prepare an enamel basin or bowl, as well as an aerosol. The bowl should be cleaned and then painted with rich red paint in a spray can. When the paint layer dries, you will need to paint snow-white circles on the red background, like on the cap of a real fly agaric.
The stump itself should be painted white. To make the figure more original, you can draw a smiling face on the stump. After this, all that remains is to put a painted hat on top of the beautiful mushroom. After this, the homemade product will be ready!
You can also build a fairy-tale tower from a stump, which will certainly become a bright accent of the local area. To make such a decoration, you need to prepare a dry oak stump, for example. It will play the role of a basis for a hut or tower, decorated with various kinds of decorative elements. Decorative components for the tower can be cut from plywood or a piece of fiberboard. The decoration should be attached to the tower using self-tapping screws. The wooden components of the homemade product will definitely need to be treated with antiseptic compounds so that they do not begin to rot in the open air.
Often, in the trunk of dry trees, very close to the surface of the earth, there are small hollows or growths. These are elements of natural origin, but they can be safely used to create an effective composition. For example, from a hollow you can lower miniature toy ladders with cute gnomes holding on to them. On the growth that is on the stump, you can place various interesting figures.
There is another unusual option for crafts made from a stump. Otherwise known as the “green monster”. For such a solution, you should prepare a stump of enormous size and with a very powerful root system. If you have one in your garden plot, that's very cool. You just need to buy a variety of moss that suits your climate at a garden store. Then he is planted on a stump. It will need to be sprayed with water periodically
It is important to ensure that the moss grows well. Once this happens, it will be possible to fully appreciate the enormity of this natural craft.
Preparation of material
To prepare high-quality parts, you will need to know how to use a hacksaw or circular saw to get a neat cut of wood.
Material procurement procedure:
- selection of wood (knots, branches, logs),
- removal of bark and sawing in the transverse direction,
- grinding the cut, drying, polishing,
- treatment with compounds to reveal the texture of the pattern,
- treatment with anti-rot compounds, varnishing.
Working on blanks will require time and skill. The result will be beautiful parts for making a wide variety of products. There are many options for products made from end-cut wood, ranging from crafts for children to home or garden interior items.
For further work you need a jigsaw and glue, and additional decorative elements if necessary.