DIY crafts made from tree branches are an excellent and easy-to-implement way to decorate your home and make the interior truly unique. Such crafts can also become an original gift for loved ones, and if you involve children in the process, the activity will become a true field for creativity!
DIY crafts from tree branches
On a note! The variety of crafts made from branches is impressive, as you can see for yourself by looking at the photo below, and therefore it is not easy to single out just one option. There are so many ideas that there is enough for everyone!
You should start creating handmade beauty with the right choice of blanks.
But before you create such beauty with your own hands, you should take care of the right choice of blanks.
The choice of blanks is very important
Panel
A wall composition made of dry branches will harmoniously fit into any provincial design direction: country, Provence, chalet, rustic.
It is not difficult to find a place for it in progressive Japanese, Scandinavian or eco-style. Thoroughly cleaned and dried branches are fixed on the selected support and, if desired, covered with stain and varnish. A simple but effective principle for creating a panel is to “stretch” a bunch of branches through several wooden frames, breaking it into separate segments.
Frame
It’s easy to make the frame itself from sticks, placing them flat around the perimeter, in columns, in a fan, or weaving them into a baguette. This simple technology allows you to interestingly design a painting, embroidery, mirror, wall clock, or family photo. Coloring and decorative details will add personality and gloss to your work, and taking on such simple and exciting work is more fun with children.
To carefully and securely attach the branches to the base, use Titan construction adhesive, transparent Moment Crystal, or a hot glue gun.
Original ideas for the home
Natural materials fit organically into any interior. Simple decorative elements made from branches, made by yourself, will help create an atmosphere of comfort in your home.
Knot hanger
An interesting clothes hanger with knot hooks can decorate your hallway. Knots shaped like hooks must be selected in advance. It is important that they are strong, and the size of the branches allows you to hang clothes on them.
To attach the knots, you need to select a base. This can be one or several boards connected vertically.
It is better to attach knots to the base using self-tapping screws. The finished hanger can be painted.
In this way you can make a convenient and practical hanger for children's clothes without extra financial costs.
Decorative tree
Such a craft can not only decorate the interior, but also be a good gift idea for friends.
To bring your idea to life, you need to prepare:
- twigs,
- decorative elements (beads, colored pebbles, small flowers, glass balls, Christmas tree beads),
- a flower pot,
- pebbles,
- Styrofoam,
- glue gun,
- moss.
How to make a decorative tree.
- The flower pot is filled with stones to about halfway. Stones are needed to give stability to the product.
- Carefully make a hole in the foam for the branches.
- The branches are painted, flowers, balls or beads are glued on them (depending on the idea).
- The branches are secured in a piece of polystyrene foam, and everything is secured together in a pot.
- The foam is covered with pebbles on top. Pebbles are masked with moss.
The original craft is ready.
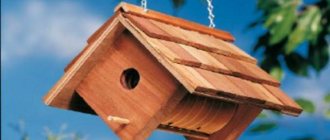
You can decorate the lamp stand with twigs or use them in making a lampshade. It is not difficult to make an interesting house from such material for decorative or play purposes.
From straight branches you can make stands for hot dishes and napkins, unusual wall panels and containers for storing small items. You can make an interesting candlestick if you paste twigs over a transparent glass glass.
Using twigs and branches, you can make unique designer items to decorate your home. Ideas for creativity can be found on the Internet, in interior design magazines, and in the surrounding nature.
Natural materials are safe for health, practical and durable. Crafts made from them will serve as an excellent addition to the interior, allowing you to create your own unique style and comfort.
Branches and twigs are free materials for creating simple crafts and unique designer products. Starting with the manufacture of the most primitive products, you can gradually move on to complex and interesting designer items that will add a special charm to any interior.
Bouquet
You don't even need glue for this idea - just your enthusiasm, a few branches and a suitable floor or tabletop vase. Two or three interesting-looking branches look no worse than a whole armful of twigs, especially if you supplement them with cones, nuts, artificial leaves and buds, or simply decorate them in the main or accent colors of the interior.
A large, tall vase with a single original dry branch is a classic of the currently popular hygge style.
Aging wood
To achieve the effect of aged wood, you need to choose branches of pine, oak, larch or walnut. Other types of wood cannot be treated in this way.
Treatment:
- You need to clean the surface of the branches with a stiff wire brush or a drill with a wire brush.
- Apply an ammonia solution, which darkens the wood and gives it an antique effect.
- You need to apply 2-3 layers of varnish.
- To give the product a finished look and add even more shine, you need to rub the wood with a cloth.
Staircase made from tree branches Source homeli.ru
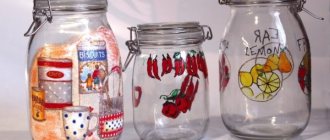
Flowerpots
Simply by covering a flower pot with dry sticks or tree bark, you will get an excellent result, and a hanging planter woven from flexible wicker yourself will certainly become one of your favorite home decorations. In such compositions, coarse burlap, hemp rope, and marine ropes go well with wood.
From short fragments of irregularly shaped branches, you can easily glue together a wall-mounted planter for succulents and decorate your kitchen, dining room or living room with it.
Unusual decor for a nursery
To decorate a children's room, you can make decor from boats. Floating wood is an excellent material for creating original compositions. With the help of such elements you can decorate the interior with a marine style.
Let's consider another option for an ensemble of homemade ships.
This option is also suitable for a child’s room. Sails can be made from multi-colored fabric and from different elements.
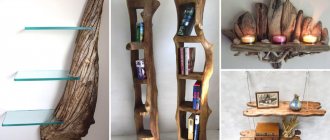
Shelf
If you need a full-fledged bookshelf, it is better to put it together from boards or old boxes, and then decorate it with unusual driftwood, sticks and twigs. Large branches in their original form or with the bark removed will be suitable for making a small decorative shelf. The example below clearly shows the principle of connecting parts.
Cat owners who managed to get hold of a hefty fragment of withered wood will probably like the idea of making a house out of it with beds and scratching posts for their pets.
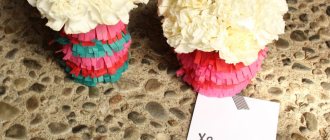
Topiary with candies
The highlight of this craft is that you will get not just a decorative product, but also a kind of vase for sweets. This option is perfect as a delicious gift for children, girlfriends, mothers, grandmothers, and loved ones.
Preparation
To make wood, take:
- Ball;
- Scissors;
- Double sided tape;
- Beautiful caramels (without wrappers);
- Stick for the trunk;
- Pot or box for base;
- Pot filler;
- Ribbons, paper and fabric flowers and any other decorative details.
The process of making topiary
- Make a hole in the ball for the barrel.
- Cover the ball with double-sided tape.
- Glue caramels on it.
- Fill the free space with decorative elements.
- You can also decorate the trunk at your discretion.
- Place the stick-trunk in a pot or box, cover everything on top with cotton wool, cardboard or something else and decorate with caramels, only in wrappers. Ready!
Hanger
A long, knotty stick, well secured to the floor base, will become both an interior decoration and a convenient hanger for outerwear or bath accessories. It is not difficult to make a wall hanger from suitable segments if you stuff them onto wooden planks.
Remove the bark from the workpieces or thoroughly sand and varnish them so that it is convenient and safe to use the craft, otherwise it is easy to get a splinter.
Headboard
The most important thing in the execution of such decor is to treat the branches well so that they do not fall off on the heads of the sleeping person in the future. You also need to secure them well so that they do not move when the mattress moves.
Boho style for the bedroom
Raw branches for the head of the bed
Birch is ideal for the bedroom
Housekeeper
Corridor key holders are designed using the same principle, but on a reduced scale. They do not need to withstand significant weight, so improvised hooks do not need to be nailed to the base, but simply inserted into the overall frame, secured at the bottom and top with small nails.
A large branch can serve as a key holder if you screw a series of metal hooks into its lower part and add some decoration on top.
Napkin holder
Another great idea for those who want to make something simple with their kids. You just need to select a set of several thin twigs of an interesting shape, cut them into identical fragments, prepare a wooden base, drill holes in it, drop glue there, install the blanks in the grooves and decorate at your discretion.
Painting and varnishing will help give your homemade napkin holder a presentable look, which will also make it more durable.
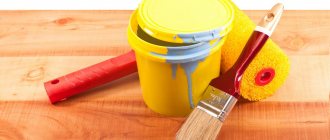
Wood staining
To color branches you can use:
- water-based paint;
- gouache;
- acrylic paint;
- spray paint.
Aerosol paint has a number of advantages compared to other painting materials:
- it is easy to use;
- no brushes are needed to apply it;
- shade matching;
- allows you to achieve the effect of professional painting of any surface.
Most often, acrylic paint is used to paint branch decor. It has no unpleasant odor, is non-toxic, is easy to apply to the surface, dries quickly, and is resistant to external influences. The disadvantages of the material include: high cost, fading of certain types in the sun, delamination of paint during long-term storage.
Organizer
From intricately curved branches, collected in a vase or fastened together at the base, you will get a convenient storage for jewelry or a so-called tree of happiness, where you can leave notes to loved ones, hang memorable cards, calendars and photographs. Such homemade organizers look great in a study or boudoir.
To make the tree with ladies' treasures look richer and more elegant, it is better to cover it with gold or silver paint.
Screen
From large branches it is not difficult to build an interior partition in the kitchen-dining room or living room. This is a relevant technique for small studio apartments, decorated in the spirit of closeness to nature, as well as for country houses and hunting lodges.
A large armful of rods of similar size will allow you to make a folding screen for the bedroom or bathroom.
Furniture
A bed, chair or coffee table made from driftwood found in the forest can hardly be called a craft. It takes skill to implement such a large-scale plan, but if you are familiar with architecture or cabinetry, try your hand at making furniture that is as natural and simple as possible.
It’s easy to find detailed video tutorials online from masters who are willing to share their experience and show inspiring examples of their work.
Chandelier
It's not difficult to make an impressive ceiling light from branches. It can have a round, elongated or arbitrary shape and varying degrees of fullness. Even one expressive piece of driftwood with several lamps hanging from it will look great in a brutal environment, and additional glass pendants will make it more interesting and help it fit into a more complex interior.
It is better to clean the blanks for the chandelier from bark and treat them with an antipyretic as insurance against fire.
How to prepare branches?
To create a durable and beautiful product, you need to know about the proper preparation of branches for work. The following steps are required!
Table. Stages of preparing branches.
| Name, photo | Short description |
| Drying | If the branches are not dried, the craft will warp. Drying should last from 10 to 14 days (if the temperature is room temperature) or a week (if you put the branches on the radiator). There is another option for those who are especially impatient - use the oven. In this case, a few hours at a minimum temperature will be enough. |
| Disinfection | To prevent insects from appearing on the craft, the branches are disinfected with a weak solution of potassium permanganate before starting work. |
Craft - a fence made of branches
The appearance of the craft can be improved by applying varnish or paint. Moreover, the processing can be carried out both at the beginning of the process and with the finished product.
A few more original ideas for crafts from branches
Floor lamp
Floor and table lamps can have a wooden base and a classic lampshade, or they can consist entirely of branches. In this case, it is better to make a lampshade from antipyretic-treated burlap and not use too powerful light bulbs.
How to choose branches to work with?
To make a beautiful craft, you need to choose the right source material. Straight, not very dry branches are most suitable - for example, part of a pine/spruce tree (but it is important that without resin).
Beautiful craft made from branches
A worthy decoration for any room
Heart made of branches
Imitation of a window from branches
If the craft is small, then it is convenient to use linden or birch to make it, since such wood is easy to process. It is also important that the branches are not eaten by beetles.
Original wreath on the door
It is also important that the rods are flexible and have little moisture. Sometimes forked branches (like forks) are needed, but working with them is more difficult - skills and some experience are required.
How to make a bar stool with your own hands?
In our new article, we talked about making bar stools, provided detailed step-by-step instructions for the best options, and also showed the most original and beautiful ideas! More details in this article.
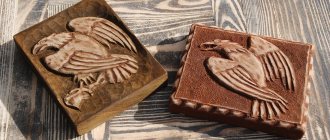
Stages of making a seahorse from branches
Sconce
The situation is similar with wall lighting fixtures, but there are two creative ideas:
- Attach several thick branches or their halves to the wall in horizontal or vertical rows, and hide the LED strip behind them.
- Make a box from thin twigs and place a lamp inside.
Shade
You can make beautiful designs for lampshades from natural materials. Individual wood elements are attached to a metal base. The wood can be pre-coated with a special varnish.
You can hang light bulbs on the branches. And hang the base from the ceiling. You will get a chandelier of a non-standard configuration.
The photo shows another colorful option. Individual elements of wood are attached to each other, and round lamps are suspended from them.
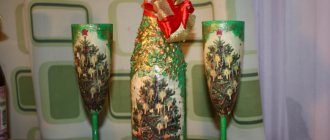
Candlestick
What could be simpler than wrapping a glass with a string of sticks and tying it with twine? You will already have an original candlestick that you won’t be ashamed to put on the fireplace or, for example, on the Christmas table. It’s easy to make a whole festive composition from twigs, pine needles, pine cones and New Year’s decorations, providing a place for candles. However, such a craft is not difficult to coincide with any holiday.
Small logs with a groove drilled on top can serve as candlesticks. Thematic details will complement and decorate your work.
In the end, I would like to emphasize that for creativity you need to take branches that have already been broken off by the wind, snags lying on the ground and old unnecessary stumps. This is not only an ethical, but also a practical point. The raw materials must be dry, and before use it is recommended to further dry them and treat them with anti-rotting compounds. It would be a shame to put a lot of effort and effort into your craft, and then throw it away due to damage to the wood.
DIY hanging table
Hanging objects can add a feeling of weightlessness and airiness to any interior. A hanging wooden table can make a wonderful bedside table. It is attached to the ceiling with three ropes using a hook. How to make it? Necessary:
- Tablet.
- Grinder machine.
- Drill.
- Hot glue gun.
- Screw.
- S-shaped hook.
- Polyurethane spray.
- Felt strip.
Installation of a hanging table
Step 1:
First you need to choose a suitable board with an unusual texture. Sand all uneven surfaces with a sander.
Step 2:
Next, you need to drill three holes that will match the diameter of the selected rope. The holes should be equidistant from each other, and one of them should be located as close to the wall as possible. You can hang the table using four ropes, then you will need to drill four holes.
Step 3:
The wooden surface should be covered with several layers of polyurethane, allowing each of them to dry. Since the table will be adjacent to the wall, protect its surface from damage. To do this, glue a strip of felt to the part of the table that is adjacent to the wall with hot glue.
Step 4:
Next, pull the ropes through the holes and tie strong knots under the board. After this, you need to drill a small hole in the ceiling and insert a screw with a ring into which you should thread an S-shaped hook.
Step 5:
Then tie all the ropes at the top into a strong knot with a loop and hang the structure on the hook.
The result will be simply mesmerizing. Your hanging table will simply float in the room.
How to make a coffee table from a cut or hemp as in the photo - detailed lesson at the link!