Weaving unusual crafts from newspaper tubes is one of the most popular types of home crafts, to master which you just need to study a few step-by-step master classes. There are many weaving technologies that allow you to make a unique decoration from paper wicker without extra costs. By following detailed instructions, you can make a real piece of art that will be useful in everyday life. The tips, photos and ideas presented in the article will be a good help for you in this interesting, entertaining and exciting process. Involving children in making crafts from newspaper tubes will help facilitate and speed up your creative endeavors.
Technology of weaving from newspaper tubes
To make tubes (paper vine), you should choose high-quality material that will be easy and convenient to work with. The best option is newsprint. It produces tubes of the required thickness, which are simply glued together.
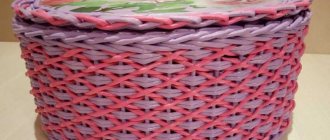
A beautiful bright basket woven by an experienced craftsman from simple newspaper tubes
You can use magazine sheets for weaving. They are denser, so experts recommend using them directly to strengthen the frame of the product, for example, weaving the bottom, handles and other elements that should be especially strong.
Important! Office paper is not suitable for making crafts. It is very difficult to work with because it is thicker than necessary. Working with such material is extremely inconvenient.
Cash register tapes have an acceptable thickness for this work, so you can also make tubes from them. However, it should be taken into account that they need to be painted only on one side, because the other is quite slippery and the paint will not stick to it.
If desired, decorations made from paper tubes can be painted in any color you like
If you have at least a little experience in weaving various decors from paper tubes, creating such a cup will take you no more than an hour
Methods of weaving with newspaper tubes are very diverse, each has its own pros and cons
To work with tubes, you should prepare the following tools:
- Paper . It should be thin; newspaper sheets are best suited for making tubes.
- Spoke . To ensure that creases are not visible when weaving, a knitting needle should be selected with a diameter of no more than 1.5 mm. It is also desirable that it be long; it will be inconvenient to work on short knitting needles.
- Glue . The rolled paper must be held firmly and tightly, since it has to be bent in different directions, so it is better to use instant glue to secure it.
- Knife . In order to cut newsprint smoothly, you must use a sharp knife. A stationery one is also suitable, but you need to prepare additional sharp rods, since it quickly dulls on the paper.
How to make paper tubes - step-by-step master class
Making consumables for crafts from paper tubes is quite simple; to do this, you should follow the following instructions:
- Sheets of paper must be cut into equal strips.
- Having turned the paper 40 degrees, you need to place the knitting needle in the corner and begin to twist the tube tightly.
- At the end of twisting the vine, the corner needs to be greased with glue and secured to paper.
- You can paint the sticks either immediately after production or after the craft is completely ready.
Advice! For painting, you need to choose a durable paint that has a bright and rich color. It is recommended to immediately discard watercolor paint; it is very pale, so it will not be able to properly paint over drawings and text on paper.
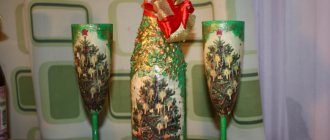
Making useful and interesting things with your own hands is always a pleasure
To make crafts woven from newspaper tubes or paper look beautiful and neat, they can be coated with acrylic paint. It has a rich color and is able to completely cover all the nuances on paper. Gouache, stain and stain also look no less good. Some experts choose natural dyes for their work, such as iodine, brilliant green and potassium permanganate, diluted with water.
Materials
Of course, you can’t do without paper here. It is best to make tubes from waste newspaper.
Newspaper paper is thin and easy to roll. It lends itself very well to painting. You can also use regular, low-weight paper.
Another option are magazines, used notebooks and cash register tape. It is recommended to cut paper along the grain.
Another important attribute is glue. To make paper tubes you need a glue suitable for paper. It is important that it is not very liquid, otherwise the tubes will get wet and fall apart.
If you need to paint paper straws in wood colors, use wood stain.
Construction primer is great for painting.
It doesn’t hurt to varnish the finished products. It is better to use acrylic varnish, it does not smell, dries quickly and forms a good protection.
Types and techniques of weaving crafts from newspaper tubes
Currently, weaving techniques are being improved and many different methods are emerging. Some of them present absolutely no difficulty, which allows novice craftsmen to use them to make crafts from newspaper tubes.
Easy way
In order to weave products from paper tubes in the simplest way, you need to place several tubes vertically and with another additional vine you need to pass first over the first stick, then under the next one, and so on until the end. Depending on the product, you need to select the required number of tubes.
Layer-by-layer
For this method you need to take several vertically arranged tubes and two additional ones for weaving. You need to “hug” each stand with additional vines and so weave until the end, periodically bending and continuing the next row.
Weaving in rows
First, you should place several racks and weave an additional tube through one to the end. In this way, you need to weave subsequent rows, not continuing the previous tube, but starting a new one.
Square weave
This pattern must be woven from left to right through two posts. You need to repeat exactly as many rows of these until you get a square pattern, that is, the height of the woven row will be equal to the distance between the two posts. With another vine, you should start weaving from right to left through two posts. After which you need to continue weaving new rows.
Rope weaving
In order to create this pattern, you should place several posts and secure them so that they do not move during weaving. Two additional vines need to be braided around the racks and intertwined with each other, tightly fitting the twigs.
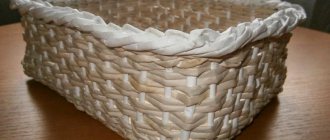
Rope weaving - ideal for creating baskets
Openwork weaving
There are a number of types of this weaving, it is an open-cell lace and, as a rule, includes several weaving techniques presented earlier.
That is, for example, first the base is woven with a rope, into which X-shaped double structures are then inserted and glued to a new weave of a different type, which completes the product.
Weaving the edge of the product (closure with a pigtail)
In order for the product to look high quality and neat, the weaving must be completed correctly. This can be done in two proven ways:
- False braids . They are woven from several racks, attaching them one by one to the walls of the product.
- Edge braids . They should be woven from the ends of the remaining posts from left to right. One of the tubes is bent outward and the second is bent, passing the first vine under it. Eventually the first vine is brought out inside and glued.
The photo shows how to properly complete the product using the braiding method.
Simple
The technique resembles conventional weaving of fabric. As a basis, take several tubes along the planned width of the product and place them at a distance of 1-2 cm from each other. They are braided with working tubes, alternately passing over or under the guides of the base.
Weaving is done from left to right, lengthening the working tubes as necessary.
Basket
- Several vertical tubes are fixed parallel to each other and an additional long tube is passed through them, which must first pass under one, then over the other tube.
- The tube must periodically be lengthened by attaching another one to it, so the bottom must be completed completely. Then walls are made on its basis. To do this, the remaining racks are enlarged by attaching additional tubes to them.
- Two vines are crossed, the one that went under the vine needs to be bent and go around the second one. One of them should be in the rack, and the second should lie on the surface. Thus, it is necessary to raise all the racks and begin weaving the walls using the technique presented for making the bottom. At the end, the remaining posts need to be folded and the edges woven together as shown above.
Weaving the bottom of the basket (diagram)
Master class on weaving a basket from newspaper tubes
Spiral
This method stands apart; it is often isolated as a separate type. It is in many ways reminiscent of another paper craft technique - quilling.
The point is that the tubes are flattened and a spiral is twisted from flat newspaper strips, then, if necessary, they are given a convex shape and the spirals are connected to each other.
In a similar way, children of the 20th century made various toys from New Year's paper streamers.
Frame
This product can be made using any weaving technique; it will look especially relevant using the rope or layer technique. As a rule, weaving occurs first horizontally, then vertically. To make the craft more neat, it is recommended to glue rows of newspaper tubes onto cardboard.
Photo frame made of paper tubes
Twisting
The workpiece is twisted tightly and evenly, moving diagonally from the corner. Wrapping is usually done on a knitting needle, which is placed at an angle of 45-60 degrees relative to the edge of the paper sheet. The ends of the winding and in several places in the middle are fastened with glue.
Having twisted the entire sheet, the knitting needle is removed. Dry the tube thoroughly. This will be the main material for weaving products.
Craft mug: 135 photos and video master class on how to make beautiful crafts with your own hands- Crafts from spoons - 125 photos and videos, tips and tricks with step-by-step instructions on how to make crafts
Crafts from cotton pads - 125 photos of beautiful crafts, features and videos of new cotton crafts
Panel
A woven picture from newspaper tubes can be made in absolutely any way. Depending on the idea, you first need to make a base from the vine; for this you can glue each twig together or intertwine them using any of the techniques presented above.
After which you need to figure out what will be depicted on the panel, it can be various lace weaves made of wicker, painted in different colors, as well as tubes twisted in a certain way, which then need to be glued to a ready-made base and painted.
Beautiful panel made of paper tubes
Cutting blanks
The paper is cut into strips 5 to 10 cm wide. The wider your strip, the thicker the twisted tubes will be. It is clear that one product requires tubes of the same thickness.
The stripes are marked using a pencil and ruler. But this is a very long task. Since newsprint is thin, it is better to cut it in whole stacks at once in several layers.
Flowers
In order to make flowers, several tubes are taken, around which weaving will take place. They need to be placed in the shape of a snowflake and glued to each other, after which you need to take an additional tube from the newspaper and start weaving in a circle.
You need to make 4 rows and bend the end of the tube inward. Then you should take 6 more tubes of the same size and bend each in half. Their tips must be greased with glue and inserted into the weaving between the openings. A flower stick can be made by inserting one dense vine into a round weave and securing it with glue.
Tools
- knitting needles, wooden sticks of different diameters;
- stationery knife;
- scissors;
- a simple pencil;
- ruler;
- clothespins;
- paper clips;
- brushes for glue, paints, varnish;
- boxes, plastic containers, cylindrical, spherical objects, etc. as a frame;
- finishing elements for decoration.
Cup and saucer
First you need to make a saucer, which is quite simple to make. To do this, you need to take 8 sticks and cross them together, after which each twig needs to be bent clockwise in turn, thus reaching the end. In order for them to hold tighter, they should be glued together in the middle with glue.
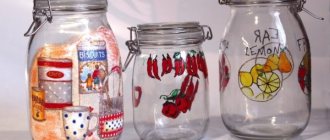
You can store anything in paper saucers, from small things to large items.
Step-by-step making of a cup
- To weave a cup, you need to install the racks, then take the tube, bend it in half with the letter P and push it through the twigs into the bottom.
- You need to make sure that you get about 10 racks. One twig should be bent in half and wrapped around one of the posts. In this way, you need to weave a cup, clasping each vertical twig crosswise.
- After several rows you need to place a cup on the mold to get the same shape. Finally, bend the edges of the posts inward and secure them with glue.
- In order to make a handle, you will need to take 3 tubes and 2 of them need to be placed parallel to each other, leaving a distance between them. You need to glue another one to one of the twigs with glue.
- The newspaper tube that is glued should be braided around the vertical posts in a figure eight pattern. After the handle is finished, the remaining posts must be inserted into the openings of the cup and glued with glue.
A handmade gift is the best gift
Fungus
- To make this craft, you will need to take 8 tubes and cross them two at a time. Additionally, two vines need to “hug” each tube from the base, extending them to the end.
- To get a semicircular shape for a hat, you need to weave it on a saucer. Having made several rows, the edges of the cap are secured by cutting the remaining posts and threading them inside.
- For the leg, 5 tubes are taken in a bundle, their ends are glued together. For a while, this whole thing is fixed with a clothespin. The twigs are spread in different directions, after which the weaving of one of them begins, bending the selected newspaper tube through the next two.
- From two intertwined tubes, you need to take one more and intertwine the next two. In this way, you need to weave to the end so that the leg is not very tight; you need to insert a stick with a diameter of no more than 5 mm in the middle.
- At the end of the weaving, the tails need to be tucked into the middle of the leg and glued with glue. After which the leg should be generously greased with glue and attached to the cap.
Making the bottom
The simplest method of forming the bottom of a craft is a cardboard base to which rod stands are attached. When making a square or rectangular bottom, two posts must be secured in the corners.
In addition, it is not difficult to make a cross in four rows consisting of an equal number of straws. To create a flat bottom, the “cross” is rolled with a rolling pin. Then this middle is braided according to a flat weave pattern, bringing the bottom diameter to the desired size.
With this scheme, the number of straws taken at the first stage to make the bottom depends on the volume of the future product.
What can be made from newspaper tubes (photo)
Using simple weaving patterns , you can make beautiful decor from newspaper tubes , which will not only be useful in everyday life, but will also decorate your home.
DIY crafts made from newspaper tubes are an exclusive work that can also be an excellent gift.
To master this craft, you just need to use the step-by-step instructions provided, so even a beginner in this matter can cope with crafts from newspaper tubes.
Rows
It is also performed on a simple basis, but three or more tubes are used as workers. They work alternately. When the length of one tube runs out, they do not extend it, but start working on a new one, but not from the first, but from the second base post.
They work in this way until the desired height of the product is reached. The principle is reminiscent of weaving a wreath of flowers.