4. Stepladder with a platform - a modification of the stepladder-pedestal, which is convenient to stand on.
Making stepladders is quite accessible to home craftsmen who have at their disposal a standard set of tools and basic skills in assembling wooden structures. A portable folding ladder for the garden, cottage and private home - a self-assembled stepladder is made from readily available wood after simple preparation.
To ensure safety and durability of use, we recommend using ready-made stepladders from the DIRS plant - https://ooodirs.ru/.
Classic ones are structures where there are steps on both sides. In universal ones - only on one side. And telescopic ones are the most complex from a technical point of view, but the most convenient. They fold and transform. That is, you can already understand that the drawing for the mentioned structures will be different.
Making a stepladder with your own hands
Today it is possible to purchase at retail outlets in Moscow and other cities a ladder, stepladder or platform made of any material with a wide range of prices. But with a little effort and patience, it is quite possible to make a similar design at home. A do-it-yourself stepladder made of wood is the simplest option in terms of its execution. For assembly you will need the following tools:
- grinder or hacksaw;
- chisel;
- Sander;
- pencil;
- ruler, tape measure;
- screwdriver or screwdriver;
- hammer.
You will also need to stock up on:
- wooden beam;
- self-tapping screws, nails;
- rubberized linings on support posts;
- metal knitting needles;
- nylon rope or chain;
- wood glue.
The wood used must be thoroughly dried, without deformations, cracks, falling knots and resin pockets. Initially, the timber is sawed into blanks, then each part must be sanded. For a stepladder you will need 4 long support beams of 150 cm each and 8 short bars for the steps. Due to the fact that the stepladder design tapers at the top, the size of the steps will vary. You should mark areas of 57, 52, 47 and 37 cm and cut out 2 parts of each size. The edges of the support posts are rounded and sanded. Rubberized pads are installed on the lower sections to reduce slipping on smooth surfaces.
Making a stepladder with your own hands
At a distance of 10 cm from the bottom edge, grooves are made with a chisel with a side section of 52 x 5 cm and a depth of 3 cm, the rest is marked every 24 cm and similar holes are made. On a beam 150 cm long, there are 5 grooves for steps. Each step is narrowed on both sides so that it fits tightly into the cut recesses. To do this, remove the thickness of the beam until a protruding 3-centimeter part with a cross-section of 5 x 2.5 cm remains. Under each slot under the step, a through hole is drilled to install a tightening spoke. To increase the service life of a homemade stepladder, all its parts are treated with antiseptic water-repellent impregnation. This will reduce the likelihood of mold growth on the wood. After waiting for complete drying, apply an adhesive composition to the edges of the stair rungs, then insert them into the prepared grooves. The spokes are mounted in holes drilled for them and secured on both sides with nut connections. The second supporting part without steps is fastened with two transverse bars and a jib. Connect the 2 parts of the stepladder with hinge joints in the upper part. To prevent involuntary divergence of the two parts of the ladder when working from it, they are connected with a strong nylon rope or a not too thick chain. For more comfortable working conditions, hooks are attached to the edges of the wooden stepladder, on which it is possible to hang a bucket or bag with tools.
How else can stepladders serve?
A wooden stepladder is an almost finished easel, a stand for painting. It can be used by both adults and children. The only difference will be in the height at which the paper is attached and the location of the shelf for paints, jars of water, etc. To secure the paper, it is advisable to equip the structure with a plywood board.
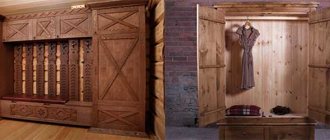
A wooden stepladder can be used as home decoration.
You can also make a table from one stepladder. All you need is a tabletop - a board made of chipboard or plywood. Part of the upper steps is removed, the crossbar on the support is installed flush with the highest remaining step. The shield is placed on the step and crossbar.
Such a stepladder can be both a table and a cabinet with shelves.
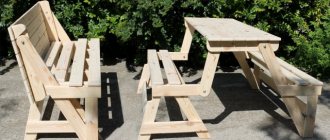
If you have two identical stepladders, you can make a bed and a gazebo with your own hands. In the first case, you will need a long shield to create a bench on the top of the stepladders. The lower parts can be used as tables (see above) or as the lower tier of a bed (you will need another long board). A gazebo can be made similar to a bed.
Another interesting transformation of a stepladder into an ironing board.
Types of stepladders
Materials and calculations for DIY wooden stairs: 3 important steps
The following main types of stepladders are distinguished:
- portable version, which is used without resting on the wall;
- rope ladder (suspended);
- folding stairs, which during operation are folded into a structure similar to an isosceles triangle. Most often, this is what is used in everyday life. In turn, it can be with one-sided or two-sided ascent. To have a support platform or without it;
- in the form of a board with strips of other boards or bars nailed to it;
- aviation. Used instead of a ladder for work. Usually colored orange.
The following main types of stepladders are distinguished:
wooden;
metal. Typically steel or aluminum is used;
combined.
To make it yourself, it is better to use wood. Moreover, the version in the form of a triangle, used in the household, for apartment conditions often began to be made in the form of transformers, when a stepladder is converted into pieces of furniture - a table, chair, bench or shelves.
Did you know? An image of a structure similar to a rope (grass) stepladder was found on the walls of a cave near the Spanish city of Valencia and is about 10 thousand years old. This cave painting also showed two people with baskets climbing on it.
Additional components
The finished staircase can be improved with the help of various devices that will increase the reliability and service life of the structure. Here are just the most common components:
- iron chain or nylon ball to connect two structures;
- attachments for the lower edges of stringers, in common parlance – “shoes”;
- metal spokes for fixing steps.
You can also attach a fixture that suits your personal requirements. For example, you can attach several hooks on which you can hang buckets, which is very convenient when harvesting.
Making steps
DIY folding chairs made of wood, drawings
The wooden step is produced according to a similar principle as the rest of the stool. A reliable material is selected, which is pre-treated with a grinding machine. In the shorter pair of legs, special holes with a diameter of 12 millimeters are made. And rods are inserted into these holes, which ensure the process of rotation of the entire structure.
It must be remembered that the ladder-stool always has the highest possible stability. To meet this requirement, an additional strip must be pre-drilled and then attached. It is attached from the middle of the stool to the bottom edge.
To make this piece of furniture look attractive, the screw head is sealed with glue and then cut off using a hacksaw.
Additional processing
Let's say that you managed to make a stepladder out of wood. However, how to process the material to increase the service life of the stepladder? First, you need to carefully sand the entire surface with medium-grit sandpaper. After this, we treat the wood with an antiseptic impregnation, which will protect the material from rotting and create a water-repellent coating. It is also recommended to additionally coat the stairs with varnish so that they are not afraid of rain or snow. At the same time, try not to touch the fastening points, otherwise they can quickly become unusable.
But paint will not be appropriate in all cases. It can be used to treat a stepladder chair to emphasize its decorative characteristics, but in all other cases it is better to use varnish, since when using a ladder in the sun, the paint will dry out very quickly and begin to peel off.
Stages of work and their features
DIY folding chairs made of wood: drawings and job description
Scheme of a wooden stepladder.
Before you start making a stepladder, you should sketch out a rough sketch for its manufacture. You need to put all the dimensions on it at once. Only a highly qualified master can afford to work without a sketch. You should not think that a stepladder with your own hands is an object that requires a superficial attitude. Firstly, the safety of those working at height depends on it, and secondly, it is very convenient when you don’t need to constantly measure workpieces, you just need to look at the sketch.
Next, the wood is cut. You will need 4 pieces, each 175 cm long. Basically, the length is determined by the height of the work being done: if a stepladder is needed in the garden, then you should proceed from the size of the trees, but you can’t climb it too high either, other means will be needed. To work on the roof, a type of ladder called a ridge stepladder is used. It is distinguished by the fact that the second half of the folding bed is thrown over the roof, and bars are nailed to the tops for stability.
Then the stair blanks are cut with a grinder. It is better to use a metal profile for this rather than round elements, again for the safety of the worker. A foot on a flat profile will be much more stable than on a narrow cylinder. The blanks should be in the same quantity for both sides of the stepladder - factory ones are made only on one side, but this model will have two working ladders. This is convenient if the work requires two people or hard-to-reach places need immediate access.
Drawing of a stepladder with dimensions.
The length of such elements depends on the distance between the long side bars. The upper ends should be 40 cm apart from each other, and the lower ends should be 60 cm apart. You should get two pieces 57, 52, 47, 42, and 37 cm long. That is, the distance between the steps is approximately 27 cm.
Then holes are drilled in the long elements according to the diameter of the steps if the elements are round, and metal corners are attached for flat ones. The drilling depth should not be less than 2 cm. In the same way, holes for the knitting needles are made slightly lower. Then the structure is assembled without the use of bolts in order to see all the flaws and correct them immediately. All elements are processed, because the material may be damaged by mold or mildew.
Assembling stairs. To do this, epoxy glue is poured into the recesses, and round steps are driven in with a wooden hammer. Then, using fasteners, the spokes are mounted, which are tightened with nuts on both sides. The profile steps are secured with a wrench. After assembly, the glue takes time, so the blanks are put aside for a day. If the installation went without it, then it’s time to start working on the plates.
One part of the elements is attached to the tree, and then the metal ears of the structure are fastened together so that it can freely fold or open. Plates from the mechanism of an old sofa are perfect for this task.
Types of stepladders.
Next, you need to take care of your own safety - the metal chain is cut into two parts with scissors and screwed at the ends to opposite elements. It will prevent the stepladder from unfolding completely if the legs begin to slide along the surface. Naturally, this is done at the bottom of the stairs. The owner will decide at what distance, but usually this is the length of the entire chain, that is, when unfolded, the legs form a regular square with a side of 60 cm. It is advisable to “put shoes on” the legs, otherwise there is a risk that the ladder will slip on a particularly slippery or wet surface. Installation is complete.
For storage, you can soak it with used machine oil so that the ladder intended for garden work can stand all winter untouched by mold or mildew.
Self-assembly of a stepladder made of wood
First, let's prepare the main details of the future stepladder. First of all, these are the main posts, as shown in this picture.
Screw the screws in as tightly as possible so that the structure gains sufficient strength.
If you did everything correctly, then as a result of this work you will have half a stepladder that looks something like this:
Assembling the second half of the stepladder will be even easier. These are two long bars connected to each other by a set of slats. You don't have to step on the slats - they should just connect the bars. So they don't have to be fat. A thickness of several tens of millimeters is sufficient, as can be seen in the following figure. For greater aesthetics, you can make longitudinal grooves in the bars, or find ready-made parts of this shape.
Now all that remains is to connect the two halves of the stepladder into a single whole. But you shouldn’t relax - this is a very responsible and important moment.
We take a suitable hinge and install it at the junction of the two halves. Now you need to use the longest screws you have on hand. The hinge will bear a fairly large load, so it is necessary to ensure its strongest possible connection with the bars.
In addition, after installing the hinge, you need to select a small but strong enough board to install on the first half of the stepladder - you will place the tool on it and lean on it while working.
Now you have a full-fledged stepladder that will be really convenient to work with - in the garden, in the garage or at home during renovations.
Next comes the manufacture of the crossbars, that is, you need to cut the boards for the steps. Their number is calculated based on the total length of the staircase and the optimal distance between the elements. The standard is considered to be a step of 35 cm. The length of the lower step must be at least 65 cm, and the upper step - 35 cm.
Advice from professionals
Now here are some tips from professionals that will make the process of assembling a wooden stepladder better, easier and more efficient.
- The first thing you should know is that when creating a wooden stepladder with your own hands, you need to make a special support with beams and use a technique that involves laying out various elements overlapping.
- Another important point that will also be useful is that to ensure additional rigidity, each transverse beam should be attached to the rack using special bolts. Each such self-tapping bolt must have a length of at least 65 millimeters.
- The third point that you should know is that if you install corners made of steel on the end side of the support, the structure will become significantly stronger and will withstand heavy loads.
- You can also make a removable top step, which will simply be placed on a stepladder. This detail is convenient if you need to paint the ceiling. In this case, a bucket of paint can be placed nearby.
- You can also equip the stepladder with at least one handrail - the descent and ascent will then become faster and much easier.
As you can see, making a stepladder with your own hands is not too difficult and feasible for many. The main thing is to clearly know what material you will make this structure from, and also to develop correct and accurate drawings, which, after creation, will only have to be translated into a real stepladder.
After watching the video, you will learn how to make a stepladder from a profile pipe with your own hands.
Main types of stairs
A stepladder is a ladder that can stand on its own using any suitable support (a wall, for example).
The stepladder can be one-sided or two-sided. The structure has a frame to which the steps are attached, and the additional elements that the stepladder is equipped with are handrails and legs.
The height of such a structure made from a profile pipe is calculated by determining the interval between the floor and the last step. The calculation is made based on an interval of 20-25 cm. Due to the presence of various functional features, a stepladder can be:
- Classical;
- Universal;
- Transformer.
Designs belonging to the universal type combine the functionality of a regular ladder and stepladder.
The frame of such products can be folding or telescopic. The presented stepladder has a frame consisting of several sections, with each section consisting of 5-7 steps.
Telescopic structures differ in that their sections can be pulled out gradually. They are fixed using special latches or hooks.
The transformable stepladder can work in several positions. Such products made from profile pipes are very compact, lightweight and can easily fit even in the trunk of a car.
Almost finished stepladder
The frame of staircase products is assembled using metal profile pipes that serve as load-bearing posts; the steps can be made of wood or a material less durable than the frame.
All connections of the structure made of profile pipes are connected to each other using bolted connections.
This allows, if necessary, to quickly replace any damaged element. Some stepladders made from metal profile pipes can be made non-removable - welding is used to create them.
It is worth noting that the most common and practical material for creating the structures described is aluminum or duralumin alloy. A finished staircase, assembled with your own hands, will have the following advantages:
- ease;
- reliability;
- ease of use.
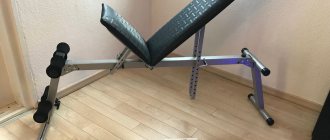
Step stool
Stepladders, like any other folding structures, have one undeniable advantage - they are convenient to store. When folded, the device can be placed in a closet or even simply hidden behind the interior door.
The stepladder chair is compact and easy to install.
But still, storing traditional stepladders requires some space. But modifications that fold into a stool or chair can be so compact that they do not take up any space at all. But their height is also small. Creating a stepladder chair with your own hands from wood is not particularly difficult. You will need boards 45 mm thick and bars 35x45 mm. Fasteners include screws or nails, as well as wooden pins.
To completely save space, such a stepladder can be transformed into a chair.
The compact design will require careful attention to the manufacture of parts and assembly. The drawings contain dimensions that must be observed. Otherwise, folding and unfolding the step stool may become difficult or even impossible.
Step stool chair drawing.
The design parts should not interfere with each other when moving. The two lower steps, similar to a small chair, rotate on pins. When folded, they fit inside the stool. It is possible to provide additional fasteners - a lock that secures the structure in the unfolded state.
Stepladder chair in harmonious condition.
Making a wooden stepladder chair. https://www.youtube.com/watch?v=TKzwnDsXsu4
Multifunctional option
It happens that a stepladder, being an absolutely useful device, spends most of its “life” idle. But you can build a stepladder with your own hands, the scope of which will be much wider than usual. A table, an easel, a gazebo and a bed are what can be created using the design described below.
The stepladder table will serve both for eating and for housework.
So, to make supports, take one and a half meter boards, 60 mm thick, 180 mm wide. The steps are also made from boards. You need to select grooves in the supports for attaching the steps. The support is equipped with a crossbar; additional holes are drilled to allow it to be rearranged. A special feature of this design is the hinged connection. The edges of the support boards are sawed off at the required angles, and the support boards are screwed to the upper ends. The lower edges of these boards are connected by a piano loop. With this design, the stepladder does not need additional devices to protect its supports from moving apart. The piano hinge with support boards is guaranteed to hold the unfolded stepladder in the working position. The staircase drawing also contains schematic drawings of structures obtained on its basis.
Drawing of a stepladder table.
Wooden stepladder: finishing touches
There is very little left before the work is completed - just arrange the upper platform and install special limiters that will prevent the staircase from moving to a greater distance than was intended. As for making the platform, this process will not cause difficulties. You just need to cut it out of some material, for example, plywood. In addition, it has to be fixed on the upper stage of the structure using a movable method. Standard hinges are an excellent option for this.
One of the last stages of manufacturing is fixing the “shoes”
In order for the platform to simultaneously perform the holding function, a special latch should be installed on the opposite side, with which it will cling to the top step of the second staircase. When choosing limiters, you can give preference to elementary straps that connect the stairs below. You just need to install the structure into working position and fasten the lower part with a plastic cable.
Regardless of what exactly it was decided to construct with your own hands: a step stool or a full-fledged structure made of wood - all elements of the product must certainly be sanded and treated with special solutions.
First of all, you need to sand all the parts that will be touched by human hands using sandpaper. The surfaces must become so smooth that during the operation of the stairs the possibility of driving a splinter in is completely excluded. In addition, it is necessary to clean surfaces if they have succumbed to mold.
Design Features
The peculiarity of this version of the stool is that it combines two objects at once: a regular piece of furniture for sitting and a small stepladder. Of course, this is a huge advantage of this product. It is especially useful around the house when you need to reach the top shelves in closets or wipe the top of furniture, replace a light bulb or hang curtains.
The stool can be easily transformed into the desired configuration
What is the essence of such a stool? The fact is that steps are attached to its legs, so an ordinary stool turns into a miniature and fairly compact staircase. Such a chair can be:
- stationary;
- foldable;
- transformer.
The first option is a high stool with inclined legs and additional transverse slats, each of which is a step. The folding version is more convenient to use, since if necessary, you can take it out and unfold it, and then fold it and put it in the pantry so that it does not take up space. The transformer is a chair that, with one movement, turns into a full-fledged household stepladder with support on the back.
Types of stairs made of profile pipes
Stairs can be stationary; they are installed outdoors or indoors. Portable ones, which can be folding or attached, are easier to make with your own hands. A stepladder is a mobile structure often used on the farm. A good material for it is a profile pipe, from which you can make a ladder with your own hands. The design diversity is great.
Marching
This is a staircase that contains one or more parts called flights. It can be straight or rotary. A straight march is a step that is wider than the main ones. The turning one is wider on one side and narrower on the other, which forms the turn of the staircase.
Screw
The steps in a spiral staircase are arranged in an ascending direction around an axis - a pipe or column. In rare cases, the ends of the steps form an empty cylindrical space, from which the staircase is protected by railings. The rest have railings only on the side opposite the axis. The helical design occupies a minimal footprint, providing greater lift steepness.
Ladder
These are portable ladders, usually collapsible, designed for temporary use at a specific location. Stepladders are used very widely; they are easy to make with your own hands.
Materials for production
Metal is the most popular choice when it comes to factory products. Typically manufacturers use:
- aluminum;
- stainless steel, galvanized steel;
- a combination of elements made from these materials.
Fiberglass and wood round out the list. Each material has certain advantages and some disadvantages.
- Aluminum transformable stairs are lightweight and resistant to corrosion, but they cannot withstand heavy loads, so they deform quite quickly. They are used in everyday life, for household needs.
- Steel models are as durable as possible, but the owners have to pay for this quality, since the structures are very heavy. They are usually used by professionals working in pairs or in teams.
- Stairs made of aluminum and steel. These devices can already be called ideal. They are reliable and not too heavy, so they are suitable for those craftsmen who are more accustomed to working alone from time to time.
- Fiberglass (fiberglass) structures. This is the best option for outdoor work. The dielectric material allows electrical installation work to be carried out without fear of possible injury.
- Wooden models. You can rarely find them in stores. Usually these are original designs, but they are not suitable for repair. Examples are a step-chair, a transforming stool, etc.
Fiberglass folding models are a rarity. A wooden transforming staircase is the easiest to make with your own hands, since the material is convenient, so it does not require the presence of special equipment.
Requirements for stairs
A properly manufactured staircase with steps inserted into the string.
Wooden stairs used in production must comply with the standards.
Here are the names of several of them:
- SNiP 12 – 03 – 2001: Labor protection in construction.
- POT RM-012-2000: Rules for labor protection during work at height.
- GOST 24258 – 88: Technical conditions for scaffolding means.
Let’s not invent anything new; we will apply them to our home construction. Our wooden extension ladder, drawings and materials for it, and assembly method will fully comply with them. Let's list the main requirements.
Material requirements
- Steps and strings of stairs must support a weight of at least 120 kg.
- Elements of stairs are made from pine; in extreme cases, steps can be made from hardwood (birch, beech, ash, oak).
- Fiber inclination of more than 7% is not allowed.
- The wood should not have defects that violate its strength characteristics - cracks, knots sawn along the axis, curls, resin pockets. Bowstrings should not have core tubes.
This beam can be used for stairs
The staircase elements are made from solid pieces of wood. As an exception, manufacturing from planks glued along the entire length is allowed. At the same time, the laminated veneer lumber should not be inferior in strength to solid wood, and should not have delaminations and swelling at the joints.
Laminated timber without defects is also acceptable
External surfaces must be sanded and free from unevenness and burrs.
Design requirements
Another example of a safe ladder
- Wooden stairs are not made longer than 5 meters.
- On the upper outer edge of rectangular steps, a chamfer of at least 2 mm in size must be removed.
- The strings must be tied before the first and after the last step, as well as every 2 meters in length, with steel ties with a diameter of at least 2 mm on nuts and washers.
- The minimum cross-section of steps is 2x4 centimeters.
- The step pitch is no more than 0.35 meters.
- The steps and strings are assembled into a tenon. It is allowed to connect with metal fasteners, with the steps deepening into the grooves selected in the staircase array. When assembling into a tenon, glue that is resistant to moisture is used.
Stairs with steps assembled into a tenon
Fastening on bars is unacceptable
Safety requirements
- There should be no protruding wooden or metal elements; all parts are buried flush.
- If the ladder rests on the ground, then a frame with metal spikes is installed at the bottom of the strings to prevent slipping. For the same purpose, for working on hard surfaces (concrete, parquet, ceramic tiles), rubber shoes or pads are installed below.
- When supporting the upper part of the ladder on pipes or similar parts, metal hooks are installed at the top to ensure reliable fixation and prevent tipping.
The nuts on the coupling bolts should be recessed and not left as in this photo
If you meet all these requirements, then your ladder will be reliable - but be sure to also carry out a test (we will talk about the method below). But if you have the desire and ability, you can additionally carry out a design calculation.
Step-by-step instructions for creating a classic stepladder with your own hands
The classic model is familiar to every master
And no matter how fancy the store variations may be, the classic model will always be ahead. After all, it is stable, with a comfortable stop, made for specific needs
Materials:
- Wood 6 by 0.20 by 0.1 – 1 pc.;
- Wood 3 by 0.20 by 0.1 – 1 pc.;
- Corner – 2 pcs.;
- Plate – 2 pcs.;
- Screw – 2 pcs.;
- Nut – 2 pcs.;
- Self-tapping screw – 12 pcs.;
- Nail – 4 pcs.
Tool:
- A circular saw;
- Electric planer;
- Stationery knife;
- Electric drill;
- Hammer"
- Paint brush;
- Chisel;
- Mallet;
- Jigsaw;
- Roulette;
- Marker;
- PVA glue;
- Triangle;
- Dye.
Production technology:
- Using a saw, cut the beams in half lengthwise. We process all burrs with a plane and sandpaper. We saw the wood crosswise for the racks. From small pieces we cut the crossbars to the following lengths: 46, 49, 52, 54, 60, 63 and 66 cm. For support, we cut off 2 more crossbars;
Drawing:
- On the widest side of the racks we mark places for cutting 2.5-3.5 cm grooves. The steps will be attached to them. The center of the drawn rectangle should be located at a distance of 20 cm from the top of the structure. Each subsequent beam should be fastened in increments of 33 cm. The contours of the grooves should also be marked on the support beams. From the top down they should be located at a distance of 2.5 cm and 83 cm;
- Using a hammer, holes are made in the wood for the beams. The procedure is performed extremely carefully - so that the holes are even;
- On the boards of the longest and shortest length, places for future tenons are marked. Their length should be 6 cm. Cuts are made along the notches on all 4 sides with a hacksaw. A similar procedure is carried out with the wood from its ends, in the longitudinal direction. This is necessary in order to be able to embed the spikes deep into the structure;
- The lower and upper steps are inserted into the grooves and lightly grabbed with nails. The remaining boards are numbered for ease of installation, and grooves are cut out on all other sections;
- At the stepladder stop, 2 beams are inserted for fixation. The main thing is that there are no gaps and the connection is as tight as possible. The hammered nails are removed and the structure is pre-assembled. If necessary, the fastening points are lightly tapped with a hammer;
- The structure is disassembled and painted. Marked ends are not painted;
- 6 mm holes are drilled in places for installing racks. in diameter. With their help the steps will be fixed;
- Using a wood tool, 7 mm wooden dowel pegs are cut. in section, which will give the structure strength;
- The stairs are being assembled. At the same time, all elements are pre-coated with PVA glue;
- Plates and corners are mounted on the upper part of the structure, which are secured with screws.
We recommend reading: DIY stepladder chair.
Fishing chair on three legs
An original three-legged stool can be easily made from the following parts:
- three round leg rods (length about 60 cm);
- a triangle made of thick leather or dense fabric;
- Mounting screws (one loop, the other long);
- three locking washers and three finished washers, as well as two nuts.
Preparing parts and assembling the chair is carried out in several stages:
- measure 25 cm on the bars and drill and also make holes in the top cutouts to support the saddle;
Tip: If you don't have round stones to make chair legs, cuts from a shovel or other gardening tool are ideal.
- On the leather part we punch holes in the corners, and on the canvas seat we finish the corners with metal blocks;
- Attach the two legs with a long bolt and insert a second eye bolt between them;
- Fix the third leg with the intermediate bolt and adjust the tension so that the tripod can be folded down easily;
- Screw the prepared seat piece to the upper ends of the legs;
- Attach a long strip of leather to the chair so you can carry the folded product over your shoulder or attach it to a backpack.
Having mastered the manufacture of a folding chair for fishing, you can begin to create a more complex model - an armchair or a comfortable chair with a backrest.
How to make a boat chair with your own hands. PVC Watch the video, okay?
Page 4
When it comes to children's furniture, first of all it is necessary to take care of comfort, reliability, durability and safety, including environmental protection.
The best thing is a wooden high chair. Of course, the modern wooden chairs on offer are of great value if they are made from truly valuable and high-quality wood.
Why don't you make your own baby chair? This article will help you choose the best materials for chairs, get detailed instructions and recommendations for making and decorating them.
Types of stepladders
Stepladders are made from various materials, including wood.
When making stepladders the following is used:
- tree;
- metal (iron, steel);
- aluminum alloys.
Wooden construction is considered the simplest, but not very practical. Under the influence of climatic conditions, wood loses its appearance and properties, which does not have the best effect on the product.
Metal stepladders are strong and durable. They are inconvenient to use because they weigh a lot and take up a lot of space due to their size.
Aluminum products are the best option. They are reliable, small-sized and lightweight.
- a simple stepladder made of timber;
- step-chair;
- multifunctional transformable staircase.
A simple stepladder made of timber
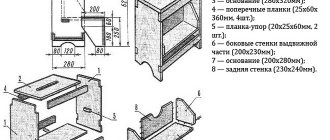
To make an ordinary garden staircase, you will need 4 beams 2 m long with a cross-section of 60x40 mm for support posts, as well as about 14 meters of timber with a cross-section of 60x30 mm for steps and crossbars.
1 – support pillars; 2 – steps; 3 – crossbars and jib; 4 – limiter.
Steps and crossbars must be of the following dimensions:
- 59 cm (2 units);
- 54.5 cm;
- 50 cm;
- 45.5 cm;
- 41 cm (3 units).
Marks should be placed on the two support bars in the places where the steps will be attached. The lowest mark is located 10 cm from the edge. The interval between the remaining marks is 40 cm. Then, taking into account the markings, five grooves with a depth of 1.5 cm are made.
Having completed the preparatory work, we proceed to assembling the main part of the structure. To do this, we place the support posts with the grooves up and align them so that the distance between the upper edges is 40 cm, and between the lower edges - 60 cm. The steps are inserted into the grooves and fixed with self-tapping screws. An additional crossbar is attached to the reverse side.
In order for the ladder to stand, it is necessary to make a support. Since it does not have steps, the support posts are connected to each other by two crossbars: upper and lower. The design is additionally equipped with a jib
When making a support, it is important to maintain a distance of 30 cm between the upper ends of the stand
The final stage is connecting the two parts. In relation to the main part, the support is placed so that its upper edges are between the last step and the additional crossbar.
This design does not require fasteners from above. And the lower ends of the ladder can easily be moved to the required distance.
Step stool
This type of staircase is very compact and does not require much storage space. Thanks to its attractive appearance, it can easily be considered an element of the interior of your apartment.
Option with reclining backrest. General view and drawings.
When assembling the structure, you need to be extremely careful and observe all the dimensions indicated in the drawing. In properly assembled structures, parts move freely and do not interfere with each other.
The wooden ladder stool can be equipped with an additional locking fastener that secures the device in the desired position.
Drawings and dimensions of parts
Before constructing a step-stool with your own hands, you need to study in detail the drawings and dimensions of the future craft. There are several types of this design:
- transformable chair;
- high step stool;
- ladder chair;
- step stool with a spiral module.
The first model is a transforming chair. When it is folded, it cannot be distinguished from a simple chair with a backrest. To make a stepladder, you just need to lay out the elements of the product. If this chair is well designed, it will look beautiful in different interior designs. If the stepladder has an unfolded or folding appearance, then it will consist of three steps.
The second model is a high step stool. In its design, it has a high chair and a retractable module, which, if possible, can be pushed under the seat of the stool. A variation of the step stool is the ladder chair. It comes with or without a back.
There is another type of step stool - a stool that has standard dimensions. From under the seat of this stool, steps can be pulled out in a spiral. This chair has many functions; it is unusual in its appearance both when unfolded and when folded. If you need to make a transforming chair, you must first develop a diagram. It is possible to use prepared drawings with dimensions or to make drawings yourself, having examples of constructing a suitable model.
If you rely on the standards, then the seat should be located no less than 41 centimeters from the floor. The base of the stepladder chair should be at least 41 centimeters deep. Now you need to decide on the height of the structure. You can use the standard characteristics or add 11-16 centimeters on top. To make the product more stable, you can use a wide base.
All drawings of a step-chair indicate the dimensions of the following parts:
- front and rear sides;
- strips for the back of a chair, seat, steps, etc.;
- supports that fold either sequentially or smoothly.
The future design must have at least 3 steps. The dimensions of the legs should guarantee the quality of the product in various positions. The shape of the supports is similar to the letter “A”, since the planks should be located in an inclined position and connected by a crossbar. In order for the structure to be stable, you need to know that the angle of inclination of the frame and legs is 80 degrees. The steps should have a distance between each other of no more than 21 centimeters so that the stepladder chair can be used comfortably. The design has a seat that should be divided into 2 parts, the division is based on the placement of the central supports.
Once the dimensions of the model and methods of fastening the parts have been determined, the diagram must be transferred to a piece of paper with millimeter markings. It is necessary to carefully draw all parts of the product and follow the order of installation of the parts. Having all the relevant sketches, you need to prepare a pattern for the blanks. Using carbon paper, you can transfer the image of the future structure onto a piece of plywood or wood.
What you need for work
Before you start making a stepladder, you need to prepare the tools, make the necessary drawings and cut the pipe into pieces of the required sizes.
We recommend that you read: How to use the “Mole” product to clean blockages in pipes and prevent them?
A correctly executed drawing not only allows you to calculate the amount of material, but also visually visualize the future design.
To make a folding stepladder, the following tools and accessories are needed:
- Bulgarian;
- welding machine;
- drill and drill bits;
- tape measure, marker, corner and hammer.
In addition to profiles of the required size, you will need a hinge corresponding to the size of the pipes, which is put on the racks, and then attached to them using bolts and screws. Using a hinge mechanism, a folding stepladder is mounted.