A hammock made with your own hands will hardly leave anyone indifferent: both adults and children will enjoy spending time sitting or lying on it. Moreover, a beautiful product can decorate the site of a private house and a city apartment. In this article we tell you how to create a comfortable and stylish place to relax on your own.
Bonus: 6 Tips for Building and Attaching
There are several important points that will help you choose how to make a swing-hammock with your own hands.
- If you like fabric models, then special attention should be paid to the material. The strength and durability of the product depends on it. Canvas, calico, teak, camouflage and canvas are suitable for this.
- It is better not to use synthetic materials. Firstly, they are more difficult to work with. And secondly, synthetics are uncomfortable to use in the hot season. It does not allow air to pass through, so you will hardly want to spend a lot of time in such a hammock.
- As for macrame, you can use both synthetic laces with polystyrene and special natural ones produced for this weaving technique.
- You can secure the finished product in the classic way between two trees, on poles or on a system that you can design yourself.
- If you decide to attach to trees, the diameter of the poles must be at least 15 cm. To avoid damaging the bark, use tubes or place fabric under the rope.
- Instead of trees, you can use support pillars, then they should be deepened into the ground. Or make a support structure with v-bars, similar to a boat. It's mobile, so you don't have to dig holes in the yard.
Detailed pattern of weaving using macrame technique
In the macrame technique there are a huge number of patterns that can be made from thick cord or even rope. This is what we will use to weave a hammock that is comfortable, durable and beautiful! And yet, you can use a different principle of fastening, not on two strips and rings, but by knitting a “softer” structure, without a fastening base
There is another option - weave thick fabric with a cord using the macrame technique and secure it to the slats.
But we will look at the plank method, only first we weave the fabric of the required size.
Then we attach it to the slats (10cm longer).
- If the dimensions of the fabric are 2.5 by 1 m, then we knit a mesh of 20-30 loops (depending on the thickness of the cord).
- After the first row, in order to knit the next one, you need to turn the fabric inside out each time.
- We calculate the remainder. You need to make sure that the knot is on the edge of the row.
- We thread the loops of the finished fabric into the holes of the wooden plank.
- We collect the cords. At the edges we make a loop according to the size of the ring on which we will hang the hammock from the tree.
- Wrap the loop with a loose cord. Tie tightly under the loop.
- Thread the ring through the loop, although you can also hook it through the loop.
All that remains is to choose a motif and knit the fabric according to this pattern. For example, it could be “Chess” - watch the weaving technique in the video:
Or any of the schemes:
Do it yourself
If you prepare the drawings in advance, it will be much easier for you to complete all the work.
We will look at 2 options on how you can make yourself an original and practical hanging chair using PVC pipes.
- With weaving
. The idea is to take a couple of rings for the base and weave the chair around them; - With case
. Here the frame will be placed inside the soft case. For those who are not familiar with the macrame technique, for example, this option is much simpler.
But first of all you need to decide on the size. Think or look at other drawings about what diameter pipes you need. The question is how to get the exact diameter. There is an answer.
Elementary calculations. Therefore, there should be no problems with this.
Next, it is equally important to understand how to bend the pipe. PVC and polypropylene pipes cannot simply be bent by hand. They then lose their properties
Here are the options:
They then lose their properties. Here are the options:
- use special tools for bending plastic pipes;
- heat the material and then give it the desired shape;
- pour hot sand inside and bend the pipe into a circle.
Connecting the 2 ends is not difficult. You can use some kind of inserts in the form of a piece of wood. Special glue is also used. But objectively, the best solution would be a bushing together with welding.
Wicker chair
To weave a hanging chair based on a pair of pipe rings, you need to take:
- 2 rings with a diameter of about 70 and 110 cm;
- approximately 800-900 meters of cord;
- 12 meters of slings;
- 2 wooden rods;
- a couple of thick cords;
- roulette;
- scissors, etc.
Choose a cord width of 4 mm or more. It is better to use a pipe diameter of at least 35 mm. The thicker the pipes, the more weight they can support.
Next you need to do the following:
- Connect two hoops using a winding on one side, pulling the cord well. This is where your feet will be located in the future. At the bottom there is a ring with a smaller diameter, at the top with a larger one;
- The pipes themselves along their entire length should also be wrapped in several layers for softness and decorativeness;
- After this, the process of weaving the base (seat) begins using the macrame method. Choose the ornament yourself;
- Next you need to make the backs. The top ring will be raised at approximately 45 degrees. Due to the difference in the distance between the lower and upper rings, space is created for weaving the back.
At the final stage, the slings are attached and the structure is suspended.
Armchair with cover
If you are far from the weaving technique, then you can use another method. Here the task is much simpler. The fabric cover will allow you to get a soft, but at the same time durable hanging chair.
Here you need to take:
- one durable hoop with a diameter of 90-100 cm;
- a piece of durable fabric;
- braid;
- metal buckles;
- about 8 meters of sling;
- metal ring for hanging;
- sewing machine;
- scissors, needles, etc.
This is not to say that everything is extremely simple here. There are some nuances.
The process of making a hanging chair with a fabric cover can be described as follows:
- You need to make a cover out of fabric. First, cut a couple of squares of the same size, fold them 4 times, and cut out a circle;
- After ironing the circles, cut out holes for the slings;
- Next, the elements are connected to each other. When sewing the circles together, be sure to leave room to insert the ring later;
- Having made the cover, turn it right side out, make an indent of 5 cm on each edge;
- Place a ring inside the case and then sew it with strong threads;
- The case should be filled with padding polyester. Or any other material of your choice;
- Slings are installed, and with their help the structure is suspended. It can be applied to the ceiling, to a tree, to a beam in a private wooden house, etc.
At this point the manufacturing process can be considered complete.
How to make knots for a wicker hammock - detailed instructions and drawing
Today we talked a lot about weaving a hammock. It’s worth finding out which knots allow the hammock to hold tightly and not slip or fall! A well-stretched hammock will allow you to fully relax, and not “lie” in a position where your legs meet your head.
I’ll show you clearly how to attach a hammock, with what knots:
- Bed. If we attach the hammock to the ring.
- Bleached. If the support is thin.
- Retractable bayonet. With a thick support, this type of knot is the most reliable.
And it’s better to show here. I understand this, so I selected a video on the topic:
What do we need
The necessary consumables can be purchased at the nearest hardware supermarket, as well as tools. If you already have the necessary tools at home, expenses will be minimal .
Here's what you'll need in terms of supplies:
- Three wooden cuttings with a diameter of 3 cm and a length of 1 m;
- Two wooden cuttings with a diameter of 1.6 cm and a length of 1 m;
- Four wood screws 2.5 cm long;
- A skein of polyester rope with a diameter of 0.5-0.6 cm, a length of 180 m;
- A coil of rope is 1-1.5 cm in diameter, 6 m long.
You will also need the following tool:
- A centimeter, or better yet, a tape measure;
- Ruler;
- Pencil;
- Tailor's scissors;
- Three clamps;
- Bulgarian;
- Flat and round file;
- Drill + wood drill bits 16 and 4 mm;
- Crosshead screwdriver.
However, if you have a utility room at your dacha, it’s probably already full of such tools, and finding everything you need won’t be difficult. It is better to do all the work on a large table with dimensions of about 1.5x2 m.
Attention! Don’t forget about safety equipment – safety glasses and gloves.
Video description
To properly hang a hammock, you should definitely watch the following video:
Hanging a hammock is a very important procedure on which your safety directly depends.
On verandas and in rooms where it is possible to easily reach the concrete floor, a hole is drilled in the ceiling into which a high-strength steel bolt is inserted. The chair itself is already installed on it, using a ring or hook. Even a wooden hammock can be secured in this way.
It is very important to reliably strengthen the structure on the ceiling Source pinterest.com
Materials
A hammock chair can be made from different materials:
- rattan or wicker;
- with a base made of plastic or acrylic;
- made of thick textile without frame;
- non-standard models in the form of a drop.
Attention : when using the product outdoors, durable and wear-resistant materials are selected. They must cope with negative environmental factors and be resistant to rain, direct sunlight and ultraviolet rays and temperature changes.
As for the materials used to make the hammock chair, the type of construction and model are taken into account . The most common are:
Macrame. In this way, the products are decorated on a hoop, which is braided with a silk cord that is soft to the touch. Using this method, original products with fringe and various decorative elements are created.- Tarpaulin.
It is a fairly durable material and is perfect for outdoor use. The tarpaulin can withstand heavy loads up to 300 kg. It is not afraid of sudden changes in temperature, increased moisture, or direct sunlight. Its only drawback is the small selection of color palettes . This model will look harmonious on the veranda, in the garden or gazebo. - Textile. For these purposes, dense fabric is selected that can withstand weight up to 150 kg. Also, the selected material should not stretch or deform during operation. To increase the strength of the material, it is recommended to fold it in two layers. You should avoid light and easily soiled colors . Especially when using the product outdoors.
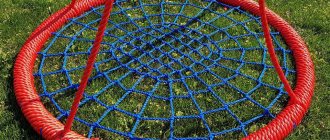
Weaving a hammock from linen thread (rope)
The clothesline has special strength and is not afraid of moisture and the scorching sun. That is, a hammock is great for a summer house; hung it and let it hang all season! This is a huge advantage of the material, namely, clothesline. But the thickness of such a rope is greater than that of a cord, and therefore it is not so convenient to weave. But it's economical! You will need less thick rope than thin yarn.
The simplest and most convenient way to weave clothesline is a net.
It's very easy to do.
- We tie a rope to the bar.
- Then we connect the ropes that are nearby. We tie them in a knot.
- We go lower and tie a knot in the ropes that are nearby, but were previously tied to neighboring ropes.
And so on to the very bottom. At the bottom we thread the rope through the holes of the plank and secure it with knots.
This hammock is made very quickly! But for complete comfort it should be equipped with pillows and bedspreads.
Peculiarities
The features of the hammock chair include:
safety and environmental friendliness (due to the use of natural and non-toxic materials);- original design;
- simplicity and ease of use;
- Possibility of use at any time of the year;
- ease of care;
- long service life.
A hammock chair is a soft version of a hanging structure . On soft pillows that sway from side to side, it is pleasant to spend summer evenings in the fresh air.
Advantages
The advantages of a hammock chair include::
- Wide selection of models. Such products differ in shapes, designs, colors, and materials of manufacture. Some chairs are something like a cocoon, others are a product with a soft fabric seat.
- Possibility of self-production. To do this, you will need to use minimal sewing skills and prepare supplies.
- A hammock chair can be framed or frameless. Both models do not have sharp corners or parts, which makes them popular among small users.
- The textile can be easily detached from the product and washed in an automatic machine.
Device
A hammock chair, as a rule, has a fairly simple design . It consists of:
Fabric seat. For these purposes, a tight cut is most often used.- Crossbars, which serve as a strapping element and distribute the load. The seat is tied to the crossbar.
- Sling. To do this, use a strong rope or braided cord.
- Suspension. For these purposes, chains for ceiling mounting or rings with a spring are used.
Hanging hammock chair using macrame technique – master class
I'll show you a very simple model. In fact, it is no different from a full-fledged hammock in which you can lie. But there is also a difference - this is how the strips are attached. They are not placed horizontally, but one is fixed above, the second below. Between them there are wooden slats that connect the upper and lower base and allow the structure to be stable.
A few words about the quality of the threads. The fact is that the main emphasis will be on the lower part. Therefore, the threads should not stretch too much; ideally, if it is a thin cable or dense synthetic rope, then the hammock will not stretch quickly.
What else do we need:
- Planks (1.6-2cm) – 2 pcs.;
- Reiki (0.6-1cm) – 2 pcs.;
- Rope for weaving – 125-130m;
- Clothesline for fastening – 4m;
- Screws and drill.
Making crafts.
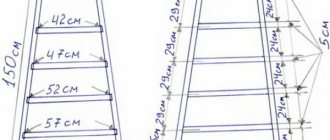
We make 2 holes on each edge of both planks. One is at a distance of 2, the second is 3.5 cm.
We insert thin slats into those holes that are closer to the edge. And this is how all 4 wooden bases are connected.
We hang a wooden base to make it easier to weave. We cut the rope into 8m lengths (into 16 pieces).
Fold the rope in half. We leave the loop in front of the bar and fold the edges over the bar. We thread the edges into the loop.
This is how we fasten all 16 ropes.
Distribute all loops evenly over the base.
We take the first 4 ropes (from 2 loops) in our hands. We bend the rope on the far right at a right angle, place it on the 2 closest ropes and thread it under the one on the far left.
We pass the left rope behind the two that are nearby and thread it into the loop on the right, which we formed when we bent the right rope.
Lightly tighten the knot. We do this with all the ropes.
To make the second row, step back about 7cm. We skip the last 2 ropes. We take the next 4 ropes in our hands and do the same with them as we did in the previous row: we throw the rightmost one over the leftmost one; We pass the left one into the right loop.
And so the whole series. We weave until we have ends of ropes of about 20 cm.
We tie the edges tightly on the bottom bar.
The chair is ready! All that's left is to hang it up.
We cut the clothesline into 2 halves of 2m each.
We thread the ends of the clothesline into the holes at a distance of 3.5 cm from the edge.
We make strong sea knots at the ends of the ropes.
All! Let's hang up our chair! Simple, fast, and we are guaranteed a wonderful holiday!