Among athletes who engage in strength training, the most popular is the bench press. Thanks to this simulator, you can pump and strengthen muscle groups located in the chest and triceps area. However, not everyone has the opportunity and time to visit the gym, so some craftsmen make this equipment themselves. The design of a do-it-yourself bench press is no different from standard factory-made models. All you need to make it is a small number of tools and materials.
It's better to buy or make it yourself
Sports and movement improve the quality of life of any individual. As mentioned above, not all people have enough free time and money. The way out of this situation would be to install a bench press bench in the house, because the machine does not take up much space, but is very multifunctional and will allow you to regularly work out a large number of muscle groups.
Bench presses are special machines on which almost 65% of the exercises included in the workout are performed.
What is better - to buy a simulator in a specialized store, or to make it yourself? To better understand the issue, you should look at all the pros and cons of purchased and homemade exercise machines.
Using this device, you can do barbell flyes, lunges, and cardio exercises. The model is useful for the development of forearms, legs and so on.
Purchased simulator
Advantages:
- Sports stores offer a huge number of different models to suit every taste;
- No time required for purchasing materials and manufacturing;
Flaws:
- Quite a price;
- Most often, this is a price-quality discrepancy.
The traditional design consists of supports and a regular horizontal board.
Homemade barbell bench with your own hands
Advantages:
- Low final cost;
- Ability to independently select materials;
- The ability to independently design the most comfortable configuration for use.
Flaws:
- Wasting time on design and manufacturing;
- Not everyone has the ability to make structures on their own.
The main advantages of the model: simplicity, functionality, practicality.
After looking at all the pros and cons, everyone can make the right decision for themselves.
How to make simple equipment from wood
The algorithm for making a simple two-support bench structure made of wood is as follows:
- Grooves are cut out in the longest beam that will serve as the base, and the racks are secured in them using fasteners and glue.
- Short bars are attached to the bottom of the posts. Grooves are also cut out in the expanders, and racks are inserted into them. These details will give the structure stability.
- Smaller diameter bars are attached to the side of the main crossbar to form the necessary parts responsible for adjusting the lifting height. Nylon washers are used at the junction of the base and moving elements, which will avoid abrasion of the wood during operation of the bench.
- The plywood sheet, which will serve as a sunbed, is mounted on the moving parts, and is also attached to the support using a door hinge.
- Narrow grooves are cut out on the base. A bolt-nut will subsequently be inserted into them to adjust the lifting height of the lounger.
- For the legs, a smaller plywood sheet is mounted at the end of the bench.
- An inclined bench for bench press made of wood is coated with a composition that increases moisture resistance and varnish.
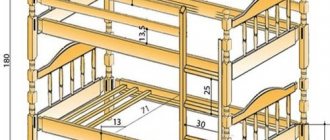
When manufacturing, the classic standard for the size of such products should be taken as a basis.
Designing a bench press bench with your own hands is not at all difficult. You don't have to be a jack of all trades to do this. Armed with the right tools, the right blueprint, and patience, anyone can make this kind of versatile training equipment. Moreover, once a simple model is assembled, it can be modified at your own discretion. The result is functional and durable sports equipment.
Drawing
Cut grooves in the longest timber
Install the crossbar onto the supports
Attach bars of smaller diameter to the side of the main crossbar
Install nylon washers at the junction of the base and moving elements
Use the bolt-nut to adjust the lifting height of the lounger
Ready-made design without a sunbed
Attach plywood sheet to moving parts
Cut narrow grooves on the base
Cover with stain and varnish
Finished design
Types of designs and their features
Bench-type machines come in the following varieties:
- A horizontal bench (folding or regular) is a stationary type of sports equipment. Most often, this design is characterized by inclusions in the form of:
- Rack for shells,
- Set-top boxes;
- Retainers.
- The bench plus parallel bars allows you to perform a greater number of exercises. It is desirable that there be 110 centimeters between the racks.
- Exercise bench with adjustable seat and backrest. This type of simulator has:
- Spring bracket;
- Hinged stands;
- Fasteners;
- Stopper;
- Stopper chain.
The design can be adjusted depending on the level of inclination of the bench.
With the help of this simulator, the user will be able to use a barbell, dumbbells, and also take a sitting position in training.
Using this simulator, you will be able to:
- Perform bench presses at different angles;
- Adjust the load;
- Comprehensively pump a large number of muscle groups;
- Install a bench for training at home, with the possibility of subsequent folding.
It is possible to exercise with a barbell in a sitting or lying position, or use other sports equipment.
Not just spirit
A healthy body is also necessary for a developed mind. Physically undeveloped outstanding scientists, engineers, creative intelligentsia, top managers and businessmen are the exception rather than the rule. Leo Tolstoy at 60 was spinning the sun on a horizontal bar. Niels Bohr, the one in school textbooks, was a famous football player who played for the Danish national team. Things got funny with him: when Bohr was awarded the Nobel Prize in physics, of course, the Copenhagen Tagebladette published a note saying, it’s good, our forward was given a Nobel Prize for football. And a “nerd” in “physics” often turns out to be one in areas of activity that require mental effort.
The abdominal muscles are known to be more difficult to pump than others, because... their ends are not directly connected to the bones. At home, doing abdominal pumping without special equipment, it won’t take long before you get a hernia. Therefore, you need a bench for the press. Structurally, both apparatuses are most often combined into one, with the possibility of conversion for certain sets of exercises.
Sports benches are not technologically complex products. There are enough descriptions of them in RuNet, but more in the spirit of: choose the drawings, and then - this is how you have to saw, pound like this, screw like this. A person who cares about his physical development, as a rule, knows how to operate a tool. But how to choose a prototype so that your training benefits? How to modify it to suit your biomechanics and biometrics? Which sample is more suitable for certain groups of exercises?
This publication is devoted to the questions of how to make a bench for exercises in the preferred direction of physical development with your own hands, using a reasonably chosen model, and then, based on it, a home exercise machine. Those who intend to prove themselves in sports or bodybuilding by working out in it will not be ashamed to come to a well-equipped professional gym. In the meantime, the material is designed for beginner athletes and simply for people who understand: you can and should use the benefits of civilization, but letting them turn you into a twitchy “teapot” or a swollen kettle is wrong.
Note: the problem of home sports activities has recently become more and more acute in rural areas - “physics” is decreasing there, stress is increasing, and a well-equipped gym is sometimes far away.
What to consider before making
The process of designing a bench simulator is quite simple, however, this still requires certain skills in handling tools, such as:
- Drill;
- Welding machine;
- Vise;
- Bulgarian.
If you can easily handle all of the above items, then you can safely take on the production of a training structure.
If you wish and have experience in construction work, you can supplement the design with an adjustable lounger or other devices.
Signaling
At competitions, a light signaling system must be installed, with the help of which judges can communicate their decisions. Light signaling similar to that used in weightlifting may be used. When the referee sees a violation of the rules, he turns on his remote control. If a majority of the judges turn on the remote control, an audible signal will sound to inform the athlete that their attempt has failed. In this case, the athlete does not need to complete this set.
Each referee controls the white and red lights. These two lights mean “good lift” and “no lift” respectively. Light signaling lamps are positioned horizontally in accordance with the position of the three judges. The light signaling must be arranged so that the bulbs light up simultaneously, and not separately, as the judges turn them on.
In case of need, for example in case of breakdown of the electrical alarm, the referees must have flags or banners in white and red with which they can indicate their decision after the command in the voice of the chief referee “flags”.
After the alarm goes off and the lights are illuminated, the judge(s) who did not count the weight lifted must raise the appropriate card (plate) indicating the reasons for the unsuccessful approach.
What materials and tools will be needed
Before you start making your own exercise bench, it is important to purchase and prepare in advance the appropriate materials and tools, such as:
- A profile pipe with thick walls measuring 40 by 40 millimeters;
- Steel strip (40 mm wide), thick pipe;
- Hinges for the door;
- Sheets of steel (two millimeters thick);
- Durable water-repellent material;
- Reinforcing rod without ribs;
- Sanded board;
- Foam rubber with a thickness of at least 20 millimeters;
- Roulette;
- Bulgarian;
- Knife;
- Vise;
- Apparatus for welding work;
- Drill.
Layout
So, the decision has been made - the barbell rack will be homemade. Before starting work, you need to think through everything carefully. For greater accuracy, it is best to make a drawing. The barbell stand must be proportional. Load-bearing structures must support the entire weight; for this, everything must be calculated and plotted on the drawing. In addition, the drawing will help you avoid buying too much. Since materials are usually bought by eye with a reserve, and this is all money. What is important for a homemade stand is low price. So it is better to first draw up a plan in which the future stand should be described.
Drawing up diagrams and drawings
Initially, before making an inclined bench with your own hands, you need to draw up the correct drawing, where it is important to indicate the features of the selected structure and the corresponding size indicators.
The dimensions of the bench must meet individual requirements. To do this, you can use the standard parameters.
Advice. To create the necessary drawing of a barbell bench with your own hands, you can use information from Internet sources, or take measurements from the finished structure located in the gym. You can use a special training video, which can be easily found on the Internet.
Create a drawing
The manufacture of any bench press model begins with the completion of a drawing. The figure should indicate all the design features of the future simulator and its dimensions. You can find a ready-made scheme on specialized resources, where all the nuances are described in detail. However, in this case, you need to take into account that the proposed dimensions may not coincide with those that are necessary. To achieve the desired result, you simply need to replace the original parameters. If you have experience training on a professional bench press in the gym and performing exercises on it effectively, then you can take the dimensions of this apparatus and make drawings based on them yourself.
Step-by-step instructions for assembling a bench press bench with your own hands
When the drawing has been created and all the necessary materials and tools are available, you can begin making the bench.
The distance from the floor to the bench must correspond to the parameters of the lower arm of the lever intended for the legs; an additional 10 cm is added.
The manufacture of the frame includes the following manipulations:
- The pre-prepared pipe is cut into 2 equal parts, 830 millimeters long. These are future training racks that will support the barbell and serve as frame legs. That’s why it’s so important that the material used for manufacturing is especially durable.
- A mark is applied to the resulting racks at a height of 340 millimeters from the surface of the base using a simple pencil.
- Cut out a piece 520 millimeters long to connect the resulting posts together.
- The racks are connected to the intermediate part at the height of the previously set marks. It is important to make strong seams during the welding process, because this place is subject to significant load and large vibrations. Do not forget and accurately take into account the height above the floor of 340 millimeters.
- The prepared part (length 340 millimeters), which performs the function of a stand, should be installed on the opposite edge of the future simulator. The next element is a bar (length 970 millimeters), which connects the front posts of the base of the exercise bench with the rear ones.
- The previous segment is connected to the supporting elements in the upper border,
- The crossbar (520 millimeters) is fastened to the side surface, and you can use self-tapping screws or a welding machine.
- Next, special extensions are attached in the area of the leg posts in order to evenly distribute the load on the floor area. Moreover, extensions of 220 millimeters are installed in the area of the front legs, and 300 millimeters on the rear legs. The sections are fixed using a welding machine.
- Using prepared steel strips and a vice (2 or 4 pieces), bend the racks in the form of petals. From the side, the racks should resemble the English letter J. The side at the back should be 70 millimeters, and at the front about 20–30 millimeters.
- Upon completion of the manufacturing process, two holes (1 centimeter in diameter) are cut in the area of the beam that connects the base posts, 16 centimeters from the central part.
The high-quality design allows you to fully pump the chest muscles, which contributes to the formation of a beautiful torso.
Next, you can proceed to making the lounger:
- Two sheets of steel are cut out with dimensions: 350 by 160 and 350 by 940 millimeters.
- The first sheet is fixed with welding material in the area where the legs will be located, while protruding 5–10 millimeters beyond the border of the rack.
- The second sheet is fixed using door hinges, this is a kind of handicraft method. The loop is welded with welding seams, one looking towards the pipe, the second - at the sheet of the bench.
- Next, two ribless reinforced rods (length 300 millimeters) are fixed, the reverse side of the plate is indented 100 millimeters. This helps raise the back of the lounger to perform a variety of exercises.
- Then, the polished board is laid on the surface of the plate, and the width of the board is 5 millimeters larger than the steel sheet.
- The board is fixed to the steel sheet using self-tapping screws from the bottom edge; the hole is not made through.
- In the area of the joints of one steel plate to another, a distance of one centimeter should be maintained between them and the wooden board.
- The surface of the board is smeared with glue and foam rubber is laid on it, then stitched with durable material (you can use a construction stapler as fastening).
There is no need to purchase expensive equipment to practice at home.
Regular option
The simplest version of the simulator is highly durable. The bench is very useful and compact; it can be made as an addition to other exercise machines.
There are features in the manufacture of this option, namely, you can use:
- A less strong material is a 40 by 40 corrugated pipe, since there are no right angles in the structure.
- As a support for the feet, the rods are 10 millimeters long, with threads on the tips, which are rubberized to the required size.
- Removable rubber couplings, which are adjustable at the lower stop and can be removed at the top for exercises that they interfere with.
You can make a bench yourself using wood or profile pipes.
Incline bench
This type is made more difficult than the previous one, and is a more convenient option.
Peculiarities:
- Replace the support section of the pipe with a thick-walled pipe, in order to avoid bending under the weight of the legs; it is also possible to use a regular support pipe 40 by 40 millimeters;
- It is important to install an adjustable backrest by welding a metal oblong ring to the support frame.
- The adjustable backrest is equipped with a frame, which is welded from a 20 by 20 mm corrugated pipe.
- Next, drill 4 holes in each rack using a drill (markings are applied in advance). This is a simple backrest with 5 tilt angles, the maximum angle is 450.
A convenient exercise machine will help you build muscle mass, pump up your triceps and deltoids.
Making a bench with a stand and back
This version of the exercise bench is the most convenient and functional, however, it is also the most difficult to manufacture.
Manufacturing Features:
- To install the backrest in 900, it is necessary to construct an additional frame that has an emphasis at the bottom of the bench;
- No rack holders are needed;
- Drill a large number of holes;
- Fixation is carried out using a pin (reliable fastening, threaded through the side of the frame), which helps to set different angles of the backrest;
- Easily retractable racks are made of corrugated pipe 30 by 30 millimeters plus supports 40 by 40;
- Next comes the production of rack holders from metal strips;
- Attaching the handrails for later use as bars will help increase the functionality of the bench.
The bench press bench is considered one of the most popular sports equipment.
Improved bench model
The bench can be improved - for example, by adding bars to it. This will provide an opportunity to additionally load the muscles of the chest and triceps.
Materials and tools
In order to install parallel bars onto an existing bench press, you don’t need a lot of tools.
The following materials are needed:
- bars;
- welding machine.
That's all. Installing beams is not as difficult as it seems at first glance.
Assembly work
It will take 20-30 minutes to weld the bars to the bench press.
Necessary:
- Get a welding machine and a special mask to protect your eyes.
- Weld the beams to the bench.
The improved bench model is ready. Now there is an opportunity to diversify your home workouts.
Tips and tricks
- Make the width of the bench equal to 280 millimeters; on average, with narrow shoulders of the user, 260 millimeters is enough;
- To avoid rust and subsequent destruction of the metal parts of the bench, its surfaces should be coated with varnish or paint;
- The lounger is usually made of wood and sheathed with material and foam rubber, for greater comfort, if the user decides not to sheathe the boards, they should be thoroughly polished and varnished/painted to avoid structural damage and accidental damage to body tissues;
- It is important to use only reliable and durable materials in construction;
- High-quality connections should be made, paying special attention to welding and bolted connections.
You can make a bench yourself using wood or profile pipes.
Platform
All exercises are performed on a platform measuring at least 2.5 * 2.5 m and maximum 4.0 * 4.0 m. The surface of the platform must be flat, hard, non-slip, and horizontal.
The platform should not rise more than 10 cm from the stage or floor. The surface of the platform may be treated with an approved non-slip coating, such as deck paint. Loose rubber mats or similar sheet materials are not permitted. The use of platform inserts made from non-slip materials is acceptable, provided that they are not dangerous (i.e. the barbell, when thrown onto the platform, will not bounce excessively off the surface, thereby putting platform assistants and athletes at risk).
Permission must be obtained from the Technical Committee, Jury or Judges to use this platform. If an athlete, due to his small stature, cannot remove the barbell from the racks for squats, then he is allowed to build an elevation on the platform (increase the height of the platform).