There are several different technologies and many building materials for repairing and finishing slopes. Let's consider how to plaster a doorway after installing the door, taking into account their condition. Let's get acquainted with the characteristics of the most commonly used mixtures, with detailed instructions for carrying out installation work, with recommendations from specialists. Read to the end and you will learn about common finishing methods.
Doorway after installing a new door Source remontnik.ru
Relevance of plastering
After installing the door, there is almost always some gap left between the frame and the opening. And these are voids, visible fasteners and, in general, the area looks unfinished and not aesthetically pleasing. To eliminate these and other unpleasant moments, you can resort to various technologies. One of them is plastering the slopes of the doorway.
This technique allows you to solve the following problems:
- filling voids and depressions;
- leveling slopes or giving them the desired geometric shape and strengthening mounting corners, if provided;
- strengthening the fixation of the box in order to increase its bending strength;
- improving the situation with ventilation, penetration of noise and air flow, moisture in the case of a street door;
- protection of polyurethane foam, which is used in most cases when fixing the box in the desired position;
- creating a complete look of the structure as a whole;
- formation of a solid foundation for further decorative finishing of the technological opening.
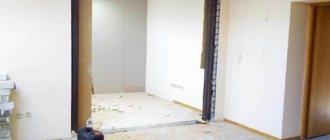
Standard option for finishing a doorway Source doors-im.ru
Plaster is a mixture, the basic composition of which includes a binder component and a mineral filler. That is, the solution can be applied in a layer of over 5 mm; after drying, a durable material with a rough surface is formed. This base has good adhesion and load-bearing capacity. Virtually any further finishing can be chosen: paint, putty, wallpaper, tiles, etc.
How to plaster a doorway without a door
It is not always advisable to install a door. For example, an arched opening is often made for the living room. It looks beautiful and interesting. But there are special requirements for its plastering. These include the following:
- Making a plywood template.
- Reinforcement of the arched section.
To plaster arched passages, you will need two plywood templates. They are attached to both sides of the wall with self-tapping screws. After this, plaster is applied. The mixture is leveled using a rule with a protrusion cut out from one end several times in two directions. Rub the surface with a rounded grater.
Selection of plaster
Plaster for door slopes must comply with operating conditions. These may be sides inside or outside the heated room, constant or variable relative humidity and temperature, and mechanical stress to varying degrees. You also need to take into account the materials with which the solution will come into contact: concrete, wood, metal, plastic. Good adhesion of the composition to one or another base is important here.
Cement plaster for interior and exterior work Source prom.st
More often, craftsmen consider three options for dry mixtures:
- DSP.
This can be a ready-made composition or mixed independently in traditional proportions: 1 part cement and three sands. This plaster is inexpensive, but has a number of good characteristics. In particular, the material can be used in conditions with any humidity and temperature changes. The coating becomes strong and durable. When applying a layer over 3 cm, it is recommended to use reinforcing fibers or lay a mesh to avoid cracking. The composition has good contact with most types of substrate. The surface is grey, rough, with high compressive strength.
- Two-component plaster.
This is a cement-sand mixture, which includes another binder component. For example, gypsum accelerates the hardening process of the solution, slaked lime improves the plasticity of the crumbly mass. There is less susceptibility to cracking, but resistance to direct moisture is slightly reduced. That is, on a street without a canopy, it is better to finish the slopes of the external door with one-component plaster.
An example of two-component plaster Source virashop.ru
See also: Catalog of companies that specialize in finishing materials and related work
- Gypsum mixture.
Compared to cement analogs, this composition is more flexible, easier to work with, cracks less, and the surface can be created smooth enough to immediately begin painting or wallpapering. But such a composition is unacceptable for use in conditions with high humidity and gypsum has less mechanical strength. There is also the appearance of rust stains that appear through the layer.
In addition to operating conditions, before choosing a plaster mixture, you need to take into account the permissible layer. For example, it is not recommended to apply a cement-sand mixture in a layer less than 10 mm. And Rotband, known to all builders, has a coating thickness limitation of 50 mm.
Gypsum plaster Rotband Source td-komplektovshik.ru
Preparatory work
Work on plastering slopes must be carried out as carefully as possible. The door, when closing and opening (especially with sudden impacts), transmits vibration to the frame, so poorly applied plaster can simply fall off. Therefore, if you want to avoid the need for repairs for as long as possible, you need to complete all the work as carefully as possible and prepare the walls well for work.
The door frame is installed even before finishing work on the slopes begins. This way the structure will be more durable, and there will be no need to fill the gaps between the wall and the slopes. When installing, be sure to use a level to check that the box is as level as possible vertically and horizontally. If necessary, use wooden wedges for adjustment.
First you need to prepare the surfaces in a rough form. To do this, old plaster and pieces of bricks protruding beyond the slope are removed. You can beat them off manually or use a hammer drill.
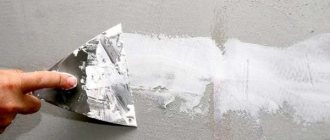
The next step is to remove dirt and cement mixture residues. Use a wet rag or spatula to remove all layers from the brick or concrete slab. The more carefully this stage is completed, the less the risk that the plaster will fall off along with the dirt.
Installation stages
The technological process of finishing a particular object with water-containing solutions includes several mandatory stages. This includes site preparation, rough and finishing leveling. Additionally, reinforcement and installation of mounting angles may be necessary. Let's take a closer look at how to plaster door slopes.
Preparatory stage
Here all actions come down to the formation of a solid and clean foundation. So, if this is a newly installed box, then first you need to cut off the excess polyurethane foam. A common mistake that is often observed is that the foam mass is removed flush with the profile. However, it is necessary to take into account the plasticity of this material and the minimum layer of solution. The latter should be at least 5-10 mm. That is, cutting the foam should be done with a groove so that the coating does not immediately crack.
Trimming excess polyurethane foam Source chistoe-okno.ru
Why are slopes trimmed?
Plastering the slopes of the entrance door is carried out for the purpose of:
- align, improve the wall around the door, make the hallway attractive;
- close the fastening structure of the door frame;
- seal the area around the door (the plaster forms a monolithic coating);
- additionally insulate the room, reduce the level of noise coming from outside.
All these goals are achievable if plastering of the entrance door slopes is used. The main advantages of plaster:
- the solution can be given any shape;
- the material is plastic, it can be laid flat without much difficulty;
- the compositions are environmentally friendly, non-flammable, create a durable coating;
- finishing and repairs can be done with your own hands;
- the material is available and not expensive.
Finishing
Leveling plaster alone cannot be used as a finishing coating. No matter how strong it is, it wears out and cracks over time. Therefore, the surface must be subject to further finishing. But before this, in any case, all defects are eliminated and a primer with a strengthening effect is applied.
The simplest solution is coloring. If the appearance of the plaster is not satisfactory, then the surface is first smoothed with putty, sanded and treated with primer. The same thing happens before finishing the opening with wallpaper.
Another option is decorative plaster. It can be different in texture and color. Puttying is not necessary here. You can immediately begin facing work. But in this case, the plaster layer must be reinforced.
Materials and tools
To carry out the work you will need a set of tools and materials:
- water containers;
- plaster, water and mixer for mixing;
- masking tape will help protect the surface of the door frame;
- plastering rule;
- metal profile for installing beacons;
- spatulas for working with plaster;
- level (bubble or laser) to control the verticality of the beacons;
- a tape measure, a pencil and a square will help with marking;
- a screwdriver (possibly a hammer drill) to secure the profile;
- deep penetration primer, brush and tray for applying the primer.
Is it possible to do?
Slopes are decorative elements around the perimeter of the window, covering the inner segment of the opening (sections of the walls) from the top and sides. According to GOST 30971, it is recommended to equip them with plaster and plasterboard, but there are also options with polymer panels with insulation.
Slopes for PVC windows can be finished using all possible existing materials, including plaster. But debates precisely on the question of whether this material is the best in comparison with all the others have already become traditional.
When deciding what to choose, plaster is usually contrasted with all other methods - and especially with plastic linings and sandwich panels, which in this case would seem to be very appropriate, but are not always preferred.
The design of these elements is not the same as the procedures for walls and ceilings - it is more complicated, more expensive, so it is always specified in the price lists, written down on an individual line.
Forming a smooth opening
Repairing openings in the bathroom, or near the front door, which will be discussed later, is a completely different matter. In these places there are no plasterboard partitions, but rather thick load-bearing walls.
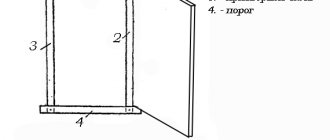
The front door opening is often filled with one frame with two panels or several bindings. This is justified by the fact that one door, for example, can be metal, and the second wooden.
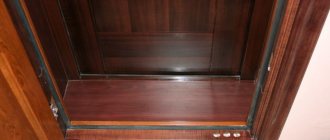
The space between them is called the stub. Considering that the thickness of a load-bearing wall can be quite impressive - say, two bricks (51 cm), then it is natural that even a double frame does not completely fill the opening. Most often, the door is placed flush with the wall on the outside, and slopes are created on the inside.
Sometimes they are covered with wood or MDF, but most often they are plastered with cement plaster. In any case, after replacing the door, or during a major renovation of the walls, when the plaster needs to be knocked down to the base, the geometry of the slopes is significantly disrupted, and you have to think about how to level the opening.
Methods for leveling slopes
Now we have come to the most difficult stage of wall repair. By the way, invited craftsmen charge separate money for plastering slopes, and the price, I must say, is rather high - about 250-300 rubles per linear meter.
Thus, the slope of one door measuring 2.1 * 0.9 m will cost at least 1,300 rubles. Although, such work may not take too much time - it all depends on the initial state of the opening.
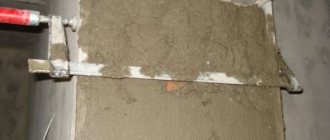
- Try to do it yourself, especially since you can use a variety of available materials for the work. Aligning the side walls of an opening without a door is carried out according to the same principle as plastering rectangular columns. On the sides of the slope, checking the level, two long aluminum rules are fixed on both sides, extending them beyond the plane of the surface to the thickness of the plaster.
- The rules, in this case, serve as beacons, but in principle, you can do without them. The role of the rules is just as successfully performed by ordinary profiles for drywall, which are mounted on self-tapping screws or dowels, with their backs to the side surface of the opening. Just like the rules, they need to be moved forward by the thickness of the screed.
Other recommendations
When filling a space with sealant, you should use masking tape. After finishing the work, it is freely removed. Before starting plastering, it is worth assessing the surface and choosing the right grout material. If this is not taken into account, then all the work will be in vain. Plastering should be carried out over the entire area, without interruptions. All corners and joints must have expansion joints, otherwise cracks will appear. Hiring workers to plaster slopes will require a large amount of money, but when you do it yourself, you can save a lot. The process itself will not be difficult.
Non-standard solutions
In addition to the above standard methods using popular materials, you can use more original options that will highlight the interior, decorate the front door and surprise your friends:
- Artificial stone is a non-standard finishing of slopes. The main advantage is resistance to mechanical stress (if it is not a plaster model, it is fragile). Not a cheap option, requires the participation of a specialist.
- Tile. A type such as clinker (imitation brick or stone) is suitable.
- Plastic panels are an affordable but unreliable finish.
- Decorative plaster – in terms of aesthetics and durability, it has no equal. But you will need to work hard to find a good specialist in this field, because this work requires a creative approach and professionalism.
Materials can be combined if their properties are similar (sandwich panel parts + stone, laminate + tile and others).
Fastening decorative stone or brick
First you need to draw up a diagram for laying out brick or stone. If when laying a brick the entire diagram can be drawn on a piece of paper, then with stone everything is more complicated. First, you need to mark the entire surface and immediately think about how the stone elements will be placed: in the opening and along the outer part, or they will only frame the outer part.
On the floor, it is worth completing the detailing of the future layout, which should be as accurate as possible, after which you can begin lining. The stone is attached to the slopes using glue or a special mixture. After all the elements are attached, the stone is varnished.
Thus, by following all the technologies for installing this or that finishing material, you can give the interior a style and create a unique design, without hiring a master, but doing everything yourself.
Advice from professionals
Every business requires practical experience. Therefore, advice from craftsmen who perform finishing work professionally is especially valuable. Here's what professional finishers advise:
- When leveling the plaster, do not pull the rule in one direction. If you move it along a zigzag line, the surface will be smoother.
- When installing a corner, it is better to cut off the edge, which will be adjacent to the main wall at 45°. This way the coal will not rise up during subsequent work.
We also recommend watching the video carefully. Having seen all the stages of the work clearly, you will understand much better how to finish the slopes with your own hands.
Finishing the slopes is an important stage, the quality of which directly determines the service life of the door. But if you study the technology and prepare everything you need, you can do it yourself even with minimal finishing skills.