Home/Repair and finishing/How to properly putty walls after applying primer?
The process of applying putty to primer is very important. During repairs, a large number of people think about whether it is possible to apply putty immediately on the primer, because this can help save time spent on repairs. The primed surface must dry thoroughly in order to form a protective layer on the surface, which is why putty cannot be applied immediately.
List of tools for work
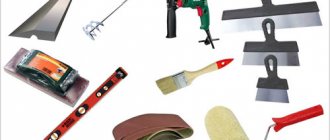
We will give a list of the most necessary tools for applying putty to various surfaces.
Tools for work
The fact is that the higher the quality, the easier it is not only to work, but also to study. Crooked and rough spatulas make it very difficult to apply putty even for experienced professionals, let alone beginners. The material is permanently glued not to the wall, but to the surface of the spatula, does not flow, the tool leaves behind noticeable marks, etc.
Currently, most craftsmen are switching to polymer putty; it is more expensive than usual, but significantly increases labor productivity. Due to this, the increase in cost has almost no negative impact on the construction estimate. What needs to be prepared for puttying?
- Spatulas. There must be at least two: a wide one with a length of 30 cm or more and a narrow one with a length of 5–10 cm. The length of a wide spatula can reach 50 cm, it all depends on the skill of the performer and the characteristics of the wall. Using a short spatula, the material is applied to a long one, and the latter stretches it along the wall. It is not recommended to buy spatulas with a narrow blade; little material can be placed on them, you have to add it often, and this requires time and extra effort. Spatulas can have straight and shaped handles, parallel or semicircular side edges.
- Ironing irons. The tools are much more convenient for work; the sizes and shapes of the handles are different. But learning to work with such tools is difficult; you can switch to them if you have practical experience. You will feel more or less confident after puttying 150–200 m2 of surface. Instead of a trowel, you can use a spatula for mechanized application, but this is a rather expensive tool.
Advantages and disadvantages
Ceiling primer for painting has its clear advantages:
- Levels the plane;
- Improves adhesion to paint;
- The application process is very simple;
- Protects from moisture;
- A large palette of colors makes the painting process easier;
- Protects the ceiling from mold and mildew, and prevents corrosion when processing metal parts.
But despite many advantages, the material also has its disadvantages:
- Layer transparency;
- Possibility that the film is formed unevenly.
But almost all shortcomings can be easily solved by correctly applying the material to the ceiling.
Drying time for cement plaster.
As a rule, the approximate calculation of this indicator is 1mm layer in 24 hours. This period assumes ideal drying conditions. However, increased humidity can lead to a delay in the drying process for an unprogrammed amount of time, which is due to the ability of the material not only to give off moisture, but also to absorb it from the outside.
This leads to the dehumidification of air in plastered rooms using boilers, which contributes to the gradual drying of the surfaces.
Using a hair dryer for these purposes is not advisable due to the instant effect, which negatively affects the strength.
Thus, it is impossible to answer how long it takes for cement plaster to dry on walls with one hundred percent certainty. This calculation is made individually in each individual case.
Of course, a basic calculation of how long the plaster takes to dry can be done independently. Knowing the necessary parameters and taking them into account will allow you to make approximate calculations.
Accordingly, having a few weeks before the start of the rainy season will provide the opportunity to carry out all plastering work in optimal weather conditions, which will avoid problems and will contribute to obtaining excellent repair results.
How long does it take for primer to dry?
Seeing how many positive properties a primer brings, it must be used during repairs. The main question is why you can’t putty immediately after a layer of this substance has been applied.
Naturally, the answer is obvious, if immediately after the walls are re-primed, work on plastering the walls begins, such work will not receive the above positive qualities.
It is important that under no circumstances should you begin to putty the walls immediately after applying the primer. The reason is that the product will lose all its qualities, and treating this surface will simply be useless.
The reason is that to achieve maximum effect, you should wait until the primer dries. This question interests many workers and specialists who do their own apartment renovations.
How long you need to wait after applying the first layer depends on the following indicators:
- the type of walls that were treated;
- wet or dry wall, how porous the material from which it is built is;
- humidity and temperature in the apartment;
- What is the primer made of?
In order to find out exactly how long the primer needs to dry, you should carefully read the instructions for using this product. Usually the manufacturer writes all the characteristics and method of use on the packaging.
It is important that in order to properly putty all surfaces, you need to wait after priming for the period of time that the manufacturer indicated on the packaging.
Why does putty bubble?
Sometimes the putty layer begins to bubble.
Another important question that is often asked is: “Why does the putty bubble after priming?” This effect may be due to several factors:
- too thick a layer of putty is applied;
- A wet wall was primed, then the soil dried out, and now the wall is drying. Acrylic primer allows steam to pass through, it comes out and blows up bubbles;
- the primer is not diluted correctly;
- the wall was poorly prepared and there was dust left on it;
- The humidity in the room dropped sharply. This happens when you start working in a cold room and in the process heat it up with a heater.
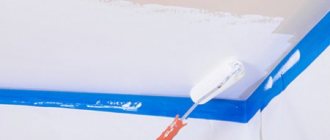
Apply the putty in a thin layer.
If you are sure that you first dried and prepared the walls well, selected the right primer and diluted it according to the instructions, then try mixing a “cooler” putty. In some cases, this measure helps.
What affects the setting speed of impregnation?
- Low temperatures slow down the drying of the primer. If the room is cold, it is recommended to increase the temperature.
- Oil-based primers take much longer to dry than water-based ones. Some manufacturers' compounds dry more slowly, because... the mixture contains more oil. To speed up the polymerization process, choose a brand with less oil and more pigments.
Why is it necessary to prime walls?
If you carefully examine the surface of the walls being prepared for painting or pasting from a close distance, you can see depressions and roughness on them.
Due to their presence, the quality of adhesion to the finishing material may deteriorate, and the smooth surface of the wallpaper may also be damaged.
The performance properties of the primer depend on its type. The strengthening composition ensures the gluing of microparticles of the surface structure, resulting in the formation of a smooth, dust-free surface. This makes it easy to apply glue or paint to it.
Deep penetration soils fill the microscopic pores of the base, due to which the working surface acquires additional strength.
Using a primer for treating walls has a number of positive aspects:
- the surface acquires a uniform, smooth structure and becomes more durable;
- eliminates paint odor;
- the glossy surface becomes more shiny;
- the risk of mold and rot formation is reduced;
- paint and glue adhere well to the surface, which at the same time absorbs less material.
Composition and technical characteristics
The composition of ceiling primers includes the following components:
- Surface film forming agents;
- Plasticizer;
- Additives to improve film formation;
- Antiseptics;
- Components to improve absorption and hardening.
In addition, color pigments may be present in the primer composition. The shade of the coating will depend on their addition.
Important! The composition of the primer may vary depending on the intended surface to be coated, as well as the type of room.
A universal ceiling primer for painting dries on average in 1-1.5 hours. Can be stored for up to 6 months at temperatures from 5 to 50 degrees. Retains its properties at temperatures of 5-30 degrees.
Consumption per 1 m2
Basically, when applying 1 layer, 10 liters of primer material is enough for 65 sq.m. The average consumption is 0.15-0.17 kg/sq.m.
This indicator can increase upward depending on the type of surface, porosity and smoothness. Also, consumption increases with the number of layers applied.
Sequence of applying layers
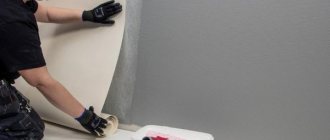
It was previously explained whether it is possible to plaster over putty, but you need to know in what order the putty mixture is applied after priming and preparation. Use starting putty to eliminate unevenness. When there are large cracks, a reinforcing mesh is installed on them.
The dried layer should be sanded down. The surface is cleaned of dust, the treated areas are primed again, and the final puttying proceeds. Sanding and priming are carried out again.
The dried layer should be sanded down.
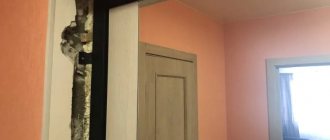
The nuances of puttying corners and slopes
Separately, it is necessary to describe the principle of working with corners and slopes. For easier processing, you can make a thicker layer, which is then leveled by sanding. The stage is difficult even for professionals.
The second option to simplify the work would be to apply the solution using a sealant gun, previously cleaned of the old composition. Or you can use a confectionery syringe, which is inserted into the gun, thickening is made using rubber linings and gluing with electrical tape. It works like this:
- Putty solution is drawn into the selected tool.
- Squeeze the putty out of the syringe into the crack in the corner; it is advisable to fill the entire void from top to bottom at one time.
- Afterwards, the layer is leveled with an angled spatula, based on the base, just as plaster is applied to beacons.
- When the layer dries, the protruding parts are sanded.
On slopes they work using an angle trowel, a convenient method. Sanding is also carried out. Evenness is checked by the rule.
On slopes they work using an angle trowel, a convenient method.
Ceiling preparation
Before priming the ceiling before puttying, it must be properly prepared.
If partial repairs are being carried out, then the floors, furniture, doors, and windows should be covered with film. First, the old coating, dust, dirt are completely removed, and loose plaster is removed. Seams and cracks are unraveling. Then you need to clean the base of the ceiling very well. Next, existing oil stains are degreased. You should also seal all large depressions, cracks, and remove bulges.
If the ceiling is wet, it must be completely dried. To do this, use a fan heater or simply ventilate the room. The ceiling for priming must be dry before puttying.
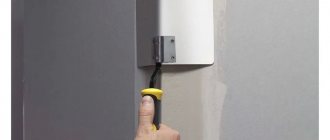
How to determine whether walls are ready for puttying
After the primer has been applied, you should carefully determine whether the wall is dry or not. On those surfaces that are porous, after 40 minutes, a visual inspection can determine that the wall is dry. But this is not true; such walls need to be coated with another layer of primer.
It is important that in order to understand whether the wall has dried or not, you need to touch it with your hand; if there is a film effect, then the surface is ready for puttying. If this effect does not occur and dust is found on the wall during inspection, then several more layers of primer should be applied.
Using these simple tips, even an inexperienced specialist will understand that a primer is required for many types of repair work. An important point is that the final drying time is indicated on the packaging.
Source
What functions does the primer perform?
- A layer of applied primer, getting inside, makes the treated surface more durable.
- The applied layer gets into all the pores and cracks, resulting in the formation of a “protective film” on the wall. As a result, less paint or putty is required.
- Thanks to the primer layer, the paint will be applied more evenly and there will be no streaks or stains.
- Some types of primer, in addition to their intended purpose, also protect walls from the appearance of fungus and mold.
- The applied layer of this product helps to adhere more thoroughly to the putty.