When setting a festive table, decorating with napkins is not the last place. Ordinary paper ones, bought in a store and placed next to each plate, look boring and uninteresting. Products made from fabrics are elegant and noble, but they get dirty easily and require thorough washing.
A beautiful flower made from the most ordinary napkins will help you decorate the most ordinary meal.
Manufacturing will not be difficult and will not take much time.
“Kill two birds with one stone”: you can decorate the table, giving it an original look, and without spending a lot of money and effort, you can make a charming napkin holder in the shape of a lotus with your own hands.
The availability of the material and its low price are also a nice touch.
Magic topiary for Decorative
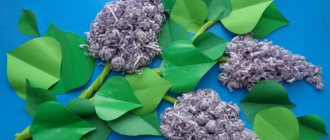
In the interior, a tree or topiary created with one’s own hands is considered a symbol of happiness and prosperity, which is why it is so often given as a gift for birthdays and holidays. Its crown is made from various materials, including paper napkins. miniature The versatility of the plant lies in its symbolism and practicality. Anyone will be happy to have a representative of such flora, and the interior of a room in the house will be transformed if a paper miracle appears on it, similar to a bouquet of inflorescences. Decorative and color elements depend on who you plan to give the topiary as a gift to. If this is a gift, made with your own hands, intended for the whole New Year, for a family or an anniversary, then it is better to choose neutral colors or make the tree multi-colored. Let it lift the spirits not only of children, but also of adults.
manufacturing For the original decorative element you will need: • the desired color of napkins. By the way, if necessary, the tree crown can be painted. Plastic ball base for. If there is no ball, use a round piece of foam or make one from papier. Masha, one method is shown in the photo - we cut out 3 hearts from the box, glue them together and get a ready-made base for topiary in the shape of a Stick! • hearts, acting as a miracle trunk. It could be the tree branch itself. so that, the main thing is that it is without knots.
• corrugated paper, in which I often pack bouquets, burlap or. • Plaster, glue, scissors, stapler. • decor Elements - all kinds of beads, coffee beans, ribbon, braid, rope - depending on your idea.
2. You need to make enough miniature bouquets of napkins to fill the entire spherical crown. Napkins of different shades in the same color scheme look beautiful. Our topiary successfully combines white and pink Flowers. napkins resemble the shape of a clove or For. 3. To plant a dandelion tree, take a pot and pour it into a plaster solution, diluted to the consistency of thick sour cream. We leave the planted tree for a day until the plaster hardens.
4. Decor. We wrap the pot in corrugated paper for decorating bouquets or paint it with acrylic paint and tie it with ribbon or a crown. We decorate the decorative item with lace, ribbons, chains, and beads. The main thing is not to overdo it so that the craft does not look tasteless. Three to five elements are enough. Using the same principle, you can plant a flower napkin from a bouquet in a pot.
General procedure for working with paper
You can create an endless variety of crafts with your own hands from napkins. It should be borne in mind that each part of the flower will require different starting material.
Thin single-layer napkins do not hold their shape well and can be used to make light, airy decorative elements.
Select napkins for work that are the same shade. The use of white and colored napkins is encouraged.
If there are limitations in the source materials, you can choose a craft with fewer requirements for a variety of shades.
Thick pink napkins will allow you to get luxurious roses. Plain white napkins, after finishing with a marker, will become carnation petals.
The most common aromatic oils or other perfume compositions that are used for homemade soap will help to give the finished flowers the appropriate smell.
Materials and tools for decoration
To begin work on making a flower, you need to prepare the necessary equipment and materials.
Serving napkins has a lot of different options.
You can get creative and prepare flowers from paper napkins in advance.
To work you will need:
- Thick napkins, it is better if they are three-layer and large format;
- Stationery knife and scissors;
- Cute and thick needle with a large eye;
- Thick threads or floss.
You can always use napkins for their intended purpose.
Additional Information. A prerequisite for making decorations from napkin paper is the presence of green material for the base. The petal part can be done in any color scheme - at the discretion of the craftswoman.
The napkins are easy to take out and look the same.
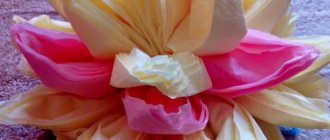
A beautiful lotus made from napkins will help you decorate even an ordinary meal.
How to make crafts from napkins with your own hands: ideas with templates for children 5-6 years old
Applique is a great napkin craft idea for 5-6 year old children. At this age you can already collect pictures from napkins.
What you will need for the craft:
- napkins of different colors;
- corrugated paper;
- tube of glue (PVA)
- sheet of cardboard for base
- tape (you need double-sided)
It is better to select materials from paper of the following color shades:
- green;
- brown;
- yellow;
- white;
- pink;
- blue.
Step-by-step instructions on how to make a craft from napkins with a template:
- The base is a sheet of cardboard. Glue a strip of green corrugated paper onto it - this will be a lawn. On top we glue a sheet of blue napkin, which will imitate the sky. Do not smooth the material - the craft should have a relief.
- We twist strips of cut brown paper into flagella - from them we will collect branches and trunks of future trees. We do the same with a piece of yellow napkin.
- We twist the longer flagella in a spiral into a circle, and from the short ones we lay out the rays of the sun. We crumple a white napkin - we get improvised clouds.
- To make grass we use corrugated paper. We twist the resulting medium-sized strips with the blade of scissors, making them look like fringe.
- Cut a white napkin into oval pieces and curl their edges. By gluing three ovals together, we get snowdrops - they need to be glued to the grass.
- We twist the ovals in the center and glue them together several at a time - we get an apple flower. In the same way we collect blue woods.
- We make thin strips of paper look like leaves, easily twisting each one in the middle.
- The napkin is yellow and needs to be cut into strips. From one edge we cut the strip for a fringe and twist it in a spiral - we get a dandelion.
- We will make tulips from pink napkins, gluing the petals on double-sided tape, five or seven pieces each, and twisting them in a spiral.
The resulting napkin applique is a real painting created by the hands of a 5-6 year old child. It can be placed in a frame or gifted to a loved one.
Ideas for ready-made products
In addition to the classic two-color lotus model, you can create many more options in different colors.
Lotus can be made in completely different colors and shades.
An option of layers of different colors in pastel shades will create a rainbow mood.
For a romantic dinner, you can make a flower from napkins in burgundy, red and pink tones. The bottom layer is made from the darkest tone, and the top layer is made from the lightest tone. You can put a cute gift or engagement ring in this flower.
The boiling white model will emphasize the cleanliness and freshness of the table decoration. It is perfect for the summer.
A white lotus will highlight the beauty of a summer table.
Whatever material is used, a do-it-yourself lotus made from napkins looks soulful, warm and cute. In any case, it will delight guests and owners.
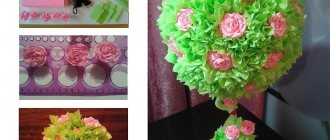
Bouquet of flowers from napkins
A beautiful bouquet made with your own hands from absolutely ordinary paper napkins can be an original and pleasant gift. Choose the color and size of napkins as desired. In this case, it will be yellow flowers with green leaves in a ready-made basket. Type of basket.
Instead of a basket, you can use a regular plastic flower pot or any other vase that is not used for its intended purpose.1. We inflate a regular balloon to the size you need. Dilute PVA glue with water (about 1 teaspoon of glue per half glass of water). Dip the napkins into the resulting solution and cover the balloon with them. The more layers, the stronger the bouquet will be. The tail of the ball must be left free in order to later pull it out.
2. While the ball is completely dry, there is time to cut out flowers and leaves. To do this, take a four-layer napkin and fold it in half, then in half again.
3. Cut out a circle and make many cuts along the edge. If you want a lush flower, then the cuts need to be made thinner and wider. Leaves are cut in the same way. The only difference is the larger diameter of the circle. The green color can be much brighter. In the example, the color is not saturated enough.
4. Next, straighten the circle and snap it in the middle with a stapler. If you plan to make a flower together with greenery, then snap both circles together: put green on the bottom, yellow on top.
5. The next step is collecting the inflorescence. To do this, press each layer of the napkin, starting from the top, towards the center. The main thing here is to be careful, as thin napkins can tear. The leaves can also be bent, but not necessary. This will make the flowers appear more luxuriant.
The number of colors depends on the size of the inflated ball. Don’t be upset if there are a lot of flowers and it seems to you that there is not enough space for everyone. They will all fit in easily. To do this, the inflorescence must be pressed more tightly to the middle. If there are fewer flowers, then on the contrary, they need to be straightened out more and not glued tightly to each other, or additional new ones should be cut out.6. When the napkins on the balloon are completely dry, carefully deflate the balloon and remove it. If desired, you can stick several more layers of napkins on the place where the ball was pulled out so that there is no hole. In this case, you will again have to wait until the napkins are completely dry. If the hole is small, you can leave it as is. 7. Using super glue, glue the ball to the basket and begin gluing the previously prepared flowers. You need to start from the highest point of the ball and gradually work your way down to the bottom. Try not to press too hard so as not to push through the ball, since there is emptiness inside. Of course, work on the bouquet can continue. It can be decorated with beads and various satin ribbons. In this example, red glitter is applied in the center of the flowers. To do this, apply a drop of glue with a thin brush, and then sprinkle with glitter with another brush. The final bouquet will look like this.
Napkin holders “Lotus” and “Pineapple” for the festive table
I bring to your attention Alena Gagarina’s master class on making a “Lotus” napkin holder using the origami technique.
So... to make a flower you will need 3-layer napkins (in no case soft, but hard, as if starchy. Decoupage girls, these are the napkins that are difficult to separate into layers. If you look closely at the photo, you will see that these napkins seem to have holes punched all over the entire area of the napkin. The holes give the napkin “hardness”, “starchness”. Here in Italy these napkins are from the “Regina” series. I haven’t bought them in Russia yet, so look at the photo as a guide. Sizes of the napkin, which I took in size 38 by 38, you can also use napkins measuring 35 by 35. This is what napkins are about
3. Also for work you will need
- a “knife” that is used for paper and opening envelopes. Well, it’s hard to call it a knife, because it doesn’t cut... I hope you understand what I mean. He's in the photo. There is no need to replace it with scissors - you will tear the napkins... you can take a narrow ruler, at worst - scissors, - a thick needle with a large eye, - an awl, - threads like floss... they are better than using thread in several layers or a harsh thread ,— napkins in 2-3-4 colors, it all depends on your imagination. Of these, 12 are green, the rest depend on your imagination. In total, you need a maximum of 108. The last layer will “close” the flower.
4. Each level has 12 napkins!
So, let's get to work: Learning to fold a napkin. For the base we take 12 green napkins. The napkin must be folded carefully, corner to corner... the final result of the work depends on this.
8. Turn over and bend the corners:
10. Now take the folded napkin, turn it over and form a petal. Like this.
11. We pierce it with an awl in the corner, pull a thread and a needle through the puncture site. ONLY the FIRST LAYER (base) will have to be stitched. The thread and needle will not be useful in any of the next levels! Don't be scared!
12. here it is - a boat. This is exactly the folding of the napkin that will be required for the entire flower.
14. We collect all 12 green napkins on a string.
15. Now we turn over the 12 napkins collected on a string and pierce the second corner of the napkins with an awl. We collect them on the second thread in the same way.
Now we first tighten the first thread TIME and tie it. We do the same with the second one.
19. This is the bottom of the base - the wrong side:
20. Turn the base over... it should look like this:
When you tie both threads and cut them carefully... the thread will not be visible. This is the base for the flower. The thread and needle and scissors can be removed - they will no longer be useful.
21. Now take a napkin of a different color and fold it according to the same pattern that we have already learned:
22. The more careful. Corner to corner you fold the petal, the neater your flower will be.
24. Help yourself with a knife, you will be more careful.
25. Turn it over - bend the corners and form a petal again:
26. Here it is “boat”
Please note: If at the base of the flower the boat is upside down, then at the petals it is open up.”
27. See how to “tuck” the petal into the base. We insert it and use a postal knife to compact it tightly (push the petal into the base) in such a way as shown in the photo:
29. This is how the first petal rose.
30.c loot the first level:
32. We assembled and straightened everything with a knife so that the middle was tight.
33. After you have straightened all the petals, we assemble the second level:
39. Third and fourth. Do not forget to use a knife so that the center of the flower is “hard” and the product “holds and does not crumble in your hands.
40. Fifth: This is how our product will look from above:
46. The structure should be rigid.
Creation of the Gulistan lotus
You can make a beautiful and festive lotus yourself from napkins. To work, you will need huge napkins. In total, you need to take 108 pieces. will help you make a lotus from napkins :
- The first layer will be created from 12 petals arranged in a certain way.
- First, all 12 parts are stitched with threads matching the color of the material. In order for the needle to fit normally and the visual appearance of the flower not to be damaged, you need to create holes with an awl at the base. First, everything is stitched on one side, then the craft is turned over, and everything is stitched on the other side. The base should stand perfectly, without falling or sagging.
- The remaining parts are created according to the same scheme as the base. When everything is done, the craft can be assembled. After completing this step, you should be more careful - if the parts at the base are turned down, then the lotus petals should be facing up!
- The petal can be tucked into the base and compacted firmly with a spoon or knife. Next, you need to assemble the entire first row of the craft. When everything is done, you can move on to row 3. The petals should again be tucked into the previous row with the “boat” facing up.
- Each new row should be closer to the central part. You need to press the leaves very tightly, because if the middle turns out to be weak, the lotus will quickly fall apart when transferred.
- There should be 9 rows in total. The flower itself should be dense and strong so that if you drop it, it should not break.
Many people think about how to make a napkin holder from napkins and how to make a pineapple from paper, everything is done in the same way, you just need to find a detailed master class and get to work. You can also make various crafts using the origami technique using modules. But remember that this is very difficult.
Originally posted 2018-04-18 13:51:59.
Learning to make your first flowers
How to make flowers from napkins? I will explain step by step for each type of inflorescence below. If you want to make a bouquet of identical flowers of different shades, then it is best to do them in one go - this way you can make the flowers more or less similar, in the same style.
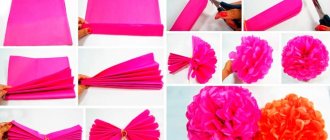
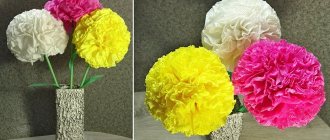
Or a slightly different option, first cut out the folded curves with scissors, then straighten the napkin and fold it like an accordion (the more frequent the accordion step, the more voluminous the result will be). We tie it with thread and straighten the petals:
These pompoms can be used to decorate gift boxes in an original way; it looks very aesthetically pleasing and festive!
Flowers can be flat - for example, lotuses, and voluminous - for example, roses.
Necessary materials and accessories for work
Creating a lotus from napkins with your own hands is quite simple; it requires a minimum of available materials. Thanks to this, you can decorate the table not only at home, but also in a restaurant or at a picnic.
To create an unusual figure you will need:
- Thick paper or fabric napkins for leaves - 12 pcs.
- Napkins for petals – from 36 to 96 pcs.
- Knife and regular scissors.
- Thick needle.
- Thick thread or silk floss.
In addition to napkins, you will need scissors and other materials and tools.
It’s better to try your hand at creating such original decorations using thick paper napkins. Then you can move on to creating fabric models. It is more convenient to work with starched fabric.
Advice. If you take material of different shades, you can create picturesque leaves and a flower. Additionally, you can make stamens from paper napkins of a different color and install them inside.
Additionally, you can make stamens from another material.
Creating flowers and floral arrangements
Stunning bright bouquets and single flowers made from napkins will decorate any event and make an excellent gift. The only drawback of paper decor, the lack of natural aroma, can be easily corrected by dripping essential oil on it. A paper flower created using the simplest technique will remain attractive for a long time.
You need to start creating right now. The choice of pattern and plant itself will depend on the number of napkins available and their color. It’s very simple to create a unique homemade decor; you just need to move step by step towards your intended goal, using the following master classes as a guide.
Rose
There are several ways to make a paper flower queen. The easiest way is to twist it from one napkin without using scissors or glue. We straighten the material and lay it out on the table. Grab one edge with your index and middle fingers and roll it into a tube. Visually measure 2/3 and crumple the napkin, forming a bud. We bend the upper part arbitrarily, simulating opening petals. We make a stem from the bottom of the tube - we twist the napkin into a spiral.
A beautiful rose can be made from a dense three-layer blank. This elegant white product will decorate a glass on any table. Straighten out a large napkin. We bend one corner by 1-2 cm and fold it, pressing it to the very end. We twist the resulting strip. Holding it from below, unbend the upper petals and place them in a glass or glass.
Peony
You can make a lush peony from a multi-layer napkin of any color. You can make the product more realistic by tearing off one strip of folded paper at the bends. To quickly create several elements for a lush craft, the following step-by-step master class is presented:
- We lay out the napkin in one movement, we get a two-layer rectangle;
- We fold the workpiece like an accordion, tie it with a torn piece of paper or thread in the middle;
- Fluff the pliable folds on both sides from the center;
- We roll up a wire leg or prepare several multi-colored blanks for other crafts.
Carnation
Original carnations on the stem will be made from a thin bright napkin. The blanks will be square elements according to the size of the planned flower. Fold them in half and diagonally. Carefully cut off the edge of the triangle. The small hole will be the center of the flower. On the opposite side of the workpiece we make an arched cut and form a fence around the edge.
Using the same scheme, you need to make at least 5 blanks. The more elements there are, the more magnificent the carnation will be. Now we move on to forming the flower head. As a base you can use stiff wire, a long fireplace match, or a pencil. We string each shaped piece and glue it together in the central part. We straighten each petal. The stem can be wrapped with green tape, colored corrugated paper, or foil.
Topiary made from napkins
Topiary made from any decorative material looks stylish and original. But it’s much easier to make a beautiful tree from napkins. It can be a craft in the form of a circle, star, heart. The constituent elements may also differ. Paper roses, dandelions, peonies, and asters are most often used. It’s enough to start preparing materials and original ideas will come to mind.
Ready-made topiary made from napkins is an excellent gift for any celebration or just a memorable accessory. To make an extraordinary craft, you will need the following materials:
- Flowerpot, flower pot;
- Newspapers, napkins;
- Several tree branches;
- Threads, stapler;
- Scotch tape, glue;
- A mixture of cement and sand.
We prepare a beautiful flowerpot and pour sand and cement into it. Add some water and make a solution. We install the densest branch in the center and decorate the base of the improvised trunk with small pebbles or glass. If desired, the composition can be modified and the central piece of wood can be entwined with flexible rods. We fix small elements with transparent tape.
While the solution in the pot dries, we begin to form the center of the topiary. To do this, we crumple up several newspapers, wrap the resulting ball in a solid printed edition, and secure it with threads. Let's move on to making flowers. Fold the napkin in half twice and secure it with a stapler. Straighten the edges of each layer. Using this principle, we make the required number of flowers. All that remains is to glue them to the newspaper ball and decorate with beads.
Chrysanthemums
To decorate the chrysanthemum you will need multi-colored napkins:
| Raw material color | Quantity, pcs. |
| Green | 4 |
| Pink | 30 |
Beautiful chrysanthemums are obtained not only from paper, but also from viscose napkins.
Step-by-step master class on making a flower from cellulose:
- Fold a regular green napkin in half.
- Bend the edges of the workpiece into small triangles towards the center.
- Fold the piece toward the center along the long line, then fold it in half again.
- Repeat similar steps with the remaining paper towels.
- Fold the pink napkin in the middle to form a triangle.
- Once again bend the craft into a smaller triangular shape.
- Fold the edges towards the center.
- Turn the product over to the reverse side and bend the corners.
- Fold the piece in half. Apply the rest of the cellulose material in a similar way.
- Place the finished green blanks one on top of the other and tie them in the middle with wire.
- Distribute the pulled napkins in a circle.
- String the pink parts row by row onto the green ones, while grabbing the adjacent petals.
How to make a three-dimensional figure from napkins
For a children's party, you can make a number from cellulose material as decoration.
Step-by-step master class on craft design:
- First, you should decide on the size of the future product and draw a number template on cardboard.
- It is recommended to use polystyrene foam for thermal insulation as a base.
- Transfer the digital layout onto the foam blanks and connect them to each other with double-sided tape.
- Fold the napkins in half and cut to form a square of 2 layers. Fold this figure 2 more times. and fix it in the middle with another similar part.
- Use scissors to turn the created multilayer square blanks into circles. Make notches around the circumference and make them fluffy.
- Attach the resulting inflorescences to the foam with a glue gun. If you use PVA glue, then you should cover the surface of the number with it in advance and spread it on each floral detail.
- When decorating the foam template, you need to attach flowers even at the back. It is advisable not to leave wide gaps and glue the workpieces closer together.
- A digital layout 1 meter high will require about 5 packs of napkins.
Dandelion
Step-by-step master class on decorating a dandelion from cellulose material:
- Prepare a three-layer yellow table napkin. Separate each layer.
- Take 2 thin pieces and fold them 4 times, then bend the parts the same number of times.
- Place all tiers on top of each other and fasten them in the center with a stapler. For strength, fix them again by placing the staples crosswise.
- Cut a circle from the yellow stapled stack.
- On the edges of the created round figure, make cuts 10 mm long at the same distance from each other.
- Lift the top layer up and squeeze it with your fingers in the center.
- The same manipulations must be done with the next tiers. You can lift multiple layers at the same time.
- A tube rolled up from a thin strip of paper is suitable as a stem.
- Leaves can be cut from a 4x12 sheet of paper. It needs to be bent in half and cut diagonally with cloves. Glue them to the bottom of the stem.
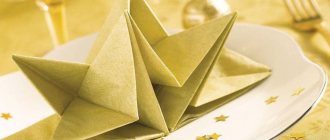
How to fold a lotus from a napkin
This option is ideal for table setting. You can use either a paper or cloth napkin, which is then placed on your lap.
What you will need:
You need to take a regular square-shaped base. Its size in this case is not important, and pastel colors are desirable.
What do we have to do:
Unfold the napkin into a large square. Bend each corner towards the middle (see photo).
After this, turn the part over. It is important to make sure that the workpiece is folded neatly and correctly. Again the corners need to be bent towards the middle.
After this, there is no need to turn the workpiece over
It is enough to grab the corner and lift it, as indicated in the picture. This corner must be carefully pulled up.
When doing this, it is necessary to hold the inside of the workpiece so that it does not unravel. It remains to do the same actions with the remaining petals, according to the photo.
This lotus will definitely decorate any table.
The following video reveals a more complicated method: a lotus napkin holder, which will definitely become the highlight of the table. And an original napkin holder, from where you can easily get a petal napkin and use it for its intended purpose.
What can be used for decoration
Although a lotus made from napkins is an independent table decoration, it can be brightened with the help of additional decorations. DIY lotus decor options from napkins:
- A napkin core in the center. To do this, create a ball of paper. The paper napkin is straightened into one layer and folded like an accordion. The accordion needs to be tied with thread in the middle. Then cut the paper along the folds and ruffle it. You will get a fluffy ball. It must be placed in the center of the lotus, where it will symbolize the stamens.
- The core is made from napkin tubes. Another technique for creating a core from napkins is to make small tubes out of them and insert them into the center. To do this, the napkin is cut into 4 parts, from each you need to twist a tight tube. After this, all parts are inserted into the core of the product.
- Decoration with beads or rhinestones. These elements will look colorful on a flat flower with few rows. It is enough to collect 1-3 rows of petals. After this, beads are laid out in the center of the petals of the last row, as in the photo. The color of the parts should contrast with the color. Mother-of-pearl or metallized beads or large sparkling rhinestones look most striking.
- Lotus decoration with shells. For each flower you need to select 1-2 medium-sized shells, which are placed in the center of the petals. Shells can be combined with beads. Such natural material will make the products more lively and romantic.
- Sisal decoration for flowers. You can cut a romantic lace lotus stand from sisal. From this material, cut into small strips, you can also create the core of a flower. To do this, the sisal needs to be cut, crumpled and placed in the center of the product.
How to make flowers from napkins with your own hands
Napkins can give you a lot of imagination to create amazing products. They are useful not only for your hands, but also for making various crafts and decorative items.
Carnation
Let's start with one of the simplest flowers - the carnation. The finished product looks like a real flower. And by making several of these carnations you can get a beautiful bouquet.
For manufacturing you will need the following materials:
- green crumpled paper;
- a strip of double-sided light green paper;
- threads;
- glue stick;
- pen rod;
- stapler;
- scissors;
- ruler.
Let's move on to step-by-step production:
Let's start working with a napkin. Ours is pink, you can replace it with red or white.
- We unfold the material and place the lower part slightly above the center line. Cover with the top layer.
- Turn the napkin over with the narrow side facing you. We cut the sides along the fold lines. We measure ten centimeters in width for each side obtained. We measure thirty centimeters in length. We cut off the excess.
- Fold them in half and cut along the fold line. We put the parts one on top of the other and make an accordion. We bend the resulting workpiece in half, mark the center and secure the paper in this place with a stapler. You need to make three such products. We tie them together with a thread in the middle.
- Making a stem. We take double-sided light green paper with dimensions of 4 by 29 centimeters. We treat the tip of the paper with glue and screw it onto the rod from the pen. Towards the end of the paper, once again grease everything with glue.
- We wrap the workpiece from a napkin. We glue it with glue and fix it with a stapler for reliability. The edges of the napkin need to be fluffed with scissors. After this, we begin to separate the layers by lifting them up. We omit the last layer.
- From corrugated paper we cut out leaves and a piece that looks like grass.
We attach it under the flower, hiding the lower petal. We attach the leaves and wrap the stem with a thin strip of paper.
How to make roses from napkins
You can even make roses in a simple way. They will turn out voluminous and realistic. To make them we will use:
- red napkins;
- green corrugated paper;
- scissors;
- pencil;
- skewers;
- scotch.
Let's start making roses from napkins:
Cut off the edges of the prepared napkins that are connected. You should now have separate squares. We divide them into a layer.
- Take one of the squares. We begin to wind it onto a pencil. Do not twist the paper all the way, there should be a straight edge.
- Using gentle movements, squeeze the twisted part, press it tightly and remove it from the pencil. We do the work with the remaining parts.
- We begin to roll one of the parts into a roll.
- Leave the untwisted section of the napkin at the bottom. Add the remaining layers in the same way. Add petals until you get the desired size of the rose. We press and twist the material at the bottom.
- We insert a skewer from below; this will be the stem.
Use tape to secure the flower. Cut a strip from green corrugated paper. Wrap a strip around the skewer. We secure the material with tape at the top and bottom.
Dandelion
How to make a flower from a napkin in the form of a carnation to decorate a table or room, and in the form of a dandelion, is equally simple.
You need to take 2 bright yellow napkins and place them on top of each other.
- Using a compass, draw a circle with the diameter of the napkin on the top napkin.
- Napkins are cut out in a circle.
- In the middle, all layers of the napkin must be stapled.
- In a circle, cut the napkins into thin strips (1 cm), leaving a distance of 1-2 cm to the middle.
- Each strip in the circle needs to be bent perpendicularly and slightly twisted into a tube. All the petals of the bonded layers of the napkin are folded in a circle and given shape, while simultaneously dividing each napkin into layers.
- Then the bottom of the bud is secured with a piece of wire. A stem is formed from the remaining part of the wire.
- You need to cut several green stripes from a piece of napkin.
- The first strip is attached to the base of the flower using a glue stick and wrapped around the base of the flower.
- Attach 2 strips of napkins and wrap the stem completely. The edge of the napkin is folded inward and glued to the bottom of the stem.
- The bud needs to be shaped by fluffing it.
- Dandelion leaves (2-3 pieces) are cut out from a green napkin according to a template and glued to the bottom of the stem. All is ready.
The history of the flower
In Japan, this flower is a sacred plant. The lotus represents innocence, peace, beauty and the desire to be closer to the sun and spiritual harmony. The flower is also considered a symbol of the growth of the soul. No matter what place, good or bad, a person is, he must always maintain his purity of soul.
The lotus begins its life at the bottom of the pond. It gradually stretches upward, closer to the water, and constantly moves towards the light. As soon as the flower hits the surface of the water, it begins to bloom and turns into an elegant plant.
Decorations in individual glasses
For the starting material, linen or cotton multi-colored scarves are used, sometimes decorated with cellulose material. The main condition is that the decoration be multi-tiered and dense. Individual decor looks good in both ordinary glasses and expensive wine glasses.
Options for creating jewelry:
Bouquet:
- You need to take 2 napkins, then place them perpendicularly one on top of the other and lift them, holding them by the middle.
- After this, you should shake them, while the ends should hang gracefully and evenly.
- Then slightly twist the center and carefully, without crushing them, place the “bouquet” in the wine glass.
Tulip:
- Bend the source material in the form of a square in half, and bend the corners towards the center.
- Turn the resulting triangle over onto the opposite side and bend its sides towards the middle.
- After this, fold the formed figure in such a way as to connect the corners located at the bottom and at the top.
- Twist the workpiece in a circle and place it in a glass.
Rose:
- To decorate it you will need a light green and scarlet napkin.
- The first step is to create the leaves. To do this, bend the green-colored blank 2 p. diagonally.
- Then you need to make an inflorescence. Fold the red piece in half diagonally. Bend the resulting triangle in two, aligning its base and top. A flattened trapezoid should emerge.
- After this, wrap the resulting figure in a tube; it will resemble a bud.
- Place leaves in the inflorescence, then stick the craft into a glass.
Calla:
- Fold the linen napkin diagonally.
- Make a bag from the resulting triangular shape, starting from the top point, turning it 2/3 out.
- Place the resulting configuration in the form of calla lilies in a wine glass.
Evening inflorescence:
- Bend the starting material 2 p. and lay out on a flat surface so that the open ends are directed towards the top.
- Tuck the bottom segment to the horizontal diagonal line of the figure.
- Fold the resulting accordion-shaped configuration from right to left or in reverse order.
- Place the structure in a glass, then carefully shape the corners into petals.
Both adults and children can quickly make flowers from napkins. You just need to study the pictures and diagrams and use them to create unique floral products that will decorate any holiday.
Article design: Natalie Podolskaya
Let's get started
The process of making a lush lotus can be traced using the example of a do-it-yourself master class. In order to make such a flower, you will need scissors, paper napkins of two colors, thread and a needle. You can use many more shades of paper napkins, show your imagination!
Step-by-step instructions are provided for each photo. In total, twelve green blanks and ninety-six other bright colors, such as pink, were needed to create a three-dimensional lotus. To start with the details, a stand made of green parts. Take a napkin and fold it diagonally.
Then we draw the height to the bottom edge of the triangle and bend the sides to this line.
Turn the product over and fold the remaining corners up. Shown in more detail in the photo.
Next, we fold our workpiece outward, hiding the corners. This is the first piece we got.
We make twelve such blanks.
We pull the finished parts together in a circle, securing them with a thread and a needle. We do this as shown in the photo.
This is such a cute stand.
Now you need to make ninety-six pink modules. We make them in the same way as the green details. After you make the pink modules, we begin to assemble the flower. Using a tablespoon or fork, use a pink petal to secure the two sides of the green modules. The main thing is to take two different modules!
In this way we collect eight layers of lotus. Next, lightly bend the flower petals upward, straightening them along the way.
This is such a lush lotus.
Scheme for creating a lotus from one large napkin:
Learn how to collect a bright lotus from paper napkins with your own hands
What you will need:
- Green napkins 12 pieces;
- Pink napkins 98 pieces;
- Needle;
- Threads;
- Scissors;
Napkins should be the same size and texture.
Step-by-step instructions for assembling napkins:
1.First you need to prepare the work surface, all items must be absolutely dry, since even a drop of water can ruin the workpiece. Everything should be clean, it is also desirable that there are no drafts in the room, otherwise you will have to collect napkins everywhere;
2. The first part - the base - will be made from a green napkin; it must be folded diagonally. Starting from the top corner, mark the middle; it is best to fold the napkin again to create a crease. All sides fold towards the crease.
Then the structure is turned over and the protruding parts are bent back. After this, the product must be folded in half again;
3. You need to complete 12 parts according to this scheme;
- After the twelve parts are ready, they need to be sewn together using thread and needle. The parts are sewn together by piercing all the ends, first on one side and then on the other;
5.After stitching, the product is pulled tightly and fixed;
6.After preparing the base, you can move on to the flower itself. The flower petals will be made using the same principle as the base. This will require a lot of time and patience, since you need to make 98 pieces;
7.After preparing all the parts, you can begin assembling the lotus. To do this you need a small metal spoon. The pink petal is superimposed on the green one and, with the help of a spoon, goes deeper inside. It should be placed inside, as it were, between the edges of the green base petal;
The petals are inserted into each other in a circle until the end of the row. The next row is designed in exactly the same way, with the only difference that now pink petals are inserted into pink ones, and not into green ones;
8. There should be a total of eight rows of pink petals;
9.Now you can make the center of the lotus. Twist thin tubes from yellow napkins, fold them in half and insert them into the middle of the flower. There can be as many such stamens as you want.
Now the flower is ready and you can decorate your holiday table with it or give it to someone on March 8th. Such methods of making flowers will be an excellent activity for craft lessons, since children will be able to easily make such a flower, and they will certainly enjoy the process itself.
Pineapple on a plastic plate
To decorate the holiday table, you can also make a pineapple out of paper. In the master class for this purpose, modules are formed from 11 green napkins according to the scheme from the description above. They are fastened together in a circle with a stapler or sewn together with thread. In this case, the pockets of the modules are placed towards the center. The resulting base is placed on a plastic plate, with the convex part facing up. The green petals are connected and a yellow row is inserted. Both rows are placed without reaching the core. The next row is filled with orange modules, a little closer to the center. With each row the petals are inserted more tightly. The corners are raised, forming scales and a narrow top. If necessary, the shape can be adjusted by hand. The green napkin is straightened out, and the resulting large square is folded diagonally. In one sharp corner the triangle folds like an accordion, and towards the second there are smooth folds. All three folded leaves are inserted into the hole at the top.
General rules
You can make crafts from napkins of almost any color, size and quality, but you should keep in mind that not every napkin will produce beautiful three-dimensional flowers - for example, single-layer napkins hold their shape much worse,
therefore, flowers from such napkins can only be made delicate, airy, without clear and strict lines.
It is best to use plain full-color napkins for making flowers.
They can be white or colored, but pay special attention to ensure that the outer and inner parts are painted the same color - otherwise the flowers will not be very neat
If you are limited in materials, then choose the master class that suits your materials - for example, simple white napkins will make gorgeous carnations (especially if you have red paint or a marker), and thick burgundy napkins will make roses well.
There are products with decorative perforations - they make wonderful decorative flowers. You should not use scented napkins to make various flowers - ordinary aromatic and essential oils will help make your bouquet fragrant. You can also use special perfume compositions (they are used to scent handmade soap).
heart
A very interesting idea to make a three-dimensional heart from napkins. This type of decor would look great at a children’s party, against the backdrop of a cake or other goodies.
When making such an original heart, it is important to adhere to the following points:
- A heart-shaped design is pre-prepared on cardboard and cut out with scissors.
- Parents, if desired, can trace the child’s hand on paper and cut out the sketch.
- Then the sketch is glued to a cardboard base.
- Balls are rolled alternately from red and white napkins. The strips are pre-cut, which are then carefully rolled into balls. The base is filled with red, and the handle in the center with white.
- The balls are glued with glue, starting from the outline of the hand, then the center is glued, and then the exposure along the edges.
- If desired, you can glue a ribbon to the heart.
You can write wishes on the back of the heart and give it to the hero of the occasion, or use the craft as a decoration for the main table setting.
Features of location in the interior
Lotus napkins can be used not only as a general napkin holder. You can find many more interesting uses for it:
Individual plate decor
Small flowers on each plate will delight guests and make the table setting bright.
You can decorate plates with lotus.
Additional decor for bread products
Buns decorated in this way look interesting and appetizing. To do this, you need to assemble a variant from 1 row of leaves and 1 row of petals. Place the bun in the center and fold the petals over. This decoration method is well suited for a picnic, as it keeps the bread fresh and protects it from street dust.
Coffee cup decor
The lotus can also be placed on a cup of coffee. This way it will maintain the temperature of the drink and the aroma. Drinking this coffee is doubly pleasant.
Lotus candlestick
A fabric figurine can also be used to decorate a glass candlestick. The product is assembled in the usual way, and a glass glass for a tablet candle is inserted into the center.
You can decorate a candlestick with a lotus figurine.
Important! Under no circumstances should a tablet candle be inserted into a product without a glass candlestick, as this will inevitably lead to a fire.
Surprises for a children's party
Some of the dishes on the children's table can be replaced with fabric figurines, where candies, fruits, and cookies can be placed. You will get a real Thumbelina table. Children will have fun taking sweets out of the figures.
You can put sweets for children on a flower made from a fabric napkin.
Gift decoration
If you plan to present a small gift at the table, then the surprise can be hidden in a flower. A box with an engagement ring will look especially romantic in this packaging.
You can put a small gift inside the voluminous flower.