Origami (from Japanese for “folded paper”) is an ancient Japanese arts and crafts art. It involves folding various figures from napkins or paper. Few people know that this type of art can serve for beautiful and proper table setting. Surprise your guests by placing a homemade origami napkin figurine on their plate.
This process is very exciting and not at all difficult.
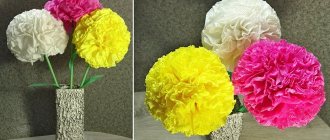
Origami from napkins: flowers and fruit compositions
A huge advantage of origami is that this type of creativity requires minimal costs. To create an interesting and unusual paper figurine, you only need napkins, the desire to create something with your own hands and surprise your guests.
Just imagine, you don't even need glue!
Floral arrangements are suitable for both a simple family dinner and various celebrations. For example, weddings, romantic dinners on the occasion of Valentine's Day. Or maybe you decide to decorate the table with paper flowers for your birthday?
Even if you have never folded shapes from napkins, these patterns for beginners will help you get the hang of it and inspire you to do more complex work.
Lily water lily
Start with the simplest lily pattern to master the basics of origami techniques and warm up a little.
Napkins in the shape of flowers look very beautiful on the holiday table.
Lily is formed as follows.
Step 1. First, we unfold and straighten the napkin; if necessary, we iron it, so the finished origami will look neater. The napkin can be either paper or rag, as in this case. Next we turn all the corners towards the center. We make sure that no corner overlaps its neighbor.
Step 2. Repeat the previous step. Fold the resulting corners toward the center again.
Step 3. Turn the resulting square over to the other side, carefully holding the workpiece with your second hand, so that the folds are at the bottom.
Step 4. Repeat step 2. Fold the corners to the center.
Step 5. Pull the lower corners up a little, straightening them and carefully holding the workpiece in the center.
Step 6. Repeat step 5 with all remaining corners.
Step 7. Bend over the remaining small back corners.
Step 8. The Lily Water Lily figurine made from napkins for table decoration is ready.
They visibly decorate and set a festive mood for the entire table.
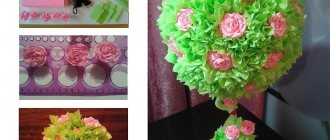
Lotus
Modular origami may seem complicated. But in fact, it differs from the usual one only in that instead of one napkin we take several at once. Let's look at modular origami using the example of a lotus flower. You will need eight green squares for the base of the flower and twenty-four for the bud. All parts of the composition are attached to each other using a stapler, the staples of which will not spoil thin paper like, for example, glue.
Lotus made from paper napkins: a simple and beautiful decoration for the holiday table.
Step 1. Take a green napkin and make the base of the flower. We don't straighten it, we leave it folded four times. Fold diagonally.
Step 2. We bend the side corners, as if we want to make an airplane.
Step 3. We wrap the resulting ends again and fold the workpiece in the center. We fasten all the blanks together using a stapler
Step 4. We make a bud using the same principle, simply inserting the modules into the base of the flower. You can continue this until the rows close together, or insert napkins of a contrasting color, for example yellow, into the middle. Ready!
In the shape of such a lotus, you can serve napkins to the table in an original way.
Rose
Even a small child can handle origami rose bud, so if you want to spend the evening before the holiday with your child, then fold origami roses from napkins with him.
Paper rose is a very simple and beautiful origami model.
Unfold the napkin and fold it exactly in half, corner to corner, to form an even triangle. Roll the triangle. Repeat this action until you are satisfied with the result. Take out the small leaves, do it very carefully, because such a fragile bud is easy to damage.
It will only take you a couple of minutes to fold it.
Iris
Origami in the shape of an iris, placed in glasses, looks very interesting and beautiful on the festive table. These figures are very easy to put together once you know the basic principles.
Realistic irises made from napkins.
Step 1. Take a large napkin and fold it diagonally.
Step 2. Then, lift its edges up.
Step 3. Then fold the edges of the napkin into the center again.
Step 4. Fold the workpiece in half.
Step 5. And again in half.
Step 6. Now put the workpiece into a glass or wine glass and straighten it. Ready!
The model takes on a very realistic look if you choose the right color.
Additional Information! Make a choice in favor of plain multi-layer napkins, without a catchy pattern or ornament. For large figures, choose appropriate napkins. Then the work will look neater.
Unusual vase with three-dimensional ornament
If you urgently need a tall vase for your favorite flowers, but the store does not have products that match the interior of the room, you can easily make it from scrap materials, spending a small amount of money. Materials for making a vase:
- PVA glue;
- Can-opener;
- Scissors;
- Paper towels that match the color of the wallpaper;
- Three or four cans of peas;
- Napkins of a contrasting color to the main background;
- A simple pencil.
Step-by-step master class
- First, empty jars are prepared. One remains with the bottom, and for the rest it is cut out.
- Next, the prepared jars are placed one inside the other, forming the desired height of the future vase.
- Using PVA glue, the structure is covered with paper towels. You will need at least three layers.
- After complete drying, a drawing is applied with a simple pencil. It is more convenient to make it from large geometric shapes that make up an interesting abstract composition. It can also be hearts, flowers, butterflies in accordance with your own creative ideas.
- From squares cut from napkins, balls are formed, which are filled with the depicted figures by gluing.
Animal and insect figures made from napkins
For a beautiful and proper table setting, it is not enough to know the correct location of each cutlery on the table; it is also important to be able to turn an ordinary, unremarkable napkin into a real work of art! For example, turn a napkin into an elegant butterfly that sat down to rest next to your guest’s plate, or into a beautiful swan that accidentally swam onto the festive table.
For many needlewomen, this seems like a very difficult test, but in fact it is much simpler than it might seem at first glance.
Every housewife can master the ancient art of Japanese masters and create an animal figurine from paper napkins.
Beautiful butterfly
To create a beautiful butterfly figurine, we will need a napkin, fabric or paper, folded 4 times.
You can play with the size of the butterflies by using different sized napkins.
Place it on the table so that the corners are facing you.
Then, fold the napkin in half, this is necessary to form the folds that will be needed in the future.
Lay out the napkin into a rectangle.
Now, from the resulting rectangle you need to make a triangle. To do this, first straighten the left side of the rectangle, and then the right.
We bend the corners up, turning the workpiece 180 degrees, and turning it over to the other side.
We turn the bottom corner of the triangle up, going beyond the border. Straighten the resulting folds.
Again, turn the napkin over to the other side and turn it 180 degrees. We bend the corner formed at the bottom upward.
Now, bend the workpiece in half and bend its upper part towards you so that when turning, the folds enter from one point.
We fold the workpiece on the other side.
By unfolding the blank, you will get a beautiful, graceful butterfly, which will become a wonderful decoration for the plate.
Origami napkin in the shape of a fish
Even a child can make this origami.
Take one fully unfolded napkin and fold all its corners towards the center.
Now we fold the resulting square into a rectangle, to do this we bend the top edge down.
Then we form a triangle by bending the corners of the rectangle inward.
The result should be a figure like this.
Now we form the tail of the fish by bending the corners of the outer layer of the workpiece.
If we turn the napkin over to the other side, we will see that it already very much resembles a fish.
Let's equalize the proportions by reducing the body of the fish.
To do this, turn the workpiece over again and bend the edges. And then we bend the protruding corners inward.
Now let's put the fish on each guest's plate.
Napkin Easter bunny
Easter is a holiday that we are used to spending with our family. Involve your children in preparing for the holiday and create an Easter bunny from napkins and an egg.
Folding a rabbit using the origami technique is very easy.
To do this, roll a cloth napkin into a tube, wrap it around the egg and tie it on top, forming ears. Draw a muzzle. Ready!
An Easter bunny made from a napkin will decorate your holiday table and will certainly impress your guests.
Graceful swan
Even kids can create a paper swan.
Take a napkin folded into four and place it so that the corner is facing you.
Then fold the right corner towards the left corner. This is necessary to find the middle.
Return the napkin to its original position.
Fold the right and left sides of the napkin toward the center.
Place the napkin on the other side and repeat the previous step.
Turn the napkin over with the sharp corner facing you and press it towards the center.
Fold the corner to form a swan's beak.
Bend the workpiece in half, straighten the neck and head of the future swan.
Fluff his tail by pulling out one layer of tissue at a time.
The swan is easily assembled from a regular square napkin.
When setting the table with such origami, it is important to remember that the swan figurine is quite unstable, so you should place the figurine on an additional napkin, which will create additional support.
Refined spring vase
Crafts made from napkins are not limited to just flowers. From this wonderful material you can make or decorate almost anything, for example, a decorative flower vase. To make an unusual vase, you will need to stock up on the following materials:
- Napkins with elegant plant or animal patterns;
- Can – tin for coffee or juice;
- Acrylic white paint and putty;
- PVA glue;
- Stack;
- Brushes.
detailed instructions
The jar is coated with paint on both sides, and then dried in a well-ventilated area. The top thin layer, where the pattern is located, is carefully peeled off the napkin. Fragments of the picture necessary for the composition are cut off with your fingers
It is not advisable to cut them with scissors, as in this case the edge will be too smooth. The next one-color layer is glued to the outside of the prepared jar, tearing off small pieces according to the papier-mâché principle. Acrylic putty is applied in uneven strokes along the upper cut of the can, masking it. Next, on one side of the future vase, from top to bottom, a trunk and branches are formed using putty using a stack. The adhesive composition is diluted from one and a half parts PVA glue and one part water. Fragments with leaves, birds, butterflies, forest animals are placed on the surface of the jar in accordance with the compositional design and are carefully coated on top with a brush with an adhesive solution. During gluing, it is important to apply movements from the center of the fragment to the edges, carefully but carefully smoothing it, trying not to tear it. Having covered the entire surface of the vase, paint the neck to match the main background. To paint the branches and trunk, use brown paint to fill in all the irregularities. After the trunk has dried, decorative protrusions are highlighted with golden paint using a sponge. To do this, the sponge is lightly pressed onto the desired area of the improvised trunk without indentation. A slight golden effect can be created over the entire surface of the vase.
A DIY vase is a beautiful and affordable accessory that allows you to transform your interior.
To secure the decor, the dried surface is coated with colorless varnish. Bouquets of wild and garden flowers will look great in such a vase.
New Year decorations
For every family, the New Year is a special holiday that everyone looks forward to. Preparations for the New Year begin long before the holiday itself. Each housewife plans how she will decorate her home, what dishes she will serve for the holiday table and how she will decorate it.
"Herringbone"
To make such a Christmas tree you will need a large paper napkin, naturally green.
To decorate the New Year's table, we suggest you fold napkins in the shape of Christmas trees.
Unfold the napkin folded 4 times so that it takes the shape of a rectangle.
On the right and left sides, bend the upper and lower corners to the center.
We bend the resulting corners towards the center to make two triangles.
Bend the workpiece in half so that the corners are on the outside.
Now you need to make sure that the napkin takes the shape of a triangle; to do this, we turn in the corners, forming folds.
Fold the workpiece in half again.
We are preparing for the holiday and surprising our guests!
We place the Christmas tree on a plate and decorate it with sparkles, confetti or a red star made of fluffy wire.
"Snowflake"
Snowflakes made from napkins are an elegant and sophisticated New Year's decoration.
To begin, take a napkin and unfold it.
Fold the edges towards the center.
Turn the napkin over vertically and fold the edges in again to form fold lines.
Unfold the napkin so as to return to the second step and fold the workpiece into an accordion along the marked lines.
Fold the edges of each layer inward.
Do the same on the other side.
All that remains is to unroll the napkin and place it beautifully on the New Year's plate!
As you can see, making a snowflake from a napkin with your own hands is completely simple.
Swan
Snow-white birds are especially popular in wedding table settings. They are in demand no less than flowers. It is advisable to make origami swans from two-layer napkins or thin woven ones. Three-layer layers are too dense and the desired graceful folds will not work.
The Swan is made based on the basic Kite shape. Experts advise first gently ironing the paper so that it becomes flatter and more “obedient.”
Key point: before folding, the square should be positioned with the free corner that opens away from you.
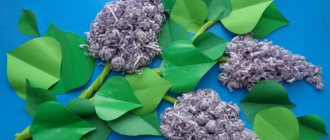
Chinese rose
To create, you will need one red and green napkin and small scissors.
Execution sequence:
- The red napkin is folded in half three times and cut. The result will be rectangular strips.
- One strip is folded in half lengthwise and wrapped around the finger. You will get a flower bud. The petals open and straighten, the lower part retracts and lengthens. The product will be attached to the stem through this area.
- The green paper is folded neatly but tightly around the bottom of the red bud.
- The resulting flower can be used as an independent decorative element or fixed on a stem, placed in a vase and decorated with an interior, adding a unique and eye-catching detail to the decor.
Chinese red impressive and sophisticated rose is ready!
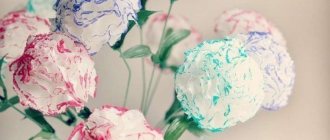
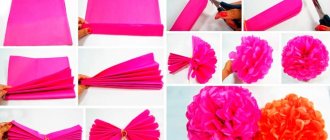
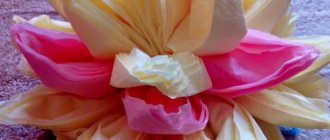
Peonies
Peonies are a symbol of femininity, attractiveness and beauty.
Execution sequence:
- A pink, red, white napkin is folded using the accordion technique and tied in the center.
- Using scissors, cut off sharp corners to create rounded edges.
- Each edge and layer rises, the flower fluffs up, giving a beautiful volume.
- The resulting product is firmly fixed on the prepared stem.
Also, if desired, during creativity you can use napkins of various colors. This will add special effectiveness and uniqueness to the resulting image, giving it lightness and uniqueness.
The magnificent peony is ready!
Lily
Making a delicate water lily flower is perfect for beginning craftsmen making origami from a napkin. Having carefully read the manufacturing diagram, you understand that no special difficulties are foreseen in the work.
Stages of work
To decorate a flower you only need seven simple steps.
- We straighten and smooth the napkin so that the future product looks as neat as possible, and direct all the corners to the center.
- We check whether any corner has “run into” the neighbor, and again we turn them towards the center again, thus forming a square.
- We turn the workpiece over, and all the fold lines are on the reverse side.
- We wrap the corners into the center of the product.
- We push the lower corners up, doing this carefully so as not to damage the petals.
- We do the same with the remaining corners.
- We bend the sharp ends of the product on the other side.
The lotus water lily is ready. They can decorate a festive feast.
Poppy
Napkins are great for making poppies. To make such a flower from them you will need multi-layer napkins of both red and black colors. For the stamens, you can use napkins of any dark color, which can be tinted with a black marker or felt-tip pen.
- On 1 napkin, use a compass to draw a circle with a diameter of 10 cm. On 2nd napkin, also make a circle of 9 cm and 3 – 8 cm.
- Napkins are cut out. The resulting circles of different sizes will become poppy petals. For 1 flower you will need 2 circles of each size.
- The wire is cut to the required length.
- At the end of the wire, use pliers to bend the end into a ring.
- From dark-colored paper you need to cut a circle with a diameter of 3-4 cm. The blank is cut out and painted black.
- Cuts are made around the circumference of the circle in the form of stamens, 3 cm wide and 1 cm long.
- In the middle of the circle, a hole is made from a dark-colored napkin and a wire is pierced into it.
- Then circles of small, medium and large diameter are also put on the wire.
- I turn the flower upside down and lightly press the petals down.
- The bottom of the bud is wrapped with green adhesive tape, which is then wrapped around the stem of the flower.
- All that remains is to straighten the petals, bend them away from each other and fluff up the middle.
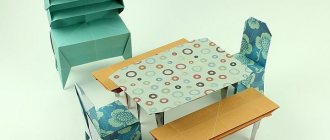
How to beautifully fold napkins into a glass?
As we have already said, there are a large number of types of napkin designs. The simplest, but no less elegant, are the methods in which the handkerchief is placed in a wine glass, glass or glass. Thus, the product does not take up much space on the table and looks neat and unusual. The two most commonly used technologies are “horn” and “tulip”, you can see them in the photo below.
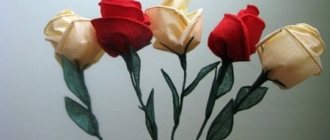
Rose
Making a flower queen using the origami technique is such a simple task that even a small child can do it. It will take a minimum of time to design one bud:
- fold the napkin in half to form a triangle;
- roll the resulting figure;
- carefully release the petals from the workpiece.
A rose made from a napkin using the origami technique is ready. You can take a variety of shades of napkins as the basis for the flower, because... Thanks to the efforts of breeders, today the noble plant shimmers with all the colors of the rainbow.