When trying to equip kitchen spaces with fashionable sets and modern household appliances, you should not neglect a small device installed under the sink called a siphon. A sink siphon will allow you to avoid some unpleasant moments when using the drainage system. So, we’ll look at what this device is and how it works in this article.
Siphon installation process
A siphon is a pipe system that creates a water plug between the sink and the sewer. This design allows you to avoid unpleasant odors from the sewer network entering the room, and also collects debris from the sink in the sump, which prevents clogging of the drain system.
The role of a siphon can also be played by a pipe bent in a special way, which also creates a water plug. On sale, the siphon can come complete with a sink, but more often it has to be purchased separately.
Why do you need a siphon?
The kitchen sink (sink) is connected to the central or local sewerage system. Some homeowners and apartment owners connect the drain hole directly to the piping system that discharges sewage. For this, a corrugated pipe is usually used, which can be easily bent in the desired direction. However, if you do not create a water seal, “aroma” from the sewer system will enter the kitchen. The main purpose of a siphon is to block unpleasant odors from the sewer.
Manufacturers produce high-quality products that differ in:
- reliability;
- strength;
- durability exceeding the service life of the mixer;
- resistance to chemical compounds, high temperatures and mechanical stress;
- simple installation, which allows a person without experience to install a siphon in the kitchen;
- versatility of use.
Practical recommendations
Installation of a hinged P-siphon.
The process of installing a siphon on a sink can be divided into stages:
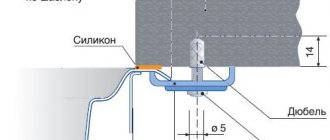
- First, you need to attach the bottom plug to its proper place, exactly where there will be a constant level of pressure in the structure. When purchasing a siphon, many professionals recommend unscrewing this same plug to make sure its quality and absence of chips.
- At the second stage, you should check the lower surface of the product, which will precisely be connected to the body. The surface of this thread must be free of burrs. It is for this reason that equipment for home installation should be carefully checked and reviewed directly at the store where it is purchased.
- A thin rubber lining in the shape of a ring is installed in a specialized groove in the structure, after which the surface is carefully treated using a mixture of silicone sealant. When working with this mass, it is imperative to cover the lower area with the composition.
Installing siphons for draining liquid from a sink requires a fairly rigid installation.
But on the modern market you can come across pipes and hoses that have a flexible corrugated design; such products stretch to the required size, but at the same time have the necessary density indicators and the ability to hold their shape. For installation work, you can use pipes of 3.2, 4 and 5 cm in diameter, or even buy universal ones, which are suitable for connecting almost any design. Installation of such a product is carried out directly to the thread using a union-type nut. It is the nut that makes it possible to connect the pipe to the siphon thread using a flat cover.
The normal functioning of both the kitchen sink and the bathroom bowl and washbasin is impossible without a siphon, and its correct installation will ensure the comfort of using this kind of plumbing parts. In the modern building materials market you can find a variety of designs that are suitable for solving various problems. But for sinks and kitchen sinks, bottle-type products with a drain hole with a diameter of 3.2 cm are still preferable. Installation of such a product is easy to do with your own hands in a short amount of time.
How does he work
The principle of operation of the siphon is based on its design feature. The lower part of the device, called a reservoir or sump, constantly contains water coming from the sink bowl. At this moment, high pressure arises in the drain - this leads to the displacement of the “old” liquid.
When the water supply stops, the pressure in the siphon equalizes. As a result, some of the liquid remains in the curved part. This water plug prevents unpleasant odors from entering the room from the sewer.
Water flows freely from the siphon and enters the sewer, and air cannot enter the room from the sewer, since the vertical pipe is located below the water level
The siphon plays another important role. Since it is installed after the kitchen sink, it is able to trap some debris. It accumulates in the sump and is easily removed by partial disassembly when removing the tank - the homeowner can carry out this procedure independently, without the involvement of a professional plumber. Preventing waste from directly entering the sewer system will prevent it from becoming clogged.
Design
The drainage system for sinks and sinks is the simplest system, consisting of a siphon and a drain pipe that connects the sewer and the drain hole located at the bottom or wall of the bowl. This plumbing product is usually made of plastic, metal, or a combination of these materials. The sink drain consists of the following structural elements:
- Body or "glass".
- Outlet pipe.
- Cuffs and seals made of plastic or rubber.
- Protective and decorative metal grille for the drain hole.
- Plastic nuts.
- Fixing screw.
Bottle siphon design
Note! There are also drains for sinks with overflow, which differ from the usual ones by having an additional drain hole located above the main one. This hole is connected by an additional corrugation to the siphon body
An overflow prevents the sink from overflowing and water from spilling out of the bowl if you forget to turn off the faucet or the drain hole is clogged.
General structure of the device
Different manufacturers produce sewer siphons; their design differs little from each other. The main details of the so-called kitchen sink elbow include:
- A decorative grate with small holes on the drain that prevents large waste from entering the sewer system. To install it, the kit includes a rubber gasket to seal the joint between the grate and the sink.
- Pipe for connecting the outlet and the filter grid. The part is secured with a corrosion-resistant metal bolt and nut.
- A siphon with a lower removable reservoir for cleaning when clogged - it eliminates the need to completely disassemble the elbow-shaped device.
The design of a siphon with the necessary components for its assembly.
The design of modern siphons (not only for a kitchen sink, but also a washbasin in a bathroom with or without an overflow) necessarily contains fixing rings with gaskets for connecting individual parts of the devices. The kit also includes a corrugated tube for connecting the outlet pipe of the siphon tank and the sewerage inlet.
Manufacturers create and produce different models, so their designs differ slightly in design and different number of parts.
Bottle and knee designs
To connect a washbasin in a room for water procedures, that is, in a bathroom, professionals advise using a bottle-type siphon. To understand why this type is preferable will be made possible by considering the composition and features of this type of equipment.
Assembly diagram for a sink with a siphon.
Connecting a siphon of this type is a simple operation and can easily be done by the owners themselves. The installation procedure involves connecting the device at one end to the drain of a sink or bathtub, and the other to the outlet of the sewer pipe.
The design of the product itself is extremely simple, and caring for it is not particularly difficult. The main thing during the installation process is to ensure that all sealing rubber gaskets are installed and not a single one is lost or forgotten. This point is very important, not so much for the installation process, but for the convenience and comfort of operation in the future, because such rubber products will ensure no leakage of wastewater.
For kitchen sinks, the best choice is a knee siphon made of metal or plastic. The installation of this type of structure in general practically repeats the connection of a bottle siphon. The differences are that instead of an element, which is called a bottle, it is necessary to install a curved element of a rigid type, called an elbow.
The uniqueness of this design lies in the fact that it can only be installed if the sewer pipe is located in the wall.
Material of manufacture
Manufacturers produce plastic or metal drains. The metal used for construction is usually brass, bronze or stainless steel. Products in this design are excellent for open placement, as they will become one of the decorative elements of the kitchen space. However, they are much more expensive than plastic structures.
Stainless steel siphon
A common disadvantage is the accumulation of contaminants on the inner surface of the water seal. This leads to a gradual reduction in the cross-section of the device. If maintenance is not performed regularly, it will become clogged. However, dirt and grease adhere less to plastic than to metal.
Modern drainage structures made of metal are purchased if a set of expensive plumbing fixtures is installed and an exclusive interior is created. The installation of a metal siphon under a sink is often carried out by professionals, because the joints between its individual parts are sealed using rubber seals and fum tape.
In old houses you can see cast iron siphons - these are real rarities and are no longer produced.
Cast iron siphons can still be found in old houses
Mostly, plastic sink drain pipes are installed. They are practical designs that effectively fulfill their purpose. If necessary, they can always be replaced or cleaned. After all, they are inexpensive and are made with a smooth inner surface on which grease does not accumulate and other contaminants do not linger. Therefore, plugs rarely form in plastic structures. Such products are also lightweight.
Plastic is a material that is resistant to corrosion and has good temperature characteristics. Manufacturers use polyethylene or polypropylene for production. Only significant mechanical impacts can damage a high-quality device.
A siphon is also called a “sink sump”. A plastic drain is a construction kit because it can be disassembled and assembled in a certain sequence. If necessary, it is always possible to replace a single part or tighten one of the nuts if a leak occurs.
Connecting a siphon to the sewer
There are several ways to connect a siphon to a sewer pipe. Their choice depends on the design of the device with a water seal and on the location of the sewer outlet. It’s easiest when installing a kitchen sink is a stage of renovation work: then, even when installing a sewer system, the most appropriate wiring is thought out.
However, replacement of siphons occurs more often than major repairs. This is due to device breakdowns and furniture replacement. Therefore, sometimes you have to figure out how best to assemble a sink siphon and connect it to the sewer outlet on the fly.
Corrugation often acts as a connecting element, but it is much more reliable and expedient to mount a smooth, rigid element. Moreover, a short pipe is much better than a long one - this way the likelihood of blockage is reduced to zero
The good thing about a corrugated pipe is that, thanks to its elasticity and mobility, it can be placed anywhere and, if necessary, extended to the desired length. However, plumbing corrugation has a weak point - it wears out much faster than the rigid element.
In addition, due to its softness, the pipe sags, thereby causing blockages. The ribbed inner surface of the pipe also tends to accumulate contaminants, causing the material to stretch and lose its shape.
If possible (if the sewer outlet is well located), you can independently replace the corrugated part with an ordinary piece of pipe for internal sewerage, cut to the required length.
You can get acquainted with the replacement option using the photo gallery:
Image gallery
Photo from
Corrugated pipe from the siphon kit
Plastic rigid pipe D 40 mm
Trimming and installation of rigid pipe
Installation of adapter coupling 50/40 mm
The smooth inner surface of a rigid pipe guarantees protection against sagging and frequent blockages, which are typical for its corrugated counterpart.
The specifics of installing an overhead sink and the features of connecting a siphon to it are described in detail in the article we recommend.
Dimensions
There is not much space under the sink, so the size of the structure is limited. In most cases, this siphon size is sufficient. For the device to operate efficiently, its bandwidth must also be taken into account. We should not forget about the distance between the outlet pipe from the siphon and the inlet of the sewer system. As a rule, the maximum height of the structure does not exceed 250 mm.
There are no exact standards here, except for the diameter of the drain pipe
Putting a siphon on a kitchen sink when the diameter of the drain and sewer pipe are the same size is not a problem. However, when there are differences in pipe diameters, it is necessary to think about their connection in advance. In this case, various cuffs and their connecting pipes are used. For example, a 50 mm internal double-socket tee will allow you to connect a 50*40 sink and a 50*25 washing machine with sealing collars.
Various adapter sleeves allow you to hermetically connect the necessary devices to the main sewer system
Assembly diagram for a siphon for a kitchen sink - step-by-step instructions
The siphon is assembled according to the attached instructions with a detailed diagram.
Siphon assembly diagram
Step-by-step sequence of actions
Step 1. Attaching to the sink. The inlet pipe is connected to the sink as follows:
- A protective mesh (1) with a sealing gasket (1c) is placed on the sink drain ;
- a gasket (2) is installed on the boss of the inlet pipe ( ;
- using a screw (4) .
We attach the protective mesh
Step 2. Installation of the main part of the device. To assemble the main part of the siphon, the following manipulations are performed:
- the sealing gasket (8) and the fastening nut (7) are placed on the lower part of the inlet pipe;
- the pipe is inserted into the body (6) and the connection is strengthened by turning the nut down;
- the cover with a sealing gasket (14) is screwed to the siphon body (13) .
Setting up the base
Step 3. Connection to the sewer system. To connect to the sewer you need:
- install a sealing gasket (12a) on the outlet pipe (9) ;
- Secure the connection of the branch pipe with the sewerage pipeline by tightening the nut (10) .
Connecting the outlet pipe to the sewer
We need to talk in more detail about the connection to the sewer drain. The diameter of the siphon outlet pipe is most often 40 or 50 mm . If the diameter of the sewer pipe is also 50 mm , it will be enough to use a sealant for the connection. If the sizes do not match, transitional rubber cuffs are used.
Seal the connection with the sewer pipe with a rubber cuff
Advice! When installing a siphon, you must ensure that its outlet pipe is located above the sewer inlet. The created slope will ensure the free flow of water.
The most important thing in the assembly process is to create connections with maximum tightness. The sealing gaskets in the seats are fixed with silicone or other moisture-resistant sealant, and the threaded fasteners are screwed in until they stop. After finishing the work, remove excess sealing material protruding from the edges of the joints.
Common types
Manufacturers produce several types of sink siphons. They are selected depending on the characteristics of the installation site.
Some types of siphons: bottle with a tube, bottle with partitions, tubular
Corrugated drain
The corrugated tube is convenient to use when the sink drain hole has a non-standard location. This device is also used if you plan to install additional equipment or any necessary items under the sink. When connecting it to the sink, you need to pay attention to the amount of water in the curved place. It should be enough to create a reliable water lock, which guarantees reliable protection against the penetration of odors from the sewer.
A drain in the form of a corrugated tube is not an ideal design, because dirt quickly accumulates on the ribs of the product.
Structurally, the corrugated siphon consists of the following elements:
- pipe with grille and union nut;
- corrugated tube
Additionally, pipe fastening may be required.
Drain with corrugated pipe
The corrugated drain is installed in a matter of minutes. First, we attach the outlet pipe with the grate to the sink. Fixation is carried out using the gasket and screw included in the kit. Then the corrugation is inserted into the pipe at one end and secured with a nut, and the other side is inserted into the sewer pipe. If cleaning is necessary, the corrugated hose is disconnected from the pipe and the sewer. Then it is washed or replaced with a new one.
Bottle drain
Bottle siphons are most often installed. They are well suited when you need to drain dirty water and other waste from multiple sinks. In this case, the required number of special bends is installed.
The design of the bottle drain consists of the following elements:
- metal or plastic grille;
- intake pipe;
- bottle container;
- pipe for draining sewage into the sewer;
- a transition piece that allows you to connect the siphon to the sewer system.
The bottle drain is a completely rigid product. If necessary, the design is supplemented with corrugation for more convenient connection to the sewer. Cleaning the bottle drain is done by unscrewing the bottom part of the bottle-shaped container and removing accumulated dirt.
Pipe drain
This type of siphon is installed not only on sinks, but also on bathrooms. It has a completely rigid structure - outwardly similar to the letters S and U.
Simple pipe (straight-through) siphon
Since many modern kitchens have dishwashers, the pipe siphon may have an additional outlet.
Pipe siphon for sink McAlpine (UK) with outlet for household appliances, 40 mm (MRSK6). The MRSK4A model is equipped with an angular outlet. When choosing, be guided by the specified sizes
There are models of tubular siphons with a break in the stream flow. Such siphons are not attached to the sink - after installation there is a difference between the siphon and the sink. It is necessary to prevent germs from the sewer from entering the sink. They are used in preschool institutions and catering establishments.
Flat drain
This is a small siphon under the sink, where size is critical. It is usually used when a “washing machine” or dishwasher is installed under the sink. There are models with a break in the jet flow.
The design is a regular knee, but it saves space
In addition to small dimensions, a distinctive feature of a flat drain is also its rigid design. Such siphons rarely become clogged. If there is a need to perform a complete cleaning, the grille is unscrewed, and then the entire structure is removed from the sink.
With overflow
When the sink has overflow protection, a siphon with overflow is installed under it. The design of the product includes an additional pipe, to which a small diameter tube is connected from the overflow hole in the upper part of the sink. This design prevents the sink from overflowing with water and reduces the risk of flooding the room and neighbors living on the floor below.
A siphon with overflow is installed not only for sinks, but also for sinks
There are also drains with one or two outlets at the neck. They are used when it is necessary to additionally connect a dishwasher or washing machine.
Please note how many components a pipe siphon with overflow has. If you are afraid of getting confused when installing it yourself, it is better to invite a professional plumber
Components
Different types of siphons have different designs, so we will consider in detail the design of a bottle-type siphon, the most popular for installation under kitchen sinks.
Structurally, such a device consists of the following elements:
- body, usually dismountable;
- outlet pipe with raised rings, connected to the sink from below;
- protective mesh with a cell diameter of no more than 1 cm;
- connecting screw connecting the mesh and the pipe;
- corrugated or rigid tube for draining water into the sewer;
- cone gaskets designed to ensure tight contact between the pipes and the siphon body;
- wide rubber gasket for attaching the outlet pipe to the sink;
- rubber gasket designed to seal the protective grille;
- plastic union nuts. They attach the pipes to the device body.
Components of a bottle siphon
Basic selection rules
To ensure effective drainage of used water in the kitchen, you need to choose the right siphon. To do this, consider the following recommendations:
- You need to purchase the kit immediately. In addition to the siphon, it must contain all the necessary components for connecting it to the sewer. If parts are purchased separately, there is a possibility that they will not be able to be assembled into a single structure.
- It is necessary to measure the free space under the sink in advance. If it is minimal, you should give preference to a short siphon.
- With closed installation, there is no need to purchase an expensive designer siphon. It is better to buy a less beautiful product of good quality, but at a lower price. After all, no one will see it, and it will not spoil the interior of the kitchen.
- If the sink siphon is open, it makes sense to buy a product with a decorative design.
Each device always comes with instructions - you need to study them carefully before installation. It is also necessary to pay attention to the absence of damage to the siphon, the quality of the threads, sealing elements and plugs.
Assembling siphons under the sink for the kitchen Ani plast and Ani grotto
Siphons of domestic production of the Ani Plast and Ani Grot brands belong to the class of inexpensive but high-quality plumbing products. Thanks to their attractive appearance, excellent performance characteristics, high quality manufacturing and low cost, they are widely used in the Russian market.
Video - Sequence of actions when assembling a siphon of the “Ani Grot” brand
Domestic manufacturers of drainage fittings offer consumers various models of siphons. Their assembly and installation is carried out according to the general principle:
- When purchasing, the product contents are checked;
- According to the diagram attached to the instructions, the device is assembled;
- installation begins by connecting the siphon inlet pipe to the sink;
- then the main block is assembled;
- the drain pipe is connected to the sewer system;
- At the final stage, the tightness of the connections is checked.
Video - Assembling a siphon for the Ani Plast sink
In conclusion, we note that a properly assembled siphon will work flawlessly for a long time. The service life of a plumbing fixture increases if the operating rules are followed, regular cleaning of contaminants and timely replacement of worn gaskets.
We recommend that you pay attention to the article - How to embed a sink into a countertop, which describes in detail how to install a sink with your own hands.
Installation nuances
To install a siphon on a sink, an experienced person needs to spend a few minutes. If you don’t succeed so quickly, it’s okay. First you need to prepare the tools and consumables. The maximum that may be needed:
- screwdriver;
- gas key;
- sealant.
As a rule, when installing plastic products, all you need is a flat-head screwdriver.
If it is necessary to change the siphon, the old product is first dismantled. This procedure begins with installing a basin or other container under the drain to prevent water from getting onto the floor. First, all parts of the plastic siphon are removed. Then the protective grille is removed by unscrewing the screw. If a metal drain is dismantled, you will have to use a gas wrench.
Finally, the inside of the drain hole in the sewer riser is cleaned of contaminants. You can use a rag or paper towel for this.
How to collect drain correctly
At the beginning of the process, you need to check that all parts are present. To do this, we study the attached instructions and lay out all the elements, for example, on a table.
A bottle drain is often installed. Its assembly is carried out in the following sequence:
- The individual parts of the flask are connected after installing a gasket of small thickness. The sealing element must be pressed well against the part from all sides.
- The nut is secured to the corrugation.
- A cone-shaped gasket is placed on the corrugated pipe. The sharp part of the sealing element is located closer to the edge.
- The corrugated tube is inserted into the outlet pipe of the flask and secured by tightening the nut.
- On the other part with the grille, a second nut and gasket are fixed.
- The two separate parts of the siphon are connected by tightening the nut.
At the end of the process, the drain is secured under the sink. If necessary, you can use silicone sealant to improve the tightness of all siphon joints. It is recommended not to use too much force when tightening the nuts.
The nuts are tightened by hand! Don't use keys!
Installing a new device
The assembled drain structure is fixed to the sink as follows:
- gaskets in the form of rings are placed under the grate and on the top of the siphon;
- the assembled drain element is pressed from below to the hole in the sink, and a grate is installed on top from the side of the bowl;
- the screw is tightened;
- a nut and an o-ring are put on the pipe;
- the siphon is inserted and the nut is tightened;
- a hose is screwed to the siphon;
- the second end of the hose is connected to the sewer.
If necessary, an adapter is additionally used if the parts at the junction have different diameters. At the end of the installation process, the functionality of the drain is checked by filling it with water and checking for leaks.
Preparatory work before installation
Before starting assembly and installation, you must check that you have all the necessary parts from the kit. If you do the work yourself, you should prepare a tool. In addition, it is necessary to dismantle the old siphon and carry out the work carefully so as not to damage the sink itself, the faucet and other parts.
Before dismantling, it is recommended to place a bucket or basin under the sink to drain the remaining water and dirt.
Old equipment is attached with a bolt; it often becomes sour, and it will be difficult to unscrew it with a screwdriver. A screwdriver with an attachment can come to the rescue. If the siphon does not have a bolt, or rather there is no notch or it has worn out, then you should simply cut the drain mesh. Wire cutters, metal scissors and other tools are suitable for the job.
After dismantling, everything is removed, the sink is completely wiped of dirt and remaining water. Be sure to disconnect the device from the sewer. The problem may be with the rubber seal, which makes it difficult to remove the tube.
If a major renovation has been carried out in the kitchen, all plumbing has been replaced with new ones, then there will be no dismantling. In this case, you just need to install a siphon on the new sink after its preliminary assembly.
Manufacturers
The choice here is simply huge, from cheap Chinese goods to expensive branded ones. The choice for each situation is individual and is based on the installation location of the device, what kind of work it will perform and financial capabilities.
Some manufacturers:
- Akvater is a Russian company, quite well known and has its own sales market.
- AlcaPLAST - products of this company, a compromise of price and quality.
- Hansgrohe is a brand from Germany, a leader in quality and design.
Siphon for kitchen sinks: types, design and installation
The article is posted in the category|subcategory
The kitchen sink is the most important and essential element of kitchen plumbing equipment. It consists of several parts, which, when connected together, provide the functionality of the sink. One of the components through which water is drained is the kitchen sink siphon. Regardless of its appearance and size, this plumbing element is designed to fulfill its main function - to protect the kitchen from unpleasant odors emanating from sewer pipes. In other words, what we have in front of us is a typical water seal, in which a curved tube is constantly filled with water. In addition, the kitchen sink drain prevents the drain from clogging with solid particles that settle at the bottom of the siphon.
How to care for the siphon?
Any type of sink drain requires regular maintenance. It consists of inspecting for damage, thoroughly cleaning the product and thoroughly removing any blockages that have formed.
Careful operation of the sink, the use of special protective grilles or food choppers increase the interval between cleanings, but sooner or later such a need arises
The complexity of the procedure is determined by the material and design. Corrugated siphons are cleaned only after complete disassembly, while in bottle siphons it is enough to unscrew and rinse the flask.
Some devices are easily pierced with a special tube. For cleaning purposes, homemade or factory-made chemicals, ready-made compositions such as “Ruff” and “Phlox” are used. They should be used carefully, especially for plastic models.
To prevent the siphon from becoming so clogged, you can periodically flush it with hot water with the addition of a handful of citric acid. It is also worth paying attention to the fact that rubber seals wear out quickly. It is better to try to replace them approximately every six months.
Siphon for bathroom, washbasin or kitchen
Thanks to the siphon in the box, there is space under the sink in the bathroom and kitchen. To mount the device, a hole of appropriate size is made in the wall. The siphon is disguised in the wall, and a tube is passed to it. For the bathroom, you can take a curved pipe. In addition to it there is a corrugated hose that connects the drain to the overflow.
Bathtub drains often have a plug designed to be installed in the drain hole. A siphon with a small height is suitable for a shower stall, and a bottle drain is mounted under the sink. The hidden design is suitable for assembling the system for washing machines and dishwashers. It is recommended to install a branched drain in the kitchen area.
Subtleties of the process
The distinctive features of installing a drain siphon for a bathroom lie primarily in the fact that the bathroom has not one, but a pair of drain holes. One of them, as expected, is located at the very bottom of the bowl, and the second is installed on the front side at the top of the product. It is this second product that protects the bathroom from overflowing. The siphon for connecting the bathing bowl to the sewer consists of the following components:
Installation of a plastic siphon.
- a corrugated flexible plastic tube, which is located on the outside of the wall of the product to ensure that used water flows directly into the sewer pipe;
- a polymer bowl that allows you to arrange a drain at the bottom of the bathroom;
- knee;
- a connecting pipe that allows you to connect the siphon and sewerage.
No specialized tools are required for installation; during the work process you will need:
- Corrugated tube.
- Silicone sealant.
- Adapter-coupling made of rubber.
- Tow or mounting tape.
The difference between the process of connecting a sink and arranging a drain in the bathroom is that before installing the siphon itself, it is necessary to install a metal rim on the drain hole in the upper part of the bathroom. After this element is installed. It is to this that the siphon is attached using a specialized bolt. As soon as these manipulations are completed, the product elbow is installed and the process of connecting the structure to the central sewer system is carried out.
Features of installing a drain with overflow
Information about drain collection is included in the instructions that came with the siphon. To work you will need:
- flat screwdriver;
- insulating tape;
- siphon;
- bucket;
- sealant;
- adjustable wrench;
- a napkin made of paper or fabric.
System assembly
First, connect the drain to the sink. The structure is placed under it and the dimensions are first checked for compliance. Next, unscrew the plug from the bottom of the device and inspect it for damage, thereby checking the reliability of the structure.
Before assembly, inspect the threads on the body
If there are burrs on it, they are carefully cut off. If this deficiency is not corrected, damage to the O-ring may occur during installation.
Before installation, check all threaded connections, nuts, joints and gaskets.
To assemble the device flask, you will need:
Siphon assembly process
- put the gasket on the threads of the upper section of the structure;
- screw the bottom of the siphon;
- place a rubber seal of the appropriate diameter on the drain tube and put on 2 tension nuts;
- insert the drain pipe into the hole at the bottom of the siphon, push it to the desired height and tighten the nut loosely;
- install a gasket in the cover of the device and screw the drain to the body.
The rubber seal placed in the groove is coated with a small amount of sealant. To ensure reliability, the substance is lubricated with the lower thread of the plug, which is screwed into the body. To tightly connect the parts, a winding is used to remove the element when necessary. Before collection, the length of the tube is selected, the height of which is determined by the depth of the shell.
The main pipe is connected to a tube with clamps. Subsequently, the part is mounted to the sink, placing a gasket between the elements. The area between the pipe and the overflow with outlet is secured with a nut. It is recommended to tighten plastic parts by hand to avoid breakage.
Installation of the structure
First you need to turn off the water, connect the protective grille and the sink drain hole, placing a rubber seal no more than 5 mm thick between them. If the grille dimensions are larger than the hole, use a sealant rather than a gasket. A rubber seal is placed on one edge of the outlet pipe, and a chamfer is removed from the other edge, improving the fit of the pipe into the siphon.
To connect the sink and the pipe, you will need a screw with a diameter of 6 mm. The part is inserted into the protective grille and tightened. Then the drainage pipe is connected to the outlet pipe. In this case, it is necessary to monitor the connection points. For reliable sealing, you can use plumbing tape.
Installation diagram of a siphon to a two-section sink
The assembled siphon must be connected to the outlet pipe, which was previously connected to the drain. After this, a connection is made between the sewer and the drain. Before installing the cuff into the pipe, a layer of sealant is applied to it and the outlet end of the outlet pipe is placed in the part. For connection, a rigid assembly is used, connecting the sewer outlet and the pipe with a conical gasket and a nut.
If corrugated hose is used, the length of the soft hose should be such that it does not sag during use. If the dimensions of the outlet and the sewer pipe do not match, a plastic adapter will be required. You can prevent smell from entering your apartment by using a rubber cuff, which is placed in the socket.
Functionality check
To check the tightness, you must turn on the water. Make sure there are no leaks by placing a cloth or paper napkin under the system.
If there are no leaks in the connection area and liquid flows into the drain, the system is installed and operating correctly.
Types of plumbing products
There are several types of siphons used for installation on a sink. Which one is better to choose depends on the budget, the nuances of the location of the sink in relation to the sewer outlet, and the requirements for the functional part.
Simple corrugated designs
The most basic type of device is a folded corrugated plastic tube placed on a movable frame base. To obtain a water seal, such a siphon is bent in the desired direction, and the bend area is fixed with plastic clamps.
Corrugated hoses are practical and convenient for non-standard sinks with minimal installation space. There is only one connecting node at the outlet, which reduces the risk of leaks
Due to the fact that the soft pipe easily changes position and shape, it can be mounted anywhere. The corrugation is easy to assemble and has a budget price.
Its main disadvantage is its integral design, which does not include separate prefabricated elements. This makes it difficult to clean the product, which is prone to the accumulation of fatty deposits. In cases of severe contamination, you won’t be able to get by with a regular tube: you’ll have to tinker a lot, taking the time to completely disassemble the system.
When choosing a corrugated siphon, you should take into account that it is not suitable for working in cold rooms, for example, in a summer kitchen that is not heated in winter. In addition, the product begins to quickly deform from frequent drains of boiling water into the sink.
Convenient bottle-type devices
Bottle or flask devices are a type of siphons for washing, characterized by a rigid design. In their lower part there is a vertical vessel with an outlet pipe inside, which looks like a bottle.
It constantly contains liquid, which provides the functions of an effective water seal.
All household waste, particles of dirt, debris and grease are collected in the flask pipe. In order to remove them, you do not need to completely dismantle the device: just disconnect the pipe by unscrewing the nuts and thoroughly rinse the parts
Compared to corrugated devices, they are much more difficult to install and disassemble, but they are much easier to clean from accumulated blockages. Additional equipment can be connected to them using splitters and fittings.
A useful design feature of some bottle siphon models is the presence of an overflow, thanks to which the liquid level is controlled and the sink is prevented from overflowing.
Bottle siphons also include compact flat siphons, ideal for installation in any hard-to-reach place.
Reliable pipe options
Pipe-type plumbing equipment - collapsible and non-dismountable models, made in the form of a rigid curved pipe.
The collapsible structure consists of pipe sections connected in a certain order. It requires the most accurate comparison of the sink outlet opening and the sewer drain hole. The functions of the water seal are assigned to the curved section of the device in which water is collected.
The water seal in the device is located at a shallow depth. If you rarely use the water supply, liquid evaporates from it, causing the appearance of unpleasant sewer odors.
Pipe siphons can be additionally equipped with overflow devices and sockets, which allows installation on double kitchen sinks. The main advantage of the products is increased strength. At the same time, they are immobile and rather bulky, and this limits installation options in limited space.
Debris particles in pipe siphons fall to the lowest point of the structure. Typically, the cleaning procedure is accompanied by characteristic difficulties, not counting the improved models with an easily removable elbow.
Features of installing a siphon with overflow
If a siphon is installed for a kitchen sink with an overflow, then several additional steps are performed at the siphon assembly stage. The lower edge of the overflow pipeline is attached to the outlet pipe. Fastening is carried out according to the already familiar scheme, using a conical washer and a union nut. The overflow tube is connected during installation of the device on the sink.
The upper edge of the overflow tube is connected to a specially cut hole in the upper part of the sink, on its outer side. The upper edge is secured using a screw connection on the sink side. The screw is simply screwed into the pipe using a screwdriver. Now, when a certain water level in the sink is exceeded, the water will flow directly into the siphon, bypassing the outlet of the sink.
Additional information on how to install a siphon in the kitchen correctly is presented in the video.