Installing a countertop in the kitchen is an important step in organizing the space. The convenience of the entire room depends on competent calculations and proper installation. Cook food quickly and with pleasure, clean up after cooking, dine comfortably - it all depends on the countertop. You can invite professionals to install it, or you can resolve the issue yourself. Having basic repair skills and following the instructions, a DIYer can easily handle the installation of a countertop.
Self-assembly is becoming increasingly popular because it allows you to accurately adjust furniture to the desired size. This is practical and costs much less than paying for the services of an invited furniture maker. Let's consider all the nuances of proper installation of a countertop with your own hands.
DIY installation - pros and cons
Let's figure out whether it's worth taking on the installation yourself and, if you decide that it's worth it, we'll learn how to install the countertop.
- If you have some skills, installing a surface made of chipboard, MDF, wood or veneered wood will save you 1500-2500 rubles. — that’s exactly how much the whole complex of work costs.
- It is better to do a concrete countertop “like a stone” or tiling the surface yourself, the work will be of better quality.
On the other side:
- If you don’t have the skills to work with chipboard, MDF, or wood, then it’s better not to take risks. It is impossible to restore the previous appearance from chipped cuts and other deformations;
- Countertops made of difficult-to-process and expensive materials, such as glass, must be installed by craftsmen;
- Sometimes installation is included in the cost of the countertop.
Have you decided to do the installation work yourself? Countertop installation includes:
- Removing the old countertop;
- Measurements and cutting of a new one;
- Edge processing;
- Fastening the tabletop and joining two sheets if necessary;
- Sealing and installation of baseboards;
- Hole cutout for sink and faucet;
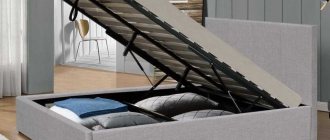
- The finished product must be moved very carefully so that additional stress is not created in the cut areas - otherwise they can lead to cracks. Smooth and glossy surfaces have increased fragility .
- Measurements are taken very carefully, preferably based on an already installed kitchen unit.
Before ordering a tabletop, it is better to make a template.
Slicing
For your product to fit perfectly, it must be the right size. This is quite difficult to achieve. Even if you took measurements accurately enough, there is always such a thing as error.
At home, you need to think about how to trim the excess or adjust it so that the new tabletop does not become deformed. There should be no chips or cracks during your work. Cutting can be done in the following ways:
Complexity of work depending on materials
Installing a countertop yourself is not a very difficult undertaking, but a lot depends on the type of material used:
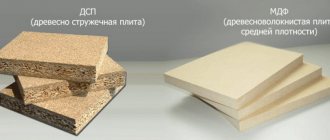
- Laminated chipboard (fiberboard) is the actual chipboard covered with a high-strength laminate. The difficulty of installation mainly lies in the careful cutting of the table top. Mechanical damage leaves unsightly marks on such surfaces.
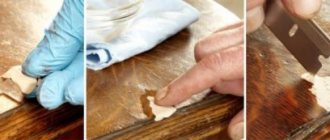
- Wood is considered the traditional material for kitchen furniture. Such a surface will need to be regularly restored using protective coatings or lubricated with polishes. Although, if necessary, the wooden surface can be sanded with your own hands - and it will become attractive again.
- Metal surfaces are becoming increasingly popular - joining countertops made of this material will not be difficult. However, mechanical stress will leave scratches and marks on them that will need to be sanded down with your own hands.
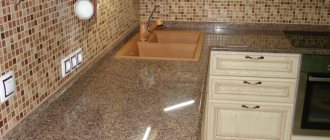
- A stone countertop (made of natural or artificial stone) is resistant to moisture, temperature, and scratches. However, attaching a natural stone countertop can be difficult due to the heavy weight of the product, and cutting and cutting out holes is difficult and requires skill.
Distinctive features of overhead models
If we do not take into account sinks that are a thing of the past, which are attached directly to the wall on special brackets and do not require a cabinet or countertop as a support, all products for washing kitchen utensils can be divided into 2 categories: overhead and mortise.
The main difference between the two types is the installation method. The first ones, chosen exactly to size, are “put on” the top of the cabinet, and to install the second ones, you need to cut a hole in the tabletop.
From here follow the distinctive features expressed in design, material, and shape.
Products that do not require additional processing of the base are preferable for self-installation, and they are on average cheaper.
However, design features rarely allow the use of “overlays” in modern kitchen sets with a single countertop and built-in appliances. Overhead models are also quite often chosen for installation in the bathroom, but these plumbing fixtures have a more attractive design, material and size than kitchen fixtures.
But there are similarities between the two types of sinks. For example, installation of a tap and siphon, as well as connection to water supply and sewerage, is carried out using the same technology.
Installation of surfaces made of chipboard, MDF, artificial stone
Do-it-yourself installation of countertops made of artificial stone, chipboard, or MDF follows the same principle.
Fastening the tabletop also involves installing additional moisture-insulating elements - jumpers, plugs, corners made of aluminum and plastic. They will be required for surfaces made of both chipboard and artificial stone.
- First, most likely, you will need to take measurements and then cut the sheet based on them. In this case, the length is measured taking into account the strip overlapping the ends. You can cut off the excess from the sheet with your own hands using a wood saw or jigsaw. If there are protrusions on the wall, then all the required recesses are cut out on the tabletop in advance.
- Now we lubricate the ends with silicone sealant, apply an aluminum strip and level it flush. Then you need to secure the bar with small self-tapping screws. Excess silicone can be wiped off with acetone.
- The edge of the surface that remains closed must be decorated with edge tape. In order to attach it with your own hands, you first need to heat the tape, and then glue it and cut off the excess. After gluing, the edges of the tape are sanded.
- According to the building level, you need to adjust the legs of the floor cabinets of the kitchen unit. If the legs are not adjustable, you can place adjusting wedges and plastic spacers under them.
- Now fill the back top edge of the cabinets with caulk as shown in the photo. We also generously lubricate the back end of the tabletop with the same silicone. We attach plastic or metal corners in the cabinet under the sink.
- Now carefully place the tabletop on the cabinets and either press it tightly against the wall, as shown in the photo, or leave a 5 mm gap from the wall, depending on how much you want the tabletop to protrude above the cabinets, taking into account the facades.
- Now we will actually attach the tabletop to the kitchen unit (not to the wall). To do this, screw 30 mm and 16 mm screws under the sink into the existing holes under the countertop.
- Now you can install the plinth between the apron and the countertop and on the sides.
- If the tabletop is fastened at a corner, then the joint seam must be hidden with an aluminum profile. For more information about this, watch this video:
- In custom-made kitchens, the work surface is most often common to the lower cabinets, but if you buy a factory-assembled kitchen set, then most likely you will need to connect the countertops, since in this case there is a separate “top” for each cabinet. So, all the required cuts are made in the plane, after which the connecting elements are inserted into the grooves and firmly pulled together.
- At the last stage, a hole for the sink is cut out.
Visually about installing an artificial stone surface:
Workflow Features
It may seem to you that it is quite easy to install a countertop, but still, you should not take this issue so lightly.
Here are a few more recommendations and features of countertop fasteners:
- If you install the tabletop on furniture corners, you should do it this way: step back 1-2 mm from the top edge of the cabinet and mark the center of the corner. Afterwards, secure the corner with a self-tapping screw. 4 corners are enough for one meter.
- For chipboard, be sure to use kitchen sealant, otherwise, after a few weeks of use, the plastic surface (near the sink) may swell.
- It is advisable to level the kitchen set. Try to avoid sagging of the wooden tabletop.
- When choosing hardware, choose stainless materials, this will help extend the life of the headset as a whole.
How to properly replace a countertop
If we are talking about replacing the surface on an already installed headset, then you will have to proceed as follows:
- The old surface is dismantled without damaging the kitchen unit - the sink and baseboard are removed and all fasteners are removed.
- The new surface must be adjusted to the wall and to the existing dimensions of the furniture.
- The height is controlled very carefully as it is important that the structure rests evenly on the existing pieces of furniture.
- The resulting edges on surfaces made of chipboard, artificial stone, or wood must be sealed. This is especially important for laminated surfaces - moisture getting inside will lead to swelling and destruction of the structure.
- Fastening the tabletop also involves connecting several elements into one, so that their height along the wall is the same, and there are no gaps between the elements.
In this video, the master shows how to replace the surfaces of free-standing cabinets with a single tabletop without joints.
Sink mount
The final stage of installation - attaching the sink to the countertop - is carried out in the following way:
- the cut hole around the entire perimeter is treated with silicone sealant. This is required to protect the countertop from moisture;
- a rubber seal (mostly) or a layer of sealant is applied to the edges of the sink;
Sealing the joint using special tape
- Using special clamps, the sink is attached to the countertop;
How to install a concrete countertop
In the kitchen, you can install a concrete countertop, and then tile it or polish it to resemble artificial stone. In this case, production and installation are carried out simultaneously. Here's how it's done:
- The cabinets are aligned so that their height along the wall is the same, after which a base (made of plywood or chipboard) is laid on them. In this example, concrete is poured onto the old tiles.
- The base is securely attached to the top of the furniture, after which formwork is installed on its sides.
- The formwork is sealed with polyethylene, and reinforcement is placed inside it. The area where the sink will be installed is fenced off with a ring of metal strip.
- A cement mortar is prepared - cement M400, sand and crushed stone in a ratio of 1: 2: 2, and a plasticizer must be added to it.
- For countertops imitating stone, dyes are added to the solution.
- The solution is poured into the formwork, leveled (so that the height along the wall does not have differences) and covered with polyethylene. The solution is left to dry - this will take about a week.
- Finishing a concrete countertop begins with rough sanding, after which the tiles are glued and the seams are grouted. If an imitation of stone is created, the concrete is processed with a grinder, after which a foam filler is applied to it.
Support the project - share the material with your friends on social networks:
Preparing the necessary tools
To install a kitchen (or bathroom) countertop yourself, you will need a standard set of tools:
- Roulette.
- Building level.
- A jigsaw with a set of saw blades for cutting wood or pressed slabs of wood chips.
- A glass cutter will be needed if the master plans to additionally install a glass panel (combined types of countertops).
- To fix the back walls of the selected material, you will need a construction stapler.
- Silicone glue or sealant that will hide all remaining cracks and joints.
Due to the huge variety of materials used to make countertops, tool sets can vary dramatically. For example, for fastening glass plates, safe metal corners or washers with gaskets that reduce the amount of pressure on the glass may be useful.
Inexperienced craftsmen can familiarize themselves in advance with video instructions for installing the countertop.
Docking with a segment
A tabletop segment is essentially the top table for a segmented base cabinet. The standard dimensions of the segment are 900 by 900 mm, with a width of 600 m. Along the front, the edge of the segment can be straight or semicircular.
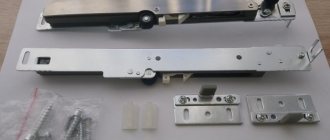
Since the ends of the joining of the table tops are sawn off smoothly, wood glue is used for joining. If such fastening seems insufficient, use special metal connectors for countertops (see photo).
By the way, similar parts are used for household trimming of countertops.
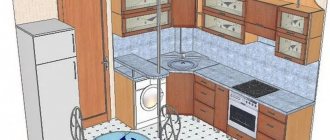
Corner kitchen styles
The corner worktop is very practical in the distribution of kitchen space; it will fit well into both large and small kitchens. The assortment of stores offers a great variety of design projects for corner countertops using a variety of coatings. In most cases, the corner tabletop is used as a dining table.
Creative countertop in kitchen design.
The most common styles from store catalogs:
- Classic style. This is an interior with ample space and the use of natural stone in the countertop. The most common colors are light colors, white, beige. Household appliances hidden behind the kitchen facades.
- The “High-Tech” style is a distinctive feature of the models - the severity of the lines, the absence of unnecessary lines, everything is laconic. Light metal structures are used. The most common color palettes: metallic, black, red, indigo, light green, sunny colors.
- The “Country” style is distinguished by the use of natural wood or MDF, chipboard, which goes very well with checkered or tiles.
- The Electric style is suitable for small L-shaped spaces. Possible varied combination of a corner dining table and decor in the whole kitchen. This style is for people who like to experiment and have a rich imagination.
The corner tabletop will easily fit into large and small spaces.
Installation rules
Rules to consider during transportation and installation:
- The product is fragile, so it must be transported carefully. Particular attention is paid to smooth glossy surfaces.
- Weak spots in the tabletop sometimes bend when moved, so only two people need to move it.
- If the measurements are incorrect, the tabletop will not fit the set, and you will have to buy a new surface.
- The cut areas are treated and hermetically sealed.