Conditions for performing connection work
I would like to note the following. In the photographs in this article, the panel and oven are connected directly to the power cable, with both devices connected to the same cable. Speaking from an electrical installation point of view, this is not correct. For a hob or electric stove, a separate supply circuit with separate grounding must be laid. A modern oven, despite its size, has double protection and can be connected to a simple (without grounding) outlet. In this example, the oven comes with a socket, which we cut off and connect directly.
See also: Two in one: advantages and types of ovens with microwave function
But be that as it may, in my example, both the oven and the hob are connected to a common cable using a power terminal block (block) designed for high current in the circuit, below you will see its photo. I would like to note that connecting an electric stove or hob to so-called twists, solders or low-power terminal blocks like Wago is DANGEROUS.
Work plan
We divide the planned work into the following parts:
- Preparatory work;
- Electrical preparation;
- Hob connection;
- Oven connection;
- Installation of devices in place;
- Functionality check.
Let's start with the preparatory work.
Materials
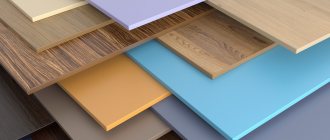
The main requirements for furniture for built-in appliances are resistance to high temperatures, withstanding heavy weight, resistance to deformation and the absence of hazardous substances or odors when heated.
Materials for kitchen cabinets and the effect of temperature on them:
- Natural wood. Expensive material. Cons - cannot withstand high temperatures. The critical mark is + 95 degrees, otherwise fires may occur with greater heating.
- Chipboard. Wood chip boards are a popular material for budget furniture. The downside is that the surface does not react well to high humidity; phenol-formaldehyde resins of varying concentrations are used in production. The higher the level of formaldehyde in the composition, the more dangerous such furniture is, since the harmful substance will poison the air when the oven heats up. Hazard class - from E 0.5 to E 1 - allowed for children's furniture and living rooms. The manufacturer indicates this indicator in the certificate.
- MDF. This material, with equal thickness, is twice as strong as chipboard. Advantages: does not change shape when exposed to high temperatures when the oven heats up and does not release toxic substances into the air; it repels water and steam well.
For the back walls, you can use laminated plywood or fiberboard (hardboard).
Connecting the hob and oven - preparatory work
In principle, all preparatory work, without which it is impossible to connect the hob and oven, must be done in advance. Namely:
1. Power supply for household appliances must be connected and located on the wall behind the stove. If the connection is planned to be made through a socket, then the sockets are located behind the oven installation site no higher than 100 mm from the floor. If the connection is planned to be made through a power terminal block (block), which is what we will do in this article, then the length of the cable for connection is selected locally, based on the convenience of the work. 2. Let me remind you that to power the electric stove (hob), a separate electrical group must be allocated, a cable with three cores, brands VVGng, NYM, must be laid. The cross-section of the cable cores is 4 or 6 mm2 (not less), depending on the power of the hob. 3. A hole must be cut in the installed countertop for the hob. The tabletop itself must be firmly fixed.
To start connecting the hob and oven, all you have to do is turn off or check the power supply to the stove, prepare the tools and unpack the purchased appliances.
Prepare the tool
First, the hob is connected and installed, then the oven.
Rules for preparing a furniture niche
After the installation location and method have been selected, it is necessary to provide:
- Protection against voltage surges in the general electrical network;
- Grounding;
- Ventilation – the oven needs to be built in at a distance of 50 mm from the back wall of the niche, 9-10 cm from the bottom, and the gaps on the sides should be approximately 5 cm.
Connecting the hob
- Unpack the hob and oven;
- Prepare a PVS 3x4 cable to connect the panel;
- Remove the top insulation from the cable by 10-12 cm;
- Strip the cable cores and crimp them with a special tool (it is not expensive);
Crimping the hob connection cable
PVA cable cores are multi-core. To ensure a strong connection and for safety reasons, crimping is mandatory. The power of the hob is high, the currents are high, and if there is poor contact, a fire can occur.
- Connect the PVA cable to the hob;
- Close the panel terminal block cover.
The connecting cable is connected to the hob.
Move on to the oven.
Oven connection
Check if the power supply cable is turned off
- Strip the cores of the power cable and make rings at the ends, almost like in the photo (the ring should close). The rings will ensure a tight and reliable connection;
- Connect the terminal block to the power cable. Tighten the mounting screws securely;
Connecting the terminal block to the power cable of the hob.
- Place the hob next to the cut. Pass the connecting cable through the panel cut. Connect the cable from the hob to the connecting terminal block. Tighten the mounting screws securely;
In the photo we see that the connecting wires of both the hob and oven are connected to the terminal block.
Ovens are usually ready for connection and have their own plug, which you just need to plug into your socket. If an outlet is not provided, then bite off the plug from the oven cable and connect it to the hob terminal block, after crimping the stripped ends.
- Close the terminal block cover (it is transparent, in the photo on the right). The connection is ready.
Hob and oven connected
Functionality check
- Turn on the previously turned off power supply;
- Check the functionality of the installed devices.
That's all! The hob and oven connections are complete.
©Remont-kuxni.ru
Size calculation
To ensure that you install a built-in oven yourself without any unpleasant surprises, ensure that the project is approved in advance.
You can do this: first, buy the appliance itself, and then order a kitchen set, taking into account the size of the purchased cabinet.
Or, after installing the headset, you select the appropriate option, keeping in mind the parameters of your niche.
Remember that the device should not fit end-to-end - the basic rules for its standardization will be discussed below.
Installation Features
Installing and connecting a hob and oven is not a difficult task, but it requires a responsible approach. After all, these are devices with a high level of energy consumption that generate significant heat during operation.
Please consider the following before proceeding with installation.
Wiring condition
Connecting a powerful stove and oven to old electrical wiring will inevitably lead to short circuits and malfunctions in the operation of the appliances. Therefore, before connecting new equipment, the old wiring is changed.
When replacing wiring, experts recommend separating the lighting and power circuits. The more energy-intensive equipment you plan to install in the kitchen, the more power circuits you will need.
Attention! Powerful hobs and ovens are connected to dedicated power lines from the electrical panel.
Stoves and ovens consume a lot of electricity - from 3.5 to 10 kW. Therefore, the standards provide for dedicated sockets for them with a separate power line from the switchboard. If the hob and oven are installed independently, a separate socket with a dedicated connection to the panel is installed for each device.
Installing an outlet
After updating the electrical wiring, begin installing the outlet.
Selecting a location
When determining the location for the outlet, choose a location either next to the device, or above it at a distance of about 10 cm, or above the floor at the level of the legs.
Important! The socket box and other auxiliary equipment are not placed directly behind the electrical appliance.
It is most convenient to place the outlet on the right or left of the oven or hob.
Installation
There are hidden and external installation of the socket. The placement method is chosen taking into account the type of room and user preferences. It should be taken into account that in wooden houses all electrical wiring is installed externally, and electrical appliances are left open.
If the house is brick or panel, use any of the installation methods. Hidden installation is preferable from the point of view of safety and aesthetic appearance. But if it is not possible to ditch the walls, the socket is installed externally and the wires are covered with cable ducts.
Plug and socket selection
The average power consumption of a stove and oven is 7-8 kW, which corresponds to an electric current of 32-38 A. Therefore, a regular plug, which is used to connect, for example, a hair dryer, is not used for the hob. To connect such powerful equipment, special power plugs and sockets are used.
There are two types of power plugs on sale: black (made of carbolite) and white (made of plastic). White ones are of better quality and last longer. Both types are of the same design and are connected identically.
When choosing a socket for the hob and oven, they rely on the characteristics of the equipment itself. These devices come in both single-phase and three-phase and have energy consumption ratings from 3.5 to 10 kW.
Space for oven and panel
The hob is usually mounted in the countertop above the oven cabinet. This placement is convenient for the housewife and allows for economical use of kitchen space.
The built-in electric oven is placed in a special niche of the kitchen unit. The dimensions of the cabinet should be 10 cm larger on each side than the device itself. This will ensure proper ventilation of the equipment.
After placing the oven in the niche, check whether the surfaces of the unit are in contact with the walls of the furniture set.
Choosing a location for the outlet
Technically speaking, you can place sockets from devices anywhere in the kitchen. However, some places will be inconvenient from a practical or aesthetic point of view, so when choosing a place you need to be guided by the following rules:
- A hidden outlet would be a good option, since an open outlet does not look very aesthetically pleasing. For example, you can place the socket below at the level of the plinth - this way it will not be conspicuous.
- Another option for a hidden location would be to install an outlet in an adjacent closet. However, please note that the socket should not be located near the side walls, as this is a fire hazard.
- Some people place the outlet behind the cabinets - this approach is incorrect. Such a plug will be difficult to pull out of the socket, which will create a lot of unnecessary problems for the owner.
Note! It is recommended to attach the socket to the wall, although if the device is located in an adjacent cabinet, it can be placed directly on the floor of the cabinet.
Single wire video connection
Installation instructions
Installation of both the hob and oven begins with preparing the place.
Hob installation
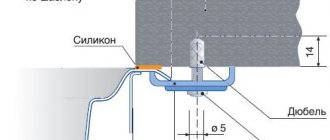
Preparing the site for installing the panel involves processing the ends of the mounting hole. The ends are treated with a special sealant, which is supplied complete with the hob. If it is not there, the sections are treated with silicone. This will prevent the formation of fungus and mold growth.
After the seal has dried, begin installing the device. The panel is carefully inserted into the prepared niche. The final stage is fixing the hob in the countertop. To do this, use special clamps that secure the position of the panel from the inside. The clamps prevent the surface from moving in the hole.
After installation, the panel is connected to the network according to the electrical diagram indicated on the back of the product.
Oven installation
The oven is installed in a niche under the hob. During the installation process, use a level to check the horizontalness of the surface on which the device is located. This maximizes the efficiency of the device.
Having completed the installation, measure the distance from the bottom of the oven to the floor - it should be at least 8 cm. The same distance is set between the wall and the back surface of the device.
After installation, the oven is connected to the mains and checked how it works.
How to choose?
To make the right choice, you need to take into account not only the descriptions of specific models, but also other nuances. The narrowest ovens (up to 0.45 m or less) are suitable for families of two or three people. However, they will not allow you to bake large portions. In most cases, preference should be given to models of classic width. And the widest versions are needed by those people who cook a lot often. Traditionally, most gas ovens are equipped with hinged doors. This solution is convenient. But you should choose it only if there is enough free space in front of the kitchen appliance.
Based on reviews from a large number of consumers, we can confidently conclude that a good gas oven:
- illuminated from within;
- has protection from children;
- automatically cuts off the gas supply if the flame goes out;
- ignites gas using an electrical impulse;
- allows you to use food heating from above and below, both together and separately;
- has a timer (which turns off automatically or gives an audible signal).