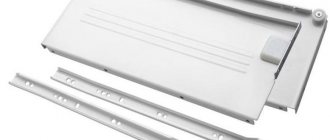
Tandembox plus contents: standard box, height M (83 mm).
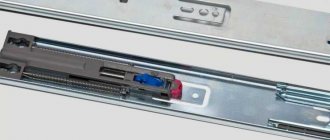
Tandembox M guides (30, 50 and 65 kg) length (item):
Tandembox M guides with TIP-ON length (article):
| Sidewalls (drawbars) Tandembox M length (item):
| Rear wall holder left/right
| Facade fastening INSERTA – 2 pcs.
OR Fastening the facade with a screw - 2 pcs.
|
> Go to prices for Tandembox Antaro
Criterias of choice
When choosing tandem boxes for a cabinet or cabinet, you should consider:
- overall dimensions of the device;
- type of guides;
- additional options;
- manufacturer.
Size selection
Manufacturers produce tandemboxes in standard sizes (from 270 mm to 650 mm) or upon individual order. The maximum load depends on the size of the device.
To independently calculate the bottom and rear wall of the structure, you must use the following formulas:
- the side part of the cabinet is equal to the length of the guide + 10 mm;
- the side of the drawer is defined as the difference between the length of the guide and the gap of 10 mm;
- overall length of the front and back parts of the drawer = width of the cabinet (cabinet or other piece of furniture) – 35 mm;
- side height = drawer front height – 38 mm;
- the height of the panels at the front and rear is equal to the difference between the height of the side panel and 16 mm;
- the width of the bottom of the drawer is determined as the length of the front (back) sides + 14 mm;
- bottom length = side length.
Sizing
To avoid errors in calculations, which could lead to the design being unusable, it is recommended to use the DYNAPLAN system for automatically determining tandembox parameters.
Determining the type of guides
To install tandem boxes, guides equipped with the following technologies can be used:
- TANDEMBOX BLUMOTION. The drawer closes automatically, as additional equipment is installed on the guides - a closer. Drawers with closers are silent when closing, which completely eliminates the possibility of chipping on the facade when closing quickly;
Tandembox with soft closing drawer system
- TANDEMBOX TIP-ON. The main difference between the guides is the presence of additional fittings that allow you to open the drawer by pressing the front wall of the device. Such equipment increases the level of comfort when using furniture;
Tandembox with the ability to open by pressing
- TANDEMBOX TIP-ON + BLUMOTION. As the name implies, furniture fittings are complemented by both a push-opening system and a door closer. The main disadvantage is the high cost.
When using tandem boxes from different manufacturers, the names of these systems can be modified without losing the essence of the design feature.
Additionally
To increase the level of comfortable use, tandem boxes can be supplemented with:
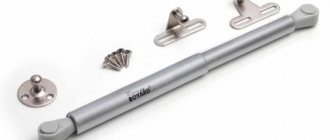
- electric drive, increasing the level of convenience of opening/closing the drawer;
- internal dividers that allow you to store small items separately from each other.
Drawer divider system
Manufacturers and their features
The main manufacturer of tandem boxes, as mentioned earlier, is the company Blum (Austria), which produces devices in the following series:
- "Plus". Tandemboxes are designed for loads up to 60 kg. Depending on the owner’s preferences, they can be supplemented with transparent or combined inserts;
- Antaro. Antaro models are distinguished by their straightforwardness and classic appearance, which allows them to be installed in any interior;
- "Intivo". A line of designer tandem boxes of various configurations.
Products of the Austrian company Blum
You can also pay attention to fittings made by the following manufacturers:
- The German company Hettich is the second largest manufacturer of retractable systems for furniture and other types of fittings.
- Russian company Firmaks. The technology is developed in a test room, and manufactured and assembled in factories in China, which makes it possible to obtain high-quality fittings at a minimum cost;
- Polish company GTV. Unlike fittings from Blum and Hettich, the Polish manufacturer produces tandem boxes of increased length (up to 750 mm);
- Boyard (Russia). High-quality fittings at affordable prices.
Tandembox plus includes: inner drawer, height M (83 mm).
| Lengths and art. same as for a standard box | Lengths and art. same as for a standard box | Rear wall holder left/right
| Front panel for cutting 1081 mm
Front panel holder left/right
|
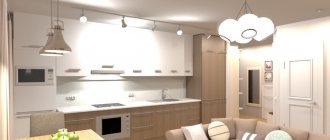
Installation of tandembox plus (Blum)
While continuing to work on my kitchenette, I wrote another master class. It is dedicated to the installation of the tahndembox plus retractable system from the Austrian company Blum.
It's probably worth starting with calculations. I will provide a diagram and formulas from the official website, which I used in preparing my project.
Let's go straight through the theoretical part. I will make a reservation that at the end of the article the complete installation file will be attached. If after my lesson there are still questions, the answers to them can be found there.
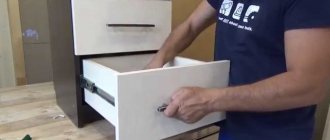
Let's move from theory to practice. The box is assembled according to general rules (invoice bottom, inset body strips). The racks for the guides are marked as follows, at least that’s what I do.
First, the boundaries of the facades are marked: from the bottom edge to the top of the facade, then the gap between the facades is 3 mm, then the second facade, then another 3 mm, the third facade and the remaining 5 mm.
In this case, the lower boundary of the facade corresponds to the reference point for installing the guides. We set aside 33 mm from it upward and lower the perpendicular, on which we set aside 37 mm from the front edge. This is the third hole in the guide. We drive another couple of screws along the same line into the subsequent holes.
Let's move on to assembling the boxes themselves. In my configuration these are drawers with heights M and D. We calculate the dimensions of the bottom and back wall using the formulas. We fasten the fasteners to the rear wall with self-tapping screws.
These elements snap into grooves located in the rear of the side walls.
Then the bottom is inserted into the grooves in the lower part of the side walls.
We turn the box over and fasten the bottom with self-tapping screws.
We put the finished box in place.
Now we assemble the deep drawers D. They are equipped with higher fasteners for the rear wall and the presence of rails.
We put fasteners on the back wall and secure it with self-tapping screws.
I have already described this moment, but here the photos are more detailed. The rear part of the side wall with a niche for attaching the rear wall.
The back wall is fixed in its proper place.
Self-tapping screws are screwed into the bottom through special holes.
After assembling and installing a couple more drawers in place, we move on to adding the fronts (in my opinion, the most difficult part of the installation). That is, we have to install a couple of clamps.
My case is quite complicated. The facades are not attached as usual, but with an offset to the right. (I tried to capture this fact in the photo) separate left and right ends of the facade.
We turn it over to the inside and begin marking according to the above diagram. On the right there is an overlap of 11 mm on the stand - plus. On the left, on the contrary, there is a gap of 3 mm - minus.
We drill holes 12 mm deep with a 10 mm drill. It is necessary to drill on a solid substrate, otherwise you risk pushing through the front part of the facade.
You should end up with a couple of blind holes like this.
The retainer fittings should be inserted into these holes.
The latch is inserted in a bent state.
And then he straightens up. In this case, the footers stand up and cannot be pulled out.
High facades must be marked with exactly the same hole for the railing. It is advisable to install a couple of them, with a pitch of 64 mm, but I decided to save money.
The railing is also inserted in a bent state.
After which it is unbent and fixed in it.
We snap the front into the side walls of the box. And the railing is placed in the grooves of the rear wall retainer. As usual, it is pressed until it clicks.
By rotating the railing, you can adjust the tilt of the facade back and forth. We put the second facade in place.
The lower façade has some differences in installation. Namely, the overlay on the lower horizon. Add 16 mm to the dimensions.
In the next photo I showed the same holes. This is a little trick. I started drilling with a wood drill (with a spike), it does not move, but the spike can pierce the facade from the outside. Therefore, I drilled more with a metal drill with a limiter.
We put the third facade in place.
All that remains is to adjust the position of the facades. The first photo shows how the eccentric moves the façade up and down. In the second photo, left and right, in the third, the facade is simply dismantled.
The final touch is the installation of decorative caps.
And finally, as promised, additive diagrams in PDF format. .
How to install a drawer on Tandem or Movento guides.
Please note the size is 37mm
from the edge of the body to the 4th hole in the guide, it must be maintained exactly!
The left and right guides must be at the same level. By level we mean the same measurement of dimensions relative to the body (cabinet). Pay attention to the correct positions of the guides on one wall. The distance between the guides (third picture) must be chosen so that there is a gap of at least 7 mm between the top of the drawer and the next guide!
, or better yet more, we would recommend at least 20 mm.
Take this point into account when calculating the height of the drawer sides! IT IS NOT NECESSARY TO TURN THE SCREWS INTO ALL HOLES!
Many holes are made so that in case of a drilling error, you can re-drill the hole in another place! There are no recommendations on how many screws to install on the box. Use common sense! The heavier the box, the more screws!
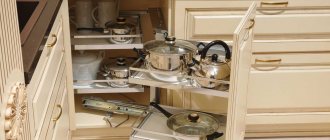
Features of different types of tandemboxes
Pull-out drawer compartments, pallets and containers equipped with the Tandembox system are made of:
- chipboard or MDF board (facade and back wall);
- plastic – bottom;
- aluminum – sidewalls.
Large capacity boxes are equipped with a tubular fence on top - a rail. Some tandem boxes have sides made of transparent plastic or glass.
When making or upgrading drawers yourself using the Firmax Newline, Moovit, Deco Line and others kits, you can use fiberboard for the bottom.
Particularly popular are the Tandembox Blum drawer systems, which have improved ergonomics, rigidity, strength and ease of opening.
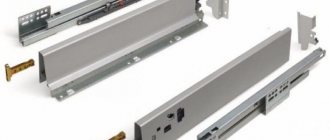
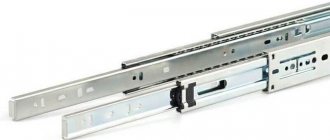
Standard Tandembox guide kits include:
- 1 – ball guides, mounted on the sides of the drawer compartments of the table, cabinet or cabinet;
- 2 – sidewalls of the box (tsar), on which the profile runners are fixed;
- 3 – brackets for fastening the rear wall;
- 4 – brackets for fastening the facade.
On a note!
Additionally, the sets can be equipped with dividers for the internal space of the drawers, which make it more convenient to store kitchen accessories.
Tandemboxes can be installed on a container or box of any width and depth. There are furniture fittings on sale, on the basis of which the owner of the apartment can independently design and manufacture a drawer for kitchen furniture according to the owner’s order.
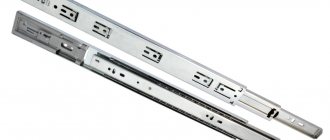
Many sets are equipped with a closer, which significantly increases the comfort of using kitchen furniture. Modern models are equipped only with ball guides, which have the following advantages compared to other furniture fittings:
- ensures full (100.0% depth) extension of the box;
- low noise level;
- high reliability when opening and closing with complete absence of jamming;
- Possibility of integration into any furniture structures;
- The variety of design options allows you to implement a variety of drawer designs.
Installation of the front and front eccentric for the Tandem drawer.
1. Attach the front to the drawer. Mark a line on which the front eccentrics will be installed, so that the eccentrics fall approximately in the middle of the box wall; this marking is quite arbitrary. 2. Mark holes on the line for the eccentrics, approximately 50 mm from the edge of the facade. 3. Drill holes for the eccentrics as shown in the figure. 4. Insert core punches into the holes under the façade eccentric. 5. Attach the front to the assembled and installed box in the body and lightly mark the fastening positions on the box. 6. Drill according to the markings. 7. Secure the façade with a screw without fully tightening the screw. 8. Adjust the position of the front. The eccentric allows adjustment in height/width - +/- 2 mm. 9. Tighten the screw completely.
Drawer height.
Now you need to correctly calculate the height of the box. Let's look at an example for Tandem:
Let's say we have a standard kitchen cabinet (cabinet), 720 mm high, made of 18mm chipboard.
Then the internal height of the case will be = 720 - 36 = 684 mm. We want to make 4 drawers in this building. Then the height of the box = (684 - 32.5*4)/4 = 138.5 mm, rounded to 138 mm. You can make the task more difficult.
We want the boxes to be different heights. For example, so that all but the bottom one are 100 mm high. The total height of the walls of the boxes = 138 * 4 = 552 mm. Three drawers 100 mm high are 300 mm. Then the lower one will be 552 - 300 = 252 mm high. I hope the idea is clear!